Leica M9 (and M Lens) Reviews, Tests, Comparisons
Leica M9 (and M Lens) Reviews, Tests and Comparisons
Using rangefinder lenses on a full frame camera with no anti alias filter!
Jeffrey R. Charles.
Copyright 2012-2017, 2019, 2021, 2025 Jeffrey R. Charles All Rights Reserved.
(Lens Review, Comparisons, etc., Chapters Only:)
Copyright 1975, 1997, 2004-2017, 2019, 2021, 2023, 2025 Jeffrey R. Charles, All Rights Reserved.
URL: http://www.versacorp.com/vlink/jcreview/leicam9r.htm
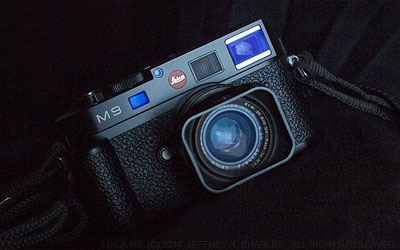
Leica M9 with 35mm f/2 Summicron-M Asph Lens
|
Contents:
- 1.) Introduction and Conventions
- 2.) Leica M9: A Compact and Portable Camera System
- 3.) Compatibility with Vintage Compact Leica System Cases
- 4.) Initial Results with the Leica M9 (Almost no radial blur!)
- 5.) Moire, Green Stripes, Hot Pixels, Other Artifacts, and Sensor Corrosion
- 6.) Everyday Pictures with the Leica M9
- 7.) Astrophotography with the Leica M9, Plus a Simple IR Cut Filter Test
- 8.) Lens Coding. It works great!
- 9.) Using Various Accessories with the Leica M9
- 10.) Conclusions
- Appendix A: Leica M9 Apparently Fails to Reach Infinity Focus w/any of 13 Lenses (2013)
- Appendix B: Results After 2014 Leica M9 Warranty Repair (See Ap. B2 for 2015 Repair)
- Ap. B1: Rangefinder Came Back Misaligned. (See Ap. B2 for W. Repair Results)
- Ap. B2: Infinity, Rangefinder, Sensor Performance after early 2015 Warranty Service (2015)
- Ap. B3: Infinity, Rangefinder, Sensor Performance after CCD Sensor Replacement (2017)
- Appendix C: Comparing Leica M9 Camera to Hasselblad-Imacon V96C Digital Back (2013)
- Appendix D: Performance of Leica Mount Lenses Used/Tested to Date (Cumulative Results)
- Appendix E: Comparison of Various 35mm and 40mm Lenses (2013)
- Appendix F: Comparison of Various 50mm Lenses (2015), Saturn Images w/Summilux (2016)
- Appendix G: Comparison of 135mm Focal Length Lenses: A 135mm Lens Shootout! (2019)
- Appendix H: Comparison of Various Tele Lenses, 180mm to 400mm (2016)
- Appendix I: Effect of Pixel Size on Dynamic Range and Low Contrast Detail (2013)
- Appendix J: Rangefinder Cam Diameters, Filter Sizes, Bokeh Fringing, and MTF basics
- Appendix K: Leica Optics and Images Compared to 4x5 Film, etc., Images (NEW 150503)
- Appendix L: Products and Versions it would be Nice to See Made by or for Leica, etc.
- Appendix M: Relevant Dimensions for Micro 4/3, Leica, Hasselblad, Etc.
- Appendix N: Benefits and Perils of Buying Photo Gear You can't Inspect in Person (2016)
- Appendix O: References
- Appendix P: Photo Gear for Sale (to help fund the Leica)
- Appendix Q: Image Rotation in Some Browsers (some use EXIF data, ignore post processing)
Part 1: Leica M9 Review, Tests, and Comparisons. An Introduction.
Draft of Leica M9 Material Added as Separate Web Page: 23 Feb. 2013.
Copyright 2013-2017, 2021. Jeffrey R. Charles, All Rights Reserved.
This review covers the Leica M9 digital camera and a host of compatible lenses, accessories, and adapters. It is written from a user perspective, where the camera and lenses are used to take pictures. It dispenses with corporate mystique, or any notion of photo equipment being a status symbol. Emphasis is on the experience of using the camera and M mount lenses, and the results that can be obtained with them.
While the Leica M9 is the only camera covered in detail, this review has been periodically updated cover a wider range of Leica M lenses, keeping it relatively up to date in terms of lenses. Some of the lens reviews and comparisons may eventually be separated into different web pages, to reduce the (long) length of this one.
Other parts of this review cover certain lenses that were not originally made for the Leica M mount, but which can be used on Leica M cameras under certain conditions. One appendix compares performance of the Leica M9 and certain Leica lenses to the performance of larger format digital and film cameras.
Before getting into the review, it is important to note that some photos may not display properly in newer web browsers. When work on this web page began in 2013, it was written in HTML2 to make it viewable on older computers that lack the memory needed for newer browsers. This was to make it accessible to more people. Around 2018, Firefox and some other browsers began to only display pictures according to original image EXIF data, as opposed to the way images are rotated in post processing.
Overcoming this browser problem requires either editing the image EXIF tags, or, updating the HTML2 compatible web page code to accommodate CSS. Currently there is no available time to deal with either of these options. Therefore, several photos will display sideways or even upside down in some browsers. If this is ever corrected, it will be done in one of two ways: Editing the image EXIF tags, or, by opening a later version of this page in an old browser and printing it to PDF. Now, on to the review:
We will start with shortcomings of other cameras that ultimately led to my selecting a Leica M9 back in 2013. Other suitable cameras (certain Sony Alpha full frame and Fuji-X APS cameras) have become available since 2013. However, 2013 was when I was looking for a camera with what were, at the time, rare qualities. This time frame is the context of the present camera review. Over time, several newer lenses were reviewed in addition to the camera.
In 2012, I wrote a web page titled "Influence of Marginal Ray Angle to Anti Alias Filter on Digital Image Quality" which described some pitfalls of anti alias (AA) filters (and thick sensor filter stacks) when wide angle rangefinder lenses are used with certain digital cameras. Part of the present review web page (mainly older parts that were prior to "hands on" with the Leica M9) was initially an appendix to that one. Some of the lens test data has been accumulated since 2004, but was formerly unpublished. Material covering the Leica M9 camera and most Leica brand lenses is new to this web page.
In gradually writing the 2012 web page that described radial blur that occurs when fast f/ratio, short to medium focal length rangefinder lenses are used on Micro 4/3 cameras up to the Olympus E-P2 model, the conclusion was more or less that the Leica M9 was the best available solution to the problem, but that its price was prohibitive. This conclusion still stood in 2017, even after evaluation of newer Micro 4/3 cameras up to the Panasonic GX7, plus some Fujifilm X APS format cameras.
About a year after the original AA filter web page was written, the new price of a Leica M9 dropped a bit, and some dealers had demo models for a little less than the reduced new M9 price. A used M9 was getting to cost even less, but those carry risks in terms of a lack of warranty. However, by 2017, the price of a used Leica M9 began to be competitive even with some new high end name brand full frame DSLR cameras.
Ultimately, I decided to get a Leica M9 with the full 2-year warranty from an authorized Leica dealer back in 2013, then sell much of my other photo gear in order to restore assets from savings that had been diverted to get the Leica. It did not work out as hoped right off the bat because the new Leica M9 had some problems that needed to be corrected, so I had to keep using some of my old equipment for some time. But when the Leica M9 problems, including the dreaded sensor corrosion, were at last corrected in early 2017, I could at last use the Leica M9 as intended.
A great deal of other photo gear won't be missed in light of using the Leica, because I've gradually grown weak from a medical condition, to the extent that it's difficult to even carry or use the other cameras, some of which are physically larger and heavier. Some of my other cameras are small, but don't take good pictures compared to the Leica. I'll still use Micro 4/3 cameras, but mostly for grab shots and long telephoto pictures. A newer Fujifilm X APS format camera is also used because it is a good complement to the Leica M9 system.
The Leica M9 is a sizeable investment for a person such as myself who has made significantly less than six figures. Other than an automobile or house, the Leica M9 is the most expensive single item I've ever purchased in my lifetime by a factor of two. Therefore, some soul searching (and a lot of saving) was needed before I could acquire one. (The M9 body actually cost more than the combination of every car I've owned other than the most recent two!) It is hoped the Leica M9 will provide years of reliable service.
The Leica M9 was selected over DSLR systems for a number of reasons. Three of the most important are:
1.) The physical size of the camera (and camera system) is small enough that its size is rarely a consideration in whether or not to take it on trips or otherwise use it; and,
2.) Availability of sharp and fast (f/2 or faster) prime lenses having small physical envelopes.
3.) Familiar and simple manual user interface.
I also already had a few older Leica M lenses that I used on my Micro 4/3 camera. This meant that even if I bought only a Leica M9 camera body, I could still use it right away - with my existing older Leica M lenses. More M lenses could be considered after my wallet recovered from acquiring the camera. Another important feature is that the user interface for manually setting focus, shutter speed and f-stop is like that of film cameras I'd used for decades. To me, manual settings are simpler than numerous program modes, partly because manual settings have true cause and effect relationships.
Combined, the fast M prime lenses and compact camera size would make it possible to get shallow depth of field photos without using telephoto lenses. I was used to getting pictures like this with medium format cameras, but 35mm format DSLR lenses, including my old Nikon SLR lenses, were not quite good enough to provide both high resolution and the shallow depth of field results I was looking for. Details about shallow depth of field are in Appendix D (lens reviews), in the introduction for the 50mm f/1.4 Summilux-M ASPH lens.
The Leica M9 was selected over newer Leica models for reasons other than purely having a lower price than the newer digital M (also known as the Type 240) was expected to have, and now, as of mid 2013 and onward, has. Rather, other than the absence of an EVF accessory port, I actually prefer the Leica M9 or M9-P over most of the new Typ... models for a number of reasons. These include a frame line preview lever and passive illumination of the frame lines through a front diffuser window.
These viewfinder related features make using the Leica M9 more like using a Leica M film camera, and also make it possible to set up a shot before the camera is even turned on, which can save a lot of battery time. This probably will not be possible with the newer versions. Passive illumination of the frame lines also keeps them dim enough to use for framing piggyback astrophotography shots by looking at stars through the viewfinder.
The new Leica M10 and M11 restore the frame line preview lever and have a 0.73x viewfinder (compared to 0.68x in the Leica M9), and a shallower depth, all of which at least put them on par with the Leica M9. The superior high ISO performance of the M10 and onward is not a big deal for me, since I often use a low ISO setting and a tripod anyway.
Thus far, the Leica M9 has proven to be the easiest to learn digital camera I've ever had the pleasure to use. Other than a few menu items such as ISO and white balance, using the Leica M9 is almost like using a Leica M film camera. This makes its user interface familiar. A rangefinder camera is also something I can still focus accurately, unlike my diminished ability to focus an SLR in the absence of a strong magnifier.
In only a couple of months, the Leica M9 has made it possible to almost effortlessly obtain pictures I have not obtained with other cameras over the last few years. These include getting pictures of cloud formations before they disperse, capturing multiple hawks in a single photo, and even taking accidental pictures of a comet.
Part of the increased success in capturing short lived events may be because of how easy it is to use the Leica M9. You just turn it on, compose, focus, meter and shoot. It's that simple in many cases. There is no mental block about what menus you have to wade through while the opportunity for the shot you want slips away. The M9 just does what a camera should. It takes pictures, and pretty good ones at that. The Leica is a results oriented camera, not a process oriented bunch of lights and menus with a camera attached. In practice, setting the M9 takes only half as long as my Micro 4/3 camera does in manual mode.
It has even been possible to take pictures through a telescope with the Leica M9, by using either a Visoflex or a different camera (such as a Micro 4/3 camera with an EVF or an SLR film camera with a strong focus magnifier) to frame and focus. I used similar techniques with a Leica M3 on long focal length lenses in the 1970's, since its shutter caused less camera shake than an SLR.
It is envisioned that this web page will be updated over time to include more Leica M9 sample photos and more consistent comparisons to other cameras. However, owing to the above medical condition that requires a lot of bed rest when I'm not at work, I often have only enough energy "overhead" for as little as an hour or two a week of discretionary activities like using cameras, writing web pages, or even housekeeping. Therefore, any updates could easily be many months apart and consist of only a few additional pictures or descriptions. The date of the newest revision is at the end, for reference.
1.1 Conventions
In the sample pictures the relative magnification will often be referred to as a given "percent crop". This relates to the pixel scale when a browser is set to display photos at 100 percent of the posted size. It is not an indication of the percentage of the original image format that is shown.
For example, the image scale of a "50 percent crop" is half that of the original image. A 100 percent crop is a direct crop from the original image that has not been scaled at all. A 200 percent crop is twice the scale of the original image, and so on. Some crops larger than 100 percent are included to allow for the reduced ability of some web browsers to display all detail in an original image at 100 percent. A larger percent crop also makes it easier to point out small details in the original image.
1.2 Down Sides, Most of which were Temporary:
Unfortunately, there appeared to be a few issues with my particular M9 camera.
1.2.1 Lens Mount to Focal Plane Distance:
As one who shoots both landscapes and astronomical photos, I quickly found that none of the 13 Leica M mount lenses I had (at the time I tested the M9 camera) would quite reach infinity focus on my Leica M9. These were not all Leica brand lenses, but some of them were.
Considerable testing (with the lenses, plus a fine ground glass on the back of my Leitz-Minolta CL film camera) appeared to show that the lenses were calibrated to within about 0.02mm of each other and with the Leica CL camera focal plane, but that the Leica M9 lens flange to focal plane distance could be at least 0.035mm too long at the center. There also appeared to be up to a 0.03mm (worst case) parallelism error between the lens flange and focal plane. This is 3 to 4 times as much error than I recall was advertised focal plane tolerance in the 1970's for Leica M film cameras.
It was hoped that these focal plane errors would just be temporary, but I did not get a chance to send the camera in to Leica USA for warranty service until it was just shy of one year old. The matter played out over a couple of years. The initial repair of early 2014 failed to correct the problems, and some aspects of the camera, including the rangefinder, were actually made worse by the early 2014 warranty service. After that, it took the better part of a year to get Leica to take a second look at it.
Fortunately, by early 2015, Leica USA corrected most of the issues that had gotten worse in the 2014 repair attempt, and they calibrated the camera using some instruments they said they didn't have in 2014. It was then possible to determine which of my lenses were consistent with Leica's reference lenses. The 50mm Summilux lens I acquired in 2015 tested within 0.002mm of their post-repair measurements, which is within the margin of test error.
The end result of the 2015 repair was that the camera's lens flange to focal plane distance was reduce to being only about 0.01mm too long at most, and it has been possible to get accurate focus via the rangefinder even with a 135mm f/2.8 lens. Details about the results are in Appendix B2.
This review previously included a detailed running account of events up to the early 2015 service, plus sample pictures from before and after the repairs. (This material is in Appendix A, Appendix B, and Appendix B1.) This was partly so Leica could reference technical details during service. Some of that older material is now gradually being removed. This is partly because, the usual point of a review is to assess how a camera performs when it is working properly.
Below, some tests done up through late 2014 assumed that the Leica M9 lens flange to focal plane error had been corrected by the 2014 warranty service. However, tests in late 2014 showed that incremental service on the lenses (more or less to make them agree with the camera) is what made the difference. This is known because lenses that were not serviced in this way still had about the same infinity focus error in M9 images as before the 2014 service, when set to their infinity stops. Material based on the former assumption is gradually being edited.
The original image sensor eventually experienced the dreaded "corrosion" problem, where coatings in the sensor filter stack develop flaws that are imaged in the picture as dark spots or clump of spots that are each surrounded by a brigher ring. Tests in Appendix B3 were performed after the sensor was replaced by Leica in 2017.
1.1.2 Astigmatism and Dimness in One Channel of the Rangefinder
As noted above, the rangefinder was degraded and misaligned vertically in the first round of service by Leica USA in 2014. This was never fully corrected, though Leica did do a better job of adjusting vertical alignment of the rangefinder in 2015.
1.2.3 Image Sensor Cover Glass Coating Corrosion
Like many Leica M9 cameras, my sample developed what is commonly referred to as sensor "corrosion" within less than 3 years. This was repaired in 2017, only shortly before the end of the time window in which Leica corrected this problem for free.
1.2.4 Sensor Cover Glass Causes SOME Radial Blur at Wide Apertures.
This is not a flaw unique to my particular Leica M9. It was found that the sensor cover glass causes some radial blur and image smearing at wide apertures, especially with wide angle lenses.
This blur and smearing at least seems to be a little more pronounced on the new replacement sensor, so I don't know if the sensor stack thickness changed between old and new M9 sensors. (Based on various articles, I think the old filter/cover glass stack was about 0.8mm thick.)
Specifically, most wide angle lenses must be used at f/3.4 or slower to eliminate radial blur or smearing around highlights that are imaged toward the edges of the frame. Radial blurring at wide apertures even happens in images with the 35mm f/2 Summicron ASPH lens.
For those who are interested, I found that it was possible (at least in 2013) to purchase the extended warranty on the Leica M9. Leica USA was initially unsure of the warranty availability in the U.S., but Leica in Germany informed me that it was, so I purchased the extended warranty on my Leica M9 at that time.
Before getting into the rest of this web page, the usual caveats: This is not a complete, formal, or comprehensive review like those at web sites dedicated to camera reviews, nor am I a professional camera reviewer. This review is instead a compilation of my user impressions of the Leica M9 and any lenses or accessories that may also be mentioned. Unless specifically noted otherwise, where any details about any product are mentioned without quoting a manufacturer, such details were often obtained through inspection or measurement of available product samples, and do not represent any manufacturer's official specifications.
Leica M9: A Compact and Portable Camera System
In the context of when the first version of this section of the review was written in 2013, the Leica M9 is a unique approach to full frame digital photography. Rather than being a typical digital camera with a myriad of confusing program modes that vary from brand to brand, the Leica M9 is based in large part on the manual user interface familiar to Leica M film camera users.
There is no auto-focus or program exposure, but there is something better, and that is simplicity of operation for those used to manual film cameras! Since it has a full frame (36x24mm) image sensor, even the coverage of familiar lenses is retained. The Leica M lenses have real mechanical manual focus, and manual aperture (f/stop) controls.
The Leica M9 is also very compact, being quite small in comparison to full frame digital SLRs. The M9 is comparable in size to a Leica M film camera. For those unfamiliar with Leica film cameras, the Leica M9 is about the same size as the vintage Pentax Spotmatic single lens reflex (SLR) camera body, and is smaller than the Nikon F2 SLR film camera. If these are not familiar, the M9 is only about 2 cm wider, 1 cm taller, and a little under 1 cm thicker than a Micro 4/3 camera such as the Olympus E-P1, E-P2, or E-P3. It also has a solid feel and the physical Leica M mount lens sizes are even smaller than many Micro 4/3 digital lenses.
The Leica M9 is a rangefinder camera rather than an SLR, yet it uses interchangeable lenses. The rangefinder eliminates the need for the mirror box used in SLR cameras, so the M9 has a compact size even though it uses a full frame 36mm x 24mm image sensor.
A rangefinder is a very precise method of focusing. Rather than watching an image mush in and out of focus as with an SLR camera, a rangefinder provides two sharp images that are superimposed over each other. The images move horizontally with respect to each other as a lens is focused, and merge into a single sharp image at the focus distance.
Since the Leica M9 viewfinder does not "look through" the camera lens, its finder instead has frame lines superimposed over a clear view of the subject to show the coverage of different lenses. When a compatible lens is attached, the camera automatically brings up the appropriate pair of viewfinder lines, one of which matches the lens field of view.
The Leica M9 viewfinder line pairs are for 28mm and 90mm, 50mm and 75mm, and 35mm and 135mm. These frame line pairings make it fairly obvious which frame line corresponds to a given lens, with smaller frame lines being for longer focal length lenses.
For lenses wider than 28mm, a matching viewfinder attachment is used in the camera's flash shoe. Zoom lenses (in the usual sense of the word) are not supported, because the viewfinder frame lines show only specific focal lengths. Exceptions are that Leica makes two zoom lenses, but each of these are intended to be used at only 3 focal length settings.
Even though a wider 21mm lens would normally require a separate finder attachment, I delighted to find that the full extent of the Leica M9 viewfinder (the part outside the 28mm frame lines) covers almost exactly the same field of view as a 21mm lens, so I can use the 21mm without attaching its accessory finder. It is necessary to move my eye around to see the edges of the M9 finder, but it is faster than using a separate finder. It was also possible to code most of my lenses so they are automatically recognized by the camera.
One limitation of a rangefinder camera is that focusing becomes less accurate when the lens focal length exceeds about four times the width of the image format. For this reason, 135mm is the longest lens that can usually be used on a rangefinder camera, at least when the rangefinder is the only means of focus information. However, it is possible to use longer focal length lenses and even telescopes by using a different camera (such as a low cost SLR film camera) to focus, then switching the Leica body onto the lens or telescope to take the picture.
Leica also made an optical flip mirror attachments called a "Visoflex" back in the 1960's or even earlier. Several models were made. If the eye level finder is used, only the Visoflex III is compatible with the Leica M9. The Visoflex converts a Leica M camera to a Single Lens Reflex (SLR) camera that can be used with certain long focal length lenses, or for macro photography with shorter lenses.
The newest version of the Visoflex flip mirror, the Visoflex III, is compatible with the Leica M9. I be tried it on the M9 and it worked OK, but attaching and removing it is a little tedious. The physical depth of the Visoflex is deep enough that infinity focus is only possible with certain telescopes and a limited number of telephoto lenses. Many newer Leica M cameras (not the M9) are compatible with an electronic eye level viewfinder (EVF) that can be used with the camera is in "Live View" mode.
It is also possible to use moderately longer focal length lenses at infinity on the M9 without going to the bother of swapping camera bodies or using the Visoflex, since the lens infinity stop can be used to set focus. However, it is necessary to set the Leica rangefinder (and thus its parallax correction) to infinity so the rangefinder patch can be used as a reference for centering of the subject. This is not as easy as it sounds with available adapters. However, it is possible with an appropriately modified adapter. This is covered in a later section.
Introduction of a newer version of the Leica digital rangefinder, the M (i.e. Type 240) was expected only weeks after this web page was first published. (Reviews of the M began to appear when some of the first revisions of this M9 review were made.) The M240 can be used with an optional electronic viewfinder (EVF) that is similar to the one for Olympus Micro 4/3 cameras up through the E-P3. The EVF supplements the rangefinder and provides compatibility with a wider range of lenses, plus making it easier to use a digital Leica M camera on telescopes and microscopes, etc. (Update: The newer Leica M10 uses an EVF similar to that for the Olympus E-P5 M4/3 camera.)
The Leica M9 digital camera has an unusually high price, and the new Leica M lenses are also quite expensive. However, the M9 has been implemented in a way that allows it to be used with almost every Leica lens made back to about 1950. (There are only a few exceptions that include certain wide angle and collapsible lenses.) Many of these older lenses are much more affordable, but still quite good. Newer third party Leica M mount lenses such as those made by Voigtlander-Cosina (VC) and Zeiss (said to be made at the same factory as VC lenses) can also be used on the Leica M9 and probably newer Leica cameras as well.
The other lens options (older used Leica lenses or the newer VC and similar lenses) make it possible to acquire a decent range of focal lengths at reasonable cost, even when compared to the cost of DSLR lenses or recent Micro 4/3 prime lenses. These lower cost M mount lenses have the effect of making the cost of a workable Leica camera system more competitive, though most other brand M mount lenses are not as good as the Leica brand lenses.
Still, even the low cost off brand lenses on the Leica M9 seem to produce better photos than most smaller format digital camera lenses do on their respective cameras. The smaller size of the Leica M9 system compared to a full frame DSLR system (or more recently, to other full frame mirrorless camera systems) may be decisive in whether or not it is taken on different types of trips, etc.
Compact Leica M9 Camera System (Three Iterations)
Three Iterations of a Compact Leica M9 Camera system.
© Copyright 2013 Jeffrey R. Charles. All Rights Reserved.
 |
 |
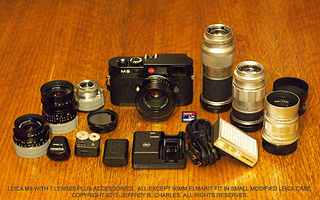
First Two Versions of Leica M9 System (Empahsis on Low Cost and Third Party Lenses):
LEFT: The first iteration of the Leica M9 system included two Leica brand lenses and several third party lenses. The lenses include Voigtlander-Cosina (VC) 21mm f/4, 28mm f/2, 40mm f/1.4 (on camera) and 75mm f/2.5 lenses, and a collapsible Industar 50mm f/3.5 lens. The Leica brand lenses are the 90mm f/2.8 Elmarit and the 135mm f/4 Elmarit, to the right of the camera. The Olympus flash was modified to remove all pins except the center pin that's for basic flash synch. Its hot shoe contacts are isolated from high voltage circuits, so only a 3 Volt potential is between them. All of the items except the 28mm and 90mm lenses fit in a small customized Leica system case.
RIGHT: The second system iteration shows that the Leica M9 and a good selection of lenses can fit in a small space. Items here (lenses listed from left to right) include a Voigtlander (VC) 12mm f/5.6 Ultra Wide Heliar lens, a VC 21mm f/4 Color Skopar, a VC 28mm f/2 Ultron, a VC 40mm Nokton, a Zeiss 50mm f/2 Planar ZM (on the camera), a Leica 75mm f/2.5 Summarit-M, a 90mm f/2.8 Tele Elmarit M, and a 135mm f/4 Elmar lens. Accessories include filters, extra caps, battery and charger with cord, auxiliary viewfinders, a short cable release, and a VC light meter for low light situations. The charger cord is short, to easily fit in the case. All items in this system except the 21mm finder, 28mm f/2 Voigtlander lens (left of camera) and the 90mm Tele Elmarit-M lens with rubber hood (second lens from right) fit in a small modified hard Leica film camera case.
|
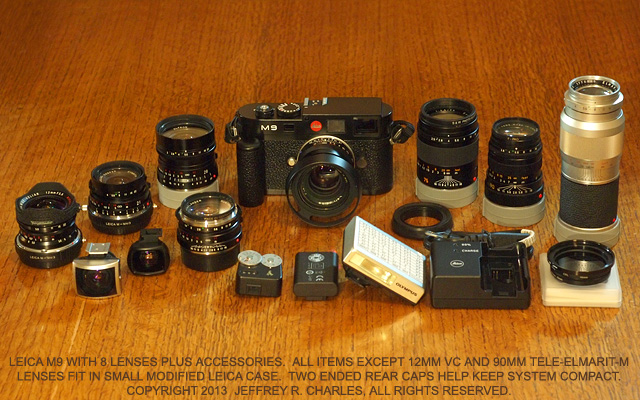 |
Third Version of Leica M9 System (More Leica Lenses After Wallet Began to Recover):
(This picture is a PLACE HOLDER, and does not show the full system)
This third and most recent system iteration also shows that the Leica M9 and a broad selection of lenses can fit in a small space. Items here (lenses listed from left to right) include a Voigtlander (VC) 10mm f/5.6 Hyper Wide Heliar lens (with a Fuji X adapter used as part of its rear cap), a VC 12mm f/5.6 Ultra Wide Heliar lens with its viewfinder, a VC 21mm f/4 Color Skopar, a 7Artisans 28mm f/1.4, a Leica 35mm f/2 Summicron-M ASPH (on the camera), a Leica 50mm f/1.4 Summilux-M ASPH, a Leica 75mm f/2.5 Summarit-M, a 90mm f/2.8 Elmarit M, and a 135mm f/3.4 APO Telyt-M lens. Accessories include filters, a Leica SF-24D flash unit with accessory lenses, extra caps, battery charger (charger uses short plug adapter instead of cord), extra batteries, auxiliary viewfinders, a short cable release, and a VC light meter for low light situations. All items in this system except the 10mm f/5.6 Voigtlander lens, 21mm finder, 28mm lens (left of camera) and 90mm Elmarit-M lens (second from right) fit in a small modified hard Leica film camera case.
* When the M9 camera is in the case, the 35mm or 50mm lens is usually attached, then most of the other lenses are paired on double sided rear lens caps. Any two of the three lens pairs can fit in the case, and the other pair is kept in an external lens case. The lens pairs are: The 21mm with the 135mm, the 28mm with the 90mm, and the 35mm or 50mm with the 75mm.
* A Visoflex III with 65mm f/3.5 Type II Elmar and 280mm f/4.8 Type III Telyt lenses are kept in separate cases. Also, a Voigtlander 180mm f/4 APO-Lanthar, a Leica 250mm f/4 Telyt-R, a Nikon 400mm f/5.6 ED Nikkor, and a small Borg telescope are all occasionally used with custom adapters. This comprises the third, and probably the last, iteration. Lenses are reviewed in a later section.
|
Compatibility with Vintage Compact Leica System Cases
The Leica M9 is almost as compact as a Leica M film camera, with the main difference being a little added depth. The added depth is enough that the M9 will not fit all vintage cases made for M film cameras, unless of course the case is modified.
Another consideration is that the front lens in the M9 viewfinder is not recessed at all, so the viewfinder side of the camera cannot safely slide in and out of the camera recess in a vintage case, unless this aspect is modified too. Over time, I developed two generations of modifications to a vintage Leica system case. The first generation (not pictured) was just to test the concept. I kept only accessories in the first version due to the flush viewfinder lens issue.
The second generation of the case modification was finished in March, 2014. It provides a larger pocket for the camera body, and the viewfinder corner of this pocket has a padded slope that the top part of camera contacts at only its top edge, as opposed to both the top edge and the front surface of the viewfinder glass. This prevents direct contact between the vulnerable viewfinder glass and the original case divider, to reduce the risk of scratching. All other modifications are in the form of a stand alone cloth covered insert that is simply slipped into the case, and which is held in place by its own fit to the case interior, plus a tab that slides behind part of the camera pocket.
The second generation case modification is shown below. It is a significant improvement over the first in that it provides more space for the camera body, better padding between items, and accommodates the camera with a lens up to 75mm focal length attached. The latter was accomplished partly by staggering the lens stacks, rather than keeping them next to each other along one side of the case, as in the first modification. In this version, all dividers are attached to each other for better stability. An added feature of the new insert is that it can be removed and rotated 180 degrees, to provide an arrangement similar to the first version.
As with the first version, two-ended rear lens caps such as those Leica has made for decades are an important part of getting the whole system into such a small space. It is an even tighter fit with the 50mm f/1.4 lens, but still works. The fit of the vintage case is a bit tight for so many items, but it is workable, and the object was to fit an existing case rather than starting from scratch. The case got a little more crowded when I switched from a compact customized Olympus FL14 flash to the larger Leica SF-24 flash.
A case interior that is about 5mm larger in all directions would provide a better fit and permit wider tolerances for the insert. An interior at least 8mm larger in all directions would accommodate some larger diameter high speed lenses such as the 35mm Summilux or the 75mm Summicron. A considerable enlargement of the case would be needed to accommodate a Noctilux, while still having room for the other lenses. If the lens stacks were not staggered, it would be possible to carry a relatively large flash unit in the case, but this would require that the case be about 20mm longer (end to end) in order to still permit the camera with an attached 75mm lens to also fit in the case.
If Leica or another manufacturer made a case and insert similar to this that was 15mm wider, 10 to 15mm taller, and 8 to 10mm deeper in its shortest dimension, the lens stack insert could have considerable padding and there may also be room to leave a vented lens hood on a 35mm to 50mm lens when it is kept on the camera. It would also accommodate a larger flash unit. A little added height would permit lenses other than the compact 21mm f/4 to be stacked with a 135mm f/4 Elmar or 135mm f/3.4 APO lens, which would speed up changing between the 21mm and other lenses.
Simple Modifications for Leica M System Case, to Work with Leica M9. Second Version.
Simple Modifications for Leica M System Case, to work with Leica M9.
© Copyright 2014 Jeffrey R. Charles. All Rights Reserved.
 |
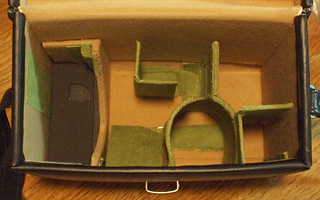 |
Custom Cloth Covered Metal Camera Case Insert Accommodates Camera and Six Lenses!
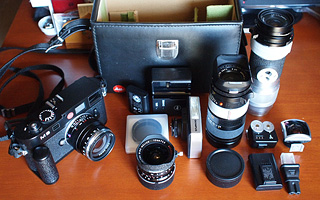
LEFT: The Leica M9 and all lenses and accessories shown here fit in the modified hard Leica system case. I already had some of the shown lenses to use with a Micro 4/3 camera, so I didn't need to pick up many extra items to have a relatively good selection of lenses for the Leica M9. I eventually added 35mm f/2 and 50mm f/1.4 ASPH lenses, but not until after my wallet finished licking its wounds from acquiring the camera.
RIGHT: As with the first generation of my modification, the key to getting the Leica M9 and so many lenses and accessories in the small Leica case is the custom insert that dominates the inside of the case. The insert and associated dividers isolate the two lens stacks from each other, and from other items. This insert is made of a combination of sheet metal and stiff cardboard, padding in some places, and a cloth covering. I used the shown thick green cloth because I had a lot of it around. All dividers are attached to the insert, and some of these are hinged to facilitate different equipment configurations in the case. The flap just right of the camera recess protects items stored below it.
|
 |
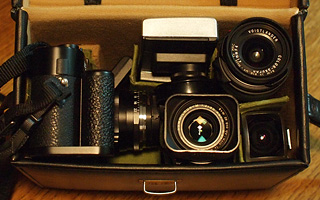 |
Vintage Leica Case and Custom Insert Accommodates Leica M9, 6 Lenses, Charger, Flash.
LEFT: Here, the case is shown partly populated. The flap toward the left folds down over the top of the 12mm Voigtlander lens. Larger lenses can be stored on their side where the 12mm and filter are shown. Other items can be added on top of the charger (shown top center) and over the small light meter shown at lower right. A compact AC plug for the charger is in the case, but is under some of the other items.
RIGHT: In this picture, the case is fully populated, including a small flash and the viewfinder for the 12mm lens. The following items are all in this small case:
* Leica M9 camera with grip, strap, and 50mm f/2 Zeiss Planar ZM lens attached is at left.
* 12mm f/5.6 Voigtlander lens is stored under the 50mm lens, protected by a hinged divider.
* 75mm Summarit-M and 35mm f/2 Summicron-M Asph, with 2-ended rear cap, are near center.
* 135mm f/4 Elmar and 21mm f/4 Voigtlander lens, with 2-ended rear cap, are at upper right.
* Spare rear cap and a body cap are under the 35mm and 75mm lenses.
* Small flash (Olympus FL-14, with the proprietary pins disconnected) is at top center.
* A couple of filters are under the flash, next to the 12mm lens.
* Viewfinder for 12mm lens and a small light meter (under the finder) are at lower right.
* Leica charger and a compact AC plug are under the flash at top center.
* Two spare M9 batteries. One is below flash. One (and 2 AAA batteries) is under finder at right.
* A short cable release can be stored by the battery at upper left.
* One memory cards can be stored under the camera recess, and another stored at lower right.
* Note: A 90mm Tele-Elmarit-M and 28mm f/2 lens stack can be swapped for either lens pair.
|
 |
 |
Custom Case Insert Configured to Accommodate a 6 (Left) or 8 (Right) Lens System.
LEFT: In practice, the flash is kept in a soft case, all lens caps are used, and the lens stacks and a few other items are kept in plastic bags as shown. The plastic bags make it easier to access items that are near the bottom of the smaller compartments. When the camera is placed in the case, the camera strap is nested between the camera and the center lens stack. There is quite a bit of strap material here because I keep both a neck strap and wrist strap attached to the camera at the same time. When the camera was serviced by Leica, the vulcanite was replaced with the shown covering that looks similar (compare to vulcanite pictured on the grip), but has less contour, a flatter finish, and a more rubber-like feel.
RIGHT: An alternate configuration for the case, easily implemented by just bending some of the hinged dividers, is to carry more lenses and accessories, while carrying the camera and one lens separately. Here, two additional lenses (28mm and 90mm) and more filters are added. This accommodates an eight-lens system, but provides less free space when swapping lenses. The flash is under the filters at left.
|
Initial Results with the Leica M9: Almost no radial blur
(Plus some results after warranty service to correct infinity focus problem.)
The first Leica M9 images below are taken under similar circumstances and at similar f/ratios as the Micro 4/3 images that showed (in my 2012 web page about radial blur with anti alias filters) serious radial blur problems. It is evident that the lack of an Anti Alias (AA) filter in the Leica M9 (plus other aspects, including a larger sensor) can provide far better results, though there is obviously aliasing on certain subjects. As with the Micro 4/3 tests, a tripod (Gitzo Reporter or heavier) was used for all test pictures, even with wide angle lenses or fast shutter speeds.
Before the Leica M9 was serviced, temporary lack of infinity focus with the Leica M9 caused blurring on distant subjects with fast wide angle lenses, which wasn't too good. The blur from defocus at long subject distances was then about a third as severe as the radial blur that was noted with the same lenses on a Micro 4/3 camera.
After the Leica M9 was returned from service in March 2014, infinity focus was possible with most lenses. All Leica brand lenses made after the early 1980's reached infinity focus on the camera, but some older Leica lenses and a few third party lenses (those more than 0.04mm from reaching infinity focus before the M9 was serviced) still did not quite reach infinity focus. These lenses were tweaked to reach infinity focus on the camera as serviced, which also matched their infinity stops to the newer Leica brand lenses. Unfortunately, the Leica M9 rangefinder came back misaligned in the vertical direction to an extent that critical focus is difficult to say the least. That is covered in Appendix B1.
The VC 28mm f/2 used for the tests below was one that needed some tweaking. After its infinity stop was adjusted, the imaged quality of distant subject matter, including the palm tree trunk (at the right in each picture below) almost doubled in comparison to when the same lens was used at the same f-stop before the M9 was serviced.
Since the Leica M9 can now achieve infinity focus with most lenses, radial blur comparisons can be made to a Micro 4/3 camera having an anti-alias filter. With the same 28mm f/2 manual focus lens, results with the Leica M9 are nearly ten times better than the average Micro 4/3 image from my previous radial blur tests, when the palm tree trunk image is positioned the same 8mm physical off-axis distance in both cameras. A factor of ten improvement over the off-axis Micro 4/3 images is about as good as the theoretical limit of performance, given the Leica M9 pixel size, etc.
After service, the best case off-axis Leica M9 results are close to 10 times better than the average Micro 4/3 image with the same lens and f/ratio, which certainly isn't bad. This is almost entirely due to the Leica M9's lack of radial blur that is probably caused by the anti-alias filter in the Micro 4/3 camera. The Leica M9 results are also over four times better than the best case Micro 4/3 image with the same lens and f/ratio, where focus was adjusted in the Olympus EVF, with the magnified view being decentered to enlarge the palm tree trunk. To see the difference, compare the top Micro 4/3 image in the second image table below to the bottom Leica M9 image in the third image table.
In addition to comparing moderate focal length Leica M9 and Micro 4/3 images, a few longer focal length (>400mm) images are included in the astrophotography section and accessories section. To take these pictures with a Leica M9, I used a techniques similar to some I used in the 1970's to take long focal length (up to 1600mm) pictures with a Leica M3 film camera.
One such method is to frame and focus the image with an SLR camera having a strong critical focusing magnifier, then replace the SLR with the Leica body and an adapter to take the picture. A modern day version of this is to use a digital camera having an EVF as the focusing device. Other methods are covered in the "Using Various Accessories with the Leica M9" section.
Using a separate camera to focus was practical even in the 1970's because a Leica M caused less camera shake than a typical SLR. There is less reduction of camera shake with the Leica M9 because its shutter blades move about 2.4 times faster than the shutter curtains in a Leica M3 to provide a faster X-synch speed, and probably to facilitate the 1/4000 second shutter speed.
The mechanical Leica Visoflex flip mirror can obviously be used with telescopes having adequate back focus, but camera body swapping is an effective way to get long focal length images using camera lenses that lack adequate back focus for a Visoflex. I hope to eventually replace the SLR body with a more compact ground glass attachment having a strong magnifier such as a Peak 15x loupe I use when critically focusing a Hasselblad.
The EVF of the digital M would simplify long focal length photography, but for a savings of over $2k, I can put up with camera swapping or a Visoflex unit. This is partly because about 90 percent of my pictures have been taken between the focal lengths of 21mm and 135mm, even at times I had access to a wide variety of lenses outside this range. Thus, focal lengths other than those supported by the M9 frame lines or a shoe mounted finder are not used that often for the type of pictures I take.
Radial Image Blur Comparisons:
Radial blur comparisons between Micro 4/3 and Leica M9, Context.
© Copyright 2012, 2013, 2014 Jeffrey R. Charles. All Rights Reserved.
 |
|
Radial Blur from Anti-Alias Filter (Upper Right), from 2011 Test with Micro 4/3 Camera.
To compare radial blur, we will start with Micro 4/3 images from the 2012 tests, all taken with a VC 28mm f/2 Ultron lens. This picture shows the entire width of the Micro 4/3 image from which the next two examples of radial blur will be cropped. The points of interest will be the right sides of the palm tree trunk and the roof air conditioner at the extreme right of the picture, wires from the power pole transformer left of that, and the green tree near center. The camera is an Olympus E-P2 and the lens is a Voigtlander (VC) 28mm f/2.0 Ultron. The VC 28mm f/2 lens has remarkably low veiling flare (even less than the 35mm f/2 Summicron-M ASPH), which can reduce shadow detail captured in backlit situations such as this, but which is very helpful in most other situations. Compared to Micro 4/3, Leica M9 covers about twice the field of view with a given lens, due to its larger sensor (36x24mm versus 17.3 x 13mm). The best comparisons below were made almost two years after acquiring the Leica M9. This is because the Leica M9 did not initially allow any wide angle lens to focus even as far away as the palm tree at right until it was serviced twice by Leica.
|
Radial Image Blur Comparisons vs Focus Distance, Micro 4/3 Images:
Radial blur comparisons between Micro 4/3 and Leica M9. These examples of strong off-axis radial image blur are with an Olympus E-P2 camera, using the same Voigtlander (VC) 28mm f/2.0 Ultron lens that was used for my 2012 blur tests. Apertures used are f/2.0 and f/2.4.
© Copyright 2012, 2014 Jeffrey R. Charles. All Rights Reserved.
 |
|
|
Radial Blur with M4/3 Camera: 28mm f/2 Ultron Lens Focused on Tree Trunk (Right).
This image is cropped from the right side of the above scene. Here, the lens is focused near infinity, between the distance of the green tree at the left and the palm tree at the extreme right. Radial blur in the original 12MP image from the Olympus E-P2 camera is more than 13 pixels wide on the right side of the palm tree trunk, and almost as wide on the right side of the roof air conditioner. The blur is even wider at the corners. However, the blur width decreases toward the center of the original picture, where it is absent on the green tree at left. Note that the palm tree at right is in focus, but light from the background sky is blurred toward the center of the image, and thus over the palm tree trunk, probably by the camera's anti-alias filter. The scale of this image is about 43 percent of the original, so flaws are large enough to be obvious without pixel peeping. Most blue in the backlit wires is from the sky being blurred over them rather than from lens aberrations. Exposure at ISO 100 is 1/4000 sec at f/2.4.
|
 |
|
Radial Blur with M4/3 Camera: 28mm f/2 Ultron Lens Focused Closer than Tree Trunk.
In this image, the lens is focused slightly in front of the palm tree, with best focus on the foreground telephone pole. Setting the focus closer reduces the width of the blur at the palm tree trunk distance by almost half, at the expense of some de-focus on the green tree at left (which is near the center of the original picture) and objects beyond it. The exposure at ISO 100 is 1/4000 sec at f/2.0. In spite of the wider f/2 aperture, the focus change reduced the off-axis blur to less than that of the image taken at f/2.4. Backlighting was less intense for this image, but blur width is relatively independent of backlight intensity.
|
Radial Image Blur Comparisons, Leica M9 Images. Almost No Radial Blur!
(Top image taken before service of M9, when good infinity focus was not possible.)
Radial blur comparisons between Micro 4/3 and Leica M9. These examples of very low Off-axis radial image blur are with a Leica M9 camera, using the same Voigtlander (VC) 28mm f/2.0 Ultron lens that was used on Micro 4/3 cameras for similar tests. Both images taken at f/2.4.
© Copyright 2013, 2015 Jeffrey R. Charles. All Rights Reserved.
 |
|
Reduced Radial Blur with Leica M9: 28mm f/2 Ultron Focused Closer than Tree Trunk.
This image with the Leica M9 was taken prior to service, so the lens flange to focal plane distance is a little too long to allow the lens to reach infinity focus. The palm tree trunk at right is positioned at the same 8mm off-axis distance on the focal plane as for the Micro 4/3 images. The Leica M9 has a full frame sensor, so the tree appears closer to the center of the format. The position in this cropped image is similar to that in the above Micro 4/3 images. The same VC 28mm f/2 lens is used. The Leica M9 has very little radial blur, but its higher contrast at the Pull 80 ISO setting blows out the sky under lighting conditions similar to those for the Micro 4/3 images above. Here, the Leica M9 it fails to allow the 28mm lens to focus as far away as the palm tree trunk at right, even with the lens set at infinity. This prevents a sharp wide aperture image, hindering accurate assessment of radial blur. In this image, blur in the palm tree trunk from defocus is almost a third as severe as radial blur is in the optimized Micro 4/3 image above. Trees in the distance are even more blurred. The exposure at ISO 80 is 1/4000 sec. at f/2.4. This crop is about 65 percent of the original image scale. An improved image, taken after the camera was serviced, is below.
|
 |
Reduced Radial Blur with Leica M9: 28mm f/2 Ultron Focused on Tree Trunk (Right).
This image with the Leica M9, taken after service, also places the palm tree trunk image 8mm off-axis on the focal plane. The same VC 28mm f/2 lens is used. The light is more favorable, so the sky is not blown out at the Pull 80 ISO setting. With infinity focus now possible, it is obvious that the Leica M9 has very little radial blur. Here, the 28mm VC lens focuses as far away as the palm tree trunk at right, providing a sharp wide aperture image. In this image, the tree trunk is not blurred much at all, and appears to be resolved nearly ten times better than the average blur in the top Micro 4/3 image on the previous table. Trees in the distance are also well resolved. The exposure at ISO 80 is 1/4000 sec. at f/2.4.
UPDATE 1: It was later found (gradually, by Nov. 2014) that service on the lens is what made the most difference for infinity focus, and that Leica's 2014 service on the M9 camera did not fully address the issue. Service on the lens had been done after the first test to make its infinity focus almost agree with the M9 camera, at the expense of causing the lens to focus slightly past infinity on my Leica film camera. Things were considerably better after Leica's 2015 service.
UPDATE 2: After the original Leica M9 Sensor (which developed corrosion) was replaced in 2017, images with this lens have had more radial blur, but not as nuch blur as with Micro 4/3 cameras.
Note: Add image of same test with same lens, but with replacement Leica M9 image sensor.
|
Moire, Green Stripes, Hot Pixels, Other Artifacts, and Sensor Corrosion
The Leica M9 initially exhibited several artifacts, while others did not appear until well after the camera was serviced by Leica in early 2014. Artifacts such as aliasing are to be expected in a camera having no anti-alias filter. However, other artifacts, including the green stripes or green pixel blocks next to saturated areas, seem unusual. The green stripe artifacts only occur under very specific conditions.
Aliasing
There is a tradeoff to doing without an anti-alias filter in order to prevent off-axis radial blur with rangefinder lenses, and that tradeoff is aliasing, or moire. The Micro 4/3 cameras tested with rangefinder lenses to date (Olympus E-P1 and E-P2) have about the same amount of radial blur (pictured above), but only rarely exhibit moire in the image.
The Leica M9 does not have any image flaws that have been identified as radial blur, though there have been rare instances of blue fringing and faint double imaging near the edge of the picture, neither of which appear to be attributes of the lenses used. Images at the same distance off-axis that would result in radial blur on the Micro 4/3 format show almost no obvious blurring flaws that are not an attribute of the lens. However, images of certain subjects do have moire.
In the examples below, moire appears in the image of the off-white cloth cover on the small speaker. Weave in the cloth is on a hexagonal pattern and has a 1.2mm interval. This speaker was imaged about 7mm off-axis when taking pictures of a clock that appear later sections. When a 35mm lens was used, the Leica M9 camera was about 4.2m from the speaker. When a 40mm lens was used, the distance was about 4.8m. At the Leica M9 focal plane, the lens images the weave on about a 10 micron interval, and a somewhat smaller horizontal interval (inadvertently, an interval similar to the camera pixels!) when the oblique angle of the speaker is taken into account. The result is moire.
The obvious moire pattern on the speaker cloth consists of an oval well left the center, which is surrounded by oval rings having a magenta cast. A second moire pattern, consisting of arcs centered around a point below the speaker, is superimposed over the oval pattern in the picture with the VC 40mm Nokton, but not in the photo with the 35mm Summicron, maybe because of a slight difference in the original image scale. Color moire is also visible around the top edge and the center ring of the brass plate in the Nokton picture.
Since images from Micro 4/3 cameras having anti alias filters provide good central resolution with rangefinder lenses, and because moire is generally most obvious near the center of the picture, the notion of a radial gradient anti-alias filter readily came to mind right after I took a few pictures with the Leica M9. Such an anti-alias filter could be almost as strong as that in my Micro 4/3 camera at the center, then gradually diminish in intensity with increased off-axis distance. For a rangefinder using fast f-ratio lenses, the anti-alias effect would need to begin to taper off significantly by 5mm to 6mm off-axis, and become relatively insignificant at an off-axis distance of about 10mm or slightly more, in order to reduce aliasing near the center, yet not cause blurring with wide angle rangefinder lenses. These off-axis distances can be increased for SLR lenses.
Moire with the Leica M9.
Moire with the Leica M9, inadvertently imaged while testing various lenses.
© Copyright 2013 Jeffrey R. Charles. All Rights Reserved.
 |
 |
| Moire with Leica M9 and 35mm f/2 Summicron-M ASPH lens, working at f/5.6. |
Moire with Leica M9 and 40mm f/1.4 Voigtlander (VC) Nokton MC lens, at f/5.6
|
Intermittent Horizontal Green Stripes Next to Saturated Parts of Image
Before acquiring a Leica M9, I had seen some posts that discussed subtle stripes in certain early Leica M9 images, and had looked at a few examples of such images. Later posts appeared to indicate that Leica had corrected the problem. When I got my new Leica M9 in early 2013, it did not exhibit these striped artifacts under any conditions. After the camera was serviced by Leica in early 2014, it began to exhibit such artifacts photos of strongly backlit subjects on rare occasions, with some artifacts not being very subtle.
The striped (and in some cases even rectangular) green artifacts occur only when something in or near the field of view is bright enough to locally saturate part of the image, and when such an object is located either right at the very edge of the picture, or slightly outside the edge of the picture. The artifacts are not optical, since the boundaries are too well defined. In some cases, such as in the right example below, the artifacts are large and obvious, to an degree that renders a picture unuseable. When the camera is positioned at only a slightly different angle with respect to the subject, the artifacts usually do not appear at all. Since these artifacts appear only in rare circumstances, it is possible that the camera had this anomaly all along, but just was not noticed before.
Since I acquired the camera, the stripes have only appeared in 5 or 6 pictures, all of which were taken on the same day. It must be very rare, since I was not able to later replicate the problem. In 2015, Leica confirmed that the green artifacts are from a known readout error that may only rarely occur if part of an image is saturated. It is worth noting that the green stripes have not as yet happened with the new sensor, though there has occasionally been a green cast in strong highlight areas.
The sun is the most common object that causes strong saturation in a small part of the image. As when using any rangefinder camera having a focal plane shutter, great care is used when taking any picture toward the direction of the sun. Specifically, the camera is quickly panned over to the subject to take the picture, then quickly pointed back away from the subject. This limits time that the sun image can enter the camera to under a second or two.
Intermittent Green Stripes, but in Only a Few (1 in 1000) Leica M9 Images.
Green stripes with Leica M9, inadvertently imaged while testing some lenses for flare.
(Only happened with original sensor. Has not yet happened with replacement sensor.)
© Copyright 2013 Jeffrey R. Charles. All Rights Reserved.
 |
 |
| Horizontal green stripe in an image taken with the Leica M9, when an area on the left edge of the picture is saturated. It is with a 135mm f/4 Elmar lens, set to f/8. Exposure is 1/2000 sec. at f/8, Pull 80 ISO. The picture, taken to flare test the lens, revealed anomalies in the Leica M9. If the extreme left of the image is saturated, a green stripe extends from the left edge to the image midline, but not past the midline. This is the entire picture, not a crop. |
Here, we have a rare green block of pixels that appeared when the left side of the image was slightly more saturated. The exposure is 1/4000 sec. at f/8, Pull 80 ISO setting. The green area again extends to the midline of the picture, and stops suddenly. This leads one to wonder if the sensor might be two 18x24mm fields that are read out separately. Pictures taken just after this did not have such artifacts. On average, this occurs in less than 1 out of every 1,000 images.
|
Hot Pixels, Including Transient Hot Pixel Clusters
Somewhat important is that the Leica M9 camera has several "hot pixels", including some clusters of contiguous hot pixels larger than 2x2. After some observation, I found that two types of hot pixels are most dominant. (This section applies only to the original sensor, since the replacement sensor had no obvious hot pixel clusters and was not evaluated for hot pixels.)
The first and worst type of hot pixels are "always on", with most being red. These are more obvious in low light or at high ISO settings, but also appear in shadow areas of normal pictures. Fortunately, most of these are well away from the center. These are more obvious versus the ISO setting than hot pixels in any of my previous digital cameras (including my 12 year old Sony DSC-F707), so they often have to be digitally retouched out of pictures.
The second type of hot pixels are transient. This is not something I've experienced with any other camera. Some of these transient hot pixels are clusters of hot pixels as large as 4x4 pixels (16 contiguous hot pixels!), with the brightest of these being red, but which are surrounded by even more hot pixels, specifically, up to 30 dimmer pixels having various shades of green and blue, most of which have been observed to be on the right side of the red pixels. It usually takes processing to see the dimmer green and blue pixels, but the brighter red clusters are obvious. These hot pixel clusters appear even at low ISO settings, including the pull 80 setting.
While the latter hot pixel clusters are transient, they often appear in the same locations. The interesting difference in the Leica M9 transient hot pixels is that they seem to be most obvious only in the first picture or two that I take after the camera has not been used for at least a few hours. If I take a series of pictures, the brightness of the transient hot pixels seems to be reduced with each picture. It is almost as if something was causing small areas on the CCD to slowly build up a charge as time goes by between pictures, but that the charge (if this is the cause) is reduced when taking a series of pictures. Large clusters of hot pixels seem unusual, even when most are transient.
When both types of hot pixel cluster are considered, there are seven relatively obvious ones (5 major, 1 moderate, 1 minor). The column and row coordinates are shown below, counting from the upper left corner. These are followed by the brightness, expressed as the DN number in an 8 bit image:
* Coordinates: 2134 / 2622 (109 DN red for 8 bit image, when BG is 40 DN)
* Coordinates: 2484 / 2570 (99 DN red, when BG is 1 DN)
* Coordinates: 2716 / 1762 (159 DN red-wht, 3 pixel spike by sat. area; only in img. 4850)
* Coordinates: 3386 / 852 (102 DN red)
* Coordinates: 3610 / 331 (single hot pixel; 125 DN white)
* Coordinates: 3838 / 549 (dimmer gray hot pixel: 47 DN)
* Coordinates: 3846 / 1730 (brightest pixel in cluster is 154 DN)
* Coordinates: 5056 / 1512 (single hot pixel; 107 DN blue)
Notes: Some hot pixel clusters are obvious even if the background is not a very dark.
Transient Hot Pixel Clusters in the Leica M9.
Transient hot pixel clusters in original the Leica M9 image sensor. These are most dominant in the first picture taken after the camera has not been used for at least a few hours.
© Copyright 2013, 2016 Jeffrey R. Charles. All Rights Reserved.
 |
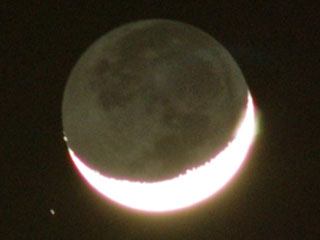
 |
| One of several hot pixel clusters in this Leica M9 is at the bottom center of this unprocessed 100 percent crop. It is from a picture of the crescent moon setting, in the astrophotography section below. The exposure is 1/4 sec. at ISO 80. The brightest red pixels form a contiguous 4x3 cluster. The brightest of these has an 8-bit DN of 67, with the background being 0. This transient effect is most evident in the first picture taken after the camera has been unused a few hours. |
This 400 percent crop has been processed to show dimmer pixels around the main cluster of red pixels. Many dimmer red, green, or blue pixels surround the brighter 4x3 cluster, but these are so dim (1 to 8 DN) that they can't even be seen without considerable image processing. The brightest red pixels appear closer to white in this enhanced enlargement. Pixel clusters like these were only obvious in the first picture or two I took in the moon set series.
|
Image Sensor Cover Glass Coating Corrosion (a.k.a. Sensor Corrosion)
Sensor corrosion is an area where I thought that my Leica M9 might dodge the bullet, since the sensor had only been cleaned twice, both times by Leica. I had never attempted to clean the sensor myself. One theory of the time was that the sensor cover glass coating had to be breached in a small area for corrosion to begin (as opposed to corrosion starting spontaneously), so I thought my M9 might be safe from it.
However, I noticed some odd artifacts in early 2016, only weeks before the camera's extended warranty was to expire. The first sign was not actually dark spots, but was instead local blooming around highlights that only happened at certain sensor coordinates. (In other words, bright features rather than dark ones.)
The first artifact was small, but before long, multiple artifacts exceeding 20 pixels in width had been found. I prepared some sample photos and posted them so Leica could see them. Their people suspected the cause was indeed sensor corrosion, but they would need to see the camera to be sure.
Unfortunately, the number, size, and nature of the sensor defects make it impractical to process them out of most pictures. The sheer size of the artifacts means that they are obvious at almost all f-stops.
When the problem came to light, there was a backlog of parts at Leica, so the repair timing was going to cause my M9 to be in for service just when I had hoped to go on my first real vacation since about 2003. The purpose was to take photos with the M9 while I still had enough health to travel some distance in a given day. Fortunately, it looked like Leica may have had a temporary solution.
Image Sensor Cover Glass Coating Corrosion in Leica M9 (Early to Moderate Stages)
Early to moderate stages of sensor cover glass coating corrosion in the Leica M9.
© Copyright 2016 Jeffrey R. Charles. All Rights Reserved.
 |
 |
| Early stages of Leica M9 sensor cover glass coating corrosion were originally thought to be hot pixels, except that there was a curious dark spot in the center. Distortion on the right of this crescent moon image was one of the early signs. The bright vertical spike has a dark diagonal line through it. I had no idea what it was, and initially thought the dark area could be a distant contrail. There was no power line in the image to cause a diffraction spike. Unrelated "tearing" on the left of the crescent is from aliasing, as is the red and cyan fringing. This 150 percent crop is from a 1 sec. exposure at f/4.0 (ISO 160) with a 90mm f/2.8 Elmarit-M lens. Not bad for 90mm! |
This image shows a more advanced stage of sensor corrosion, with the defect exceeding 20 pixels in height. The greenish bulge on the right side of the glow around the bright part of the moon was first thought to be from the green stripe flaw (shown in two other pictures), but it was not in the right part of the sensor for that. Also, when the sensor defect was away from the moon, it looked like a dark structure with a bright ring around it. The far fainter (barely visible) inverted blue crescent that intersects the moon at the 1:30 position is a reflection from a filter. This 75 percent crop is a 2 sec. exposure at ISO 500 with a 180mm f/4 Telyt-R lens, set to f/4.8.
|
 |
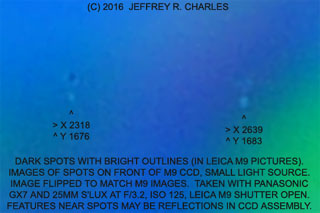 |
| Shadows of two sensor corrosion structures in an image of the sky. Just before this photo was taken, these spots and rings were found to be the culprit. As the limb of the rising moon crossed the right spot, it appeared to have a bright bulge on it, which disappeared as the moon cleared the spot and ring. At the time this was taken, there were at least 14 sensor defects of similar size. |
This image is flipped to match the orientation of the picture at left, and shows corrosion structures as seen from the front side of the sensor. The left spot even shows the surrounding ring. The right spot appears to have dim tracks leading away from it. The dark areas appear to have some structure, with most having two or more dark spots, as opposed to being single spots.
|
Other Quirks
The Leica M9 has exhibited only a few unexpected quirks other than the infinity focus issue. One is that has never recorded the estimated f/stop in the JPEG image EXIF data, even though the external meter cell has been shown to work based on its influence on the meter readout brightness. There is also a place just to the lower left of the rear LCD screen where the leatherette keeps trying to peel up. Minor, but something to keep an eye on in case the leatherette is brittle like the older vulcanite.
On one occasion, the camera, even though in singe shot mode, appeared to save images only to the buffer and never write them to the memory card. This may have been some sort of crash, because the camera later could not read from the card and its LCD screen didn't turn off when the power was turned off. Just before this started, the motor didn't advance after the last picture had been taken, even though the busy light was not on. The motor only advanced when the camera was switched off. The images remained visible on the camera screen even after turning the camera off and on, but the camera could not read the card later on.
When I read the card in my computer, none of the recent images were on it, so I lost all pictures I took during that situation, even though the camera had been powered on and off a few times and the battery changed when it was off. Fortunately, these were only test shots, so most were easily replicated. Everything including the memory card worked OK later. This gave me the impression the camera power switch may be a soft switch, similar to that on many computers.
There was one occasion when I found that a menu setting did not take when it was made immediately prior to the camera displaying a low battery warning. This only happened once, and this aspect of the camera worked fine when the battery was recharged.
In 2015, the camera did this again, but kept getting worse until it would not take pictures at all. Recovery required many steps that Leica recommended, including reset and re-installation of the firmware, but at least the camera did not have to be sent in (again) to address it. Unfortunately, Leica's hot pixel mapping may not have survived the process, since hot pixel clusters are now evident.
Everyday Pictures with the Leica M9
For anyone who has used a Leica M film camera, the Leica M9 should be relatively easy to use. In fact, I found it to be the easiest to use digital camera I ever encountered. If shooting at the base ISO and full resolution, there are often only four things to set: Shutter speed, aperture, focus, and white balance. Pretty much the same as using a Leica M film camera, except that you don't have to load film and you can select white balance instead of putting filters on the lens.
Personally, I find setting basic functions like the above to be easier than selecting from a myriad of program modes that vary from brand to brand in digital cameras. The Leica M9 menus are also relatively shallow, and the settings made most often are generally toward the top. It's simpler (at least for me) than even my Micro 4/3 camera. About the only thing I'd change is to add a dedicated white balance button and a small always on LCD (similar to that on the Epson R-D1) to show settings.
It sort of reminds me of the difference between PC and a Mac computers, back when DOS was all that most ran on a PC. If learning the processes required to use DOS had appeal, or if a PC it was the only affordable choice, it was appealing. If one instead wanted results without all the process, the Mac was the way to go, though it cost more. In the end, a Mac had less real cost (considering one's time), because it was possible, even easy, for many to get results with it.
In digital cameras, those who are into the process of learning a camera as much as obtaining the end product of taking pictures with it can dive into deep DSLR menus and set up stuff as long as they want. Those who are into the end product of getting good photos more than the process, can just use the Leica M9 and take pictures!
Even during the first week of use, I missed fewer pictures with the Leica M9 than I did with my Micro 4/3 camera. Even better, the clear rangefinder viewfinder provides a view of the subject at the very instant the picture is taken, so you quickly get a feel for whether or not you got the intended shot. The only thing that took a little getting used to was the 0.68x finder makes the subject look farther away than the 0.91x finder on the Leica M3. For people who are used to the M4-P and later Leica M film cameras, the difference between their 0.72x finders and the 0.68x M9 finder won't be as obvious.
Below are a few photos of everyday subjects, taken with the Leica M9. Landscapes are not included for now due to the apparent infinity focus issue, but some may be added after that is addressed under warranty.
Everyday Pictures with the Leica M9. (Pictures at infinity focus not added until 2015.)
Everyday Pictures with the Leica M9.
© Copyright 2013 Jeffrey R. Charles. All Rights Reserved.
 |
|
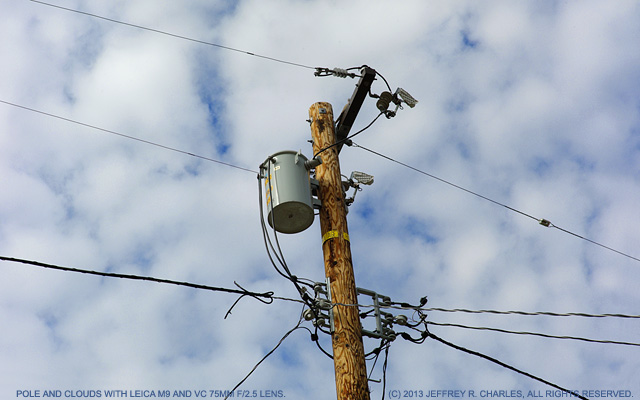
Grab Shot of Utility Pole and Sky
When I went out the door one day, cloud formations behind a nearby power pole caught my eye, so I went back in the house, grabbed the M9, put on a 75mm lens and took this picture. The M9's fast power on time and simplicity of use made all the difference. By the time I took a second picture, the clouds had changed enough that the scene was no longer as interesting, but this first shot was what I wanted. The full size image holds up to even pixel peeping, being sharp as a tack and isolating the pole from the sky by virtue of high resolution on the pole. The original was taken with color saturation low, but it was possible to increase the saturation in post without noise becoming obvious like it would have in an image from my Micro 4/3 camera. A huge full frame digital SLR will easily take as good of a picture, but I doubt I would have gotten the shot in time with one.
|
 |
|
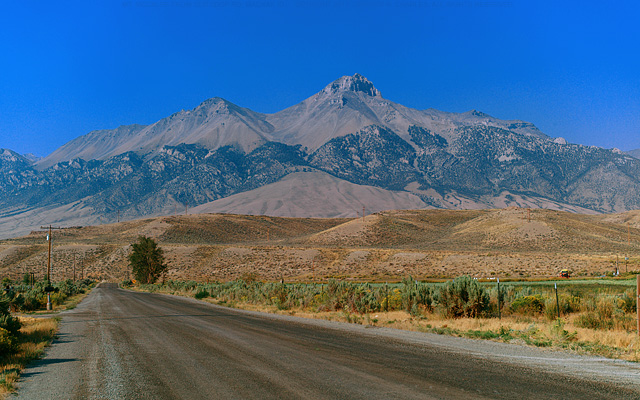
Mt. McCaleb from about 1 km northwest of Mackay, ID (haze from smoke processed out).
Mt McCaleb is an interesting mountain that has a different appearance, depending on location and lighting. Taken with a Leica M9 camera and 50mm f/1.4 Summilux-M ASPH lens. Exposure was 1/750 second at f/6.8, ISO 80. Tungsten white balance was used as an experiment to see if adding more blue to the original image would make it easier to process out strong haze from the smoke by removing the large amount of excess blue color from the original. It may have helped a little. Even the Leica M9 JPEG image had enough overhead to process out the strong haze that was caused by local smoke from forest fires. Copyright 2017 Jeffrey R. Charles. All Rights Reserved.
|
 |
|
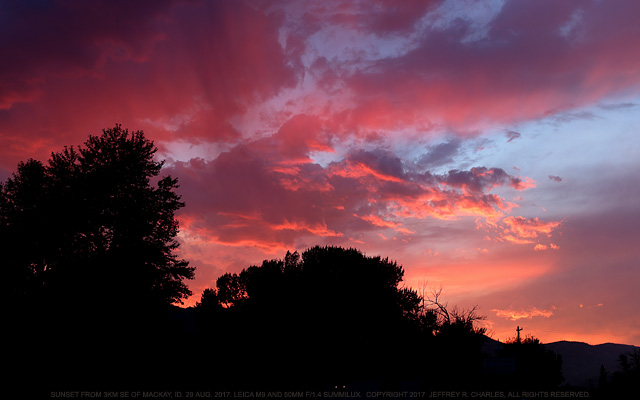
Smoke-Enhanced red sunset, from White Knob Motel, about 3km SE of Mackay, ID.
In 2017, sunsets were very colorful in the Mackay, ID area, due to lingering smoke from distant forest fires. The warm color is more obvious when clouds were present, but still interesting at other times. Leica M9 with 50mm f/1.4 Summilux-M ASPH. 1/45 at f/5.6, ISO 80. Brilliant color in images like this, taken at the "Pull 80" ISO setting, remind me of the color that Kodachrome slides used to capture. Copyright 2017 Jeffrey R. Charles. All Rights Reserved.
|
 |
|
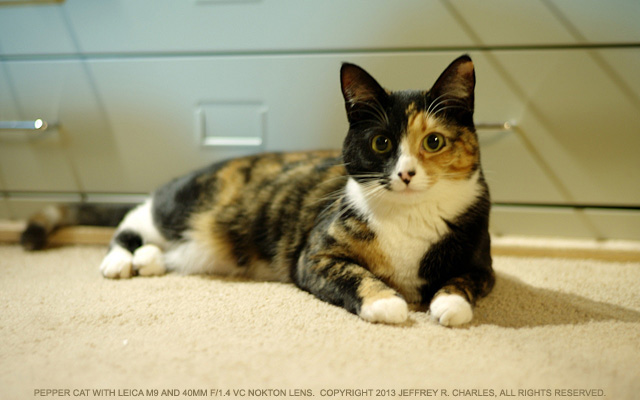
Pepper Cat Looking at Me Instead of the Camera Lens
Manual focus with the Leica M9 rangefinder is about as fast as manual focus with my Micro 4/3 camera and its EVF, so I rarely miss cat shots while fiddling with the camera. The M9 also has less noise at ISO 800 than my Micro 4/3 camera does at 400. There is one difference though. My cat makes eye contact more than most cats, and since she can see part of my face on one side of the M9 camera, she looks at me instead of the lens. (All cats probably won't do this, but she does.) This is why she's looking a little to the left. Fortunately, I was later able to keep her from doing this as much by using my left eye to focus. This actually shows one of the strengths of the Leica rangefinder. Since its eyepiece is in an upper corner, using the camera is not like putting a veil over your face, which lets you stay better connected with your subject. For portraits, a person will respond to a suggestion that they look at the lens, even if a cat won't.
|
 |
|
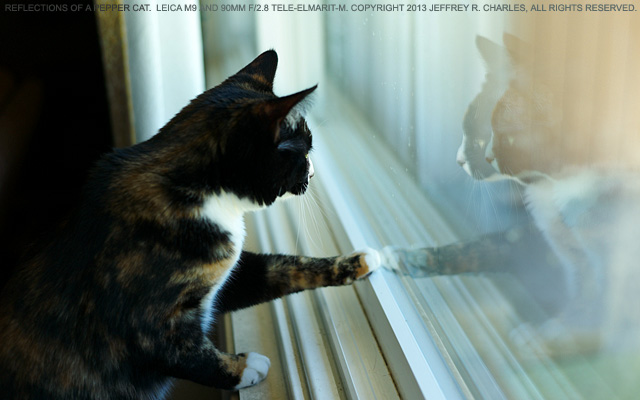
Pepper Cat Surveying The Great Outdoors, with Her Reflections Looking Back
Reflections on a Pepper Cat. This is Pepper cat and her reflections, captured with a 90mm Tele-Elmarit-M Type II lens, working at about f/3.1. This lens provides enough working distance that Pepper wasn't distracted by me or the camera. One curious but good thing is that turning on the Leica M9 does not seem to distract the cat, while turning on my Micro 4/3 camera, even from 20 feet away, will get her attention or even wake her up. It might be some high frequency sound that the MFT camera makes, but that the Leica M9 does not exhibit. For now (prior to warranty service), when wider apertures are used at close distances, I have to focus the rangefinder, then lean forward 2 or 3 cm in order for the image to have the same focus I set in the rangefinder. This could in part be related to the rangefinder showing infinity focus when each lens is set to infinity, while actual photos don't quite reach infinity focus. Best focus in the image is a bit closer than the rangefinder indicates, at all distances and with all lenses. This was fixed by Leica in 2015.
|
 |
|
Pepper Cat Enjoying the Highest Indoor Vantage Point
Another cat picture. Here we have Pepper cat, master of all she surveys. This is one of the few pictures for which the rangefinder coupling of the 50mm f/2 Zeiss Planar ZM behaved well enough to get good focus, prior to widening the lens rangefinder cam surface. The exposure was 1/24 sec. at f/2.5, with ISO set to 800, white balance on Tungsten. Given proper exposure, the Leica M9 has less noise at ISO 800 than my Micro 4/3 camera has at low ISO settings, but it seems a little more susceptible to clipping highlights and shadows, at least on in-camera JPEG's. A bright light was just outside the right of the picture, so the 50mm ZM lens appears to be fairly resistant to flare.
|
Initially, I felt a little limited in the scope of photos I could take with the Leica M9, even though this web page shows several subjects that were all photographed in the first few months, and within the first cumulative 12 hours or so of using the camera.
One limitation is that color pictures taken with the M9, at ISO settings higher than 800, are too noisy for my taste. This was a conundrum, since my high speed Voigtlander and Zeiss lenses had to be stopped down quite a bit to avoid obvious fringing, and this in turn required setting the ISO higher for hand held pictures in dim light.
This all changed when I at last had the opportunity to use a 35mm f/2 Summicron-M ASPH lens! Even though the 35mm Summicron ASPH has some fringing at full aperture, it is not enough fringing to be relevant in most real world low light pictures.
With the Summicron, I started using the Leica M9 for the type of things for which I'd have otherwise used my point and shoot camera, and the M9 with the Summicron were both easier to use than my point and shoot (since I could easily focus the Summicron at the distance I wanted), then the Leica would let me take available light pictures longer into twilight than either my point and shoot or my Micro 4/3 camera.
For example, a friend once bought a new Harley motorcycle, but did not bring it out onto his driveway until well after sunset. The Harley is all black and chrome, but the Leica M9 with the Summicron working wide open allowed me to get good available light pictures of the motorcycle and admiring neighbors without disturbing anyone. Not something that would have been possible with a point and shoot, cell phone, or my Micro 4/3 cameras!
This was also one of many situations in which the angle covered by the 35mm Summicron was just right. I could not have gotten the same shot with my VC 40mm Nokton because the framing would have been too tight, given the limited distance I could get from the motorcycle. If I'd asked for the Harley to be re-positioned so I could use my 40mm Nokton, the moment, and possibly the mood of the people that made the moment what it was, would have been lost. It pays to have the right focal length, and 35mm is often just the right focal length!
Using the 35mm Summicron ASPH on the Leica M9 brought back what it was like to use a Leica M3 and a 35mm Type 1 Summicron with Tri-X film for low light pictures in the 1970's. The Leica M3 with a 35mm Summicron was an almost ideal camera, since the 35mm focal length works well for a variety of things, and the f/2 maximum aperture is adequate for many low light situations. With the Leica M9 and the 35mm Summicron ASPH, I obtained good hand held color images light so dim that street lights were starting to turn on!
At last, here was a camera and lens combination that was almost like an extension of my arm, rather than a big clunky SLR that gets in the way, or a smaller camera that lacks equivalent low light capability. The rangefinder lets me see what's going on right when I take the picture, unlike an SLR with its temporary finder blackout. It was also easy to focus with the rangefinder in dim light. For the first time since using a Leica M3 and 35mm Summicron lens several decades ago, I had a camera in my hand that could capture the moment as I saw it!
A Camera and Lens Combination that Captures the Essence of the Moment!
A Leica M9 and 35mm f/2 Summicron-M ASPH can discretely capture the moment, without disturbing those who make the moment what it is!
© Copyright 2013 Jeffrey R. Charles. All Rights Reserved.
 |
 |
|
A New Harley on the Block! Chroma Noise at ISO 800.
Left: These pictures were taken as friend and his neighbors admired his new Harley motorcycle. The photos were taken well after sunset, without flash, at ISO 800. The orange tint on the background road is from a streetlight. The selected image does not show people, to protect their privacy. Right: Even in dim light, the Leica M9 and the 35mm Summicron ASPH captured abstract shots of the Harley from up relatively close. A 100 percent crop from one example is shown here. Chroma noise is considerable for a full frame sensor at ISO 800, but it is not very obvious when the whole picture is viewed all at once at a smaller scale.
|
Astrophotography with the Leica M9, Plus a Simple IR Cut Filter Test
Cameras may be used for astrophotography in a number of ways. They can be used with their wide angle, regular or telephoto lenses for anything from sunset photos to "piggyback" astrophotography. A camera can be used with long focal length lenses for moon pictures, or it can even be mounted on a telescope. A camera can also be used with its lens pointing into a telescope eyepiece in an afocal setup, but this is usually reserved for fixed lens cameras.
The Leica M9 rangefinder camera is not a Single Lens Reflex (SLR) camera, but there are numerous ways to frame and focus when using it with long focal length lenses or even telescopes. These include using a Leica Visoflex flip mirror, an astronomical flip mirror accessory, or using SLR or EVF cameras to frame and focus, then swapping them for the M9 to take the picture. There is also a way modify an adapter so the rangefinder patch in the M9 can be used to center distant subjects when using moderate tele lenses, and this is covered later. Now that we've covered a few basics, we can get into some simple astrophotography examples. The following are my first attempts with the Leica M9.
Astro Photos with the Leica M9, using Leica (and other) lenses!
Astro Photos with a Leica M9, using camera lenses.
© Copyright 2013, 2017 Jeffrey R. Charles. All Rights Reserved.
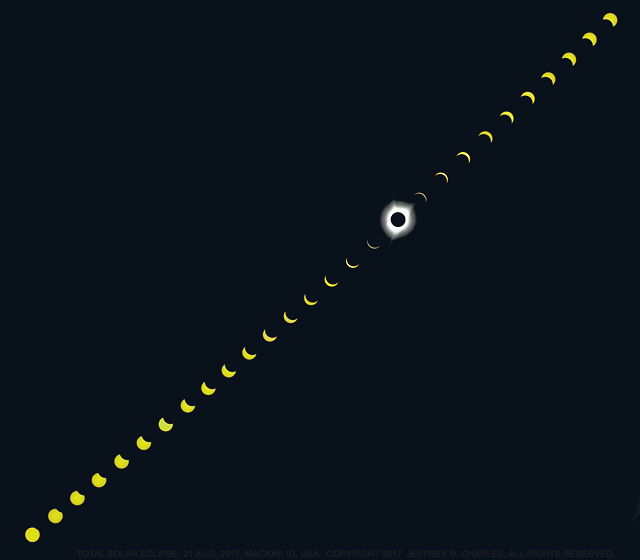 |
|
Total Solar Eclipse of 21 August 2017, from Mackay, ID (Multiple Exposure Sequence)
Sequence picture of partial and total phases of the Total Solar Eclipse of 21 Aug. 2017. Most partial eclipse images were taken with the Leica M9 and a 50mm f/1.4 Summilux-M ASPH lens, plus a Seymour Solar threaded glass solar filter stacked with a Hoya X1 dark green filter, to get a yellow (rather than orange) solar image. Exposures were 1/125 sec. at f/6.8, ISO 200. The whole eclipse is not imaged because, due to fatigue, I oriented the camera differently than planned. I also intended to take the totality image with the Leica, but was too fatigued to remove the solar filter before totality. The totality image is from my video. Details are in my 2017
Eclipse Web Page, at my www.eclipsechaser.com web site. Copyright 2017 Jeffrey R. Charles, All Rights Reserved.
|
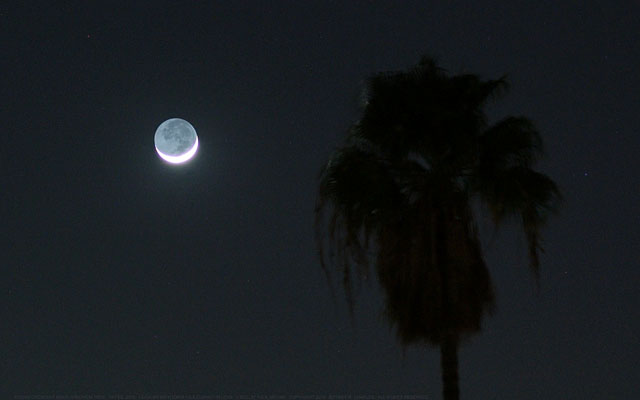 |
|
Crescent Moon and Palm Tree with 90mm Elmarit-M Lens (cropped)
This two second exposure of the moon behind a palm tree was taken with a 90mm f/2.8 Elmarit-M lens, working at f/3.4, ISO 500. White balance was manually set at 4000K to preserve the blue twilight sky. (Auto white balance made the sky more gray.) The lens infinity stop was adjusted to match the camera. This 33 percent crop shows slightly less than half the original image width.
|
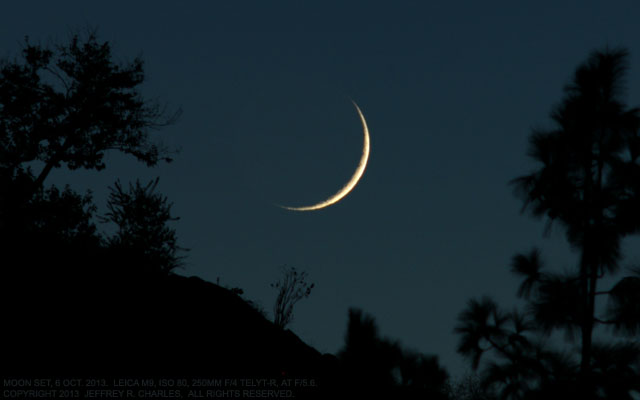 |
|
Crescent Moon Setting with 250mm f/4 Telyt-R Type 1 Lens (cropped)
This picture of the moon setting was taken with the Leica M9 and a Leica 250mm f/4 Telyt-R lens, set at f/5.6. The pull 80 ISO setting was used for low noise. This crop covers about a third of the original picture width and is 40 percent of the original image scale per pixel. (Thus, this is 2.5x a reduction in pixel scale, but the picture does hold up well at 100 percent.) Hardware used to take this picture with a Leica R lens is similar to the custom adapter for Nikon lenses that is shown in a later section. Focusing was not necessary since the adapter was adjusted so the infinity stop on the lens would agree with the Leica M9 focal plane. One of several red color "hot pixels" is just above the word "at " in the "at f/5.6" on lettering in the picture. Surprisingly, red colored hot pixels appear even at the lowest ISO setting.
|
 |
|
Moon Low in Western Sky with 135mm f/4.5 Hektor Lens (cropped)
This moonset was taken with the Leica M9 and a mere 135mm f/4.5 Hektor lens, set at f/6.8. Two exposures are combined. The sunlit part of the moon was exposed for 1/30 second, while the dimmer part illuminated only by "earthshine" is a 4 second exposure. The longer exposure had very little blooming, probably due in part to good lens quality, and also due to the lack of an anti alias filter in the camera. This made compositing the images easier than usual. While the Leica M9 is expensive, the 135mm f/4.5 Hektor lens is often available used for well under US $200. In this 100 percent composite crop of the moon, the Hektor lens does pretty well at f/6.8. Here, the Leica M39 thread to Leica M bayonet mount adapter is thinned enough that the lens focuses almost to infinity on the M9 prior to the camera being serviced. (Without the thinned adapter, the moon image was fuzzy, given the camera's apparent initial infinity focus issues.) The Leica M9 should routinely do this well with any decent 135mm lens at infinity after it is serviced.
|
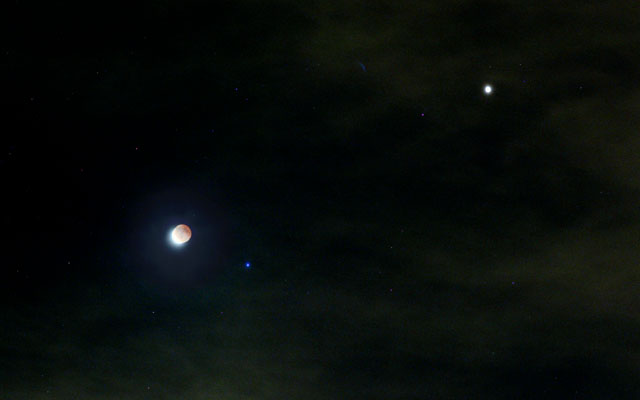 |
|
Total Lunar Eclipse of 15 April 2014 with 75mm f/2.5 Summarit-M Lens (cropped)
The end of the total phase of the lunar eclipse of 15 April, 2014 was imaged with the Leica M9 and a 75mm f/2.5 Summarit-M lens. The exposure was 4 seconds at f/2.5, ISO 160. Framing was done with the standard Leica rangefinder viewfinder, obliquely illuminated with a flashlight to keep the frame lines from washing out the subject matter while composing. Some stars are visible through the thin clouds.
|
 |
|
Full Moon Rising with 400mm ED Nikkor Lens on Leica M9 (cropped)
This moonrise is a composite of two images taken with the Leica M9 and a 400mm f/5.6 ED Nikkor lens, working at f/9.5. One image is exposed for 1/30 sec., and the other for 2 seconds, both at ISO 80. It has a slightly phony look, somewhat like an HDR processed image, but it was just a straight composite of two shots. This moonrise was only a few hours before the lunar eclipse pictured above. Framing was done using the rangefinder patch in the Leica viewfinder, which closely matches the field of view of a 400mm lens. Details for how this was done is in the section that covers adapters.
|
Astro Photos with the Leica M9 and a Telescope!
Astro Photos with a Leica M9, through a small telescope.
© Copyright 2013 Jeffrey R. Charles. All Rights Reserved.
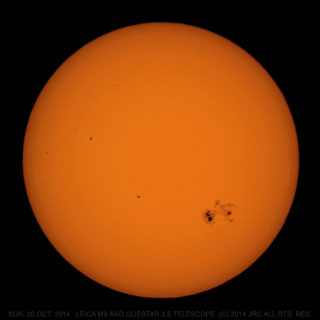 |
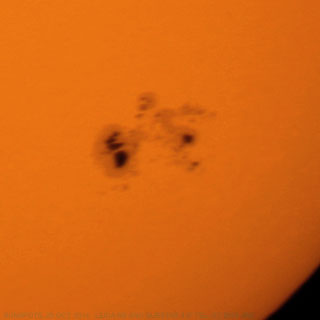 |
Sun Spots on 25 October 2014. Leica M9 and Questar 3.5" Telescope.
These solar images of 25 Oct. 2014 show a large sunspot group. The same group was visible during the partial solar eclipse two days earlier, but that was a work day so I could not image it with a telescope.
The LEFT image shows the entire sun, taken with the Leica M9 and a Questar 3.5 inch (89mm) aperture, f/16 Maksutov-Cassegrain telescope. An off-axis 40mm solar filter was used for this 1/360 sec. exposure at ISO 80. The slow f/ratio cast sharp shadows from dust on the sensor cover glass, which had to be retouched out. The remaining dark spots, including the small round ones, are actual sunspots.
The RIGHT picture is a 50 percent crop from the left image, with some sharpening added.
|
 |
|
Moon through Questar 3.5" Telescope with Leica M9.
This larger moon picture is taken through the same telescope with the Leica M9. An Olympus E-P2 Micro 4/3 camera with the VF-2 EVF and a Leica M adapter were used to center the moon and focus on it, then I just swapped the Olympus camera for the Leica M9 body to take the picture. The larger 36x24mm format of the Leica M9 sensor accommodates a longer focal length than does the 17x13mm Micro 4/3 format for lunar photos. An SLR camera such as a Nikon F film camera can also be used to frame and focus, then the M9 with a Nikon F to Leica M adapter can be swapped onto the telescope for the picture.
|
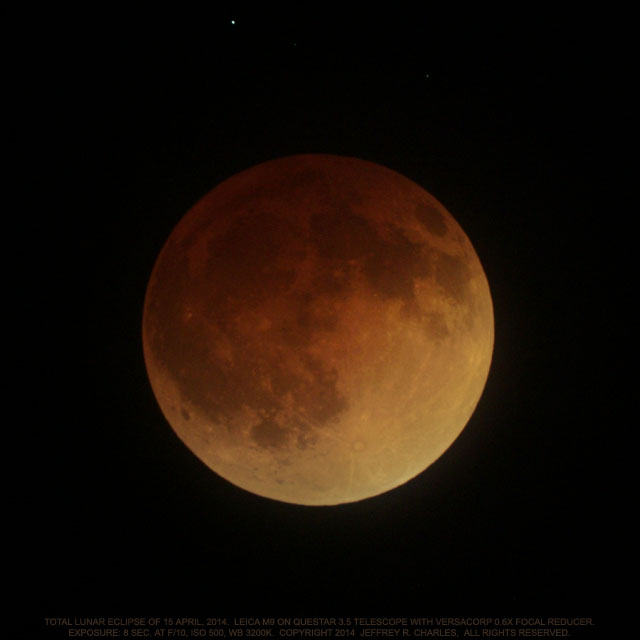 |
|
Total Lunar Eclipse of 15 April 2014. Leica M9 on Questar 3.5" Telescope.
The total lunar eclipse of 15 April, 2014 was imaged with the Leica M9 and the same telescope, but with a focal reducer to provide a 900mm effective focal length. This is roughly a 30 percent crop. Even with color saturation set relatively low in the Leica M9, the camera over saturated the red-orange color of the eclipse in the first picture, and the image had an artificial color gradient that followed the gradient in brightness on the moon. None of my film images of lunar eclipses ever had this color gradient, which is far redder in the dimmest areas. This may be unique to certain image sensors. (For example, my Olympus E-P2 images did not have as much color gradient.) To compensate, the white balance was set to about 3200k. This provided green and blue image information that could be used to even out the color gradient, which was red on the darkest part of the moon and slightly cyan on the brightest part. Being able to set the white balance color temperature directly saved the day for this application, though the screen on the camera displayed the image redder than it actually was, which caused me to set the color temperature a little low. A setting of about 4000k would have been better. The exposure was 8 seconds at f/10, ISO 500. Focusing was done with an Olympus E-P2 and a VF-2 electronic viewfinder. The magnified view was set slightly off center in order to focus on an area of the subject that was a good average for the slight field curvature of the telescope. The bright spots above the moon are stars.
|
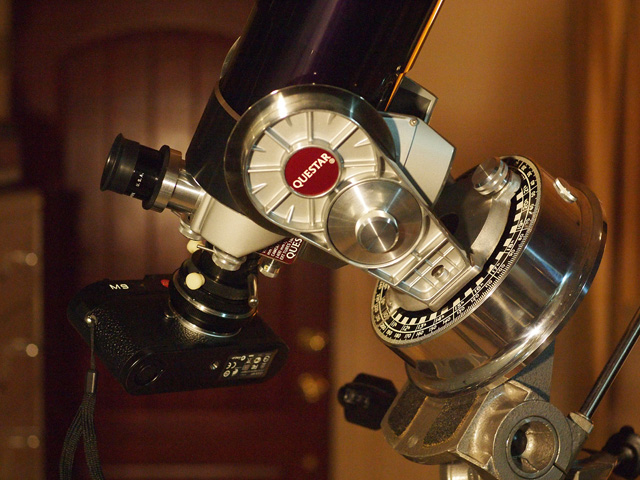 |
|
Leica M9 Mounted on Questar 3.5" Telescope.
Leica M9 camera on the Questar 89mm aperture telescope that was used to take the above moon picture. Unlike a full frame digital SLR, the tail isn't wagging the dog when the smaller Leica M9 camera is used on a small to moderate size telescope. (The tail may be wagging the dog financially though, since this is the first time the camera cost more than my telescope!) Since the telescope has no infinity stop, the initial infinity focus issue with the Leica M9 was not a problem when using the scope. It probably isn't too common to use a Leica M9 in this way, but the next model Leicas (the M 240, digital MP and others) have an EVF accessory, so pictures of the moon through a telescope may be more commonplace with them.
|
I used camera body swapping techniques similar to those above with a Leica M3 in the 1970's, since the M3 shutter shook a tele lens or telescope less than an SLR. I didn't have a telescope as good as the Questar back then though. A lower cost but larger Celestron 8 (203mm aperture) will potentially provide a better picture, because its heavier weight keeps the camera from shaking it as much.
The Leica M9 shutter shakes the camera considerably more than a Leica M3 shutter, possibly because the M9 shutter curtain has to move over 2.4 times faster in order to provide its faster X-synch shutter speed and a workable slit width at the fast 1/4000 second shutter speed. Also, a vertical direction of motion for the shutter more easily shakes most fork mounted Cassegrain telescopes.
The Accidental Leica M9 Comet Picture!
I took a comet picture without even knowing it while testing Leica M9 low light performance!
© Copyright 2013 Jeffrey R. Charles. All Rights Reserved.
 |
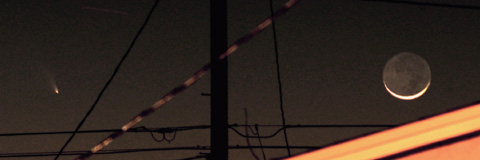 |
Accidentally Photographing a Comet with the Leica M9!
While using the Leica M9 for some low light comparisons in Appendix C, I took pictures of the crescent moon with a 135mm f/4.5 Hektor lens, at exposures ranging from 1 to 6 seconds. Later in the week, people at work were talking about a comet (comet Pan-STARRS) that had been within a few degrees of the moon on 12 March 2013. After learning of the comet, I went back and looked at the pictures I'd taken with the Leica M9 that night, and there it was!
The LEFT image is a stack of 3 exposures with the Leica M9, at the base ISO of 160. Two of the images are 6 second exposures at f/6.8 and the third is 3 seconds at f/4.5. A 150 percent crop is shown here. The nucleus of the comet is elongated a little because of its motion in the sky (from earth's rotation) over the longer 6 second exposures. A fast f/ratio would help for pictures like this because it permits a shorter exposure without the added noise of higher ISO settings. Stacking images suppresses some visible noise, partly because the comet's motion between pictures causes each image of it to utilize different pixels.
The RIGHT image shows the comet and moon together, with the comet being a small bright spot near the left side of the power pole and line. This is a 25 percent crop of a 6 second exposure at f/6.8. The M39 to M adapter for the Hektor lens was thinned to compensate for apparent infinity focus issues in my Leica M9, covered in Appendix A. Results after initial service (they didn't get it right and even fouled up the rangefinder on their first repair attempt) are in Appendix B and B1.
|
Hydrogen Alpha Nebula Photography
Prior to the Leica M9, the Leica M8 and M8.2 were introduced. The M8 series cameras have a weak internal infrared (IR) cut filter, requiring users to add an IR cut filter to the front of the camera lens for certain pictures. This may be inconvenient for day to day photos, but for some types of astrophotography, a weak IR cut filter (or even no IR cut filter) provides greater efficiency when imaging longer wavelengths such as H-Alpha, at 656 nm. Many dim nebulae can be imaged in H-Alpha through narrow band filters, even from a light polluted city.
Many people have paid good money to have the IR filter removed from their cameras for astrophotography, but the Leica M8 already comes standard with a weak IR cut filter. Initial tests of the Leica M9 show that its IR cut filter is enough weaker than my Olympus E-P2's filter that it can image H-Alpha more efficiently, as shown below. In spite of the decent H-Alpha efficiency, I haven't yet noticed any imaged purple cast on synthetic cloth items in my pictures.
Hydrogen-Alpha Performance Comparison: Olympus E-P2 Versus Leica M9
Performance of Olympus E-P2 Versus Leica M9 for H-Alpha Astrophotography.
© Copyright 2013 Jeffrey R. Charles. All Rights Reserved.
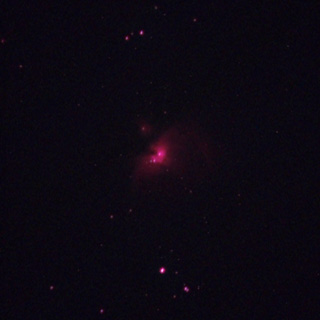 |
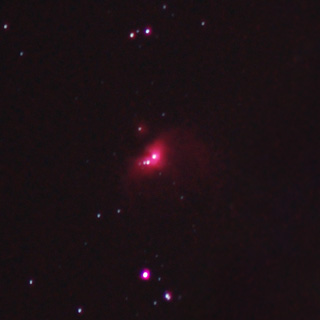 |
Testing H-Alpha Sensitivity of the Leica M9.
These pictures of the M42 Nebula in Orion compare Hydrogen-Alpha (656nm) performance for narrow band nebula astrophotography. Both of these composite images combine one or more white light (broad band) pictures with a Hydrogen-Alpha image to keep most stars from being imaged as a red color. The Hydrogen Alpha component in both was taken with a 180mm f/2.8 ED Nikkor lens working at f/2.8, using an Astronomik 12nm H-Alpha filter between the lens and focal plane. The Hydrogen Alpha component is emphasized more than usual to provide a better comparison.
The LEFT image is with an Olympus E-P2 camera. The H-Alpha component is a 60 second exposure at f/2.8, with the camera at ISO 400. This is the top layer in the composite. The only processing is reduce blue channel noise and increase brightness by 0.06. The blue cast shows that some chroma noise remains. The white light component consists of four 60 second exposures through a 500mm f/5 Reflex-Nikkor lens, with the camera at ISO 250. The long focal length provides smaller relative star image sizes (image scale is larger relative to blooming), and these star images dim when the image scale is reduced for this web page image.
The RIGHT picture is with the Leica M9. The H-Alpha component is a 32 second exposure at f/2.8 with the camera at ISO 800. This makes the combined exposure versus ISO equivalent to the longer E-P2 exposure at left. The only processing was to increase brightness by 0.06. Focus to compensate for the filter behind the lens was hit and miss, since the M9 isn't an SLR and it lacks live view. This is the best image I got before the nebula set behind some power lines. (Mottling at lower right is from a power line.) The red glow around the lower two stars is from moderate de-focus. The white light component is a single 8-second exposure at f/3.2 with the 180mm ED Nikkor lens, camera at ISO 160. The Leica M9 H-Alpha image is decidedly brighter than that of the E-P2. It requires about 1.6x to 2x more exposure vs ISO with the E-P2 to approach the H-Alpha image brightness of the M9. Even without the filter, the M9 images the red part of the nebula more brightly than the E-P2.
|
Simple Infrared Cut Filter Tests
Performance of Olympus E-P2 Versus Leica M9 IR Cut Filters on Synthetic Cloth.
© Copyright 2013 Jeffrey R. Charles. All Rights Reserved.
 |
 |
 |
 |
Photographing Synthetic Cloth as Part of Leica M9 IR Cut Filter Test.
These photos of black Polyester cloth compare IR cut filters in the Olympus E-P2 and the Leica M9. A dark gray non-synthetic object outside the cropped area was used as a color reference.
The UPPER LEFT picture shows that the Olympus E-P2 renders synthetic cloth in a fairly neutral color. Auto white balance was used. The original image includes tan carpet surrounding the cloth.
The UPPER RIGHT picture shows that the Leica M9 images the cloth with a slight brownish purple cast. This is not surprising, given the superior H-Alpha performance above. An IR cut filter can correct this. Illumination was daylight. Daylight white balance was used. The sharp image resolves a few thin cat hairs on the cloth.
The LOWER LEFT image shows that the Leica M9 image can be processed to render the cloth in a neutral color, but color balance on other subject matter becomes cooler (cyan) when this is done.
The LOWER RIGHT image shows that the Leica M9 will sometimes image synthetic cloth in a closer to neutral color. This image was taken with skylight coming in the window just after the sun set on a clear day. A "less warm" light color appears to neutralize some effects on synthetic cloth, but there is still a slight purple cast. Auto white balance was used.
|
Lens Coding. It Works Great!
Leica developed lens coding to compensate for vignetting (off-axis light falloff), blue shift toward the corners (from different ray angles at the IR cut filter), and other artifacts that would otherwise spoil a digital picture taken with short back focus lenses.
If a given lens lacks coding, the Leica M9 menu has a large array of Leica lenses that can be selected, though the menu in my M9 did not show every available lens. (For example, the 28mm Summilux is not in the menu of my Leica M9.) The code on the lens does not involve any type of on board electronics. Instead, it is a simple 6 bit bar code that is read by the camera.
Other than the expected degree of vignetting, the artifacts above do not occur when using film. This is partly because film doesn't care what angle the light from a lens hits it, but the angle does matter with electronic image sensors. For example, a typical infrared cut filter will cause an image to be increasingly bluer when light passes through it at greater angles from perpendicular to its surface.
Light from an ultra wide angle rangefinder lens may intercept the corner of the Leica M9 image sensor at close to a 45 degree angle from perpendicular to the sensor surface, which is about twice the angle that occurs with many digital SLR cameras and their lenses. Leica's solution was to develop a camera that works with their rangefinder lenses (including their older lenses), while other manufacturers tended to develop lenses that work with their cameras. For example, ever wonder why an early wide angle zoom for a Micro 4/3 camera telescopes out from its stowed position, even for the widest angle setting? It is because the manufacturer designed the lens in a way that minimizes the range of angles at which light from the lens arrives at the image sensor.
Wide angle rangefinder lenses do not telescope out like many digital zoom lenses do, so light from them arrives at the sensor from a relatively wide range of angles. In the case of my Micro 4/3 camera, this range of angles exceeds the roughly 20 degrees that the Micro 4/3 sensor's Anti Alias (AA) filter can handle. Enter the Leica M9. Its sensor has about twice the width of a Micro 4/3 sensor, yet Leica made it work with wide angle rangefinder lenses! Part of this success is due to offset micro-lenses, while other aspects are due to the 6-bit lens coding.
There are some purists who are not into lens coding, and to each their own. For my own use, lens coding is very useful, since it eliminates the risk of forgetting to set the menu or user profile for the proper lens. Lens coding is especially useful when a camera system has more than 4 lenses. A camera system exists to serve the photographer, not the other way around.
Results from Leica Lens Coding
Effectiveness of Leica Lens Coding with Wide Angle Lenses.
© Copyright 2013 Jeffrey R. Charles. All Rights Reserved.
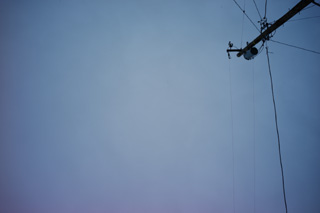 |
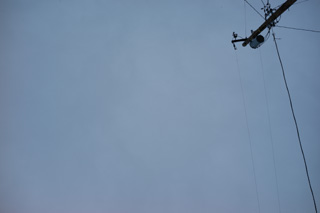 |
|
Leica Lens Coding Minimizes Effects of Vignetting with 21mm and Wider Lenses!
These sample images of an overcast sky with the Voigtlander VC 21mm f/4 lens show the effectiveness of Leica's lens coding. The LEFT picture is without any coding for a wide angle lens, using the menu setting for a 75mm lens to simulate a situation similar to no coding at all. The result is strong vignetting, blue shift toward edges and corners, and some red cast toward the lower left. The RIGHT picture is with the same 21mm lens, but with coding for a Leica 21mm f/2.8 non-asph. lens set in the Leica M9 menu. (A code of 000001 on the lens provides similar results.) Illumination of this second image appears much more uniform, and virtually no red cast is at the lower left.
|
It was possible to code to code most my lenses so the Leica M9 camera will automatically recognize them as the code that worked best in tests. The non-aspheric 21mm f/2.8 code (000001, where only the single most clockwise of the six coding slots is blackened) worked particularly well with the compact 21mm f/4 VC lens, which was selected purely because of its small physical size. The coding doesn't look like a factory job, but it's functional and permanent, consisting of milled slots with paint in them rather than something temporary like lines with a magic marker. The same coding also works well with the 12mm f/5.6 VC lens.
My particular Leica M9 seems to have less red cast at the left with wide angle lenses (when coded properly) than have most Leica M9 sample images I've seen on the web. The reduced red cast was a factor in my deciding to keep this particular M9 and get its apparent infinity focus issue addressed under warranty, rather than returning it and getting another M9. It seems odd that a red cast would favor one side of the image. This made me wonder if the offset micro-lens array might be slightly biased to one side, maybe from a difference in thermal expansion when it was applied to the CCD, perhaps if using a jig that registers the array to only one corner or side.
The codes are simply 6-bit binary numbering, not too unlike what people may have used decades ago when programming Altair (and similar) computers. In a reference at L-camera-forum.com, the codes are represented in a left to right (clockwise, as seen from the back of the lens) direction when the lens is viewed from the rear and rotated so the code dots are at the 12:00 position. However, the lens code binary must be counted up from right to left for numerical values in the references to fit. In most references I've seen, white areas correspond to 0, and black areas correspond to 1. This seems counter-intuitive, but the examples here will retain that convention. Most importantly, it works.
The 6 bit coding is limited to only 64 options, and many of these appear to be assigned to the characteristics of specific lenses, rather than assigning code values to degrees of general characteristics such as vignetting, lateral chromatic aberration (LCA), or distortion. Nonetheless, I was impressed by how well the codes seemed to work with various lenses.
Coding (Commercial and Home Brew) on Leica M Mount Lenses
Examples of Leica-Compatible Lens Coding on Various Lenses.
© Copyright 2013 Jeffrey R. Charles. All Rights Reserved.
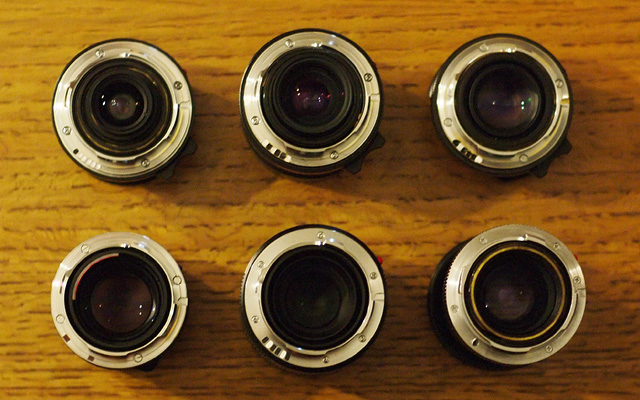 |
|
Leica 6-bit Lens Coding Requires No Electrical Connection!
Examples of Leica M9-compatible 6-bit coding on a few Leica M mount lenses. The bar codes are shown at the 7:30 position on the back of each lens. From left to right, starting with the top row: 21mm f/4 VC Color Skopar lens, coded as 1 (000001); 28mm f/2 VC Ultron lens, coded as 26 (011010); 40mm f/1.4 VC Nokton Classic lens, rotationally offset coded (see below for what this means) as 29 (011101); 50mm f/2 Zeiss Planar ZM Lens, Magic Marker Coded as 33 (100001); 75mm f/2.5 Leica Summarit-M, factory coded as 45 (101101); and 90mm f/2.8 Tele-Elmarit-M, coded (very easily, by just painting part of a screw head) as 4 (000100). Basic interpretation of the binary code is below.
|
A few lens coding examples are below, along with their interpretation. Focal length and f/ratio in the strawman examples are what the Leica M9 camera Info screen shows when the codes are used. The lens model and product number is either from a reference [14] or is just an educated guess.
Lens Code Interpretation:
Bar Position:  [1] [2] [3] [4] [5] [6] Total
Position Value: 32  16  08  04  02  01      STRAWMAN LENS EXAMPLE:
Example for 01:                     01  =01 Elmarit-M 21mm f/2.8 11134
Example for 04:             04          =04 Tele-Elmarit-M 90mm f/2.8 11800
Example for 09:         08          01  =09 Elmarit-M 135mm* f/2.8 11829
Example for 26:     16  08      02      =26 Summicron-M 28mm f/2 ASPH 11604
Example for 29:     16  08  04      01  =29 Summilux-M 35mm f/1.4 ASPH 11874
Example for 33: 32                  01  =33 Summicron-M 50 f/2 IV Non-ASPH
Example for 34: 32              02      =34 Elmar-M 50mm f/2.8 11831
Example for 38: 32          04  02      =38 Elmarit-M 90mm f/2.8 11807
Example for 45: 32      08  04      01  =45 Summarit-M 75mm f/2.5 11645
Example for 51: 32  16          02  01  =51
Example for 53: 32  16      04      01  =53 Apo-Telyt-M 135mm f/3.4
Notes:
Code value of 01 (000001) used for VC 12mm f/5.6 and 21mm f/4.0 lenses.
Code value of 04 (000100) used for 90mm f/2.8 Tele-Elmarit-M, Type II.
Code value of 26 (011010) used for VC 28mm f/2.0 lens.
Code value of 29 (011101) used for VC 40mm f/1.4 lens.
Code value of 33 (100001) used for Zeiss 50mm f/2 Planar ZM lens.
Code value of 34 (100010) used for Industar 50mm f/3.5 lens.
Code value of 38 (100110) used for Leica 90mm f/2.8 Elmarit lens.
Code value of 45 (101101) used for VC 75mm f/2.5 lens.
Code value of 53 (110101) used for 135mm f/4 Elmar lens.
* Leica M9 info screen displayed "uncoded" when 135mm f/2.8 lens code of 001001
was used with a 135mm f/4 Elmar (maybe because the Elmar did not bring up 90mm
frame lines), so 135mm strawman example is from reference at l-camera-forum.com.
The 90mm f/2.8 Tele-Elmarit-M proved to be very easy to code, in spite of its lens mount having a screw head in the coding area. The code of 4 requires only one black mark, and the mark just happened to fall on the half of the screw head that was toward the counter-clockwise direction, as seen from the rear. Just to see if it would work, I painted the CCW half of the screw head black, and the other half white, and it worked! No other marks were needed, and no coding slots were required.
I had been concerned about how to code the VC 40mm f/1.4 Nokton, and whether or not to shorten the lens bayonet claw on the viewfinder side to bring up the 35mm frame lines rather than the 50mm frame lines. The lens bayonet claw modification can't be reversed, so I ultimately decided to get a second 40mm Nokton that was in good shape optically, but not so good mechanically (so it would be cheap), since I can eventually correct many mechanical problems, then could modify the cheap one. However, the seller of the second 40mm lens very stupidly sent the lens in an unpadded envelope with no protection of any kind, and the lens got trashed to an extent that it could not be fully restored. (Photo in Appendix M.) This again left me with only my original near-mint Voigtlander 40mm f/1.4 Nokton, which I wasn't anxious to modify.
However, I arrived at a good compromise for the good 40mm Nokton. Instead of shortening the lens bayonet claw to bring up the M9's 35mm frame lines, I realized I could simply widen the U-shaped cutout that is engaged by the lens release button, then shift (rotationally offset) the coding stripes slightly. The result was that if I put the lens on in the usual way, it would bring up the 50mm frame lines as usual, and show uncoded. Then, if I simply rotated the lens counter-clockwise (as if removing it, but without pushing the lens release button) the wider U-shaped cutout in the lens will stop against the lens lock plunger after only about 0.7mm of rotation. This brings up the 35mm frame lines, and the offset coding stripes then show the lens as a 35mm f/1.4, making this a more versatile solution for the 40mm. I later acquired a 35mm f/2 Summicron-M ASPH. The Nokton is fairly good, but not as good as a Summicron ASPH, particularly in regard to veiling flare. I still use a 40mm Nokton on Micro 4/3 and Fujifilm X cameras though.
Using Various Accessories with the Leica M9
This section briefly covers use of various accessories with the Leica M9. It touches on using standard Leica brand accessories, plus standard and modified versions of other brand accessories. Some accessories will be covered by category.
Electrical Accessories (Battery, Charger):
The Leica M9 is a significant investment, and batteries or chargers are not where to cheap out. Leica batteries and chargers are designed for the camera, and their cost is a small fraction of the camera's cost. Since the Leica M9 is a digital camera, it obviously has electronics with specific power requirements.
Power supplies that are not in spec can cause damage. For this reason, I personally would not even think about using any battery or battery charger other than the Leica brand and model that is made for the Leica M9. A charger of inadequate design or implementation can destabilize a battery, which can in turn cause problems with the camera. A battery that does not truly meet Leica specifications could be even worse.
On the subject of Leica battery specifications, Leica cleared up a few apparent discrepancies between the Instruction Manual and some of the battery and charger hardware, providing a general range of valid values for their brand of batteries and chargers, when used on the M9. Values in my Leica M9 Instruction manual are shown in the center column, and values from valid Leica brand hardware are in the right column. This is only applicable to Leica brand hardware, since other brands may not necessarily provide power to the specifications shown on their labels.
Leica Product:            Information in M9 Manual:    Other Valid Hardware Values:

M9 14470 Charger, Inputs  100-240VAC 50/60Hz 12/24VDC  Same
M9 14470 Charger, Output  4.2 V DC, 800 mA             3.7V DC, 800 mA (0.5V less)
M9 14470 Charger, LEDs    Rectangular                  Round
M9 14470 Charger, Label   May not be mentioned         Vinca logo
M9 14464 Battery, Model.  14464                        14464 / BP-SCL1
M9 14464 Battery, Capac.  3.7 V, 1900 mAh              3.7V, 1860 mAh, 6.9 Wh
My 14464 Battery, Box     Not mentioned.   Silver/Blk; M8 box OK if bat. 1860 mAh
Basically, the Leica brand charger label shows an output that is 0.5 Volts lower than what the Leica M9 manual specifies for the compact charger, but this is OK per Leica. Lower values than in the right column could indicate a Leica M8 charger or battery, or even a third party item. For example, the following battery capacity may be questionable on a Leica M9: 3.7V, 1800 mAh, 6.7 Wh.
For Leica brand batteries, those that should NOT be used with the Leica M9 are the type with the same 14464 part number embossed in the plastic (rather than printed on the battery or a label). These are older Leica M8 batteries that should NOT be used with the Leica M9. According to Leica, this is partly due to their age.
Electrical Accessories (Flash):
Flash units other than Leica brand units that Leica specifies for the M9 are another area where caution is in order. It is unknown to me if the Leica M9 uses a mechanical X-synch contact or a solid state one, but either way, it is a bad idea to use older flash units.
For example, Leica flashes may have only about 5 Volts across the flash contacts, but I have measured other flash units (these are obviously never used on the camera) that had more than 200 Volts potential between the flash contacts. This testing was done prior to getting a Leica M9, to see if any flashes could be used directly with the Imacon V96C digital back, which is extremely sensitive to voltage across the flash contacts.
Even if a flash has low voltage between its main contacts, many flash units (and the Leica M9) have additional contacts. These proprietary contacts are used for different functions by different companies, and may have different voltages, so it is not a good idea to use a flash of another brand that has such additional pins.
When I decided to temporarily use an Olympus FL-14 flash with the Leica M9, I measured the voltage across its flash contacts (it is only 3 Volts) and removed the proprietary contact pins from the unit first. I later got a Leica SF 24D flash, after finding out that the "pre-flash" can be turned off on the unit. It is important to be able to turn off such a feature.
Camera and System Cases:
Vintage Leica System Cases: With a little modification, many of the older rigid Leica M system cases will work with the Leica M9. In these, the most important modification is to remove and relocate the glued-in partial divider that restrains the camera body, so it will accommodate the deeper (a good 3mm deeper, not counting the rear buttons) Leica M9 body.
Most of the larger padded black system cases will work if so modified. However, since the Leica M9 viewfinder and rangefinder windows are not recessed at all, the divider also requires modification to prevent any contact with these vulnerable optical surfaces. Once appropriately modified, a compact system case such as this provides quick access to the camera and keeps the system together.
The slimmer but unpadded thick leather system case for Leica M3 does not work with the Leica M9 and a typical lens because the inside of this type of case is too narrow. Even if the partial height camera stabilizer is removed and rotated 90 degrees, the height of the Leica M9 is excessive for the width of the case, unless something is added to keep the camera from going down into the bottom inch of the slight taper in the case. Even then, there is no padding or wiggle room.
Some soft system cases are available from high end manufacturers, but soft system cases that lack rigid but padded dividers don't do much for me.
The Leica M9 Ever-Ready Case, part 14872, has good provision for seeing the camera LCD screen, and part of the bottom bends down to access the latch for the camera base plate without removing the camera from the case. However, the top of the case, and the point where the case needs to bend the most when uncovering the camera, are both relatively stiff. This makes it hard to pull the top of the case forward and downward far enough to uncover the lens. If the top of the case is not pulled down far enough, it can then easily be imaged in the lower part of a picture, and one may not know this until afterward, given that the Leica M9 is not an SLR. If the top part of the case was detachable from the bottom (as on many older film SLR cases), it would be a far more serviceable case.
One other area of concern about this case is that the threaded fitting that screws into the tripod threads on the bottom of the camera is only long enough to engage about 1.5 turns of thread, which is marginal. The threaded fitting in the case also lacks its own tripod thread on the bottom side, meaning that the entire case must be removed before the camera can be used on a tripod. It also takes some time to get the camera situated in this case, partly due to a rigid fitting in the top that fits around part of the shutter speed dial. This case does not work with the Leica grip, but the grip is less important when the case effectively adds grip area to the camera.
The Leica large front Neoprene case M, part 14868, is flexible enough to accommodate the Leica M9 with the Leica grip. However, it is a stretch to actually get the camera into the case with an 80mm long lens (such as the 90mm f/2.8 Tele-Elmarit-M with its collapsible lens shade) into the case. Once in the case, the lens is clearly stretching out the front of the case, reducing any protection offered by the case. I bought the case brand new in the box, and the dealer even kindly sent pictures of the 14867 ands 14868 cases side by side, and my case is like their picture of the 14868 case. The case seems to fit the 35mm Summicron with its hood just fine, but is a stretch for longer lenses. The illustration of the 14868 case in a B&H photo web page looks longer than a normal 14868 case.
Regardless of the length of the lens, it takes some time to get the Leica M9 in and out of the Neoprene case. This is mainly because the slots for the neck strap lugs don't extend enough far enough forward of the lugs to make it easy to slip the camera into the back end. To use the camera, this case must be removed entirely. The case includes a loop on one side to run the neck strap through, so it won't fall when removed. It takes long enough to access the camera that the old term "never-ready" case comes to mind. I may use this case on the rare occasions when I know I'll only need the camera and one lens, but for now, it is sitting comfortably in its silver and black box, while the camera is either used with no case or kept in the above system case.
Ever-Ready Cases for the Leica M9.
Ever-ready cases that fit the Leica M9, two made by Leica, one by Sigma.
© Copyright 2013 Jeffrey R. Charles. All Rights Reserved.
 |
 |
| Ever-ready cases that fit the Leica M9 include those made by Leica, plus certain vintage cases. These three cases, from left to right are the Leica Long Front Neoprene case (14868), the leather Leica Ever-Ready case (14872), and a vintage Sigma MC-2 soft ever-ready case that also fits a Nikon FM SLR camera. The Leica ever-ready case is well built, but I found the Sigma case more practical to actually use on a regular basis.
| The Sigma MC-2 case comfortably holds the Leica M9 with the grip and a lens of up to slightly over 80mm physical length, and provides easy access to the camera. Here, the Leica M9 with a Leica grip and 90mm f/2.8 Tele-Elmarit M lens with hood are shown in the bottom part of the case. A Leica case similar to the Sigma MC-2, but with softer plastic zipper pulls, more padding, and pockets for memory cards and a spare battery would be useful.
|
A nearly perfect ever-ready case for some applications with the Leica M9! After trying the above Leica cases, I started trying out some ever-ready cases I had on hand, and made a surprising discovery. A vintage Sigma MC-2 soft ever-ready case that had come with my Nikon FM2 a long time ago turned out to be a perfect fit for the Leica M9! It even fits the M9 with the Leica grip and a medium length lens. The Sigma MC-2 case has a loop to tether it from the camera strap, similar to the loop on the Leica Neoprene case.
The MC-2 case by Sigma is a soft case that looks like it is made of lined black leather. It has zippers on each side of the front, and a velcro closure on the back. The zippers let the case open up all the way, so the Leica M9 can just be set into the bottom half, then the top half can be pulled over the top of the camera and lens, after which the two side zippers are closed. In my own tests, getting the camera in and out of this case is at least four times faster than with either of the above Leica cases. The only flaw is that the front part of the case is offset toward the viewfinder side a little more than the Leica M9 lens mount.
The Sigma MC-2 case does not provide as much protection as either of the Leica cases, but it is notably better than no case at all. When not in use, the case can be folded up into a space smaller than a mid sized Leica lens, making it possible to carry it in a gadget bag, then switch between using the case on the camera or storing it in the bag. I'm not sure if the Sigma MC-2 case is still available new, but would assume that it is not. There were several models of this style of Sigma case that look similar, but models I've seen other than the MC-2 are too small for the Leica M9.
Camera Grip:
The Leica 14486 hand grip is based on the M9 camera base plate, but has an extension toward the front of one side that supports a 2 cm diameter grip cylinder. The grip is thus a relatively low cost way to get some redundancy for the normal M9 base plate with its flimsy rectangular slot where it mates to the camera.
The Leica hand grip is not very comfortable due to the excessive depth of the grip cylinder, and its lack of contouring. Slight flexure of the thin base plate extension also does not make the grip feel completely solid. The grip cylinder also does not provide as natural a place for one's fingers as would a simple raised grip such as the one on the front of the Olympus E-P series Micro 4/3 cameras. Often, most of the camera weight is supported by the grip, yet the grip offers little weight bearing contact area with one's fingers. This grip is better than no grip at all, but that's about it. I use one just for safety, but would rather have a simple raised area on the front of the camera that is about half as deep as the grip cylinder.
GOGGLE ALERT! The Leica M9 grip interferes with attaching some lenses with goggles. In particular, there is a 3mm mechanical interference with the 1.5x goggles on the 135mm f/2.8 Elmarit lens. To attach or remove the 135mm f/2.8 lens, the camera power must be turned off and the grip must be removed before the lens with its goggles can be attached or detached, then the grip must be re-attached. The 135mm f/2.8 Elmarit is a lens worth using even today for some applications, so this design incompatibility on the grip was surprising.
Mechanical Interference Between Leica M9 Grip and 135mm f/2.8 Elmarit Goggles, also Showing Modification to Grip that Prevents Interference.
Mechanical Interference Between Leica M9 Grip and 135mm f/2.8 Elmarit Goggles, also Showing Grip Modification to Prevent Interference.
© Copyright 2015 Jeffrey R. Charles. All Rights Reserved.
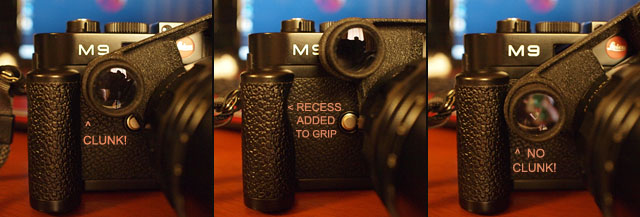 |
|
Incompatibility of Unmodified Leica Grip with 135mm f/2.8 Elmarit Lens.
LEFT: The standard Leica M9 grip prevents the lens from rotating far enough in the counter-clockwise direction to be removed from, or attached to, the camera. CENTER: The solution was to add a recess to the inner side of the grip. RIGHT: The recess allows the lens goggles to clear the grip when the lens is used. The recess is also useful in providing a more secure grip on the camera.
|
The M9 camera did not seem to like having the power turned off and on so that the grip could be removed and put back on every time I used the 135mm f/2.8 lens, because the camera soon became sluggish, locked up, and then stopped taking any pictures at all, as noted in Appendix B2. A long process (including re-installing the firmware) was required to get the camera going again, but at least it did not have to be sent in for repair.
Just in case the camera's antics were related to the additional power cycles needed to use the 135mm lens, I decided to modify the grip so that it would no longer have to be removed from the camera when attaching or removing the 135mm lens. The modification was to add a recess to the grip in the area where the goggles needed to be when the lens is attached or detached. This is easier said than done. So, I was soon off on another adventure to diminish the resale value of one of my Leica accessories (in this case, the grip) in order to make it more useful!
Some third party grips are available, including some that by Luigi (leicatime.com) that provide openings in the base to change the battery and memory card, but I have not tried any of these.
While not a grip, a wrist strap can be useful, even if a neck strap is attached at the same time. My favorite wrist strap is the gray one that used to be made for the old Contax T compact film camera. The loop that attaches the Contax wrist strap to the camera is far more substantial than the equivalent part of most contemporary wrist straps.
Lenses and Lens Adapters:
When financially practical, it makes sense to use Leica brand lenses on the M9. The vast majority of Leica lenses have always been excellent, as is demonstrated by the numerous Leica lenses, some over 60 year old, that are still in service.
Many modern lenses of major brands from Europe and Japan that are specifically made for Leica M (Zeiss ZM and Voigtlander, for example) are probably safe to use with the Leica M9, but some may not perform as well as Leica lenses, particularly in regard to color fringing and focus shift, not to mention build and focus damping.
When delving into other lenses that are not made by Leica, some care is in order. If adapters are used to mount various brands of camera lenses on the Leica M9, extreme care must be exercised regarding the adapters. The main concern here is not merely that the adapter may not work well, but instead is that the adapter can potentially damage the camera.
For example, in my 2009 review of the Samyang 8mm Fisheye lens, in the section on using the lens with 4/3 format cameras, I noted that the first Chinese adapter I acquired to use a Nikon mount version of the lens on a 4/3 digital camera actually gouged the inside of my Olympus E-500 camera.
Olympus camera gouging occurred because the top of the 4/3 adapter's AF confirm chip protruded back farther than what is safe to mount on the camera. It was just enough farther back that it didn't require noticeably more force to mount the lens, but it was also enough out of spec to gouge the area around the mirror box. Measuring the clearance inside a 4/3 camera seemed to be lost on the adapter's manufacturer.
The second Chinese 4/3 adapter wasn't much better, because its AF confirm electrical contacts were mounted at the wrong clock angle, plus the interval between connector pads was not the same as that of connector pins in the camera. Using the second adapter locked up the camera whenever it was attached. As a result, I could not use the AF confirm functions, which in turn led to my abandoning use of a 4/3 camera on telescopes and long tele lenses.
Getting away from DSLRs that lacked focus confirmation for MF lenses was necessary because I was losing the ability to focus an SLR with a narrow angle focusing screen unless it had an AF confirm light, and efforts to get a reliable AF confirm adapter had not turned out so well. (I then switched to a Micro 4/3 camera having an EVF attachment. It worked well with SLR lenses, but its anti alias filter was a problem when shorter focal length rangefinder lenses were used.)
Back to 4/3, I had seen material for other adapters with front mounted AF confirm chips that would cause problems on the Nikon mount side, since it was obvious the chip would mechanically interfere with protrusions on the back of the lens. Manufacturers of adapters that looked like they would work if accurately implemented would not respond to questions about if the item was as pictured, nor would they provide clearance dimensions, so the delivered product could be yet another bad adapter.
In the case of the Leica M9, potentially dangerous third party adapters abound. After the previous experience with adapters on my E-500, I inspect every adapter prior to use, and modify it if necessary before even trying to put it on the camera. Every Chinese adapter I have acquired to date for the Leica M9 (6 adapters and counting) has required de-burring and buffing before it appeared it would even mount in a way that was not bound to create additional resistance, and that could potentially generate metal particulates. Such particulates are not something you want inside a digital camera.
Example of a Hazardous Metal Chip on a Brand New Chinese M39-M Lens Adapter.
Metal chip on a new Chinese adapter, with photo taken after deburring to remove chip.
© Copyright 2016 Jeffrey R. Charles. All Rights Reserved.
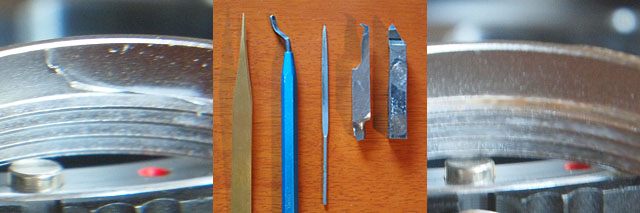 |
Hazards of Some Third Party Lens Adapters (and how some adapters can be fixed).
LEFT: The 8mm long metal chip on this Kipon M39 to M adapter could cause major damage if it got inside a digital camera. Imagine a focal plane shutter pushing such a large metal chip over your image sensor! This is why all adapters should be checked before use. The chip was straight and in line with the threads until an M39 tube was screwed in to test the adapter. Note that the chip is plated, so it slipped past quality control both before and after plating. Other metal debris is just above the chip. The flange on this adapter was also 0.03mm too thick, and the start position of the M39 threads was incorrect, resulting in the wrong clock angle for any M39 lens mounted on it.
CENTER: Tools including a deburring tool, small file, and a lathe threading tool are helpful in removing metal chips. An adapter should be thoroughly cleaned after deburring.
RIGHT: Photo of same M39 to M adapter after deburring and cleaning. The large chip came off easily, meaning that it could have come off while the $40 adapter was mounted on a camera if the adapter had not been inspected and corrected first. I do not inform vendors which adapters I will test, in order to improve the chances of testing truly random samples. The adapter with the red dot in the foreground is not part of the deburred adapter. It is just another adapter that was used to prop up one side of the deburred adapter.
|
Another area third party Leica adapters (and even some lenses) can be a problem is the cutout for the Leica rangefinder coupling wheel mechanism. Some manufacturers fail to realize is that if an item that is lacking a rangefinder coupling cam is mounted on the camera, the cutout has to be properly shaped or it will apply backward pressure to some parts of the rangefinder mechanism at a location relatively close to the pivots, which may not be good! Some adapters having burs could even potentially catch on the rangefinder mechanism. I've even seen some high end (but not Leica brand) lenses that didn't have the same size the cutout that Leica lenses have.
Other areas where some adapters fall short is thickness, since most need to be either lapped down or shimmed for the infinity stop on the lens to match infinity focus in the camera. (See last part of Appendix L.) Other adapters do not have the lens coding slots in the right positions, while others are missing metal for the full radius of each coding slot.
Many M39 to M adapters have the M39 thread start in the wrong position, so the focus index on the lens is way off from the 12:00 position. Other M39 to M adapters place the infinity position for the focusing arm of a lens like the 50mm f/3.5 Elmar right over the lens release button, or so close to it that it interferes. Some third party Leica R to Leica M lens adapters got the lens clock angle wrong by as much as 5 degrees. This is a real pain when using a larger lens on a tripod.
Up through 2015, the higher priced Kipon M39 to M adapter had been the only Chinese adapter that came close to getting the rotational angle of an M39 lens correct. It required some de-burring, but not as much as the others. However, in 2016, the Kipon adapter I ordered had just as much thickness error, clock angle error, and metal chip issues as other brands. Thus far, I've tried only one Voigtlander adapter. Its thickness was only a little off, and it had fewer chips than other adapters. I have not tried a Novoflex adapter, but would think that these may generally be good.
The bottom line is that you don't want to use third party adapters (particularly low cost ones) unless you first have them checked by a qualified technician, and modified if necessary, before even attempting to mount them on a Leica digital camera for the first time.
It is also a good idea to have a lower cost Leica M mount camera or accessory to use for testing the fit of adapters even after they are modified. I use my Leitz-Minolta CL for this purpose, as well as other M-mount items including a Visoflex. Unfortunately, I am not able to check or modify adapters for anyone else, since I'm getting to where I can hardly work on my own adapters, even in installments. Now that the major precautions are out of the way, we can briefly cover some adapter modifications.
Modifying Lens Adapters for Special Purposes
The text and pictures below summarize modifying a lens adapter to permit use of long focal length lenses at long subject distances, without necessarily using a Visoflex. Shown below is an improvement of what I used with a Leica M3 in the 1970's to take pictures with long tele lenses. My old version used a bracket (or at times even two tripods) to register the front of the Leica M3 to the lens it was to be used with.
In my 1970's arrangement, the lens didn't actually attach to the camera's lens mount, but was held (manually or with a bracket, etc.) tight against the front of the camera. This was necessary because commercial M-mount adapters were not easy to come by back then. I didn't continue using a Leica M3 after the 1970's because it was my dad's camera, and I eventually acquired a Nikon F system.
My preferred method for using a long tele lens on a Leica rangefinder includes adding a carefully calibrated part to a lens adapter that functions to set the rangefinder (and thus the parallax correction) to infinity. This is done so the central rangefinder patch can be used as a reference for the center of the field of view with lenses longer than 135mm, with the rangefinder patch itself being relatively close to the coverage of a 400mm lens.
When implementing the following custom assembly that attaches to an adapter and sets the Leica rangefinder to infinity, I used a "Thou shalt not exceed the rangefinder coupling envelope of any Leica brand lens" approach. This ensured proper clearance for the rangefinder levers above the rangefinder coupling wheel, and it also ensured that the adapter would not apply any force that would try to push the Leica M9 rangefinder "past" infinity, even slightly.
This and any other adapter modifications should only be attempted by a qualified technician. Improper design or implementation could potentially harm the camera. I used to repair cameras and lenses for a living, so I knew what to look out for during design and implementation of the adapter modifications. I won't be reverse engineering and publishing specifications for much if anything that interfaces to the Leica rangefinder, partly because there is too much variation between adapters to be able to use a given aspect of an adapter as a reference.
Lens Adapter Modifications to Use a 400mm Lens on a Leica M9 - Without a Visoflex!
Modifying an Adapter to Set the Leica Rangefinder to Infinity, for Use as a Framing Reference for Long Focal Length Lenses.
© Copyright 2013 Jeffrey R. Charles. All Rights Reserved.
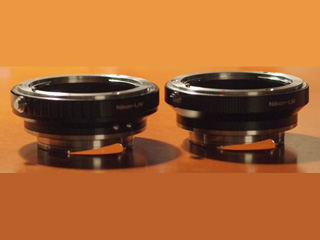 |
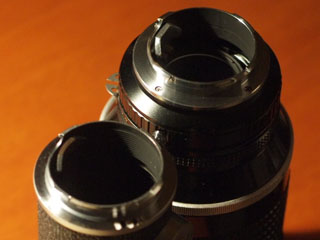 |
Modifying Lens Adapters to Safely Hold Leica Rangefinder at Infinity Position.
The LEFT picture shows two Nikon to Leica M adapters. The stock one on the left could potentially interfere with the Leica M9 rangefinder coupling lever in a way that Leica products do not, if it was to be attached to the Leica M9 as it is. It is unknown if this would damage the M9, but I didn't want to find out. The adapter on the right is modified so that it appears to have the same (or even less) interference with the rangefinder coupling lever than would a Leica brand accessory (such as the Visoflex III) that lacks a focusing cam that would push the rangefinder coupling wheel (and thus the coupling lever) rearward. One difference is that the taper of the cutout extends part way onto the back surface of the viewfinder side bayonet claw. Another is that the cutout is slightly deeper.
The RIGHT picture shows the back end of a Leica 135mm f/4 Elmar lens (lower left), next to the back end of a modified Nikon to Leica adapter (upper right) that is mounted on a 180mm f/2.8 ED Nikkor lens. The part that sets the rangefinder distance is at the 10:00 position on the back of both lenses. The brass that Leica uses is better for the application than the aluminum I used on the first adapter. Even though a lens used on the modified adapter is not rangefinder coupled, it can be used for infinity focus applications, provided its infinity stop and the length of the adapter are properly calibrated. (Almost all of the low cost adapters need shimming, etc.) The modification sets the Leica rangefinder (along with its parallax correction) to infinity, so the rangefinder patch can be used as a framing reference for longer lenses.
|
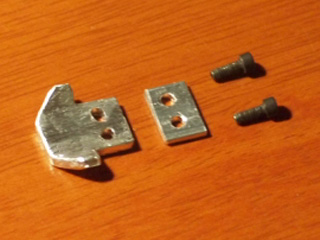 |
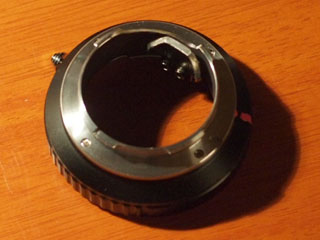 |
Detail of Adapter Modification that Safely Positions Leica M Rangefinder at Infinity.
The LEFT picture shows the custom parts used to modify the lens adapter. The only change to the adapter itself is two tapped No. 2-56 holes that permit the parts to be attached. The left side of the left part is what contacts the rangefinder coupling wheel. This surface is what must be calibrated. In this case, I iteratively filed it down to length, thoroughly cleaning it before checking it on the camera. When the right length is achieved, this surface can be polished. Other calibration methods include simple elongated attach holes, but these will lose calibration if disassembled. Baffle ridges on the large surface of the part (such as those on rangefinder transfer fittings of older Leica long lenses) will help reduce low angle reflections.
The RIGHT picture shows the completed adapter modification, with the exception of polishing key surfaces. I used brass parts for similar modifications to my Leica R to Leica M lens adapters (not shown). The surface that touches the rangefinder coupling wheel should not be painted. None of the parts were machined in the usual way, since my condition does not permit me to machine these days. Instead, the parts were made with hand tools by working a few minutes at a time, then resting. The need to rest often between installments on stuff like this makes a project take a while, even though the time actually working on it may only total an hour or two. At least it gets done eventually.
|
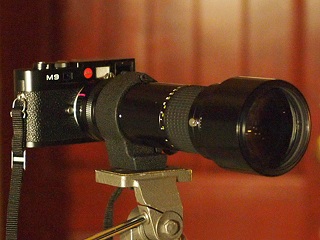 |
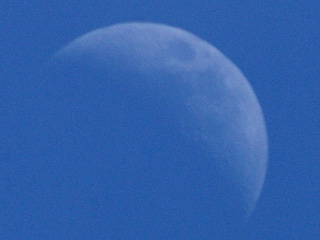 |
Modified Adapter Shown Adapting 400mm f/5.6 ED Nikkor Lens to Leica M9.
The LEFT picture shows a Nikon 400mm f/5.6 ED Nikkor adapted to the Leica M9. Since the adapter modification sets the Leica rangefinder and parallax correction to infinity, the rangefinder patch can be used as a reference to approximate framing, or at least to centering on the subject.
The RIGHT image is a picture of the moon, taken with the 400mm f/5/6 ED Nikkor lens, stopped down to f/9.5, and using B+W circular polarizing filter. The image was framed using nothing except the rangefinder patch, and focus was by the lens infinity stop. This is a 50 percent crop from the center of the image. I forgot to use the Pull 80 ISO, so color saturation for this and the next few photos was enhanced in post. Scale focusing can be used at close distances, but this is not very reliable with tele lenses until one gets to know a given lens. For nearby subjects, a Leica Visoflex can be adapted to many long focal length lenses.
|
 |
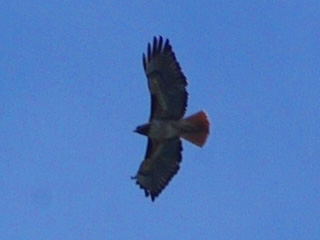 |
Birds, Photographed with Leica M9 and 400mm f/5.6 ED Nikkor Lens.
The LEFT picture captures three raptors (red tail hawks) relatively close together. This was also taken with the 400mm Nikkor lens, working at f/9.5, ISO at 160. This crop shows about the center third of the picture. As above, only the rangefinder patch was used for framing, and the focus distance was estimated. Using the rangefinder patch in this way actually made capturing multiple birds at once easier than using an SLR, since a wide area outside the lens coverage was visible in the Leica M9 viewfinder. This wider view around the framing reference made it possible to anticipate when the birds would converge in a small area. A similar viewfinder could be made for an SLR shoe, but the Leica rangefinder already has it built in. Only a custom adapter is needed to utilize it. Referencing to the rangefinder patch will also work with lenses longer than 400mm, but the view though the rangefinder patch area can become obscured by some physically longer or larger diameter lenses.
The RIGHT picture is a 100 percent crop of one hawk. The small slightly dimmer round area toward lower left is the shadow of a dust particle on the Leica M9 sensor cover glass. The M9 does not have ultrasonic sensor cleaning like some smaller format digital cameras, and user cleaning of the sensor cover glass beyond blowing a puff of air on it is not recommended by the manufacturer. It is not known if the sensor glass is surrounded by sticky material that will trap dust. My guess is it isn't, but it may help if it was.
|
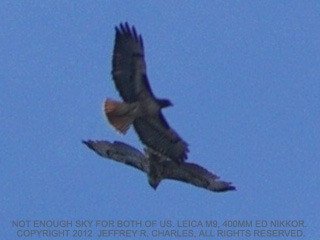 |
 |
Two Hawks Close Together (left) and Landscape (right) Captured with 400mm Lens.
The LEFT image is a 100 percent crop that captures two hawks so close together in angle that they overlap from my vantage point. This photo was taken with the same 400mm Nikkor lens and modified Leica M adapter as photos above. Some monitors show noise in the sky, while others don't.
The RIGHT picture of distant high tension line towers was taken with the 400mm ED Nikkor lens, using the rangefinder patch for framing and the infinity stop for focus. Other than the towers being biased a small part of the picture width toward the left, framing is as expected from the technique.
|
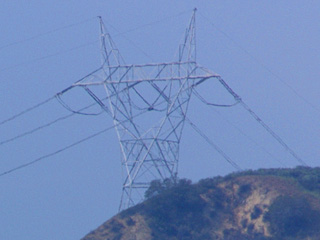 |
 |
Crops from Landscape Picture, Taken with 400mm ED Nikkor Lens on Leica M9.
At LEFT is a 33 percent crop of one of the above towers, clearly showing separation of wire pairs.
The RIGHT image is a 100 percent crop of the same tower. The wavy look to the tower members indicates that resolution is limited by atmospheric conditions. This image captures close to 5 times more detail than I was able to get with a 135mm Elmar lens, partly because the 400mm lens has an adjustable infinity stop so it can reach infinity focus while the Leica M9 is in its 2013-2014 state.
|
 |
|
Conjunction of Moon, Jupiter, and Star, with Leica M9 and 250mm f/4 Telyt-R Lens.
This interesting 17 March 2013 conjunction of the moon (center), the star Aldebaran (left) and the planet Jupiter (right) was taken with a Leica 250mm f/4 Telyt-R, working at f/6.8. As above, the rangefinder patch was used as a centering reference. Glare around the moon is from clouds. Two of Jupiter's moons are visible at full scale. With this lens on the Leica M9, I can "Telyt like it is!"
|
Modified adapters above only set the rangefinder and its parallax correction to infinity. The user has to estimate the subject distance and set the lens focus scale. A more elegant adapter would have a precise focus scale ring that goes between infinity and 2 to 5 meters minimum distance, combined with a rangefinder cam that sets the Leica rangefinder to the corresponding distance. This would permit use of the rangefinder to get more accurate distance information to transfer to the lens focus setting. The focus scale ring thus also sets the parallax so the rangefinder patch is roughly centered at the subject distance. This is no longer something I can build myself, but it would be a good enhancement. I currently use a small shoe mounted rangefinder to estimate some distances.
A fancier adapter would use a fixed or deployable beam splitter or otherwise capture part of the image data, then actuate a weak auto focus lens to compensate for any difference between the estimated and real subject distances. None of this is necessary on cameras that accept an EVF, but it could be faster.
As one who has used an EVF, one major issue is having to use a finger to toggle between the full field view and the magnified view. If this switching could be done by interpreting eye gestures or other means, it would be easier to use.
Strange as it may sound, I got better raptor pictures in my first 15 minutes with the Leica M9 and a modified adapter than what I had been able to get with a Micro 4/3 camera and EVF over the previous couple of years! This was partly because I could see the area outside the field covered by the picture.
The Leica Visoflex (Optical Version) and Other Accessories
The Leica Visoflex is an innovative flip mirror accessory that has been around for decades. It converts a Leica M camera into an a Single Lens Reflex (SLR) camera, but the distance from the lens flange to the focal plane is too long to permit infinity focus with either Leica M lenses or conventional 35mm SLR lenses. It is intended for specific Leica lenses both at infinity and for macro photography.
Early versions of the Visoflex were relatively large and had a longer lens flange to focal plane distance than the newer versions. The Visoflex II and its eye level prism finder was shorter than the first version. It can be used on Leica film cameras up to the M4 and the M4-P, but not on newer Leica M film or digital cameras. The prism finder and chimney finder for the Visoflex II both have diopter adjustment.
When the Leica M5 and M6 (both having built-in light meters) were introduced, an additional 2mm of height was required on top of the camera for the light meter circuitry. This interferes with the Visoflex II prism, so Leica introduced the Visoflex III. The Visoflex III eye level prism has enough clearance for the M6, and even for the M9, but lacks the diopter adjustment of the Visoflex II prism finder. Leica also made a chimney finder for all Visoflex models, with the latest chimney finder fitting either the Visoflex II or III and having diopter adjustment.
The Visoflex III works well on the Leica M9, though using it is somewhat cumbersome in comparison to a rangefinder coupled lens, or even an SLR camera for that matter. One significant concern when using a Visoflex on the Leica M9 is cleanliness.
Since the Visoflex III was made so long ago, it is difficult to find one that is reasonably free of internal dust, and internal dust can eventually find its way onto the camera sensor. Some samples also squeak from lack of recent lubrication. Therefore, a Visoflex should be thoroughly inspected, cleaned, adjusted and lubricated by a qualified technician before using it on any digital camera.
My Visoflex III is not exactly a pristine sample, so it required slight adjustment of eccentrics for the mirror stops before its focusing screen agreed with the Leica M9 focal plane. The adjustment to correct this was simplified by using live view on a Micro 4/3 camera having an EVF with magnified focus assist, in conjunction with a properly calibrated Leica M to Micro 4/3 lens adapter.
When the 65mm f/3.5 Elmar is used with a Leica focusing tube on the Visoflex III, it can focus relatively close and achieve roughly a 1:3 reproduction ratio. With a small aperture lens such as the 65mm Elmar, focusing via the Visoflex can be less accurate than using the rangefinder for a lens of similar aperture. However, accuracy can be improved by removing the prism (or chimney finder) and using a higher magnification 15x Peak magnifier loupe (or similar) for focusing.
It is theoretically possible to adapt most Hasselblad V system telephoto lenses to the front of the Visoflex III and achieve infinity focus. However, no adapter is currently available. Hasselblad lenses that reach infinity (with some margin) when held in front of the Visoflex III on the Leica M9 include the 150, 250, 350, and 500mm Zeiss lenses. The Hasselblad 80mm lens will not work for infinity focus because its rear lens cell protrudes too far from the back.
Conclusions About the Leica M9:
(Some are preliminary. These are from a DSLR user perspective, not necessarily my perspective.)
Many conclusions and pros, cons, etc, about the Leica M9 could not be properly assessed and added until tests are done after an apparent infinity focus issue (details in Appendix A and Appendix B below) were properly addressed under warranty by Leica. This is because it is assumed that the infinity focus issue is rare, and therefore not typical of the Leica M9. Some lenses were temporarily modified to match the camera focal plane and get good images of distant objects, even though this makes them focus slightly past infinity on my Leica film camera.
With only one exception, sample photos with the Leica M9 I've seen on the web show outstanding performance on distant subjects. The sole exception is a photo of a barn under light overcast conditions at Steve Huff's site [13], where distant objects on the right side of the image are mostly sharp, but distant objects in the upper left are blurred, while closer objects at the middle left are sharper, though still not tack sharp. It is possible (hard to say) that this is a slight parallelism problem between the lens and the focal plane, similar to that in my Leica M9.
The limited conclusions below are based in part on using the camera at closer focus distances, and are in the context of comparison to a full frame DSLR camera. I do not own a full frame DSLR camera, but instead use the Leica M9 as my full frame camera. However, I have used smaller format DSLRs and have seen how large full frame DSLRs and their lenses typically are.
The conclusions also do not compare image quality when shooting raw images, because I have not as yet evaluated the .DNG images, mainly because the version of Lightroom that works with Leica M9 images does not work with Windows XP or early versions of Windows 7 such as that running on my computers. It can also take more time to get images suitable for web pages or viewing on a computer when starting with raw images. (This is why I don't shoot raw images for day to day pictures.)
Many of the Leica features, including click stops on the lens apertures, make it possible to set things on the M9 without looking at the controls, so I was able to make some settings in the dark. (The same is possible with info on the E-P2 EVF, but you get temporarily blinded by the EVF light.)
There are a lot of advantages to the Leica M9, but if camera manufacturers were in the bar with Dr. McCoy in the Star Trek 3 movie, they'd say: "Camera has advantages many; so money, more!" The M9 is not for people who want a point and shoot, but it works well (almost a seamless change) for people used to taking film pictures with manual cameras. Also, the aperture priority auto exposure setting can simplify things to a degree.
Here are a few conclusions so far. Again, the "disadvantages" are written in the context of what many DSLR users may consider disadvantages. I only see about half of the items on the disadvantages list as actual disadvantages for my own applications.
Leica M9 Advantages:
- WAY smaller than an SLR and only modestly larger than my Olympus E-P2.
- Entire system is small too, since the lenses are small.
- Discrete. (M9-P is even more so, since it doesn't have the loud red dot.)
- Full frame 36x24mm sensor and fast f/ratio lenses permit shallow depth of field.
- 18 MP, so not over-doing it on the pixel count. Pixels can be larger.
- Acceptable performance up to ISO 800 without phony looking artifacts.
- Direct manual setting of shutter speed (half speed detents) with a real dial!
- Aperture priority auto exposure, without confusing AE or program modes.
- Direct manual f-stop settings.
- Fast f/ratios available (f/2.8 or faster at focal lengths between 28 and 90mm)
- Direct mechanical manual focus by rangefinder or scale (but no auto focus)
- Shutter speed, f/stop, and focus settings all survive even battery changes.
- Viewfinder frame line preview lever, plus automatic frame line selection.
- Possible to set up shot, select lens and focus without even powering on camera.
- Only 0.7 second power up to first shot.
- Only 0.1 second delay after press shutter release.
- LED meter display in viewfinder (similar to that in Nikon FM, but below frame)
- Corner eyepiece and visibility outside frame increases awareness of surroundings.
- Manual focus usually possible even in dimmer light than with SLR.
- Dedicated ISO button.
- Possible to directly set Kelvin values in white balance.
- Self timer enabled by a setting on power switch, so instantly available.
- Takes a plain mechanical cable release!
- Simple single layer menu.
- Separate set button (rather than center of 4-way) is easier, but takes 2 hands.
- All lenses are directly interchangeable with any Leica M film camera.
- Legacy lens compatibility going back to about 1950, by menu or coding retrofit.
- Lens coding sets camera to compensate for vignetting, etc, in a given lens.
- Availability of cheaper lens alternatives (Voigtlander, Russian, Zeiss, etc.)
- Most lenses do not have barrel and pincushion distortion like zoom lenses.
- Images appear to have reasonable shadow detail that can be brought out.
Leica M9, Neutral Impressions:
- Easy handling, except that care is needed due to lack of an integral grip.
- No AA filter to spoil wide angle shots, but at expense of aliasing.
- Color moire is only severe with some lower cost lenses such as VC 40mm.
- If LCD display used, shutter speeds are displayed (but not f/stops)
- No auto focus or electronic focus confirm (but rangefinders are accurate)
- Viewfinder is only 0.68x. My preference is ~0.85x, even if no 28mm frame lines.
- More concentration of high dollar investment in a single item (the M9 body).
- High pitch sound of shutter is not as discrete as shutter in M film camera.
- Discrete mode doesn't sound like a thrashing machine, but isn't as discrete as a manual shutter wind lever.
- Software compatible with Leica M9 .DNG files requires relatively new computer OS.
- Rough finish on the lens mount (it is not a smooth stainless steel surface like older Leica cameras) seems to wear some finish off the back surface of some lenses.
- Next model, out in late Feb, will offer EVF attachment and movie capability.
Leica M9 Disadvantages:
(Specifically, perceived disadvantages from the standpoint of a DSLR user.)
- Picture review on rear LCD lacks enough zoom for the LOW resolution screen.
- Review picture generation is slow when zooming in to see details.
- Rear screen has plain plastic cover like a $100 digital camera would have.
- Front viewfinder and rangefinder windows not recessed at all; more damage risk.
- Rangefinder relies on good eyesight; focus scale is only other focus feedback.
- No built-in diopter adjustment. $110 screw-in diopter correction lens needed.
- Not compatible with Zoom lenses other than expensive Leica 16-21mm and 28-50mm.
- Only rangefinder coupled lenses have accurate focus feedback without Visoflex.
- No macro or long tele photography without Visoflex or camera body swapping.
- No means of depth of field preview (but EVF allows this in next model)
- Must remove bottom plate to access either the battery or memory card.
- Rectangular hole on one side of base plate flimsy compared to M film cameras.
- Camera shake from shutter is VERY strong compared to Leica M film cameras.
- Not compatible with a purely electronic interval timer.
- No remote capture option via computer.
- Auto white balance isn't very good.
- No dedicated white balance button. WB has to be set in a menu.
- Base ISO of 160 may require ND filter to get shallow depth of field in sunlight.
- High ISO noise lower than for Micro 4/3, but not as good as full frame DSLRs.
- Severe moire on fine black details such as clock numerals under some conditions.
- Estimated f-stop setting is NOT recorded in JPEG EXIF data.
- In-camera JPEG engine results are not as good as with Canon or Nikon DSLRs.
- Easier to blow out highlights in sunlight than with better Canon or Nikon DSLRs.
- Pull 80 ISO setting reduces shadow noise, but blows out even more highlights.
- No integral thumb or finger grips, though after market grips are available.
- As with film rangefinder camera, it is possible to shoot with lens cap on.
- Considerably more image noise than an older and lower cost Hasselblad V96C back.
Summary: The Leica M9's manual rangefinder focusing, selectable frame lines, direct reading manual controls (including a real shutter speed dial!), and other features make it possible to set up a picture before the camera is even turned on, saving battery life. Once powered on, the camera comes up in only 0.7 seconds, then the delay is only about 0.09 seconds when taking the picture. When the Leica M9 is turned on, the default is that there are no annoying beeps or lights. It's just on when turned on. The rear LCD screen doesn't even come on unless you tell it to. All of this makes the M9 a relatively seamless change from rangefinder film photography, but with the advantages that you don't have to change film every 36 pictures or wait for film to be processed!
APPENDIX A:
Leica M9 Initially Fails to Achieve Infinity Focus with any of Thirteen Lenses Tried.
UPDATE: This section has been partially updated by Appendices B and B1 which follow, but that are not entirely completed at this time. Those appendices, plus this one, are ALL being superseded by Appendix B2 in 2015.
You can jump to Appendix B2 for current (2017 and later) state and performance of the M9 camera.
Test Series 1: Prior to Initial Leica M9 Service in 2014.
This hopefully temporary section briefly covers the extent to which the Leica M9 has thus far failed to reach infinity focus with any of my 13 compatible lenses, 6 of which are Leica brand lenses. For this reason, it has not been possible to do performance comparisons between the Leica M9 and other cameras on distant objects, other than the images in this section that illustrate the problem. This is because even a low cost camera can do better than the M9 on distant objects as long as the M9 is incapable of reaching infinity focus.
After the M9 is serviced under warranty, it is envisioned that this section will be updated with pictures of the same distant objects for comparison to other cameras. If the M9 then allows the lenses to reach infinity focus, it may do considerably better than most cameras it is compared with. Stay tuned for update after warranty service! In the meantime, comparisons at close focus distances are in the section after this (Appendix B), where the Leica M9 provides relatively good results.
The Leica M9 infinity focus issue is severe enough that sharper pictures of distant objects can be obtained with a 12 MP Micro 4/3 camera that is using a lens of only about half the focal length of what provides a similar field of view on the M9. The M9 does way better than the same Micro 4/3 camera at close distances, but for now it can't deliver on distant subjects. The problem is most notable at wide apertures, where blur at infinity can easily exceed 4 or 5 pixels, even when a lens is set at its infinity stop. In such photos, nearby objects are imaged more clearly.
Considerable testing with all 13 of my Leica M mount lenses (including M39 lenses with verified proper thickness M adapters), plus testing of the same lenses with a fine ground glass on the back of my Leitz-Minolta CL film camera, appears to show that in general, the lenses are properly calibrated to within about 0.02mm of each other (and with the CL focal plane), but that the Leica M9 lens flange to focal plane distance could be between 0.05mm and 0.07mm too long at the center. (However, newer tests with a 35mm Summicron-M ASPH shows this could be as low as 0.03mm.)
The only exceptions are that a 1998 sample of the 35mm Summicron ASPH shows only a 0.032mm error, one 75mm lens shows a 0.035mm error, and the 135mm lenses both show more than 0.11mm error. There also appears to be a parallelism error between the lens flange and focal plane of up to 0.03mm, with the upper left of a picture reaching slightly closer to infinity focus than the lower right corner. For the lenses reaching closest to infinity, the wide aperture fringing for subject matter slightly beyond best focus is almost as obvious as the lack of high resolution at infinity.
To further test focal plane error, a separate bayonet mount plate was acquired for the 35mm Summicron ASPH (an uncoded Leica mount that was available from a party after he installed a coded mount), then thinned and shimmed it until the Leica M9 provided the best possible images of distant objects.
The degree that this substitute bayonet mount for my 35mm Summicron was thinned and shimmed to get the best image supports a conclusion that the camera lens flange to focal plane distance is slightly too long, and that there is also slight tilt of the camera lens mount relative to the image sensor. However, this test shows a smaller lens flange to focal plane error than the average for all of the lenses would. Specifically, this test shows about 0.03mm error at the center, and between 0.02 and 0.03mm of focal plane tilt in a direction corresponding to the upper left down to the lower right in a picture.
The apparent lens flange to focal plane distance error can prevent truly sharp results at infinity even when some lenses are stopped down to f/4 or f/5.6. Therefore, no comparisons are currently published for distant subjects, other than to illustrate the hopefully temporary infinity focus problem. For now, it is not worth attempting pictures of distant objects at wide apertures, other than for testing.
For now, it would not be a fair test of the Leica M9 if its lens flange to focal plane distance is out of spec. I say "if", in the highly unlikely event that the Leica M9 is in spec but all 13 of my lenses and my Leitz-Minolta CL are out of spec by about the same amount. Only two of my Leica lenses (35mm f/2 Summicron Asph and 75mm f/2.5 Summarit-M) are the newest versions, and Voigtlander lenses should not be used as standards for evaluating a Leica camera body. If the M9 does proves to be in spec, I'd have a lot of lens calibrating to do, including on 6 Leica brand lenses!
The Leica M9 rangefinder shows infinity focus with all of the lenses except one, but the pictures don't. The exception on the rangefinder setting is the 21mm, for which the rangefinder shows a distance of about 60 meters when the lens is at its infinity stop. The rangefinder showing infinity focus on all other lenses, but the photos not reaching infinity also results in some inaccuracy of the rangefinder versus the focal plane. This inaccuracy persists even at closer focus distances, with the image always having a closer optimum focus than what the rangefinder shows.
I've found I can get good interior pictures by focusing on the subject, then just leaning forward between 1 and 5 percent of the subject distance before I take a picture. However, I don't want to do this leaning forward to take pictures indefinitely (and I got the camera to emphasize sharp photos, both at portrait range and at infinity), so warranty service is in order. Stay tuned for more test results and comparisons (in pictures of distant subjects) after the M9 is assessed by Leica, and serviced if necessary.
Even though it may have been possible to return this M9 and get another one because the problem was discovered almost immediately, I decided to keep this M9 and get it serviced under warranty because it has the advantage of fewer artifacts with wide angle lenses than examples I had seen on the web. (See lens coding section.)
The rest of this section merely documents the infinity focus issue, suspected to be caused by an excess lens flange to focal plane distance. A few examples illustrating failure of lenses to reach focus on the Leica M9 are shown below. These are compared to pictures with the same (or even shorter focal length) lenses on cameras that permit infinity focus. All of the test shots were done on a good sized tripod. Many cropped samples are shown at 200 percent in order to compensate for differences in the quality at which different web browsers display images.
Lens Performance on Cameras that Permit Infinity Focus, and on Leica M9 (Pre-Repair).
Comparison of lens and camera performance on distant objects, with digital camera bodies that do and do not permit infinity focus.
© Copyright 2011, 2012, 2013 Jeffrey R. Charles. All Rights Reserved.
 |
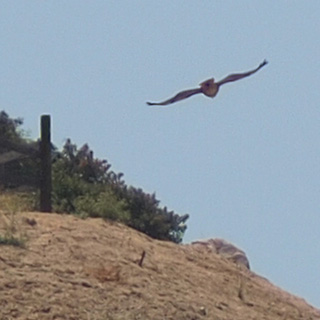 |
High Resolution of 90mm f/2.8 Lens when Focused at 200m on Micro 4/3 Camera.
These first two pictures are not taken with the Leica M9, but are included simply to show what is possible when a good lens can reach focus on distant objects. Here, a Contax G Zeiss 90mm f/2.8 lens was used at f/3.4 on an Olympus E-P2 Micro 4/3 camera to photograph a hillside from about 200 meters away.
In the LEFT picture, a small diagonal line is visible in the sky near the top of the hill.
The 100 percent crop at RIGHT reveals that the small diagonal line is actually a hawk! Relatively good detail is also visible on the ground, considering that this is only a 90mm focal length lens imaging the objects from about 200 meters away! The E-P2 anti alias filter isn't a problem with a focal length as long as 90mm. It is hoped the Leica M9 (after service) with do better with a 135mm lens than my E-P2 did with the 90mm. For now, it isn't even close.
|
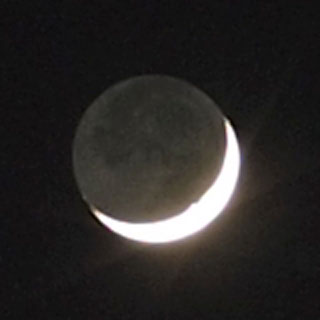 |
 |
40mm Nokton Reaches Infinity Focus on MFT Camera (left) But Not on Leica M9 (right).
The two moon pictures above were taken on the same night with the same lens.
The LEFT picture of the crescent moon shows that the VC 40mm f/1.4 Nokton has good performance on distant subjects at the center, even at wide apertures, assuming the lens reaches infinity focus on a given camera. This 1.6 second exposure at f/2.4 is with the VC 40mm Nokton and an Olympus E-P2 camera at ISO 100. Infinity focus is achieved, so even this 200 percent crop (2x the original image scale) looks OK.
The RIGHT image shows that the Leica M9 does not achieve infinity focus with the same lens, so results are quite fuzzy at wide to moderate apertures. This 305 percent crop is a 2 second exposure at f/2.4 at the Pull 80 ISO setting. The moon phase is the same, but it looks different due to defocus. There are also some odd dark lines just inside the ends of the crescent, even though the in camera sharpening was at the lowest setting. Results are better if a lens or adapter is modified to accommodate the apparent focal plane distance error in the M9 (as was done with the M39 to M adapter on my 75mm Voigtlander lens and 135mm Hektor lens), but modifying adapters doesn't solve the problem when M-mount lenses are used.
|
 |
 |
135mm Hektor Focuses Out to 200m on MFT Camera (left) but Not on Leica M9 (right).
These images directly compare what the same focal length lens can and cannot do when a camera prevents it from focusing on distant objects. Here, the same 135mm f/4.5 Hektor lens is used at f/6.8 to image a chain link fence on a hillside from a distance of about 200 meters.
The LEFT image is a 200 percent crop (twice the original image size) that was taken with an Olympus E-P2 Micro 4/3 camera and Leica adapter. It is from an in-camera SF JPEG without post processing other than cropping and scaling. The camera has an appropriate lens flange to focal plane distance, so the 135mm lens is even beginning to image the thin (about 4mm) wires in the fence, when set at a focus distance barely (one line width) short of its infinity stop. This is in spite of atmospheric scintillation that makes the fence post look wavy. Since my rangefinder lenses reach infinity focus on Micro 4/3, even my 75mm VC lens on an E-P2 shows the fence wires better than the Leica M9 image on the right, taken with a 135mm lens.
The RIGHT image is a 275 percent (2.75 times original size) image of the same fence using the Leica M9 the 135mm lens. The image appears soft because the suspected excess lens flange to focal plane distance in the M9 prevents the lens from focusing even as far away as 200 meters when set at its infinity stop, instead limiting the maximum focus distance (based on foreground objects that are imaged more sharply) to about 120 meters. The M9 image is even contrast enhanced a little to try bringing out the fence wires, but if the lens can't even focus on the subject, it's hard to salvage information. If the Leica M9 image is darkened, the sky begins to show an odd clumpy texture, even though the picture is at the base ISO of 160. Dimmer exposures didn't show the wires even this well.
|
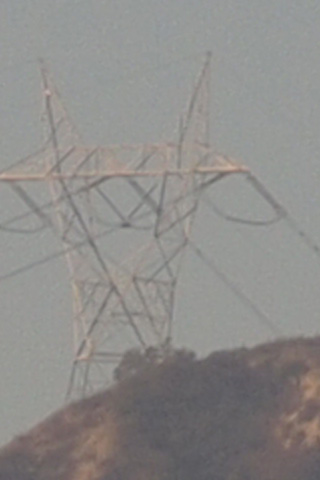 |
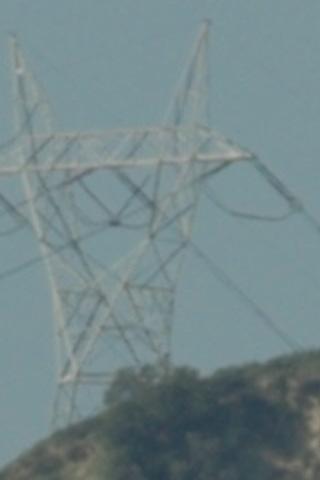 |
|
Mediocre Resolution with Leica M9, Due to Lens Not Reaching Infinity Focus (right).
In this comparison, the Leica M9 image on the right should clearly out-resolve the Micro 4/3 image on the left, but it doesn't. Here, the LEFT picture was taken with an Olympus E-P2 camera and 75mm f/2.5 Voigtlander lens, while the RIGHT image was taken with the Leica M9 and a 135mm f/4 Elmar lens set at its infinity stop, where the rangefinder shows proper focus. However, since the Leica M9 apparently does not permit the lens to actually reach infinity focus, its image is softer, in spite of the M9 image being taken at nearly twice the focal length as the Micro 4/3 image. (The left image has only about half the plate scale due to a shorter focal length lens.) Both images are 200 percent crops (double original size), but the M9 image is obviously soft on distant objects and sharp on closer objects even without pixel peeping. The right image was taken at about f/8. Blur in distant objects with the M9 is even worse wider apertures. The Leica M9 cost 10x more than the camera used for the left picture, which is part of why the M9 is being sent in for warranty service. The Leica M9 is not expected to resolve better than the Olympus E-P2 with the same lens even after service because the M9 pixels are larger, but it should exceed the Micro 4/3 performance at infinity (as it does at close distances) when the images have a similar field of view as in this example.
|
Data below uses a simple method to calculate the apparent lens flange to focal plane distance error of this particular Leica M9. Two methods were used to provide a cross check, with the method not shown using the ratio between the distance to best focus and the aperture, then calculating the error based on the corresponding angle and the f/ratio. The simplified method below is easier, but is only accurate for long lens to subject distances. At the subject distances involved, the lack of precision in the calculation is insignificant. The real world uncertainty in the results is on the order of 0.01mm, due mostly to interpretation of the distance to best focus in imaged subject matter. This information is temporarily included for reference by Leica when the M9 camera is serviced under warranty.
The lens flange to focal length error is determined by positioning the focus ring of each lens at its infinity stop, then observing the Leica M9 images to see what subject matter appears to be in the best focus. In one test (the hillside above), the most distant visible subject matter is about 200 meters away. In another test (the high tension electrical line tower), the most distant subject matter is about 10 km away. In both tests, foreground subject matter was available to evaluate for the distance of best focus when the lens was set at infinity. Two newer Leica brand lens than the other Leica lenses were added to the tests in late 2013, just to be thorough. These are the 35mm Summicron-M ASPH and the 75mm f/2.5 Summarit-M.
Tests were done at multiple apertures, but most results below are for f/4 to f/5.6 (f/6 to f/8 on 135mm lenses) unless noted otherwise. Notes below indicate any anomalies versus aperture. The Leica M9 camera is assumed to be the problem because all of the lenses (except for the 135mm lenses) are in such close agreement. Specifically, results from 9 of the 11 lenses shorter than 135mm fall within an 0.019mm range (+0.051mm to +0.070mm focal plane distance error). When the newest two Leica brand lenses are considered, the infinity focus calibration range between lens samples is 0.037mm. Six of the 13 lenses used in the test are Leica brand lenses.
In all cases, the subject matter that was in best focus was closer than the most distant visible object. In all cases except one (which was slight, with the 21mm), the Leica M9 rangefinder showed infinity focus almost perfectly when the lenses were at their infinity stops, even when viewed through an 8x monocular.
Therefore, in addition to failing to permit lenses to reach infinity focus in the actual image, the rangefinder does not quite agree with the focal plane. This is the case at any focus distance, though the 35mm Summicron Asph appears to have slightly better agreement with the rangefinder than all of the other lenses. The distance to best focus also differs slightly according to the position on the focal plane, with objects at slightly longer distances being in focus on the left side of the image than on the right slide. Image center results below are for the central 10mm radius of the focal plane.
The focal plane also does not agree with the rangefinder at close focus distances, typically by 2 or 3 cm at the close focus distance of 1m for my newer 90mm Leica lens. The focal plane does not agree with the rangefinder for all other lenses as well. It is as though everything about this Leica M9 except the lens flange to focal plane distance is perfectly calibrated. (There is not even any vertical misalignment in the rangefinder.) However, the apparent focal plane error prevents infinity focus. This is a big deal for landscapes.
A recent (Jan. 2014) update is, that after more testing with a 35mm Summicron, on which I temporarily substituted a different M-mount back plate, and temporarily configured the back plate so the lens focused slightly past infinity on the Leica M9, I determined the lens flange to focal plane distance errors may be about 0.01mm less than shown in the test results below. So the real average error is may be only 0.02~0.04mm.
Results for testing the Leica M9 each lens at its infinity stop are noted below. To get the lens flange to focal plane error (the distance is too long in all cases) the distance to best focus is measured, then the focal length is divided by this distance. The result is the ratio of the focal length to the distance to best focus. Multiplying this by the lens focal length provides a very close approximation of the lens flange to focal plane distance error. (Usually within 0.0001mm for calculation error only, and about 0.01mm for the whole process, including measurement tolerance.) For example:
e = f / (d/f)
..where e is the lens flange to focal plane error, d is the distance to best focus, and f is the lens focal length. Therefore, in the case of a 90mm lens that has best focus at 120m when set at infinity:
e = 90mm / (120,000mm / 90mm), or:
e = 90 / 1,333, or:
e (camera's lens flange to focal plane error) = 0.0675mm too long
Results for each of 13 lenses and one Leica film camera used to test the Leica M9 follows:
Lens A: 12mm f/5.6 Voigtlander Ultra Wide Heliar M39, SN 9051046:
Distance to best focus on axis, when lens set at infinity: 2.8m.
Apparent Leica M9 lens flange to focal plane error: +0.051mm
Coding: 21mm f/2.8 Elmarit, Non-Asph.

Lens B: 21mm f/4.0 Voigtlander Color Skopar M, SN 8030194:
Distance to best focus when lens set at infinity: 7m.
Apparent Leica M9 lens flange to focal plane error: +0.063mm
Coding: 21mm f/2.8 Elmarit, Non-Asph.

Lens C: 28mm f/2.0 Voigtlander Ultron M, SN 8150014:
Distance to best focus when lens set at infinity: 15m.
Apparent Leica M9 lens flange to focal plane error: +0.052mm
Coding: 28mm f/2 ASPH.

Lens D: 35mm f/2.0 Leica Summicron-M ASPH, SN 3854672:
Distance to best focus when lens set at infinity: 38m
Apparent Leica M9 lens flange to focal plane error: +0.032mm
Coding: 35mm f/2.0 ASPH.

Lens E: 40mm f/1.4 Voigtlander Nokton Classic M, SN 8030691:
Distance to best focus when lens set at infinity: 30m.
Apparent Leica M9 lens flange to focal plane error: +0.053mm
Coding: 35mm f/1.4 ASPH.

Lens F: 50mm f/2 Zeiss Planar ZM, MC, SN 15868104:
Distance to best focus when lens set at infinity and f/4: 40m.
Apparent Leica M9 lens flange to focal plane error: +0.062mm
Coding: 50mm f/2.0 (in menu).
Notes: Test at f/4. Focus shift limits distance to ~25m at f/2.

Lens G: 50mm f/3.5 Industar 22, Ctd. M39, SN N5390379:
Distance to best focus when lens set at infinity: 40m.
Apparent Leica M9 lens flange to focal plane error: +0.062mm
Coding: 50mm f/2.8 (in menu).

Lens H: 75mm f/2.5 Leica Summarit-M, SN 4116211:
Distance to best focus when lens set at infinity: 160m.
Apparent Leica M9 lens flange to focal plane error: +0.035mm
Coding: 75mm f/2.5 Summarit.
Notes: Distant subjects have cyan fringing typical for beyond best focus.

Lens I: 75 f/2.5 Voigtlander Color Heliar M39, SN 9021669:
Distance to best focus when lens set at infinity: 80m.
Apparent Leica M9 lens flange to focal plane error: +0.070mm
Coding: 75mm f/2.5 Summarit.

Lens J: 90 f/2.8 Leica Tele-Elmarit-M Type II, SN 3096431:
Distance to best focus when lens set at infinity: 120m.
Apparent Leica M9 lens flange to focal plane error: +0.067mm
Coding: 90mm f/2.8 Tele-Elmarit (in menu).

Lens K: 90 f/2.8 Leica Elmarit (M-Mount), SN 1709275:
Distance to best focus when lens set at infinity: 120m.
Apparent Leica M9 lens flange to focal plane error: +0.067mm
Coding: 90mm f/2.8 Elmarit. Infinity stop is inconsistent.

Lens L: 135 f/4.0 Leica Elmar, SN 1770945:
Distance to best focus when lens set at infinity: 140m.
Apparent Leica M9 lens flange to focal plane error: +0.13mm
Coding: 135mm f/4.0 (in menu). Tested at f/6.0.

Lens M: 135 f/4.5 Leica Hektor M39, SN 716323:
Distance to best focus when lens set at infinity: 100m.
Apparent Leica M9 lens flange to focal plane error: +0.18mm
Coding: 135mm f/4.0 (in menu). Tested at f/6.8.

Camera (N): Leitz-Minolta CL, focal plane comparison. SN 1031034:
Additional distance to Leica M9 focal plane vs CL focal plane: +0.05mm
Note 1: Filters were not used for any of the tests because I've previously detected slight optical power (enough lack of parallelism to require re-focusing of a 500mm lens) in some samples of even the best filter brands.
Note 2: The middle left of each image appeared to focus slightly closer to infinity than the lower right by a degree consistent with a 0.02mm to 0.03mm focal plane parallelism error, with the apparent parallelism difference appearing smallest with the 35mm f/2 Summicron Asph. This could be because the original back plate of the 35mm Summicron lens has 0.02mm of measured wedge in it.
Note 3: Some lenses exhibited focus shift. Of these, the VC lenses had the most, and a ZM lens had the next most. In general, VC lenses don't focus as far away at wide apertures as they do for the above results at f/4 to f/5.6. The Leica 90mm Tele-Elmarit-M also exhibited some focus shift, though less than the VC or ZM lenses. The 35mm f/2 Summicron Asph has by far the least focus shift, but is not completely free of it.
Note 4: It was possible to obtain infinity focus with the VC 75mm f/2.5 lens on the Leica M9 by thinning the M39 to Leica M adapter by the amount indicated above for the M9 focal plane error. It was possible to get better infinity performance with the Leica 135mm f/4.5 Hektor lens by thinning its adapter most of the distance indicated above. The Hektor lens rotational position is off a great deal when the adapter is thinned more. However, the rangefinder then shows slightly past infinity focus in both cases. It is also important not to exceed the minimal distance past infinity that the rangefinder will travel without resistance. Modifying the M39 to M adapters obviously does not solve the infinity focus problem when using the M mount lenses.
Note 5: In comparing the Leica M9 to the Leitz-Minolta CL: Of the lenses above that appear to show a +0.05mm lens flange to focal plane error on the Leica M9, all focus to infinity on the Leitz-Minolta CL, both at the film plane and in the rangefinder. Of the lenses above that appear to show a lens flange to focal plane error greater than 0.05mm on the Leica M9, all except one (the oldest 90mm Elmarit) show that the lens flange to focal plane error is 0.04mm to 0.05mm less on the CL than it is on the M9. Tests on the CL were done using a fine focusing screen in the film gate, viewed under at least 15x magnification.
Note 6: Leica indicated that performance of the M9 with 135mm lenses is not reliable enough to use them in evaluating a camera, so data from these is not considered in the conclusions below. Data from 9 of the remaining 11 test lenses is in very close agreement (+/- 0.009mm).
Preliminary conclusions:
- When the 135mm lens data is excluded, the apparent lens flange to focal plane distance error of the Leica M9 (based on testing with the above lenses) ranges from +0.032mm to +0.070mm. When all except the 35mm Summicron Asph and the 75mm Summarit-M are considered, the range is smaller, being from 0.051mm to +0.070mm.
- This small of a range represents very good agreement between the vast majority of the lenses and the test data. There is only 0.018mm between the minimum and maximum values for the tested apparent Leica M9 lens flange to focal plane distance error, based on all lenses except for the Leica 35mm and 75mm lens.
- The average focal plane error with all lenses (except 135mm) is roughly +0.056mm.
- When only Leica brand lenses (other than 135mm) are considered, the focal plane error is only slightly less, at +0.050mm.
- It seems unlikely that 13 lenses plus a Leica CL could all be out of calibration by so close to the same margin, with none of them agreeing with the M9.
- Therefore, it is presumed (pending assessment of the M9 by Leica, and correction if necessary) that the error is in the lens flange to focal plane distance of this particular Leica M9 digital camera.
- Optimum adjustment of the Leica M9 should probably be for the average of Leica brand lenses shorter than 135mm, which would, based on the above, reduce the lens flange to focal plane distance by 0.030 (at the very least) to 0.050mm, also compensating for slight focal plane tilt. This minimizes how far Leica brand lenses with the least error on the M9 would focus past infinity after service. Then, the 90mm and 135mm Leica lenses and all of the VC lenses would have to be adjusted to match.
- If this lens flange to focal plane distance adjustment is made without disturbing the lens flange to rangefinder coupling distance (for example, if it is possible to reduce the distance to the sensor by tweaking only the back end of the camera), the rangefinder will remain in adjustment.
On one hand, it at first may seem impressive that the Leica M9 and a Leica 90mm lens can produce a picture sharp enough to determine that best focus is at a distance of about 120 meters. On the other hand, the amount of blur (in pixels) at infinity that results from a 90mm lens only focusing out to only 120 meters is not trivial, especially at wider apertures. A lens flange to focal plane distance error averaging 0.06mm may not sound like much, but it is about 6 times larger than the tolerance I recall seeing in the 1970's [Ref.] for the same specification in Leica M film cameras.
To put a 0.06mm focal plane distance error in perspective for digital photography, the following list shows enlargement of blur width at infinity for different f/ratios, assuming no focus shift. The term "enlargement" is used because the blur from de-focus at infinity is convolved with the Point Spread Function (PSF) of each lens. De-focus blur sizes (not counting lens PSF) at infinity versus f-stop is shown below. It is assumed that the Leica M9 pixel pitch is about 6.9 microns:
- f/1.0 = 0.060mm blur at infinity, or 8.7 pixels on Leica M9.
- f/1.4 = 0.042mm blur at infinity, or 6.1 pixels on Leica M9.
- f/2.0 = 0.030mm blur at infinity, or 4.3 pixels on Leica M9.
- f/2.8 = 0.021mm blur at infinity, or 3.1 pixels on Leica M9.
- f/4.0 = 0.015mm blur at infinity, or 2.2 pixels on Leica M9.
- f/5.6 = 0.011mm blur at infinity, or 1.6 pixels on Leica M9.
- f/8.0 = 0.008mm blur at infinity, or 1.1 pixels on Leica M9.
The blur enlargement (from presumed focal plane error) is very significant at faster f-ratios, and would negate much of the value of fast f-ratio lenses for distant subjects. For example, the 5216 pixel width of the Leica M9 sensor, divided by a blur width of 6.1 pixels at f/1.4, results in an image having a resolution of only 1/855 of the picture width at best, which is not much more than the VGA resolution on older computer monitors. Or, to put it another way, the image would have less than twice the resolution of the low pixel count LCD screen on the back of the Leica M9.
Data after testing with a 35mm Summicron indicates that the focal plane error could be more like 0.04mm, but even this would need correction to benefit from the performance of Leica lenses used at wide apertures for subjects at or near infinity.
The next section compares the performance of the Leica M9 at only relatively close focus distances, since fair comparisons can't currently be made on distant subjects. At close distances, the Leica M9 does quite well, so it should provide outstanding landscapes once the lens flange to focal plane distance is corrected.
APPENDIX B: Initial Results After Early 2014 Leica M9 Warranty Repair
(The Appendix of 2015 (Appendix B2) will gradually update and supersede this one, plus Appendix A, above.)
Please see Appendix B2 for the current (2017 and later) state and performance of the M9 camera.
Test Series 2: After Initial Leica M9 Service in 2014.
(No resolution change due to camera service. Only change as from LENS service.)
This section takes a quick look at results after the Leica M9 warranty repair. The camera got back from service ahead of schedule. Unfortunately the results are not all that good in some areas. One small but obvious problem was that Leica did not quite get the clock angle of the camera's red dot correct, which results in the Leica logo being tilted at a small but obvious degree.
The infinity focus seems to be a little better, and is probably good enough to allow me to proceed with comparisons on distant objects. However, the Leica M9 focal plane is still a little farther from the lens mount than is the case on Leica film cameras I have been able to make comparisons with. (Note: Most of the infinity focus improvement was later found to be the result of gradually making the lenses agree with the camera's flawed lens flange to focal plane distance.)
Unfortunately, parallelism of the lens mount versus the focal plane still appears to be off a bit compared to Leica film cameras I've been able to compare to, and to my lenses. The right side of the picture (left side of the focal plane, as seen from the rear) continues to have slightly nearer focus than does the opposing side. I have not done enough low light testing to assess if there has been any change in the clusters of hot pixels.
The post-servicing condition of the rangefinder itself was the biggest disappointment. It is bad! It is not even like the same rangefinder any more. The rangefinder was formerly a sight to behold, with sharp, bright, and perfectly aligned images, even as seen through an 8x monocular. It used to be easy to critically focus with the rangefinder. Not so now.
Now, the rangefinder is slightly misaligned in the vertical direction, so the images never merge over each other. This can make critical focus a challenge unless the subject matter has well defined vertical features to focus on.
The second RF image is also now a bit fuzzy, and images of highlights are slightly dimmer, maybe due to the blurring. At times, the second image is just plain hard to see, which was not the case before. A few details and images are in Appendix B1, below.
Slightly Improved LEICA M9 Performance on Distant Subjects, After 2014 Warranty Service
The Leica M9 has performed better on distant subjects after its early 2014 warranty service. Further improvement with the Leica M9 at long subject distances was realized by adjusting or shimming most of my lenses to have the same back focal distance from the lens mount to the center of the focal plane as the newer (those tested that were made since about 1995) Leica brand lenses. However, this is at the expense of slight inaccuracy on Leica film cameras.
Test results with off brand lenses, and older Leica lenses, tended to show that such lenses had 0.02 to 0.03mm less back focus than the newer Leica lenses. Therefore, when the Leica M9 just reached infinity focus with the newer Leica lenses, it still did not quite reach infinity focus with all of the older lenses (135mm in particular), or with most of the off brand lenses. So, to be compatible, the back focus of all lenses that could easily be adjusted was tweaked to agree with the newer Leica lenses. The results on the serviced Leica M9 were then quite good, except for some defocus at the image edges with wide aperture lenses, due to the residual focal plane parallelism error.
The compromise is that after adjustment to work on the Leica M9, all of the adjusted lenses focus slightly past infinity on the few Leica film cameras I have been able to check them on.
Lens Performance on Camera that Permits Infinity Focus, and on Leica M9 (Post-Service 1)
Comparison of lens and camera performance on distant objects, with digital camera bodies that permit infinity focus. The Leica M9 still does not permit infinity focus after initial service.
© Copyright 2011, 2012, 2013, 2014 Jeffrey R. Charles. All Rights Reserved.
 |
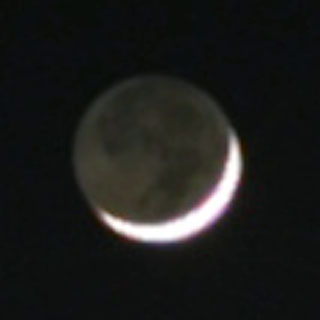 |
40mm Nokton Reaches Infinity Focus on MFT Camera (left), Still Not on Leica M9 (right).
In this comparison, the LEFT image was taken with an Olympus E-P2 Micro-4/3 camera and the RIGHT image was taken with the Leica M9, after warranty service. A Voigtlander (VC) 40mm f/1.4 Nokton lens, working at f/2.4, was used for both images. Both were taken on the same night.
As before, the LEFT image shows that the VC 40mm Nokton on Micro 4/3 does not disappoint when stopped down slightly, since a moon picture is usually associated with a much longer focal length. This is a 200 percent crop. The exposure is 2 seconds at f/2.4, ISO 100
The Leica M9 image at RIGHT, taken with the same lens, does not do quite as well. The lens reached slightly past infinity focus after both the M9 and the lens were serviced, so the focus setting for this best focus image is slightly closer than infinity. However, it is still relatively blurred. This could be due in part to larger pixels and perhaps how colors are mapped to the Leica sensor. There are also a few bright areas of color fringing that are not in the Micro 4/3 image. Blown out highlights compared to the Micro 4/3 image could be a factor in the fringing. To get comparable image brightness on the dark part of the moon, a longer exposure was required. This 300 percent crop is a 3 second exposure at f/2.4, ISO 80. The silver lining is that when the Leica image has less noise and captures more contrast on the dark part of the moon. When the Leica image is viewed at a distance, these attributes make it look better than the Micro 4/3 image.
|
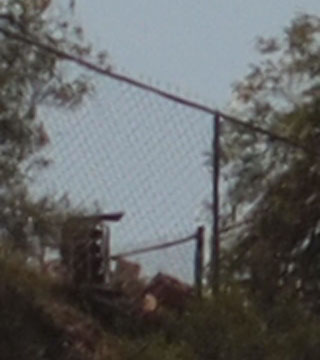 |
 |
|
135mm Elmar Focuses Out to 200m on MFT Camera (left), Still Not on Leica M9 (right).
Here, the LEFT image was taken with a Micro-4/3 camera and a 135mm f/4 Elmar lens working at f/6.8. The RIGHT image was taken with the Leica M9 (after warranty service) and the same lens, working at the same aperture. These pictures show the relative performance of a Micro 4/3 camera and the Leica M9 when the same lens is used on both cameras. Since the Leica M9 has larger pixels, a high magnification crop from its image will not be as sharp as the same subject matter in the Micro 4/3 image. However, the Leica M9 image is now a bit sharper than before the camera was serviced. There is now at least a trace of the real fence wire directions in the Leica M9 image, where lateral aliasing had formerly obscured image information indicating that some of the wires run toward the upper left. The image also now shows some trace of the fence wire just above the lateral fence pole. The wires are not fully resolved, partly due to the pixel size, but the image does reveal the actual directions the fence wires run. Interestingly, the 135mm f/4.5 Hektor lens did equally well in both images, when also stopped down to f/6.8.
|
 |
 |
|
Leica M9 with 135mm Elmar (right) Slightly Better than Micro 4/3 with 75mm Lens (left).
These images show relative image quality when a Micro 4/3 camera and the Leica M9 are used with lenses having about the same field of view over their full formats. The tower is a small feature in the center of each original picture. The LEFT image was taken with a Micro-4/3 camera and a 75mm f/2.5 VC lens, working at f/4.8. The RIGHT image was taken with the Leica M9 (after warranty service) and a 135mm f/4 Elmar lens working at f/6.8. After being serviced, the Leica M9 image at right has an edge over the Micro 4/3 image. Thus, service on the Leica M9 (and adjustment of the lens) did make a difference, since the Leica image wasn't much better than the Micro 4/3 image before the M9 was serviced. The lens on the Leica M9 has a longer focal length, and the Leica image is not enlarged as much (171 percent versus 200 percent), so the Leica image should clearly out-resolve the Micro 4/3 image. Here, it appears to do just that. For example, thin wires at the top of the tower are clearly imaged, as are smaller members of the tower itself. (This should be the case, since the Leica M9 cost 10x more than the Micro 4/3 camera.) Images of the same subject with the Leica M9 and the 135mm lens working at wider apertures were also quite good. Now that the Leica M9 can take sharp images of distant objects, other comparisons can at last be made. The Leica image has more color saturation and less chroma noise than the Olympus E-P2 image, though the Leica image has a somewhat bluer cast. The Leica image has a little mottling in the sky, but in general, the sky looks much better in the Leica image. Each picture was at the lowest ISO setting of each camera, with the lowest in-camera sharpening, and nearly the lowest color saturation setting.
|
Unfortunately, in spite of the improved results, I found that things were not as they initially seemed!
After getting the results above, I initially thought that Leica had successfully tweaked the camera to get lens mount to focal plane distance slightly shorter, resulting in better performance at infinity with most lenses. However, it appeared that the parallelism of the focal plane to the lens mount had actually gotten a little worse.
After correlating test results from ten of the 13 lenses I had used in my initial tests, I found that the average lens flange to focal plane distance in the camera had NOT really changed much at all, and that the parallelism error was indeed worse. The focal plane parallelism error was almost double what it had been before.
What made the difference? The only lenses that reached infinity focus after the Leica M9 was serviced were the lenses which had been serviced since the time of the first test. This lens service increased the lens flange to focal plane distance slightly, so that the flange to focal plane distance would match that of newer Leica brand lenses such as the 35mm f/2 Summicron-M Asph and the 75mm f/2.5 Summarit-M. My tests to date show that the newer Leica lenses have a lens flange to focal plane distance that is up to 0.02mm or maybe even 0.03mm longer than many older lenses.
The lenses which had not been serviced had almost exactly the same focus error at infinity that had been the case for tests before the Leica M9 was serviced. So, the average lens flange to focal plane distance in the camera had not changed enough to even be reliably measured! The largest measured focus difference with an unserviced lens was only 0.01mm, which is barely within the margin of error for the tests.
So, based on these tests, Leica's service (probably done here in the USA) actually made the camera somewhat worse! It now appeared to have slightly more lens mount to focal plane parallelism error (evidenced by having to double the shimmed "tilt" of a lens to compensate for it) and the rangefinder was now misaligned vertically.
New test results with 10 of the 13 lenses initially used test the Leica M9 follow. The 50mm Industar, 90mm Elmarit, and 135mm Hektor were not used in the second round of tests. Results show the actual focus distance when the focus is set at the infinity stop. The calculated lens flange to focal plane distance error is shown only for the center.
The images are still focused closer on the right side of the picture unless the lens was asymmetrically shimmed to compensate for the remaining camera focal plane parallelism error. A Yes or No after SN indicates if the lens (or a related M39 to M adapter) was also serviced since the initial tests:
Lens A: 12mm f/5.6 Voigtlander UW Heliar M39, SN 9051046: No
Best Focus Distance for: Left / Center / Right of picture // Focus error.
4m / 3.5m / 3m // +0.041mm error at f/8.0 // No change to lens. Similar result!

Lens B: 21mm f/4.0 Voigtlander Color Skopar M, SN 8030194: Yes
Best Focus Distance for: Left / Center / Right of picture // Focus error.
Just Past Inf. / Inf. / Inf. // 0mm at f/6.8 // Mount thinned on one side.

Lens C: 28mm f/2.0 Voigtlander Ultron M, SN 8150014: Yes
Best Focus Distance for: Left / Center / Right of picture // Focus error.
Just Past Inf. / Inf. / 40m // 0mm at f/2.4 // Lens infinity stop adjusted.
Just Past Inf. / Inf. / 60m // 0mm at f/4.8 // Lens infinity stop adjusted.

Lens D: 35mm f/2.0 Leica Summicron-M ASPH, SN 3854672: Yes
Best Focus Distance for: Left / Center / Right of picture // Focus error.
70m / Inf / 50m // 0mm at f/4.0 // Lens shimmed more asymmetrically.

Lens E: 40mm f/1.4 Voigtlander Nokton Classic M, MC, SN 8030691: Yes
Best Focus Distance for: Left / Center / Right of picture // Focus error.
Past Inf. / Just Past Inf. / 40m // -0.02mm at f/4.8 // Thinned 1 side.

Lens F: 50mm f/2 Zeiss Planar ZM, MC, SN 15868104: Yes
Best Focus Distance for: Left / Center / Right of picture // Focus error.
200m / 100m / 55m // +0.025mm at f/3.6 // Shim thinned on one side.
Lens G (50mm f/3.5 Industar) was not used in these tests.

Lens H: 75mm f/2.5 Leica Summarit-M, SN 4116211: No (unless by Leica)
Best Focus Distance for: Left / Center / Right of picture // Focus error.
250m / 200m / 160m // +0.028mm at f/4.0 // No change to lens. Almost same result!

Lens I: 75 f/2.5 Voigtlander Color Heliar M39, SN 9021669: Yes
Best Focus Distance for: Left / Center / Right of picture // Focus error.
Inf. / Inf. / 70m // 0mm at f/4.0 // M39 Adapter asymmetrically thinned.

Lens J: 90 f/2.8 Leica Tele-Elmarit-M Type II, SN 3096431: No
Best Focus Distance for: Left / Center / Right of picture // Focus error.
150m / 130m / 110m // +0.062mm at f/4.8 // No change to lens. Almost same result!
Lens K (90 f/2.8 Leica Elmarit) was not used in these tests.

Lens L: 135 f/4.0 Leica Elmar, SN 1770945: Yes
Best Focus Distance for: Left / Center / Right of picture // Focus error.
Just Past Inf. / Inf. / Inf. // 0mm at f/6.8 // Front lens tube thinned.
Lens M (135mm f/4.5 Hektor) was not used in these tests.
So, it was only service on the lenses (most of which I did myself over time) that resulted in measurable improvement!
In 2014, Leica (as in Leica USA) service department was only minimally responsive for nearly 10 months about addressing the flaws in the Leica M9 (including rangefinder misalignment) that did not exist before the early 2014 warranty service. However, after reaching Leica USA by phone in early 2015, they arranged for the camera to be repaired, with just days to go on the original warranty. Since it is desirable to have warranty remaining after the camera is later received back from Leica service, I purchased the extended M9 warranty from Leica.
In 2/2015, Leica USA performed tests on the M9 with some equipment that they did not have on hand for the 2014 repair. I don't know if measurements were before or after service, but their new instruments and reference lenses now appear to show a focal plane error of about half that noted in my test results. The rangefinder is also reported accurate at the optimized distance of about 1.2m, regardless of the rangefinder cam diameter on the lens used. Rangefinder vertical alignment and image blurring (covered in next section) was not fully addressed though.
Appendix B1: Leica M9 Rangefinder Came Back with Poor Vertical Alignment.
Please see Appendix B2 for the current (2015) state and performance of the M9 camera.
When the Leica M9 was new, the rangefinder was a sight to behold, and it remained so until I got the camera back from Leica warranty service. In spite of the issues with infinity focus, the rangefinder image had formerly been bright, well defined, and perfectly aligned in the vertical direction. This gave it the snap needed for accurate focus. I could also look through it with a small 8x20 monocular (which I did for critical focusing) and both images were sharp, of reasonably similar brightness, and would perfectly merge, even when viewed at 8x.
This is not the case after the camera came back from service, so it has to go in for service again, even if only to address this new misalignment. When I sent the camera in, I had recommended that only the longitudinal sensor location be moved to correct the infinity focus, so as not to disturb what had been an excellent rangefinder with the exception of sensitivity to large lens cam radii. The rangefinder was unfavorably changed in a big way during service by Leica, in that it had become vertically misaligned, as well as having a few other new issues.
The silver lining is that the rangefinder does not appear to be as sensitive to large rangefinder cam radii as it used to be. The rangefinder also appears to focus reasonably well with the 75mm Summarit-M lens that was provided to Leica with the camera. Pictures at near distances seem to be in relatively good, though not perfect, focus. The rangefinder causes the picture to far focused a little with this and almost all of my other lenses, especially at subject distances less than 10 meters.
The vertically misaligned rangefinder image is not entirely consistent in the degree of vertical misalignment, giving the impression that something could be loose. One of the rangefinder images is now also possibly dimmer than it was, as well as being somewhat blurred and discolored, almost as though an optical component was stressed. The blur is reminiscent of astigmatism which can result from a stressed mirror or beamsplitter. The blur is worse in low light, when one's eye pupils are wider. The rangefinder blur did not exist before, even when viewed through a monocular that used the full diameter of the camera's eye lens.
Vertical misalignment of the rangefinder, while not huge, is worse than what I usually see in decades old Leica M film cameras, and even my decades old Leica CL film camera. This makes it difficult to focus the rangefinder when compared to its original state, which had been fabulous.
One demonstration of how good the rangefinder used to be is that, in the resolution tests, the pictures of the mantle clock had to be focused and taken only once. No focus bracketing was required, as long as I compensated for the slight and consistent near focus in the picture versus the rangefinder.
I'm not sure why the second rangefinder image would have become dimmer seemingly discolored. It may only seem dimmer and discolored because the blurring would dim small highlights. Or, if it is real, maybe it is from outgassing of adhesive used to attach the new rubbery camera cover that Leica used instead of the original Vulcanite.
The camera has to go back in for service just to fix at least the new vertical rangefinder image misalignment. In the meantime, I may be going back to my Hasselblad and Micro 4/3 cameras for everything except wide angle pictures, or pictures of distant objects. It now is not as easy to quickly and accurately focus the Leica M9, which has led to many missed or defocused shots. This was an unexpected development. The camera did not get sent to Germany that I know of, and maybe that is why the service results are not so good.
The images of the rangefinder below were taken through the eye lens of the Leica M9, using an Olympus E-P2 camera and a 135mm f/4.5 Hektor lens. The Hektor was stopped down to close to the aperture of the viewfinder eye lens. A +0.5 diopter lens was used, which makes the viewfinder image of objects at infinity appear to be about 10 meters away in the M9 viewfinder, based on the Hektor lens focus settings.
Leica M9 Rangefinder Arrived Degraded After Camera Serviced.
Leica M9 Rangefinder Came Back Not so Good.
© Copyright 2014 Jeffrey R. Charles. All Rights Reserved.
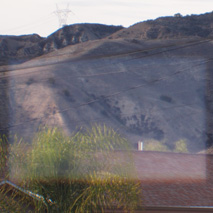 |
 |
 |
Leica M9 Rangefinder Image Degraded and Misaligned After Initial Service.
Upon receipt of the Leica M9 after warranty repair, the vertical rangefinder calibration was almost as bad as I'd seen in a Leica camera that was not ages old. By comparison with how it was before service, the second image in the rangefinder is dim, blurred vertically, and even out of alignment vertically. Vertical misalignment appears to be about 1.5 arc minutes, though it has varied slightly. This is detectable with normal 20/20 vision, and it is very obvious when a magnifier is used behind the camera eyepiece for critical focusing.
LEFT: Under some lighting conditions, one image in the rangefinder patch is now dim compared to its former appearance. Equally important, it is not consistently vertically aligned with the other image. Brightness is difficult to quantify, but before service in 2014, images in the Leica M9 rangefinder patch were notably clearer and better matched in brightness than images in the rangefinder of my Leica CL, while they now appear to be closer to the more mismatched CL rangefinder images.
CENTER: One of the rangefinder images of the while vertical pipe at center is the vertical, dim, slightly yellow object just to its left. The image is dim, blurred, and vertically out of alignment, being higher than the brighter white image. The brightness difference is exaggerated a little here because the lens used to take this image had an aperture (entrance pupil) somewhat larger than the pupil that of my eye in daylight. However, it is similar to the rangefinder image mismatch seen in low light. Vertical blur is far more than what would result from the diffraction limit of resolution for the effective aperture of the viewfinder optics. The angular width of the white pipe is about 3.8 arc min.
RIGHT: The rangefinder image of the lower left of this landscape is dim and fuzzy. Also, the second image of the tower (on right side of this image) is almost too dim to see very well. This image was even processed to enhance visibility of the second image. Before servicing, I used to observe a clear second image of the tower perfectly merge with the main image, while looking through the Leica M9 eye lens with an 8x monocular. With the rangefinder as it is now, it's hard to tell when the images are laterally merged under many lighting conditions, including those for a basic picture such as this.
|
After service, all lenses except the 135mm Elmar focused farther away than the rangefinder indicated at close subject distances. The difference appears to be a bit less consistent than the near focusing versus the rangefinder that occurred before service. Some of the inconsistency is no doubt partly due to adjusting the older and off-brand lenses to reach infinity focus at the center of the Leica M9 image after it was serviced, and to match the newer lenses, which have never been worked on. (The lens adjustments can easily be undone, but then they would not quite reach infinity focus on the Leica M9 camera.) The table below shows the situation both before and after service:
Focus Difference Compared to Leica M9 Rangefinder Before Service of M9 (prelim.):

Lens focal length and brand:	Focus vs RF	Error at 1m Subject Distance
21mm f/4.0 VC CS, Version 2	Near		30mm (approx) at f/4
28mm f/2.0 VC Ultron		Near		25mm at f/3.4 (intermittent)
35mm f/2.0 Summicron-M ASPH 	Near		10mm at f/2.8 (or less; consist.)
50mm f/2.0 Zeiss Planar ZM	Near		20mm at f/2.5 (inconsistent)
75mm f/2.5 Summarit-M		Near		20mm at f/4   (inconsistent)
90mm f/2.8 Tele-Elmarit-M	Near		25mm at f/3.4 (consistent)
135mm f/4.0 Elmar (1.5m dist.)	Near		40mm at f/5.6 (before lens adjust)
Focus Difference Compared to Leica M9 Rangefinder AFTER 2014 Service of M9:

Lens focal length and brand:	Focus vs RF	Error at 1m Subject Distance
21mm f/4.0 VC CS, Version 2	Far		30mm (or less) at f/4
28mm f/2.0 VC Ultron		Far		18mm (approx) at f/3.4 (*)
35mm f/2.0 Summicron-M ASPH	Far		20mm at f/2.8 (inconsistent)
50mm f/2.0 Zeiss Planar ZM	Far		30mm at f/2.8 (consistent)
75mm f/2.5 Summarit-M		Far		15mm at f/4.0 (consistent)
90mm f/2.8 Tele-Elmarit-M	Far		5mm at f/4.8  (consistent)
135mm f/4.0 Elmar (1.5m dist.)	Near		25mm at f/4.8 (*)

* Indicates that rangefinder shows slightly past infinity focus with lens.
* The 75mm and 90mm lenses have not been serviced or adjusted.
When received after the 2014 service, there were a few other differences in the rangefinder. Before service, all lenses focused slightly nearer than the rangefinder indicated. Another difference was that the rangefinder had quite a bit of new free (no resistance) travel past infinity, possibly up to half a degree (over three times more free travel past infinity than before). Another is that the rangefinder stops moving just slightly before the minimum focus distance with the 35mm f/2 Summicron is reached. There was a slight amount of this before, but it is slightly more obvious now.
The single thing that appeared to improve in the rangefinder is that it now works better with a lens having a large rangefinder cam radius. However, since it takes so long to focus with the second image misaligned and maybe dimmer, I miss quite a few shots compared to before. Because of this, I've gone back to some of my other cameras for everything except zone focus wide angle pictures and landscapes I can use the infinity stop for.
Going back to other cameras, even temporarily, is a painful regression, given the cost of the M9, and the fact that I'd put much of my sparse spare time into gradually adjusting and shimming most of my older Leica mount lenses to match the back focal distance of newer Leica lenses such as the 35mm Summicron-M ASPH and the 75mm f/2.5 Summarit-M lenses. (The older Leica lenses averaged 0.03mm less back focal distance than the newer lenses.)
Let's hope Leica gets it right the second time, and fixes the new rangefinder problem without mis-aligning anything else. It would also be nice if the lens mount versus focal plane parallelism is adequately addressed, since then it would be practical to take pictures of distant objects at wider apertures, which would allow more pictures to be hand held. A proper repair would also make it feasible to use a lens at f/1.4, which is for now out of the question due to the current lens mount to focal plane parallelism error.
APPENDIX B2:
Infinity, rangefinder, and sensor performance after warranty service in early 2015:
Test Series 3: After Second Leica M9 Service in 2015.
(Significant improvement in resolution change after camera serviced.)
The Leica M9 arrived back from service before I could send a 50mm f/1.4 Summilux-M ASPH lens to them to validate the lens and camera together. Not too long after the camera was received back, a few tests were done with the 50mm Summilux, and with lenses ranging up to a 135mm f/2.8 Elmarit. Initial results show that the camera is much closer to the mark, and that the rangefinder is closer to its original condition in terms of alignment, but not so much in terms of clarity in the second rangefinder image.
However, the camera died after only a few hours of use. Leica came to the rescue with procedures to get it going again without sending it in, so it worked out OK. However, the camera crash may have undone hot pixel mapping that Leica performed, since these came back. Details about the recovery are at the end of this section. Some tests below were done before the camera crash, and others were done after. This section is not finished since my web pages obviously have far lower priority than ongoing medical stuff.
Somewhat Improved M9 Performance on Distant Subjects, After 2015 Warranty Service:
As far as infinity focus and focal plane parallelism with the lens mount, test with the 50mm f/1.4 Summilux-M ASPH lens aren't too bad, in that images at infinity look pretty sharp even at wide apertures. The lens to focal plane distance of the 50mm Summilux also appears to be very close to that of Leica's reference lenses, as detailed below.
Based on test information from Leica, their post-repair measurements with one of their reference lenses showed that the M9 lens flange to focal length distance is down to only about 0.011mm too long in the center. My own field tests with the 50mm f/1.4 Summilux-M ASPH lens show that the lens to focal plane distance is only 0.009mm too long on the M9, which is within the margin of error for a field test. (A lab test can be more accurate, but micro lenses on the image sensor can complicate measurements.) Field tests show that the longitudinal position of the 50mm Summilux-M ASPH lens is within 0.002mm of Leica's reference lenses, which is within the margin of error.
This is good to know, but it seemed odd because only a few of the many Leica M lenses I tested were even close to Leica's reference lens. Specifically, only the following 4 lenses were within 0.01mm of the Leica's reference lens:
- 35mm f/2.0 Leica Summicron Asph, SN 3854672 (0.009mm longer LF-FPD)
- 50 f/1.4 Leica Summilux-M ASPH, SN 4264258 (0.002mm longer)
- 75mm f/2.5 L. Summarit-M, SN 4116261 (at least 0.003mm shorter)
- 135mm f/2.8 Leica Elmarit, SN 2989694 (0.005mm longer)
More than ten other lenses (some of which did not appear to have ever been serviced) had shorter lens flange to focal plane distances than the Leica reference lens, with most differing from the reference lens by about 0.03mm. My Leica CL lens flange to focal plane distance is also shorter than the reference lens distance by about the same margin. Lenses that did not agree with Leica's reference lenses (before they were tweaked to agree) included the following. Of these, every last one of the third party lenses initially did not agree with the reference lens:
- 12mm f/5.6 Voigtlander (VC) Ultra-Wide Heliar SN 9051046 (0.04 short, until M39 ad. shortened)
- 21mm f/4.0 VC Color Skopar SN 8030194 (0.05mm too short, until back of lens barrel shortened)
- 28mm f/2.0 VC Ultron SN 8150014 (0.04mm too short, until infinity stop adjusted)
- 40mm f/1.4 VC Nokton SN 8030691 (0.03mm too short, until one internal shim removed)
- 50mm f/2.0 Zeiss Planar ZM SN 15868104 (0.04mm too short, until one internal shim removed)
- 75mm f/2.5 VC Color Heliar SN 9021669 (0.05mm too short, until M39 adapter shortened)
- 90mm f/2.8 Leica Elmarit SN 1709275 (0.05mm too short, until infinity stop adjusted)
- 90 f/2.8 Tele-Elmarit-M SN 3096431 (0.02mm to 0.05mm too short, not adjusted)
- 90 f/2.8 Elmarit-M SN 3557058 (0.05mm too short, until infinity stop adjusted)
- 90mm f/4.0 Leica Elmar-C SN 2605156 (0.05mm too short, until infinity stop adjusted)
- 135mm f/4.0 Leica Elmar SN 1770945 (0.07mm too short, until front barrel shortened)
- 135mm f/4.5 Hektor SN 2406831 (0.013mm too short, until M39 adapter shortened)
Comparison images of the usual test subjects (crescent moon, distant fence, and distant tower) follow:
Performance Comparison between Reference Camera and Leica M9 (After 2015 Repair).
Comparison of performance on distant objects, with digital camera bodies that both permit infinity focus. The Leica M9 now more or less permits infinity focus with most lenses.
© Copyright 2014, 2015 Jeffrey R. Charles. All Rights Reserved.
 |
50mm Summilux Reaches Infinity Focus on MFT Camera (left), and on Leica M9 (right 2).
The Leica M9 provides better lunar images than it did before the 2015 service. The 50mm f/1.4 Summilux-M ASPH lens was used instead of the 40mm Nokton for these pictures because the 50mm is known to be calibrated to the M9. The f-stop was f/2.4 for all three of these pictures.
LEFT: The 50mm Leica Summilux does considerably better than the 40mm Nokton on the moon, as this 150 percent crop from a Micro 4/3 image shows. This is a 2 second exposure at ISO 100 with an Olympus E-P2 camera. The Summilux lens was almost this sharp in the center even at f/1.7.
CENTER: The Leica M9 provides a better image than before the 2015 service, but does not equal Micro 4/3 with the same lens. But the difference is now due only to the larger pixels on the Leica M9 sensor. However, the M9 will best Micro 4/3 if a lens of the same field of view is used. This is a 2 second exposure at ISO 80. In-camera sharpening was turned off for this picture. The Leica images have more blooming and some color aliasing around brighter parts of the moon.
RIGHT: This image shows dark artifacts near ends of the crescent that appear even when the M9 in-camera sharpening is at its lowest setting. This is one reason I often turn sharpening off. This is a 2 second exposure at ISO 160, processed to be about the same brightness as the other pictures in this group. The Micro 4/3 image at left also has sharpening artifacts, but they are less obvious.
|
 |
 |
135mm Elmar Focuses Out to 200m on MFT Camera (left), and on Leica M9 (right).
The fence wire test is better after the 2015 Leica M9 warranty service. Here, the same 135mm Elmar lens is used at f/6.8 on a Micro 4/3 camera for the left image, and on the Leica M9 for the right one.
The LEFT 200 percent crop was taken with an Olympus E-P2 M4/3 camera and 135mm Elmar lens.
The RIGHT 300 percent crop was taken with the Leica M9 (after the early 2015 warranty service) and the same lens, also at f/6.8. Some sharpening was used. The 135mm Elmar could focus perceptibly past the fence, which is about 200 meters away. In fact, a 135mm f/2.8 Elmarit, working at f/4, was also able to reveal the fence wires, and it also could focus slightly past the fence, which is as it should be. Pictures when the fence wires were more strongly backlit showed the wires that end just above the lateral fence pole at the top of the fence even better, but had more aliasing that obscured the directions that some fence wires actually run. At some point, I'd like to redo this test when the lighting is the same for both pictures.
|
 |
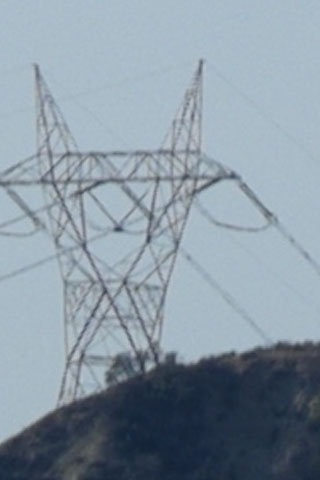 |
Leica M9 with 135mm Elmar (right) Now Significantly Better than MFT with 75mm (left).
The tower test shot is also good after the 2015 Leica M9 service. Unlike the two tests above, point of this test is to compare the image quality to Micro 4/3, when the field of view is similar for each camera. Thus, a 75mm lens is used for the Micro 4/3 photo, and a 135mm is used on the Leica M9.
The LEFT image is with an Olympus E-P2 Micro-4/3 camera and a 75mm f/2.5 VC lens, at f/4.8.
On the RIGHT is a 170 percent crop from a picture taken with the Leica M9 and a 135mm Elmar lens, working at f/6.8. This photo was hand held, so it is tilted a little and not razor sharp. Infinity performance is better, since the double wires hanging from each side of the tower were also resolved with a 135mm f/2.8 Elmarit lens, even when used wide open. As in most other tests, the Leica M9 image of the hillside in front of the tower has less noise and captures more real shadow detail.
|
It still appears that even the new (to me) Certified Pre-Owned 50mm Summilux-M ASPH lens does not quite reach infinity focus, though the error is slight. Here, the image of distant objects is quite sharp, but the green to cyan fringing in the image center that characterizes small angle subject matter residing just beyond focus reveals that the lens may not quite be reaching infinity on the M9. The same is true of the 75mm f/2.5 Summarit-M lens.
In many newer Leica M mount lenses, the central image beyond best focus is slightly softer than subject matter slightly closer than best focus. This makes it preferable to focus slightly past infinity in cases where there is any error. (See photos in Appendix D and renderings in Appendix H for this aspect of "Bokeh Fringing".) The good news is that lens mount to focal plane parallelism looks a little better, at least based on the newer 50mm f/1.4 Summilux-M ASPH.
Initial tests appear to show that best central focus with the 50mm Summilux-M ASPH is at least 150 meters away when the lens is set to infinity. Specifically, tests show best focus at 150 meters when a B+W UV filter is used, and farther away when the filter is not used. Best focus appears to be slightly closer toward each edge, both with and without the filter. According to the simplified formula in Appendix A, the distance to best focus can be used as follows to arrive at the lens flange to focal plane distance error. We'll start with the distance with the UV filter:
e = f / (d/f)
..where e is the lens flange to focal plane error, d is the distance to best focus, and f is the lens focal length.
Therefore, in the case of a 50mm lens that has best focus at 150m when set at infinity:
e = 50mm / (150,000mm / 50mm), or:
e = 50 / 3,000, or:
e (camera's lens flange to focal plane error) = 0.017mm too long.
Without a filter, the lens flange to focal plane error with the 50mm Summilux-M ASPH lens tests at only about 0.009mm too long. This is in close agreement with Leica's post-service measurement of +0.011mm.
At f/1.4, the error with the filter would result in about 12 microns, or slightly less than two pixels, of focus blur. At f/2.8, the focus blurring is less than one pixel. This is getting down to less than twice as much lens mount to focal plane error as what I recall Leica may have advertised in the 1970's for their film cameras and lenses. If the filter was used, it would still too much error to fully utilize the fast but expensive f/1.4 f-stop provided by the 50mm Summilux for astrophotography and other distant subjects.
However, without the filter (which is what really matters), the error results in less than one pixel of focus blur even with the lens at f/1.4. Fortunately, different filters can be used with various lenses to optimize focus without actually working on a lens. One pixel of focus blurring is certainly getting there, but no cigar yet. However, the jury is still out in some respects, since photos of stars do not always appear to have the green to cyan bias.
Even for small focus errors with fast lenses, subject matter slightly beyond focus fringes a green to cyan, as with the Summilux lens, revealing that it is not quite reaching infinity focus, even where focus blurring is only one pixel. (See Bokeh Fringing details in Appendix D and H.). The result is that thin backlit subjects (such as distant tree limbs and leaves) can fringe just enough, even at f/2.8, to take on a green or cyan cast, as shown in one of the images below. Fine backlit detail is replaced by the color of the background fringing. When the same Summilux lens is used on a Micro 4/3 camera that permits it to reach infinity focus, the green to cyan cast is eliminated, as also shown below. Therefore, the lens is just barely not reaching infinity focus on the M9. But it's really close.
In other words, even if focus blur is slightly less than a pixel, bokeh fringing can cause green to cyan fringing or a cyan cast on distant small angle backlit objects. When the lens is actually focused clear to infinity on a different camera, the green to cyan fringing disappears, and a sharp image without this fringing results. Instead, a much dimmer violet-blue fringe is then present. If the lens is focused ever so slightly past infinity on a different camera, fringing changes to a magenta cast, but the image may look slightly sharper than one not quite focused to infinity.
Infinity performance with multiple lenses is shown below. For this data, most lenses were adjusted to be very close to two of my lenses (50mm f/1.4 and 135mm f/2.8) that appear to already be calibrated closest to Leica's reference lenses. The 50mm is a Certified Pre-Owned lens that I have not adjusted at all, so as to keep its CPO warranty intact. Images are still focused slightly closer on the right side of the picture unless the lens was asymmetrically shimmed to compensate for the remaining camera focal plane parallelism error. A Yes or No after SN indicates if the lens (or a related M39 to M adapter) was also serviced since the initial tests:
Lens A: 12mm f/5.6 Voigtlander UW Heliar M39, SN 9051046: No
Best Focus Distance for: Left / Center / Right of picture // Focus error.
Inf / 25m / 10m // +0.006mm error at f/5.6 // Slightly thin M39 adapter.

Lens B: 21mm f/4.0 Voigtlander Color Skopar M, SN 8030194: Yes
Best Focus Distance for: Left / Center / Right of picture // Focus error.
Just Past Inf. / Inf. / Inf. // 0mm at f/6.8 // Mount thinned, shim added.

Lens C: 28mm f/2.0 Voigtlander Ultron M, SN 8150014: Yes
Best Focus Distance for: Left / Center / Right of picture // Focus error.
Just Past Inf. / Inf. / 90m // 0mm at f/2.8 // Lens infinity stop adjusted.
Just Past Inf. / Just Past Inf. / Inf. // -0.01mm at f/4.8 // Inf. stop adj.

Lens D: 35mm f/2.0 Leica Summicron-M ASPH, SN 3854672: Yes
Best Focus Distance for: Left / Center / Right of picture // Focus error.
Inf. / Just Past Inf / Just Past Inf. // -0.010mm at f/2.8 // Shim of 2014.
Lens E (40mm f/1.4 VC Nokton) was not used in these tests. See lens E2.

Lens E2: 50mm f/1.4 Leica Summilux-M ASPH SN 4264258: No
Best Focus Distance for: Left / Center / Right of picture // Focus error.
350m / 270m / 200m // +0.009mm at f/2.4 // No Filter (0.017mm w/filter).
Lens F (50mm f/2.0 Zeiss Planar ZM) not used in these tests.
Lens G (50mm f/3.5 Industar) was not used in these tests.

Lens H: 75mm f/2.5 Leica Summarit-M, SN 4116211: No (unless by Leica)
Best Focus Distance for: Left / Center / Right of picture // Focus error.
500m / 400m / 300m // +0.014mm at f/4.0 // No change to lens since acquired.
Lens I (75mm f/2.5 Voigtlander Color Heliar SN 9021669) not used in this test.

Lens J: 90 f/2.8 Leica Tele-Elmarit-M Type II, SN 3096431: No
Best Focus Distance for: Left / Center / Right of picture // Focus error.
400m / 350m / 310m // +0.023mm at f/4.0 // No change to lens.
Lens K (90 f/2.8 Leica Elmarit) was not used in these tests.

Lens K2: 90 f/2.8 Leica Elmarit-M, SN 3557058: Yes
Best Focus Distance for: Left / Center / Right of picture // Focus error.
120m / 160m / 100m // +0.051mm at f/3.4 // No change to lens since new.
200m / Inf. / 160m //  0.000mm at f/3.4 // Lens inf. stop adj. 0.04mm fld crv.

Lens L: 135 f/4.0 Leica Elmar, SN 1770945: Yes
Best Focus Distance for: Left / Center / Right of picture // Focus error.
Just Past Inf. / Inf. / Inf. // 0mm at f/6.8 // Front lens tube thinned.
Lens M (135mm f/4.5 Hektor) was not used in these tests.

Lens N: 135 f/2.8 Leica Elmarit, SN 2989694: Yes
Best Focus Distance for: Left / Center / Right of picture // Focus error.
NM / 3000m / NM // 0.006mm at f/2.8 // No change to lens since acquired.
The largest error is less than 0.025mm, and is with an older 90mm Tele-Elmarit-M lens. Error is only about 0.01mm with 50mm Summilux, which is a lens that is known to be (by offset from Leica's measurements and my measurements) calibrated fairly close to Leica's reference lenses.
Improved (compared to 2014) Rangefinder Performance:
The M9 rangefinder accuracy at near to moderate distances was much improved by the 2015 Leica warranty service. So much better that the 50mm f/1.4 Summilux can be accurately focused down to less than 1 meter at full aperture. With some lenses, the rangefinder calibration is now even more accurate than when the camera was new.
Focus Accuracy:
Focus with the 50mm f/1.4 Summilux-M ASPH is close enough that uncompensated results are good when the lens is used at f/3.4 and slower, and slight but predictable compensation permits good focus when using the lens wide open. The 75mm Summarit-M lens tests off a little, but its small error is repeatable so it can easily be compensated for. All of the lenses near focus only slightly, and this is the easiest bias to correct for by just leaning forward slightly
The most surprising result was that the rangefinder is relatively accurate when used with an older 135mm f/2.8 Elmarit lens and its goggles. This speaks well of both the rangefinder and of the ability of the 135mm lens goggles to maintain good alignment over several decades. The 135mm f/2.8 Elmarit also focuses clear to infinity on the M9, and the rangefinder agrees precisely with the image at infinity. Here's the performance with various lenses:
Focus Difference Compared to Leica M9 Rangefinder AFTER 2015 Service (prelim.):

Lens Focal Length and Brand:	Focus vs RF	Error at 1~1.5m Subject Distance
21mm f/4.0 VC CS, Version 2	Near		10mm (or less) at f/4 and f/4.8
28mm f/2.0 VC Ultron		Far		5mm at f/2.8 (semi-consistent)
35mm f/2.0 Summicron-M ASPH	Precise		0mm at f/2.8 (semi-consistent)
50mm f/1.4 Summilux-M ASPH	Near		10mm at f/1.4 to f/3.4 (consist.)
50mm f/2.0 Zeiss Planar ZM	Near		10mm at f/2.8 (consistent at 2.8)
75mm f/2.5 Summarit-M		Near		10mm (or less) at f/4 (consist.)
90mm f/2.8 Tele-Elmarit-M	Near		12mm at f/3.1 (semi-consistent)
90mm f/2.8 Elmarit-M		Near		13mm at f/3.4 (semi-consistent)
135mm f/2.8 Elmarit (1.5m dist)	Near		10mm at f/2.8 (consistent. WOW!)
135mm f/4.0 Elmar (1.5m dist.)	Near		12mm at f/4.0 (consistent)

* 28mm f2 lens was serviced to keep rangefinder from showing slightly past infinity.
* 50mm f/1.4, 75, 90TE, and 135mm f/2.8 lenses have not been serviced or adjusted.
Images Showing Increased Accuracy of the Leica M9 Rangefinder - With a 135mm f/2.8 Lens!
Images showing increased accuracy of the Leica M9 rangefinder (Compared to 2014).
© Copyright 2015 Jeffrey R. Charles. All Rights Reserved.
 |
|
Leica M9 Rangefinder is Accurate to 10mm at a Distance of 1.5m!
The LEFT 50 percent crop would be par for the course with a Leica M3 film camera, but it is apparently quite a feat for a modern digital rangefinder camera, even based on Leica's 135mm lens recommendations. What we have here is an accurately focused image through a 135mm f/2.8 Elmarit lens, working at maximum aperture! Focus was set on the cat's nose. Actual best focus is only about 10mm closer to the camera than this, so the cat's nose is still within the shallow depth of field range. No focus bracketing was required. I just focused on the cat's nose and took a picture! It took quite a while to focus due to the continued mismatch in rangefinder image brightness, but once the second dim image was detected and merged with the brighter first one, accurate focus was the result! Note the relative lack of "bokeh fringing" with this lens, even at f/2.8. The tradeoff is lower contrast on the in-focus image, with dim violet-blue fringing around brighter highlights. The fringing was easily controlled by reducing highlight saturation.
The RIGHT image shows...TBD. (Place holder image.)
|
Relative Brightness and Vertical Alignment of the Rangefinder Images:
The rangefinder still has notable mismatch in image brightness, and this frequently increases the time required to achieve accurate focus. This is the case even when the pupil diameter used to look through the rangefinder is smaller than the entrance pupil of the optics that provide the second image in the central rangefinder rectangle. Some vertical misalignment is still apparent, but it appears to be reduced by more than half, and to be in the opposite direction it was before.
The obvious vertical spectral smearing of the second rangefinder image (the cause of this smearing is not known; it was just there after the 2014 repair) is still present, and exceeds 1 arc minute in height. Spectral smearing makes it difficult to identify the exact vertical center of the rangefinder channel image, so a more precise measurement of its position was used for the present test.
In the present test, a Micro 4/3 camera with a 135mm Hektor lens was used behind the Leica M9 eyepiece. The Hektor was stopped down to 3.5mm aperture, or about f/39. This is possible because most early Hektor lenses had a little aperture ring travel past f/32. An aperture of 3.5mm is similar to the aperture one's eye iris may have under average conditions.
The limited aperture also permits formation of a diffraction limited image through the main viewfinder window, which in turn provides an accurate way to measure the centroid of the image of a point source or a small solar reflection. The aperture is also small enough that elongation of the Airy disk and first diffraction ring, as imaged through the rangefinder patch channel optics, will be noticeable due to aperture clipping if the Hektor lens is not accurately aligned with the camera eyepiece and rangefinder channel. This helps simplify test alignment.
Combined with tweaking alignment of the Hektor lens to where there is no spectrum visible in the horizontal direction, this provides good alignment for testing. It has not been possible to eliminate spectrum in the vertical direction, since this is a flaw that the rangefinder channel has had since the initial warranty service early 2014. The vertical spectrum always has blue on the top and red on the bottom, while spectrum that is due to misalignment of the test setup varies according to the direction of test instrument misalignment, and disappears with proper alignment. I used to align complex optical systems for a living, so alignment for a test like this is relatively simple.
For the rangefinder test, a reflection of the sun off the corner of a glossy black truck body panel was imaged from a distance of 12 meters. The truck panel has a radius of 40mm in one direction and 5mm in the other direction. Here, the maximum size of the reflected solar image is equal to the size one half degree would encompass at half the radius of the body panel. As will be shown below, this is small enough for the test.
The maximum size of the solar image from the 4 cm radius axis of the body panel would be: 20mm*TAN0.5 deg, or 0.17mm. From a distance of 12 meters, such a spot subtends only 0.000014 radians, or 14.1 micro-radians, which is about 3 arc seconds. This small angular size means that the oval image that results from the smaller radius in the other axis of the truck body panel will not be an issue in the results because it is a great deal much smaller than the diffraction limit of resolution for the utilized test optics. When tests must be more exacting, I use the reflection of the sun from a ball bearing.
The angular size of the Airy disk (to the first minimum, before the first diffraction ring) from the combination of the 3.5mm aperture set on the Hektor lens, combined with the 0.68x magnification of the Leica viewfinder should be equivalent to that of a 2.4mm aperture. The 0.68x viewfinder magnification also has the effect of shortening the effective focal length of the test system from 135mm to about 92mm. For the predominantly yellow color of the imaged spot from the spectrally blurred rangefinder channel, the theoretical size of the Airy disk, in micro-radians, will be 2.44*560/2.4, where 560mm is the wavelength in nanometers and 2.4 is the effective aperture in millimeters. The resulting 569 micro-radian Airy Disk corresponds to 117 arc seconds, or 1.96 arc minutes.
In the Olympus E-P2 camera used for the test, the Airy disk diameter measures about 11 of the camera's 4.3 nm pixels, or 47 microns. This is slightly smaller than the predicted 52 microns. Therefore, the numbers are not precise, but should be within about 10 percent. The measured results would imply that the Leica M9 viewfinder magnification may be slightly less than 0.68x. (However, the viewfinder most likely really is 0.68x.) Images below are 200 percent crops.
The pictures below show images from both apertures of the Leica M9 rangefinder in three different states. One shows the rangefinder channel image to the left of the main viewfinder image, another shows the images merged horizontally, and a third shows the rangefinder channel image to the right if the main viewfinder image. To the right of these is a composite of images in which the rangefinder channel spots are closer to the main viewfinder spot.
Images of Airy (e.g. diffraction) Patterns through Leica M9 rangefinder, to Assess Alignment.
Images of Large Airy (e.g. diffraction) Patterns through the Leica M9 rangefinder.
© Copyright 2015 Jeffrey R. Charles. All Rights Reserved.
 |
Leical M9 Rangefinder: Vertical Alignment Versus Spectral Blurring.
These high magnification images show a bright Airy Disk through the main Leica viewfinder channel, along with a dimmer and vertically blurred pattern imaged through the rangefinder spot channel. The blurred spots appear to have a different Airy disk size, being smaller horizontally due to being dimmer, and larger vertically due to spectral blurring. However, the first diffraction ring has a similar size on both images.
LEFT: The two arc minute diameter rangefinder channel image is left of main viewfinder image.
SECOND FROM LEFT: Images from both rangefinder apertures are merged horizontally.
SECOND FROM RIGHT: Rangefinder channel image is right of the main viewfinder image.
RIGHT: Composite picture aligned to the main viewfinder image, showing spectrally blurred rangefinder channel images on either side. Vertical misalignment of yellow light is about 1.3 pixels, or about 21 arc seconds. Vertical alignment is probably close to right on for 532nm green light.
|
The results show that the brightest (yellow) part of the spectrally blurred rangefinder channel spot (the spot that moves when a lens is focused) is about 1.3 pixels below the center of the main viewfinder spot. This corresponds to about 0.18 times the 1.9 arc minute diameter spot, for about 0.34 arc minutes, or 21 arc seconds.
A vertical misalignment of only 21 arc seconds is not enough to be directly observable by most people without magnification, but it is just enough to keep the rangefinder image from snapping into apparent alignment on fine details when best focus is reached, at least with the existence of spectral blurring in one channel. It is also enough misalignment to be obvious with a 2x to 3x focus magnifier.
However, the green (about 532nm) part of the image probably has close to perfect vertical alignment, which could mean that this wavelength was used in calibration. The rangefinder probably would test spot on with a 532nm monochromatic light source, and the spectral blurring would not be visible with a monochromatic test light source.
For field use, the vertical rangefinder alignment is better than after the 2014 repair, but is not quite as good as it was when the camera was new. Without the spectral blurring (introduced in 2014 warranty service), alignment would probably be adequate for average use without a focus magnifier. However, this falls short of its performance when new, and short of Leica M film camera rangefinders I've used.
Alignment might be fairly close to as good as it can get in the presence of vertical spectral smearing. So, we may be able to reluctantly call this rangefinder alignment adequate, partly because the camera has to be here (rather than at Leica) in order to get used or tested. However, it would be nice if the spectral blurring could be addressed at some point, since my eyes are not monochromatic.
One positive note is that the rangefinder is now slightly more accurate at close focus distances than it was when it was new! Unfortunately, it still does not have the image snap that makes focusing as fast as when new, but at least it is accurate when the images are merged horizontally. The slight residual near focusing of most lenses (compared to the rangefinder) at close distances is rarely a problem, since it is easy to lean forward slightly (as I did when the camera was new) to compensate. It is a great deal easier to lean forward than back, and the 10mm error with the 50mm Summilux is so small it often needs no compensation. Where there is slight error, the error is now biased in the best direction.
Light Meter Performance:
Up to the point of the 2015 repair, the light meter had performed well on all lenses longer than 21mm. However, it is now (preliminary) somewhat erratic, tending toward considerable underexposure in daylight at times its readings are off, yet being more accurate but tending toward a little over-exposure indoors. The meter had been one aspect that was quite reliable. Recent pictures that were taken one after another in bright conditions at the same (fast) shutter speed and f-stop also seem to vary, so it could be a new shutter issue rather than the meter. However, I don't think the shutter was serviced. The variation in exposure does not seem to happen with slower shutter speeds in dimmer light. Some of this could be related to the temporary failure of the camera which occurred only a few days later.
Miscellaneous Anomalies. The Camera Would Not Turn Off, Then, it Died!
(But the camera recovered, at least for now, after doing a few procedures recommended by Leica.)
The following part of this section is only temporarily included for troubleshooting purposes.
After only a few hours of use in the few days just after the M9 arrived back from service in 2015, it became sluggish, then locked up completely. Just before this, the info screen was showing about 30 percent of the battery power was left. Thinking the battery had gone flat without the camera shutting itself down, I turned off the power switch and removed the bottom cover to change batteries, but after several seconds delay, the camera beeped as though I had removed the cover while it was still on. This is similar to something that happened only one time when the camera was about 6 months old. However, what happened next was unprecedented.
When I put the bottom cover back on and took it off again (power still turned off) the camera beeped again. A while later, when the battery catch was released, the battery did not pop out, and had to be nudged a little to get it out. The battery was warm. After letting the battery cool down and then charging it, close inspection showed it had become slightly bloated on one side. Probably just enough to prevent a loose fit in the battery compartment. I obviously did not use this battery again. All of my batteries (including this battery) and chargers are Leica brand items.
I changed batteries, but it didn't help. Even with a newly charged battery, the camera was sluggish, taking 5 or 10 seconds to respond to any press of either the Set, Info, or Menu buttons. The ISO button didn't work at all, and the Play button was intermittent. The camera had also defaulted to RAW, and had lost all settings for sharpening and color saturation, etc. Lens detection was showing no coding. The meter did not work at all and the camera would not take a picture.
When the camera was turned off, it would not really turn off. For example, when the bottom cover was removed even several minutes after the power was turned off, the camera beeped after a few seconds of delay. After 10 more seconds of delay the screen light came on, then a few seconds later, it displayed a message that the bottom cover was removed. And all this is with the power switch turned off! In the previous few days, the battery would go dead within a day or two, even when the camera was turned off and left alone. Quite unlike prior behavior of any of my batteries, which are all Leica brand.
If a picture was being viewed in the camera, the play function often could not be turned off, and when the camera was turned off, the picture display stayed on (especially if any zooming had been done) and the busy light would flash without ever going off. The busy light would stop only after the bottom plate of the camera was removed more than 5 minutes later.
Swapping to a fresh memory card didn't do any good. With the exception of the image play function, the camera acted the same way with my original memory card, with a new memory card, and with no memory card at all. I tried turning the camera off and leaving it alone for some time, both with and without a battery in it. On some of the occasions when I left the battery out, the camera lost its image settings but retained the date and time. This could be due to the camera OS crashing, since the same thing happened when the Info button response was sluggish.
Then, several hours later, the camera just started working again. It was nice to see it resume working, but when there is no explanation for it, it makes one wonder if it will happen again, but at a critical time. This is not the sort of problem you'd want to have at an important event. As noted above, it was later found that one of the batteries was bloated ever so slightly on one side (noticed after charging), so the battery was removed from service.
But the camera wasn't out of the woods yet! Shortly after the above M9 problems, the camera worked for maybe 10 shots, then the problem started all over again. This time, it could take more than 20 seconds for the info button to get a response. While the info screen was displayed, it did not display lens coding, nor did it show the shutter speed that was set. The day after this, the camera could not take even one picture.
The symptoms left me with the impression that the camera was never turning off, and that it runs down the batteries and locks up. The warm battery creates the impression that it could be crowbarring (placing a heavy current draw on) the battery. Three batteries and two chargers were tried, but it seemed like the camera may be killing batteries, so I stopped trying to see if or when it may work again. But, Leica came to the rescue!
Leica recommended the following to restore the camera, and it seemed to work:
There were three stages. The first was reset, the next was removing the battery and leaving the camera alone so it could bleed down power, and the next was re-installing the firmware.
The first two stages are dealt with as one step below. Oddly, my settings survived the reset, so the reset function must not have worked while the camera was misbehaving. After the following, I used a dedicated low capacity SD memory card to make a "Recovery Card " that could be used in the field.
The following text adds a few observations and details about the process, but it should not be used instead of the precise directions in the Leica M9 camera manual, and the Leica instructions for updating the firmware.
PART A, RESET CAMERA AND REMOVE POWER SOURCE.
If the Leica M9 crashes, its menu may show settings that make it look like the camera is already reset. However, an actual reset must be performed before the camera may really recover. Even if the menus are sluggish, and take several seconds or even longer to respond to each press of a navigation button, it is worth attempting this process, since the alternative may be to send the camera back to Leica.
The objective is to reset the camera, then let it sit without a power source for some time (a whole day is best) to bleed down power from internal capacitors or other components that may cause certain corrupted aspects of the camera command set to remain.
A1.) With the camera power turned off, remove the memory card from the camera. If the camera has been acting sluggish, Wait at least a full minute between turning the camera off and removing the memory card.
A2.) If it is possible to access the main menu (even with delay due to slow response), scroll down to the reset function and activate it. Activation is done by pressing the "Set" button while "Reset" is highlighted in the menu.
My note: The camera may ask for confirmation with a message such as "Reset Camera to Basic Functions?" Confirm this by selecting "Yes" and pressing the "Set" button again.
A3.) My note: Allow several seconds to a minute for the camera to reset after selecting Reset before turning the camera power off. This delay is intended to compensate for cases when the camera is sluggish. If the camera was acting sluggish, wait at least one minute from the time the camera is turned off before proceeding to step A4.
A4.) Remove the bottom cover from the camera, then remove the battery. Leave the battery out of the camera for at least 12 hours, and preferably 24 hours.
A5.) Insert the battery in the camera, re-attach the bottom cover, and turn on the camera. The preceding steps may have solved the problem. If so, proceed with restoring your preferences and settings via the menu.
* My notes: If the camera malfunctions again, it could indicate corruption of the firmware.
* In this case, proceed to Part B. Firmware update.
PART B: FIRMWARE UPDATE:
Leica's web site, along with the Leica M9 instruction manual, include instructions for updating the firmware. The following is just to mention a few details and is not intended for use instead of Leica's instructions.
Instructions for updating the LEICA M8/M9/M Monochrom/M-E Firmware:
B1.) Insert a new, unused, relatively low capacity memory card in the camera. If no battery is installed, insert a charged battery and then attach the camera's bottom cover. Format an SD memory card in your Leica camera. (This creates the DCIM/100LEICA folders, among other things.) The following details may help for this step:
* Before proceeding, be SURE memory card is new and unused (so you don't lose photos or data).
* Turn the camera on, then wait several seconds.
* Press the Menu button and scroll down to the command to 'Format" the memory card.
* Press the "Set" button while the "Format" menu selection is highlighted.
* The camera may ask for confirmation you want to format the memory card. If so, confirm the command.
* After the camera screen reports successful formatting of the memory card, proceed to the next step.
B2.) Turn off the camera and remove the SD memory card. Then, insert the card into an SD card reader for your computer. The reader can be either an integrated one, or a separate reader that is connected to your computer. (A card reader is required for Firmware updates, since the firmware file must be downloaded, then copied onto the memory card.)
B3.) Download the Firmware file from the Leica Website. The file can be found under Service & Support/ Support/ Downloads Menu. Once downloaded, unzip the file. (This download and file unzip/extraction is best done before the process is begun.)
B4.) Save the unzipped file (extension ".upd" or ".upm") at the top level (e.g. root) of the SD memory card�s folder (e.g. directory) structure. (In other words, the file should not be located in any folder.)
My notes: For future use in the event of a camera freeze from corrupt firmware, also save the Firmware file on your computer. The Leica camera will delete the firmware file from the SD memory card during the firmware update process.
* If a firmware update may be done later, it may help to dedicate a low capacity SD card to firmware updates. In this case, you can copy a text, etc., file having firmware update instructions into a dedicated folder on the card so it will be easy to find. It may also be useful to have a PDF file of the camera instruction manual in the same folder.
* A second copy of the firmware file can be kept in a folder on the card, to replace the root directory copy that the camera deletes during a firmware update. The folder should have a name different from any of the folders the camera creates or stores pictures in. Before each recovery attempt, the firmware file must be copied from the dedicated folder on the recovery card to the root directory (e.g for use, the file should not be in any folder).
* A memory card dedicated to firmware updates should not be used for pictures.
* Firmware updates or re-installations should be done sparingly, due to the risks.
B5.) After copying the firmware file onto the memory card, properly remove the card from the card reader (this includes using the "Safely Remove Hardware" feature in Windows to stop services to the card before removal), then insert the card into the camera and close the bottom cover.
B6.) Turn on the camera using the main switch and wait for at least 3 seconds before continuing with step B7.
B7.) Confirm the prompt that appears in the camera monitor screen as to whether you want to update the firmware on the camera to the new version. This is done by pressing the right direction button of the central 4-way navigation switch on the camera to highlight "Yes", then pressing the "Set" button.
* Note: The firmware update process takes around 180 seconds (3 minutes). A progress bar should appear during the process.
* WARNING: Do not interrupt the firmware update by turning off the camera or by other means. Interrupting a firmware update can disable (or even "brick") the camera! This is a normal precaution for any firmware update in any device.
* If the firmware update is successful, you will be prompted to restart the camera using the main switch. (Contact Leica if firmware update is not successful or the camera problem is not resolved.)
B8.) After the camera reports successful update of the firmware, turn off the camera, wait a few seconds, and turn it on again.
B9.) Turn off the camera, remove the camera's bottom cover, wait a few seconds, and remove the memory card. Then insert a memory card you would use for taking pictures, if different from the card you just used. You can then confirm proper operation of the camera, and reconfigure your camera settings, as needed. The picture number can be reset by copying your most recent photo into the DCIM/100LEICA folder on the memory card before taking your first post-reset/update picture.
So, that's how the M9 was able to recover. I think I had done something similar to the overnight battery removal just before the camera worked for 10 shots. After the 2015 firmware update, it has worked for some time now, though I think the crash or recovery may have undone Leica's hot pixel mapping, since the same hot pixels now appear in some pictures.
Hopefully, the camera will work for a long time now. After the above appeared to work, I made a dedicated "recovery card" to keep in the camera case. I am thinking of also making some low resolution or montage images of certain pages in the instruction manual, then copying the manual images to any memory card I use in the camera. (If done properly and at an image size the camera can read, this should make it possible to review at least some of the manual on the camera screen.)
APPENDIX B3:
Infinity, Rangefinder, Sensor Performance after CCD Sensor Replacement (2017)
Test Series 4: After Third Leica M9 Service in 2017.
(Similar resolution with NEW sensor, but some radial blurring with wide lenses.)
In late 2015, my Leica M9 began to develop the dreaded "sensor corrosion" problem. In images, the problem began as medium to large (20 pixels or larger) bright spots or rings in the image. These spots or rings were not in the original subject matter. For example, if the moon was in a picture, there was an unusual localized blooming that made the illuminated part of the moon look like its limb (edge) had a large bump on it that was at least 10 pixels in radius.
Over the next several weeks and months, the areas of localized bright or blooming circles grew a little larger and began to have obvious dark spots in their centers. Before long, the spots were obvious even on pictures of a blue sky taken at wide apertures, and there were 14 of these large artifacts in every image. This made retouching to remove the spots impractical if not impossible. Inspection of the sensor through a loupe showed that the spots were slightly closer to the sensor surface than a piece of dust on the front of the sensor cover glass appeared to be.
After I posted sample images at a private site, Leica looked at them and confirmed that it was sensor corrosion. They put my camera in the queue for sensor replacement, but it was late 2016 before my camera's place in line came up.
A New Image Sensor!
The Leica M9 camera with its new sensor was sent back to me in April of 2017, and it was possible to start some testing in late April. The rangefinder appeared to be about the same as before in terms of alignment and image brightness. The camera was spotless and looking almost brand new upon its return, which was a nice touch.
Surprisingly, the new sensor produced images that looked slightly different than the old sensor. Some aspects are better than the old sensor, while other aspects are not necessarily better. A few differences between the old and new sensor include:
* Slightly softer image than original sensor when sharpening turned off.
* Fewer sharpening artifacts when sharpening at lowest setting.
* Slightly more color aliasing than original sensor, including when sharpening is off.
* Some radial blur of highlights when wide angle lenses set to faster than f/4.
* More subdued blooming within a few pixels of a bright subject than old sensor.
* Slightly more dim extended blooming around a bright subject than old sensor.
* At a given white balance setting, daytime sky images have a slightly greener cast.
** However, this can be accounted for with a custom white balance setting.
Comparison images of the usual test subjects (crescent moon, distant fence, and distant tower) follow:
Performance Comparison between Reference Camera and Leica M9 (NEW SENSOR, 2017).
Comparison of performance on distant objects, with digital camera bodies that both permit infinity focus. The Leica M9 now more or less permits infinity focus with most lenses.
© Copyright 2014, 2015, 2017 Jeffrey R. Charles. All Rights Reserved.
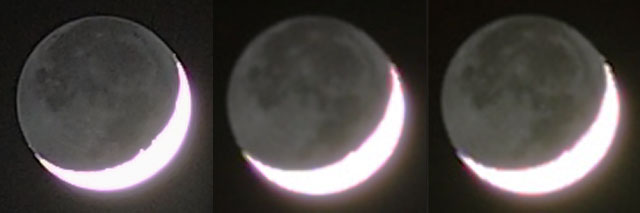 |
50mm Summilux Reaches Infinity Focus on MFT Camera (left), and on Leica M9 (right 2).
With the new sensor, the Leica M9 still provides about the same quality of lunar image that it did after the 2015 service. The 50mm f/1.4 Summilux-M ASPH lens was used because it is known to be calibrated relatively close to the same as Leica's reference lenses. The f-stop was f/2.4 for all three moon pictures.
LEFT: Considering its focal length, 50mm Leica Summilux-M ASPH does a good job of imaging the moon. This 150 percent crop is taken with an Olympus E-P3 Micro 4/3 camera, which has slightly more noise reduction artifacts than the E-P2. This is a 2 second exposure at ISO 200.
CENTER: The Leica M9 provides an image similar to that it provided after its 2015 service, but does not equal Micro 4/3 with the same lens due to its larger pixels. The slight red (versus green) fringing indicates that the lens is focusing closer to infinity than it did before the new sensor was installed. This 235 percent crop is a is a 2 second exposure at ISO 80. In-camera sharpening was turned off for this picture. With the new sensor, images have a little more blooming around brighter parts of the moon.
RIGHT: This image shows a reduction in dark artifacts near ends of the crescent when the M9 in-camera sharpening is at its lowest setting, though the new sensor shows slightly more aliasing on the lower part of the moon's limb. This is a 2 second exposure at ISO 80. The Micro 4/3 image at left also has sharpening artifacts, but very little aliasing.
|
 |
 |
135mm Elmar Focuses Out to 200m on MFT Camera (left), and on Leica M9 (right).
With the new sensor, the fence wire test is even a little better after the 2015 service. Here, a 135mm Elmar lens is used at f/6.8 on a Micro 4/3 camera for the left image, and on the Leica M9 for the right one. Both images were taken at about the same time, from the same vantage point.
The LEFT 200 percent crop was taken with an Olympus E-P3 M4/3 camera and 135mm Elmar lens. It has some sharpening artifacts on the upper lateral fence pole, but images the fence wire quite well.
The RIGHT 300 percent crop was taken with the Leica M9 and its new sensor using the same lens at f/6.8, and at the lowest in-camera sharpening setting. The 135mm Elmar could focus just barely past the fence, which is about 200 meters away. This is how it should be. The lens is focused on the fence for this image. Compared to the original sensor, slightly more of the fence wire that protrudes above the top angled pole is faintly imaged, but aliasing obscures the true directions of the fence wires in the very center of the crop. The original image was somewhat green, so this crop was processed to provide more accurate color.
|
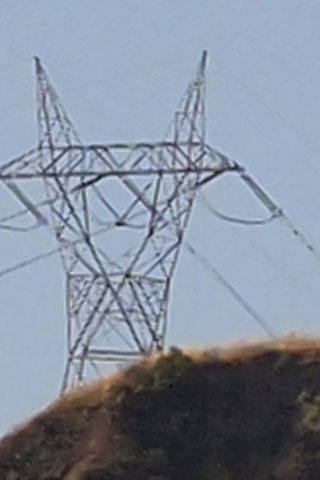 |
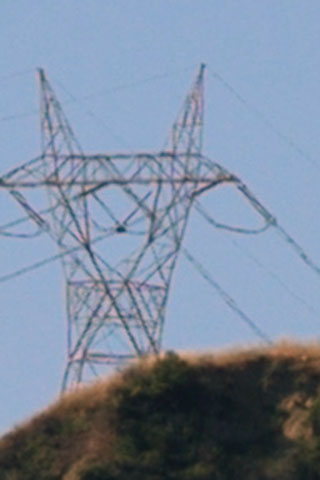 |
Leica M9 with 135mm Elmar (right) Captures More Detail than MFT with 75mm (left).
The tower test shot reveals a few things about both the new sensor and the camera's ability to reach closer to infinity focus. Unlike the two tests above, the point of this test is to compare image quality to Micro 4/3, when the field of view is similar for each camera. Thus, a 75mm f/2.5 Summarit-M lens is used for the Micro 4/3 photo, and a 135mm f/4 Elmar lens is used on the Leica M9.
The LEFT image is a 200 percent crop from a photo taken with an Olympus E-P3 Micro-4/3 camera at ISO 200 and a 75mm f/2.5 Summarit-M lens, working f/4.0. While the image has less noise than previous tower images taken with the Olympus E-P2, it also shows a little less real detail on the foreground hill. The Olympus E-P3 also has more sharpening artifacts than the E-P2. This is obvious on the tower itself.
At RIGHT is a 170 percent crop from a picture taken with the Leica M9 and a 135mm Elmar lens, set to f/6.8. Infinity performance is a little better, since the thin wires at the top, and the double wires hanging from each side of the tower, are all resolved a little better than with the original sensor. However, there is some aliasing on the more distant wire pair on the right side. As in most other tests, the Leica M9 image of the foreground hillside has less noise and captures more real shadow detail, even though the hillside image is a little soft compared to the original sensor. Where the new sensor shines is color saturation. The original image had a notable green tint, but the color saturation was strong enough that accurate color was recovered with only a little processing. As in all resolution tests, no sharpening was done in post.
|
Rangefinder Focus Accuracy was Also Pretty Good after the 2017 Sensor Replacement:
Focus Difference Compared to Leica M9 Rangefinder AFTER 2015 Service (prelim.):

Lens Focal Length and Brand:	Focus vs RF	Error at 1~1.5m Subject Distance
21mm f/4.0 VC CS, Version 2	Near		10mm (or less) at f/4 and f/4.8
28mm f/2.0 VC Ultron		Far		5mm at f/2.8 (semi-consistent)
35mm f/2.0 Summicron-M ASPH	Precise		0mm at f/2.8 (semi-consistent)
50mm f/1.4 Summilux-M ASPH	Near		10mm at f/1.4 to f/3.4 (consist.)
50mm f/2.0 Zeiss Planar ZM	Near		10mm at f/2.8 (consistent at 2.8)
75mm f/2.5 Summarit-M		Near		10mm (or less) at f/4 (consist.)
90mm f/2.8 Tele-Elmarit-M	Near		12mm at f/3.1 (semi-consistent)
90mm f/2.8 Elmarit-M		Near		13mm at f/3.4 (semi-consistent)
135mm f/2.8 Elmarit (1.5m dist)	Near		10mm at f/2.8 (consistent. WOW!)
135mm f/4.0 Elmar (1.5m dist.)	Near		12mm at f/4.0 (consistent)

* 28mm f2 lens was serviced to keep rangefinder from showing slightly past infinity.
* 50mm f/1.4, 75, 90TE, and 135mm f/2.8 lenses have not been serviced or adjusted.
TBD
APPENDIX C:
Comparing Leica M9 Camera to Hasselblad V96C Digital Back:
The physical size of a Leica M9 system is much smaller than that a Hasselblad system with lenses of equivalent field of view. Initial tests show that Leica M9 does not take quite as good a picture of a given subject as the Hasselblad V96C digital back when both use the same focal length lens, or even the very same lens. However, the Leica M9 has a niche in that it accepts wider angle lenses than the Hasselblad.
Theoretically, the Leica should out-resolve the Hasselblad when equal areas of each sensor are used with the same lens. This is because the Leica M9 has 18 megapixels in a 36mm x 24mm area, while the 36.9mm square 16 MP Hasselblad V96C back has only about 11 megapixels in the same 36mm x 24mm area. It was at first thought that neither camera has an anti alias filter, but it turns out that the V96C back must at least have a weak anti-alias filter because it can have fringing artifacts when used with 35mm format wide angle lenses. Even so, the initial results were somewhat surprising.
The purpose of a camera is to take good pictures, so image quality what really matters. More important than any technical bells and whistles. Image quality is briefly compared below. The same 40mm Zeiss Distagon T* lens was used on both the Hasselblad 500C with V96C back and on the Leica M9, to ensure a fair test. For the Leica, the lens was focused using camera swapping techniques that I used for the above photos through a telescope, then the lens was stepped through minute changes in focus for a sequence of pictures, and the best picture (which happened to be at the initial focus setting) was used. In comparisons below, the mantle clock is cropped from a picture that covers the entire 14 foot width of the room.
Hasselblad-Imacon V96C Digital Back Versus Leica M9 and Micro 4/3 Comparison
Setup for comparison of Hasselblad-Imacon V96C, Leica M9, and Micro 4/3 cameras. A common 40mm lens was used for only the Hasselblad and Leica tests.
© Copyright 2012, 2013 Jeffrey R. Charles. All Rights Reserved.
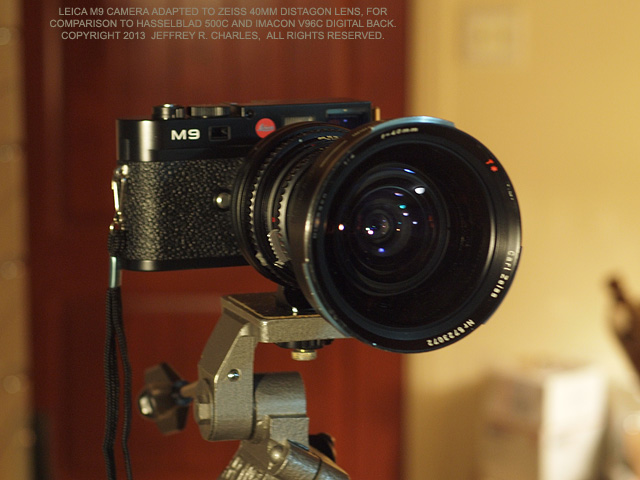 |
|
Zeiss 40mm f/4 Distagon on Leica M9, for Direct Comparison to Hasselblad Digital Back.
The same 40mm f/4 Zeiss Distagon lens was used on both the Hasselblad and the Leica M9 to increase probability of a fair test of just the cameras and image sensors. The tripod adapter on the lens adapter supports the relatively large lens so it does not cantilever from the M9 body. In the center of the image, the Distagon lens turned in better results at f/8 than the smaller VC 40mm f/1.4 Voigtlander Nokton did at the same aperture.
|
 |
|
Test Subjects on Mantle are 4-5 Meters from Tested Cameras.
Picture of test objects on mantle. A small cropped area that includes the clock at center and other nearby objects is used to assess aliasing, noise, color, and other image attributes. Rectangular crop from square image taken with V96C digital back. The clock face has a diameter of about 8 cm.
|
Hasselblad-Imacon V96C Digital Back, Images with 40mm f/4 Zeiss Distagon T* Lens
Comparison of Hasselblad-Imacon V96C Back, Leica M9, and Micro 4/3 cameras. Hasselblad-Imacon V96C Images with 40mm f/4 Lens, used at f/8.
© Copyright 2012, 2013 Jeffrey R. Charles. All Rights Reserved.
 |
|
Test Subject (Clock) Imaged with Hasselblad-Imacon V96C Digital Back (Unprocessed).
The Hasselblad-Imacon V96C image is extraordinarily clean, appearing to look like the subject that was photographed, with the exception of having less color saturation and looking a little redder. It almost looks like you can reach out and touch the subject. This 200 percent crop (double the original size) has virtually no visible noise, but it seems to lack enough shadow information to make significant changes in color balance without introducing visible shadow contours. At the other extreme, the V96C back almost never clips highlights. Strong aliasing is at a minimum, with only a couple of numbers on the clock face (including the number 4, indicated as "IIII" on the clock face) showing aliasing. The original image is 16 bit raw, and was underexposed about half a stop. As always, I used the base ISO of 50 to get the best results.
|
 |
|
Test Subjects Imaged with Hasselblad-Imacon V96C Digital Back (Processed).
Attempts to put some zip in the Hasselblad image in post results in color casts on some features, including a little orange cast to the chrome bezel on the clock. It also adds an unusual look to wood grain on the clock unless I go back and tweak the original 16 bit per color image. This may be partly because the blue channel was a little weak. The default tungsten setting was used rather than custom white balance. I later found that using a weak blue filter on the Hasselblad improves color balance on indoor pictures, making color balance more like the last Leica M9 image below, though with less color saturation and clipping.
|
Leica M9, Images with Hasselblad 40mm f/4 Zeiss Distagon T* Lens
Comparison of Hasselblad-Imacon V96C Back, Leica M9, and Micro 4/3 cameras. Leica M9 Images with 40mm lens.
© Copyright 2012, 2013 Jeffrey R. Charles. All Rights Reserved.
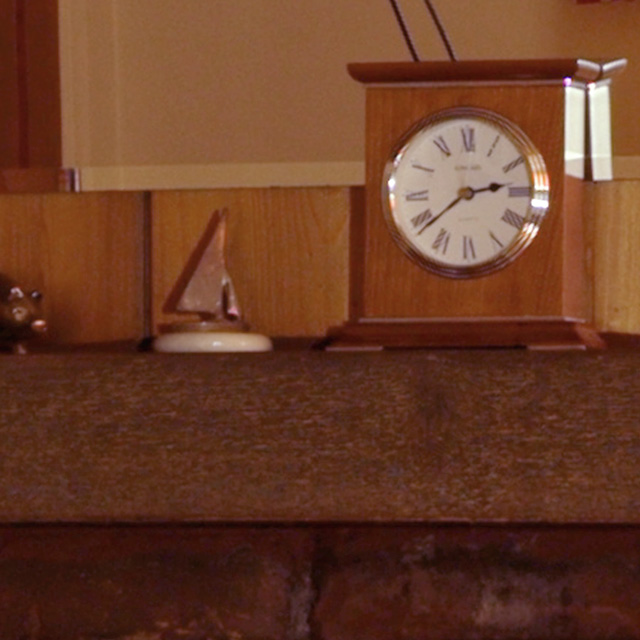 |
|
Test Subjects Imaged with Leica M9 and 40mm Distagon
Lens (Slight Processing).
The Leica M9 image has more punch and is more accommodating of changes in color balance, but noise is obvious in the reflection of a plaster wall in the large mirror behind the clock. Blue areas in the mantle beam are not real features of the subject matter either. Other than that, the Leica image colors are more like the original subject matter, except for being more saturated. The Leica M9 has more shadow detail than the Hasselblad V96C, but there is considerable noise in such areas. The Leica is nearly as susceptible to highlight clipping as my Micro 4/3 camera, but is better in other respects. Sharpness, contrast and saturation are all at the lowest settings, but aliasing is strong on many of the clock face numerals and the concentric chrome trim. The original image is an in-camera fine JPEG, underexposed about half a stop. This image is a 142 percent (1.4x larger than original size) crop, so it is not enlarged as much as the above Hasselblad image. It was shot at the base ISO of 160 to get the least noise yet still capture some highlights. Noise is lower in shadows at the Pull 80 ISO setting (as shown below), but more highlights are blown out.
|
 |
|
Test Subjects Imaged with Leica M9 and 40mm Distagon (More Ambient Daylight).
This image, which was taken with some daylight coming in the window and which is properly exposed, shows that a little less aliasing occurs in the Leica M9 with proper exposure. Aliasing in this image is not a great deal worse than with the Hasselblad. The previous image (not this one) was underexposed half a stop to be a fair comparison with the Hasselblad image, which was also underexposed slightly. The way Hasselblad and Leica calibrate ISO is quite different. The Hasselblad back was set at its base ISO of 50, and an exposure of 4 seconds at f/8 resulted in slight underexposure. The Leica M9 was set at its higher base ISO of 160 for the previous picture, and an exposure of 6 seconds at f/8 still resulted in slight underexposure.
|
Leica M9, Images with 50mm f/2 Zeiss Planar T* and Leica 75mm f/2.5 Summarit-M Lenses
Comparison of Hasselblad-Imacon V96C Back, Leica M9, and Micro 4/3 cameras. Leica M9 Images with 50mm and 75mm lenses, to assess aliasing, etc.
© Copyright 2012, 2013 Jeffrey R. Charles. All Rights Reserved.
| These images show results with longer focal length lenses on the Leica M9. The difference in resolution of the subject between the Hasselblad and the Leica M9 appears to be about 20 percent when the same lens is used, so longer focal lengths can check this. A larger image scale is also useful to further assess aliasing.
|
 |
|
Test Subjects Imaged with Leica M9 and 50mm f/2 Zeiss Planar ZM (Slight Processing).
This image shows what a difference of 22 percent more image scale makes! This image was taken at the Pull 80 ISO setting of the Leica M9, using a Zeiss Planar ZM 50mm f/2 lens from the same distance as the previous pictures. Positions of light fixtures for this picture are close to those for the Hasselblad photo. This is a 116 percent crop, to match the displayed scale of the other images. Noise at the Pull 80 ISO setting is about as low as the Hasselblad, and shadows show good detail. Subject detail is slightly better than the Hasselblad imaged with a shorter 40mm lens. However, highlight clipping is relatively sudden and severe, with the image of the chrome clock bezel having several saturated areas. Aliasing is reduced to the extent that the clock numerals are all readable, mainly because the numerals are better resolved by the larger image scale of the 50mm lens. This photo has zip, but looks less like the original subject than the Hasselblad image. The Hasselblad also would not have "stair stepping" from aliasing on the diagonal numerals at this resolution, though I'm not sure what they do to eliminate it. The picture was taken after the rangefinder cam of the 50mm lens was temporarily widened toward the inside, since reliable focus was not obtainable with the lens before this was done. It was taken at a faster f/2.5 or f/2.8 f/ratio than the others. The fast f/ratio may be why some cyan fringing is visible on the clock bezel, though it appears limited to boundaries of saturated areas. Some of the bezel also shows a faint purple cast. The out of focus black wires reflected in the mirror above the clock appear green. In general, when the 50mm ZM lens is used at wide apertures, slightly out of focus thin black objects in the foreground are imaged slightly magenta, while slightly out of focus thin black objects in the background appear green. This problem starts to clear up between f/3.6 and f/4.5.
|
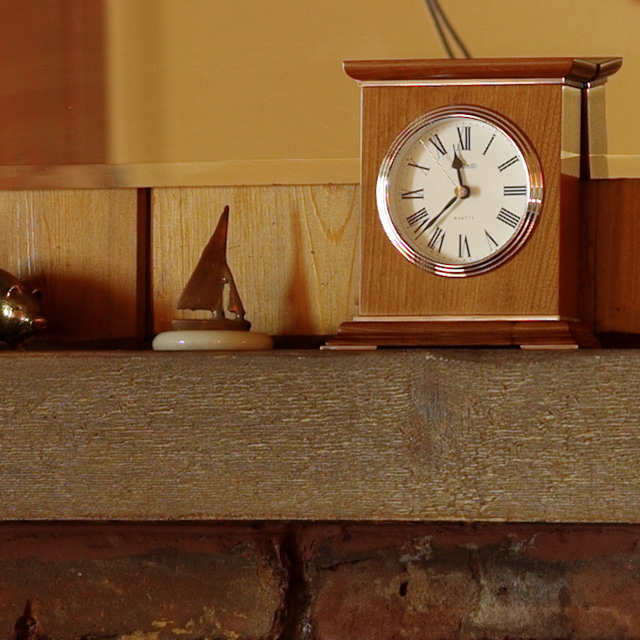 |
|
Test Subjects Imaged with Leica M9 and 75mm f/2.5 Summarit-M (Slight Processing).
The last image looked good until compared to this one! More daylight is coming in the window for this image, which is also properly exposed. It was taken with a 75mm f/2.5 Leica Summarit-M lens, set at f/4. This is a 78 percent crop, and the original was shot at the ISO 160 setting to reduce highlight clipping. Even at this relatively wide aperture, the Summarit-M lens lacks the anomalies in the Zeiss image such as the green cast to the reflection of wires behind the clock and as much purple cast to the clock bezel. When the Summarit-M is used wide open, the wires do take on a weak cyan cast, but the clock bezel color still remains fairly neutral. Aliasing in this image is reduced, though some is still visible at the 10:00 and 4:00 positions on the clock bezel, and on the bright second hand. The original image had a yellow cast (like the wall reflected in the mirror), so this crop was processed to correct the color balance toward blue-cyan. In spite of this picture being taken at a large physical aperture size of 18.7mm (75mm/4); similar to that of the above 50mm Zeiss image (50/2.5=20mm), the background wires do not appear as defocused. This is partly because the defocused image from the 75mm is not notably softer or harder on either side of focus, while the background often appears imaged softer than the foreground at wide apertures with the 50mm.
|
Micro 4/3 Image. Olympus E-P2 with Olympus 14-42mm Zoom, Set at 20mm
Comparison of Hasselblad-Imacon V96C Back, Leica M9, and Micro 4/3 cameras. Micro 4/3 Image with Olympus E-P2 Camera and 20mm Focal Length Lens.
© Copyright 2012, 2013 Jeffrey R. Charles. All Rights Reserved.
 |
|
Test Subjects Imaged with Olympus E-P2 MFT Camera, 20mm Lens (Slight Processing).
An image of the same subject with my Olympus E-P2 Micro 4/3 camera shows that it is not in the same league with either the Hasselblad or the Leica, mainly because of noise, which is mostly due to its small sensor. Even most of the wood grain texture in the clock is lost in the noise. Since the Micro 4/3 image sensor is only half as wide as the Leica M9 sensor, the Olympus 14-42mm lens was set at a focal length of 20mm so the entire picture would still cover the width of the room. The E-P2 has 12 MP, but it does not hold a candle to the 11 MP that occupy a 36mm x 24mm area on the Hasselblad V96C image sensor that was also utilized above to photograph the full width of the room. The original image is an in-camera SF JPEG, taken at the base ISO of 100 to reduce noise. In fairness to the Olympus camera, the 17mm f/2.8 prime lens does better than this zoom lens on the same camera, and the 20mm f/1.7 Panasonic lens (which I did not have at the time of this test) does even better. This image is a 200 percent (2x original size) crop.
|
Results of the Leica M9 Camera and Imacon V96C Digital Back Comparison:
The Hasselblad V96C back appears to take a more detailed image than the Leica M9, and it appears to have fewer image artifacts, even though only 11 MP of the 16 MP in the V96C back occupy a 36mm x 24mm area on the sensor. The Hasselblad-Imacon V96C really works some magic with the utilized 11 MP, since it shows more real subject detail, has less noise, and has less aliasing than the Leica M9. And this is with larger and fewer pixels.
The Hasselblad-Imacon V96C does not deliver an image with much punch (contrast and color saturation) as the Leica M9 without some tweaking. However, since the V96C RAW image captures a great deal of dynamic range, the image information to do most types of tweaking exists, provided that the raw image has reasonable color balance. It is fairly easy to get images that look just like the subject, without exaggerated color saturation. If image quality was the sole consideration, I'd take the 11MP from a 36x24mm area of the Imacon V96C back over the 18 MP in the Leica M9 any day, even at the slower base ISO of 50. Image quality is more important than ISO, since I often use a tripod anyway.
However, the Leica system is about 5 times smaller and up to 10 times faster to set up and use, which can make the difference between whether or not it is used for a given application. Also, in fairness to the Leica, the M9 image above was shot only as a JPEG in the camera, rather than a raw .DNG image. Later tests (now that the camera is serviced) will show if the raw M9 images capture more detail or have less aliasing than the in-camera JPEG. (These later Leica M9 Raw tests showed no change in detail or aliasing, but did provide increased dynamic range.) If the M9 JPEG engine and its compression are causing its image artifacts, it would be good if the Leica M9 provided the option for JPEG images with less compression. There are occasions when good in-camera JPEG results can save lots of time.
The lighting is different in the Leica picture, but the original of the top Leica image was underexposed about half a stop to be a fair comparison to the slightly underexposed Hasselblad image. The Leica M9 shows one of its advantages here, since I didn't set up the Hasselblad for a comparison shot on the same day because I was simply too tired to do it, while setting up and using the Leica M9 was a piece of cake. So by comparison, the Leica is very fast to set up and use, even when used on a tripod.
One major trade is portability versus image quality. The price of the Hasselblad system does not figure into the situation as significantly as one would initially think, since a used Hasselblad system with a V96C digital back (only available used) can easily cost less than a Leica M9 with the same range of lenses. The same is not true of the more compact CFV back, which takes solid state memory cards. Here, the tables are turned, since even a used CFV back can cost more than a new Leica M9.
In spite of the size, cost, and setup time, it is likely I would not have looked into a smaller system like the Leica M9 if the CFV back had been available with a 53.3x40mm or larger image sensor such as that for the H series Hasselblad cameras. The maximum 49x37mm sensor size of the CFV is enough of a crop factor that the same lenses don't provide the same composition that is provided by the Hasselblad 16 exposure 645 format film back. On the other hand, the Leica M9 sensor is almost the same size as the 35mm film format, so switching between the two is almost seamless with the Leica. There still are a few areas where film works better.
The time required to change lenses on the Leica and the Hasselblad is comparable, but it is up to ten times faster to take a picture with the Leica. In my own case, this is due in part to needing a 15x loupe to accurately focus the Hasselblad.
While the Hasselblad V96C images and the Leica M9 images are at least in the same league, it is clear from the earliest tests that Leica M9 images are superior to Micro 4/3 images (except at infinity, up until the Leica M9 was serviced in 2015). This of course isn't saying much when there is a 10:1 price difference.
However, the importance of a full frame format in a camera system that is almost as compact as Micro 4/3 is worth a look, considering that even APS format alternatives cost more than Micro 4/3 cameras. The larger sensor size of the Leica M series makes it possible to get shallow depth of field pictures that one could only dream of with smaller format digital cameras.
Another major area the Leica M9 trumps Micro 4/3 is image noise. The Leica M9 has a larger sensor (almost 4 times larger), which provides larger pixels than MFT, even when the pixel count is 1.5x higher. When combined with less aggressive (if any) noise reduction, the Leica M9 captures more real image detail. This is obvious in the degree of wood grain that can be seen in the mantle clock above.
The playing field gets a bit more level in extremely low light. Pictures below compare Micro 4/3 and the Leica M9 in a low light situation. Both cameras were used at their base ISO settings and with the same lens to image earthshine on the crescent moon. I was sick at home the day these were taken, so I did not attempt to use a telescope. This is also why I didn't get to take a test shot with the Hasselblad. I just used a 135mm Hektor lens, set at f/6.8. The M39 to M adapter for this lens was thinned to get closer to infinity focus on the Leica M9, so resolution on the moon was similar to what I got on Micro 4/3 in this case.
As shown below, there is a dramatic difference in the noise structure of the two cameras. The Olympus E-P1 has noise that is in a relatively fine and uniform pattern, with more subtle but larger blobs of non-uniformity superimposed over it. The Leica M9's low light noise appears more clumpy, for lack of a better word. Which is better would be up to each individual. The number of low light features actually captured with each camera appears to be similar, at least for in-camera JPEG images.
Low Light Performance of Leica M9 and Olympus E-P1 at Base ISO Settings.
Comparison of Leica M9 and Olympus E-P1 noise in a low light situation; specifically, imaging earthshine on the crescent moon.
© Copyright 2013 Jeffrey R. Charles. All Rights Reserved.
 |
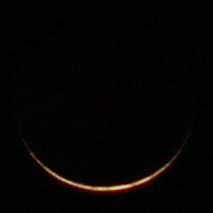 |
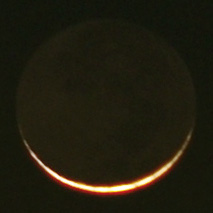 |
Noise Tests with Olympus E-P1 and Leica M9. Crescent Moon with 135mm Lens.
These pictures show image noise from the Leica M9 and an Olympus E-P1 in a low light situation. The same 135mm lens, f/6.8 f-stop, and 1 second shutter speed were used for both test images. There is a dramatic difference between in-camera JPEG images. Even though the Leica M9 has a higher base ISO of 160, the background is far darker than the Micro 4/3 image at ISO 100, while highlights are brighter with the M9.
The LEFT image is a 65 percent crop from the Olympus E-P1. Details on the dimmer part of the moon (illuminated by light reflecting from earth rather than direct sunlight) are obscured by noise.
The CENTER image is a 100 percent crop from the Leica M9. It does not appear that there is much to work with here, but some detail is in the area that looks black.
The RIGHT image is a 3-second exposure with the M9 to show about what the moon looked like to the unaided eye. The moon was about to set, so it was fairly dim.
|
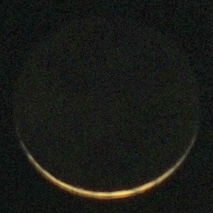 |
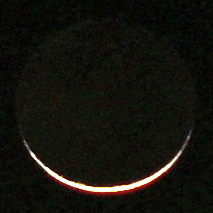 |
 |
Different Shadow Recovery Results from Olympus E-P1 and Leica M9 Images.
Pictures in this group show the degree of earthshine it was possible to bring out of the above images via image processing. The noise structures of the Olympus E-P1 and Leica M9 are very different.
The LEFT image shows the general outline of the moon, but it's anyone's guess as to how well it captured features on the darker part of the moon. Some features are visible, but they are subtle.
The CENTER image shows information it was possible to bring out of the dark areas in the Leica M9 image. The noise has a "clumpy" look to it, maybe from having so few levels of "gray" to work with in the dark areas. It appears to show almost as many features as Micro 4/3, but in a different way.
The RIGHT image is a processed version of the previous 3-second exposure with the Leica M9, showing there is no substitute for more exposure. It is also included to show the real lunar features, for comparison with the shorter exposures. An optimum exposure would have been at least 15 seconds at f/6.8, but that would have caused the image to be blurred from the moon's motion in the sky. Not a fantastic picture, but it isn't bad considering it was taken with only a 135mm lens on a light tripod. A few pictures of earthshine in previous sections, taken with a VC 40mm Nokton lens and a Leica 50mm Summilux lens, show earthshine more brightly than this image.
|
PRELIMINARY CONCLUSIONS:
Comparative conclusions about the Leica M9 should include comparing images of distant subjects. Therefore, final results will not be assessed or added here until tests can be done after an apparent M9 infinity focus issue (and possible slight rangefinder inaccuracy at closer distance) is addressed under warranty by Leica. However, some comparisons can be made for closer subject distances, or where a lens is modified to compensate for most if not all of the apparent focal plane error in the M9.
Here, the Leica M9 is at least in the same league with a Hasselblad V96C digital back, mainly because it retains detail in wood grain that is barely resolved. The Leica falls short in dynamic range and issues with aliasing. What the M9 has going for it includes its small size and its ability to accept wide angle lenses.
In comparison to Micro 4/3, the Leica clearly does better on subject matter that is exposed properly, mainly due to reduced noise. It is questionable if it handles underexposure as well, though it is close. Micro 4/3 makes some gains here because fast f/ratio lenses of moderate to long focal length versus the format size are more portable. Highlight clipping is similar with out of camera JPEG images.
After the initial comparison, I took a few additional test pictures with the M9 (both .JPG and .DNG) and did more tests at the Pull 80 ISO setting. Here are a few more preliminary observations:
- Aliasing on the clock face was not reduced in the .DNG images or the Pull 80 ISO setting.
- However, half a stop to a stop more exposure (to provide a normal exposure) results in slightly weaker aliasing, maybe because the white area between the clock face numeral lines is imaged a little wider and the numerals are imaged dark gray rather than black. The effect is similar in either .JPG or .DNG. Aliasing never gets as weak as with the Hasselblad, but it is somewhat better than the top Leica example when the exposure is increased.
- Shadow noise is reduced significantly at the Pull 80 ISO setting.
- Highlight clipping at the Pull 80 ISO setting can be reduced if the exposure is right on or slightly under-exposed. However, aliasing gets worse with underexposure, at least on the clock face. In a subject having a gradient, the transition from normal color to clipping is much more sudden at the Pull 80 setting than at the base ISO of 160.
- The .DNG images have not been examined to see if more dynamic range can be recovered from the .DNG than from the JPEG. Theoretically, the .DNG should be capable of capturing more dynamic range.
- It would be good if Leica added a setting to the Leica M9 ISO settings that provides the low noise of the Pull 80 setting, but has less contrast, to reduce clipping. If such a setting was available, the Leica M9 image quality could be considerably closer to the Hasselblad-Imacon image quality in most areas except for aliasing.
- It was previously assumed that the Hasselblad-Imacon V96C digital back has no anti alias (AA) filter. However, the virtual absence of aliasing in its images makes one wonder if it could have a weak AA filter. The minimum distance between the exit pupil of a Hasselblad V lens and the focal plane is often at least 90mm, so the angle from the center of the exit pupil to the corner of the V96C sensor (26mm off-axis) is only 16 degrees, and worst case marginal rays from a lens at f/4 would intercept the corner of the V96C sensor at only 23 degrees. A weak AA filter may tolerate these ray angles. Only slight radial blur is seen in the central 34mm of the V96C format when it is used with a 28mm PC Nikkor lens having a shorter exit pupil to focal plane distance. However, radial blur with the 28mm has been observed outside this area.
Leica M9 comparison section posted: 22 Feb. 2013. Revised: 25 Feb; 13, 25 Mar. 2013.
APPENDIX D: Performance of Leica Mount Lenses Used or Tested to Date (2021), Summary
This section takes a brief look at the performance of Leica mount lenses that have been used or tested to date. Some of the testing was incidental, being noted as the Leica M9 camera was being assessed.
Unlike the Micro 4/3 camera on which I used with Leica mount lenses, the Leica M9 does not degrade lens performance (particularly toward the edge) with an anti-alias filter. This makes it possible to explore the capabilities of various lenses on a digital camera platform (the M9) that can theoretically deliver better than 72 line pairs per millimeter in directions parallel with the frame edges, and at least 51 line pairs per millimeter in other directions. A few other lenses and widgets that are not Leica M mount, but that can be used with the Leica M9 when appropriately adapted, are covered after the M mount lenses.
The mini reviews of lenses in this section (Appendix D), with comparisons of 35mm and 40mm lenses below it (Appendix E), and comparisons of 50mm lenses after that (Appendix F) became a bit long, so the lens data may eventually be moved to a separate web page that emphasizes Leica M-mount lenses.
Photo of Some of the Leica Mount Lenses Described in this Section
Photo of some of the Leica M and other lenses that are described in this section.
© Copyright 2013 Jeffrey R. Charles. All Rights Reserved.
 |
|
Photo of Only Some of the Many Tested Leica M Mount Lenses that are Reviewed Below.
Group portrait of some of the lenses described in this section. Some are Leica M mount and others are M39 thread. From left to right in the front row, we have a VC 21mm f/4, version II; VC 28mm f/2 Ultron, VC 40mm f/1.4 Nokton Classic MC, 50mm f/2 Jupiter 8, 50mm f/2 Zeiss Planar T* ZM, and 50mm f/3.5 Industar 22. In the back row: 75mm f/2.5 Leica Summarit-M, VC 75mm f/2.5 Color Heliar, 90mm f/2.8 Leica Tele-Elmarit-M, original version Leica 90mm f/2.8 Elmarit, 135mm f/4 Leica Elmar, and 135mm f/4.5 Hektor. Contax G mount 35mm f/2 Zeiss Planar T* and 90mm f/2.8 Zeiss Sonnar T* lenses are also covered, but not pictured here. Even though this is a lot of glass, the combined cost was less than a couple of new high end Leica lenses. For the lenses I also use on Micro 4/3, I just use Micro 4/3 adapters (and their caps) as the rear caps.
|
In addition to impressions of photos with the lenses, this section also includes some visual testing of each lens that was performed under high magnification. These visual tests, which I have performed on lenses since 2004 or even earlier, are mainly to establish the maximum f/ratio at which each lens can deliver a sharp image with relatively even illumination of the format. By sharp, a central resolution better than 10 microns is generally assumed, with a lesser bar being set for the edges and corners. Visual tests are admittedly subjective, but the results are fairly repeatable and often define how I use each lens to get really "sharp" pictures.
A couple of Contax G Zeiss lenses are included for comparison. Data for the 35mm f/2 Summicron Type 1 and 50mm f/3.5 Elmar is from memory, and from evaluation of photos taken with the lenses in the 1970's. I don't currently own or have access to either of these lenses. Data for other lenses was gradually compiled over the last several years, starting in about 2004.
The combined tests mainly identify attributes a person would notice when using each lens and observing photographs it produces. Tests here do not include Modulation Transfer Function (MTF) plots, partly because I haven't the time to reliably test MTF, and partly because MTF plots are available for most Leica and Zeiss lenses. MTF is a good predictor of how a lens performs under various conditions. Other sites, such as PhotoZone.de and the Leica and Zeiss web sites, have some MTF data. MTF data for Voigtlander lenses is harder to come by.
Leica's lens coding largely compensates for reduced illumination toward the edge of the format, but there is invariably a change in contrast, dynamic range, or noise in these areas if too much compensation is required. The coding may also compensate for lateral chromatic aberration (LCA), though this is only a guess. In any cases where LCA is corrected by the camera, a lens may produce a sharp image at a wider aperture than what is shown below. It has also obviously been possible to correct LCA in post processing since the mid 1990's or even earlier.
We'll start with lens performance tables for the visual tests and recommended apertures for each lens. These are presented according to the following definitions for each column:
* Lens  = Description of each lens. May include serial number.
* ShVid = Max aperture that no axial aberrations seen w/4mm eyepiece.
* ShAx  = Max aperture that axial aber. grain ltd (or 2/3 fmt pixel ltd.)
* Sh34  = Max aperture off-axis aberrations at 4:3 aspect corner accept.
* FAFm  = Max aperture to illuminate full format w/o lens barrel cutoff.
* FA34  = Max aperture that illuminates 3x4 aspect of format w/o cutoff.
* UseAt = Max aperture for sharp, well illuminated image over 4:3 aspect.
* PhAp  = Physical aperture (mm) at UseAt f-stop (shallowest DOF vs res.)
* C/F   = Contrast and flare. E is excellent; V is very good, G is good,
          F is fair, A is acceptable, P is poor, U is unacceptable.
* Notes: Relevant notes, if any. The above 4:3 aspect ratio corresponds
  to a 20mm image height on a Leica M9, which isn't quite at the corner.

Lens  /  (Category)  Ser.N. ShVid ShAx Sh34 FAFm FA34 UseAt PhAp C/F Notes:
         (Ultra Wide)
10 f/5.6 VM HWHeliar08721181 5.6  5.6  5.6  6.8  5.6  8.0   1.5  E- f/8 bet. than 11
12 f/5.6 VC UWHeliar 9051046 8.0  5.6  8.0  5.6  5.6  8.0   1.5  E- f/8 bet. than 11
21 f/4.0 VC C.Skopar 8030194 5.6  4.0  6.8  6.8  5.6  6.8   3.1  E- No vis. fringe
         (Wide Angle)
28 f/1.4 7Artis.ASPH 620186  4.0  2.8  4.0  2.8  2.5  4.0   7.0  V  Edge Blm to f/4
28 f/2.0 VC Ultron   8150014 4.0  3.4  4.8  3.3  2.8  4.8   5.8  E- Center OK f/2.4
28 f/4.0 MSOpt Perar 158     4.8  4.0  7-11 9.5  7.5  7.0*  4.0  V+ FldCrvLndsc.f/11
         (35-40mm)
35 f/2.0 CG Zeiss    8028850 3.6  2.8  4.0  5.6  3.6  4.0   8.8  E  H. con. f/2.8 OK
35 f/2.0 L.Sum.Asph  3854672 3.4  2.4  3.4  3.4  2.8  3.4  10.3  E  Edge Frng. f/2.8
35 f/2.0 L.Summic.T1 Unknown 2.8  2.0  3.6  5.6  4.5  4.0   8.8  E- Sharp. 8 Elem.
40 f/1.4 VC Nokton   8030691 3.6  2.8  3.4  3.4  2.5  3.4  11.8  V+ Frng.f/1.4~f/3.4
         (Normal)
50 f/1.4 L.Slux ASPH 4264258 2.4  1.7  4.4  3.8  3.1  4.4  11.4  E  Sharp FF at f4.4
50 f/2.0 Jupiter 8   0251096 5.6  4.0  8.0  3.2  2.8  8.0   6.3  G  Ast. Mod for M9
50 f/2.0 Zeiss P ZM 15868104 3.6  2.8  3.8  3.2  2.8  3.6  13.9  E  Grn. frng to 3.6
50 f/3.5 Indust. 22 N5390379 8.0  5.6  8.0  5.6  4.5  8.0   6.3  V  Hi.con. vs Elmar
50 f/3.5 L. Elmar    Unknown 5.6  4.8  6.3  5.6  4.5  5.6   8.9  F+ Consid. flare.
         (Short Tele)
65 f/3/5 L. Elmar V  2618043 4.0  3.5  4.8  4.8  4.5  4.8  13.5  V  Edge Astig. 3.5
75 f/2.5 L. Summarit 4116261 4.6  3.4  3.8  4.5  3.8  3.8  19.7  E  Sharp as 35 Sum.
75 f/2.5 VC C.Heli.  9021669 4.0  3.4  4.8  4.8  4.0  4.8  15.6  V+ 1:3500 Frng >5.6
90 f/2.8 CG Zeiss    7623930 5.6  3.4  4.5  4.0  3.6  4.5  20.0  E  Flawless img 5.6
90 f/2.8 L. Elmarit  1709275 6.3  4.0  6.8  4.0  3.4  6.3  14.3  A- Pitted. Low con.
90 f/2.8 Tel-Elmarit 3096431 4.0  3.4  5.6  3.4  3.2  5.6  16.1  G+ Rear barrel flr.
90 f/2.8 Elmarit-M   3557058 4.0  3.4  4.8  3.5  3.2  4.8  18.7  V  Astf3.4,18umELCA
90 f/4.0 L. Elmar-C  2605156 5.6  4.5  5.6  6.8  4.8  5.6  16.1  G  Vig.only ex.cor.
         (Tele/Long)
135 f/2.8 L. Elmarit 2989694 4.8  4.5  4.8  3.7  3.4  4.8  28.1  V  Fringing to 4.8
135 f/3.4 L.ApoTelyt 4290761 4.8  3.4  4.8  4.8  4.5  4.8  28.1  E- Sharp.SomeVFlare
135 f/4.0 L. Elmar   1770945 6.8  5.2  6.0  4.8  4.5  6.0  22.5  V  Red-Purple coat.
135 f/4.0 L.TelElmar 2549616 5.6  4.8  5.6  5.6t 4.8t 5.6  24.1  V+ Sharp.SomeVFlare
135 f/4.5 L. Hektor  2406831 6.8  6.3  6.8+ 5.0  4.5  6.8  19.9  V- Single coat; 34f
280 f/4.8 L.Telyt T3 2757732 6.8  6.3  6.8  5.0  5.2  6.8  41.2  G- Single Coat; S8
2x Telemore95 Conv.  690924  8.0  5.6  8.0  3.4  2.8  8.0   NA   G- Prime lens f-stp
In summary, the "UseAt" column above defines the maximum aperture at which I often use a lens if I want a really sharp picture without a distracting amount of off-axis light falloff (vignetting) toward the corners. As a reminder, I put a small green dot of paint by the corresponding setting on the lens f-stop ring of each lens. On some lenses, I also put a yellow dot by the f-stop for good central sharpness. Tests on digital cameras appear to validate most of the numbers, based on relatively high standards of performance.
High standards are used because the object is to get a digital image that is comparable with a medium format film image, while not having the lens stopped down so far as to lose moderate to shallow depth of field. Only a few medium focal length 35mm format lenses can actually accomplish both of these goals. The Leica M9 can perform in this image quality range only when the lens is good enough. It does not look like it M9 images will best 4x5" film pictures I took years ago, but considering the small physical size of the M9 camera system, it is quite good.
Mini Reviews: A brief look at each lens:
The following summarizes each lens from both an optical and mechanical standpoint. The descriptions are only user impressions rather than reviews. General information including dimensions and the number of elements may eventually be added, but the emphasis is on what a user of the lens may notice. A few isolated parts of this sub-section have only templates or TBD's for the content. It is unknown when these parts will be added to or completed.
Hyper Wide and Ultra Wide (10mm - 21mm)
10mm f/5.6 Voigtlander - Cosina (VC) Hyper-Wide Heliar (Not Pictured, Tested in 2021)
The Voigtlander-Cosina (VC) Leica M mount (VM) Hyper-Wide Heliar lens is an extremely wide angle rectilinear (e.g. non-fisheye) lens that covers the full 35mm frame. Like the 12mm lens reviewed below, the inner elements of this lens are sized for a maximum aperture of about f/2.8, but the iris limits the maximum aperture to f/5.6. This prevents mechanical clipping of the aperture near the corners of the frame at any available aperture.
When the 10mm Voigtlander lens is used on an APS format (Fuji X or similar) camera, the "equivalent" focal length (FL) is 15mm. When used on Micro 4/3, the equivalent FL is about 20mm.
The physical size of the Voigtlander 10mm f/5.6 lens is similar to that of the Leica 75mm f/2 Summicron, except that the front end has a somewhat larger 67mm diameter. Larger diameter features at the front include the aperture ring and an integral four-petal lens hood. There is no front filter thread. The only options for filters are to use (large) third party square or rectangular filters, along with a third party adapter that fits around the front of the lens. It would have been nice if Voigtlander had gone with a removable hood like that on the 12mm f/5.6 Type 1 lens (reviewed below), since this would have been compatible with much smaller filters and filter holders.
The best coding for this lens appears to be 000001, which is the same coding that works best with the Voigtlander 21mm lens below. Corner darkening with this coding is only slightly more than that of the 12mm Voigtlander lens reviewed below.
The lens performs best at f/6.8 to f/8 on a full frame camera, and at f/5.6 on an APS format camera. At f/5.6, the edges and corners of a full frame digital image are a bit fuzzy (with a Leica digital camera), but this is not the fault of the lens (details below). Full frame digital images also have lateral fringing toward the edges, but there is almost no fringing on APS format (Fuji X-T10 camera). Thorough testing of the lens itself reveals that the lens actually has very high resolution even at f/5.6, with almost no visible fringing at all - clear out to the outer 1-2mm of the illuminated field. This means that unsharp edges or fringing in digital images must be caused by a camera's image sensor stack.
Minimum focus of the Leica M version is 0.5 meters, while the version made for Sony focuses down to 0.3 meters. Click stops are at half stop intervals on both versions, but the Sony version has a ring that can be used to de-click the aperture ring. The Leica M version does not have rangefinder coupling, but it does have a fixed plastic ring at the back that keeps the rangefinder set to infinity while the lens is attached. This is a good feature because it places the rangefinder patch in the center of the picture area. That is useful for centering a subject in the picture, even though the Leica M optical viewfinder is not as wide as the lens. To see the full field of the lens on a camera without live view, Voigtlander offers a separate viewfinder. I personally use an older (and cheaper) viewfinder for the Voigtlander 12mm lens, then simply allow for a slightly wider field of view.
Before acquiring the Voigtlander 10mm Hyper Wide Heliar lens, I looked at several reviews of both it and the Venus Optics Laowa 9mm f/5.6 lens. Both seemed to be quite good, but I decided on the Voigtlander, in part because images from various users appear to show that its aperture blades are more precise and symmetrical between samples. This means that the Voigtlander lens consistently produced fairly symmetrical sun stars.
12mm f/5.6 Voigtlander - Cosina (VC) Ultra Wide-Heliar, Type 1 (Not Pictured)
As of when this review was first written in 2013, the VC 12mm f/5.6 Ultra Wide Heliar was the widest full frame 35mm format rectilinear (e.g. non-fisheye) lens available. Since then, Voigtlander introduced the wider 10mm lens reviewed above, and an even wider Laowa 9mm full frame lens is now made by Venus Optics.
The physical size of the Voigtlander 12mm is very small, being smaller than most 50mm f/2 lenses. The small size makes this lens attractive, partly because it is more practical to keep in a camera bag all the time. Even though the full extent of its field of view is about 30 degrees wider than the full extent of the Leica M9 viewfinder (the part outside the 28mm frame lines), it is possible to roughly estimate its field of view without using the auxiliary viewfinder, which saves time.
The tested version of the VC 12mm lens has an M39 mounting thread that is easily adapted to Leica M via an adapter, but which is not included with the lens. It focuses down to 30 cm, through there is no rangefinder coupling. It is possible to focus the lens even closer by partly unscrewing it from the M39 to M adapter, for some interesting wide angle close ups. (An example of such a close up is at the end of this section.) The lens has no filter threads, but an optional adapter is available that accepts 77mm filters. This is useful for a radial gradient neutral density filter (sometimes called a center filter), to reduce darkening in the image corners.
The best coding for this lens appears to be 000001, which is the same coding that works best with the VC 21mm lens below. With this coding, a Leica M9 picture has about the same amount of corner darkening that the compact 20mm f/4 Nikon lens used to have on a Nikon SLR when it was used at full aperture with Kodachrome slide film. This means that corner darkening is obvious even with coding, but it is not objectionable on most indoor subjects. The corner darkening is most obvious on a blue sky.
Unlike any other 35mm format wide angle lens I've seen to date, the VC 12mm Ultra Wide Heliar uses what I have always thought was the best way to minimize corner darkening. The inner elements in this lens are sized for about an f/2.8 maximum aperture, but the iris limits the maximum aperture to f/5.6. This prevents aperture clipping by the lens barrel and thereby minimizes corner darkening even at full aperture. This in turn keeps the relative corner darkening about the same at all f/ratios. There is slight focus shift that is most obvious on distant objects.
The lens performs best at f/8, where the performance is quite good except in the extreme corners. At f/5.6, the edges and corners are a bit fuzzy, and at f/11 the whole image starts to soften due to diffraction and lateral fringing in the corners looks a little more obvious than at f/8. This means that the lens is best used at about f/8 all the time, unless a wider aperture is needed for low light or a smaller aperture is needed for more depth of field in photos including close up subjects.
A newer version of the 12mm lens has been introduced. It has the same optics, but accepts 67mm filters and a has built-in lens hood. I chose not to get this new version over the old version because its larger diameter won't fit most Leica cases and I could not locate a suitable center filter in the 67mm size. The built in hood on the new version precludes using step up filter adapter rings for a better selection in center filters. The minimum focus distance of the new version is also a bit long, at 0.5m.
21mm f/4.0 Voigtlander-Cosina (VC) Color Skopar (Tested in 2014)
The VC 21mm f/4 lens is attractive because its physical size is so small that keeping it in the camera bag is never an issue. It is so small in fact that it is difficult to grip it well enough to mount on the camera. Since it also turns out that the full extent of the Leica M9 viewfinder (the part outside the 28mm frame lines) covers about the same as a 21mm lens, it is even practical to use it without an auxiliary viewfinder. This both saves space and speeds up use of the lens.
Some reviews have said that this lens is as sharp as the Leica 21mm lenses. I don't have a basis for this comparison, but found that results on the Leica M9 are not so sharp as to be limited by the camera pixels. For comparison, I also adapted a 20mm f/3.5 AI Nikkor lens to the M9 and used its focusing scale to set focus. The results were comparable, with the 20mm Nikkor maybe even having a slight edge.
In practice, I use the VC 21mm rather than the 20mm Nikkor, partly because it does not block the viewfinder, and partly because its volume is 3 times smaller than that of the 20mm Nikkor lens, when the size of the Nikon to Leica M adapter is considered.
Some mechanical components of this lens are very delicate, being thin enough that smoothness of the focus mechanism can be adversely and permanently influenced if the lens barrel is flexed even slightly, as may occur when attempting to loosen the rear lens barrel retaining ring, or even if the lens is simply kept in a case with too snug a fit.
Wide Angle (24mm - 28mm)
28mm f/1.4 7Artisans Aspherical lens in Leica M Mount
(Tested in 2021. Not the "FE-PLUS" version.)
This 28mm f/1.4 ASPH lens is a relatively low priced Leica M mount lens from the Chinese manufacturer 7Artisans. This Leica M mount lens is made in two versions. The first is a conventional version that is intended for use on either film cameras, or digital cameras (such as the Leica M9) that have thin sensor cover glass stacks. The second version, the "FE-PLUS", is intended for use with cameras having thicker sensor stacks.
I acquired the conventional version because the M9 has a thin sensor stack. However, test results show that this may not have been the best choice. This was surprising, because based on other reviews, the 7Artisans 28mm f/1.4 lens appeared to have better optical performance on a Leica digital camera than most of the other high speed lenses that are made by either 7Artisans or TT Artisans. It has both good and bad attributes. This particular lens review will be more detailed than most, because the lens has many unique aspects.
The 7Artisans lens has a solid fell to it, but it is also long and heavy for a 28mm rangefinder lens. The length of the 7Artisans 28mm lens is 70mm (from the Leica M lens mount) and the maximum diameter (at the focus ring) is about 59.5mm. If the lens is used on a Fuji X camera, the adapter will add about 10mm to the length. The lens barrel is made entirely metal.
The aperture range is f/1.4 to f/16 in full stop clicks, except that there is no click between f/8 and f/16. The minimum focus distance is 0.7 meters. The black anodized aluminum focus ring has square profile knurling (similar to that on a Leica M lens), but the edges of the 7Artisans knurling are very sharp to the touch, and sharp corners such as these will likely lead to localized shedding of the black anodize finish as the lens is used.
One of the good features of the 7Artisans 28mm f/1.4 ASPH lens is an iris diaphragm having 13 curved iris blades. This gives the iris a round appearance at most apertures. Because if this, defocused points of light are round, and the lens can also provide amazing 26-point sunstars that are not too prominent in an image, especially when compared to most lenses with either fewer aperture blades or an even number of aperture blades.
One tradeoff of this type of low cost round iris is that rotational distances between f/stops on the f/stop ring are not linear, so the click stops get closer together for smaller apertures. There is not even a click stop or a number for f/11 between the f/8 and f/16 settings, though the aperture ring position for f/11 can still be estimated. This non-linear spacing for f/stops is not unusual for photographers who remember using "'Pre-Set" lenses that were made in the 1960's and 1970's. (Showing my age here!)
At a given f/stop, image quality of the 7Artisans 28mm lens is highly dependent on how it is used. To illustrate this, the 7Artisans 28mm lens was compared to the Voigtlander 28mm Ultron lens (independently reviewed below) under a variety of conditions. Some tests were performed visually under high magnification (partly to assess how the lens would work on a film camera), and via digital imaging on both APS and full frame digital cameras. (Fujifilm X-T20 and Leica M9.)
In the center of the image, the 7Artisans does not quite get as sharp and snappy as the Voigtlander Ultron, when both are compared at the same aperture settings. This is true for both film and digital, though it would be difficult to tell the difference between the central image quality on film, since the difference is not pronounced. More specifically, the central image of the 7 Artisans lens is a little mushy at f/1.4, but the image begins to get noticeably better by about f/1.9. The central image does not look really sharp until about f/2.8, and slight blooming around extreme highlights (or backlit subjects) is not well controlled until f/4. This blooming is caused in part by a small amount of spherical aberration.
At the edge of the image, the 7 Artisans lens has about the same image quality as the Voigtlander Ultron on film, but it is slightly better than the Ultron on most digital cameras. This is mainly due to the longer distance between the lens exit pupil (the exit pupil, not the rear element!) and the focal plane. This longer distance generally causes fewer problems with a sensor cover glass, and especially with Anti-Alias filters that are in most cameras. When the relatively low price of the lens is considered, it isn't bad. However, the lens is a better fit for crop sensor cameras than to full frame for reasons noted below.
At wide apertures, the 7Artisans 28mm f/1.4 ASPH lens has considerable coma that becomes obvious by only about 6 to 8mm image height (i.e. distance from the optical axis at the focal plane). The coma is controlled enough for most subjects near the edge of the frame by f/2.8, but the lens should probably be stopped down to f/4 for astrophotography. However, if astrophotography is important, it may be better to use an SLR camera lens with an adapter, since SLR lenses typically have less light falloff near the image corners than wide angle rangefinder lenses. (SLR lenses are workable for astrophotography on rangefinder cameras because the lens focus is set to infinity for astro imaging.)
Now we get to some not-so-good aspects of the 7Artisans 28mm lens: The 7Artisans lens has several shortcomings when it is used on a Leica M or similar full frame digital rangefinder camera. The majority of the negatives relate to varying degrees of incompatibility with Leica M cameras, including inaccuracy of the rangefinder cam. Most of these shortcomings are less significant when the lens is used on a crop sensor camera that has Live View, which most do. Shortcomings of the lens include:
- Lack of Leica 6 bit coding slots on the Leica M lens mount,
- Vignetting of full frame at any aperture (can be fixed with coding),
- Blooming around highlights or strongly backlit subjects at wide apertures,
- Focus shift, mostly between f/2 and f/4 (focus distance longer at smaller apertures),
- Field curvature requires using f/4 or slower for landscapes or astro on Leica M9,
- Focusing has slight wobble and longitudinal play that can slightly defocus image,
- Lens really isn't quite f/1.4. It is more like f/1.5 or so;
- f/stop ring click interval is not consistently equivalent to a full f/stop,
- Infinity stop is (was) not even close to being properly calibrated,
- Adjustable rangefinder cam has wrong slope to work throughout focus range,
- Back of bayonet mount claw on viewfinder side is not sloped like it should be,
- Large size of lens obstructs a good part of the Leica viewfinder,
- Filter threads are not deep enough for a filter to properly seat, and,
- Rear element cell diameter is larger than standard (rubs rangefinder mechanism).
- (The larger diameter rear cell also won't fit Fujifilm brand X mount adapters).
Lack of coding slots can be addressed (for some Leica M digital cameras) by adding some thin black paint to areas on the lens mount that correspond to areas that would be occupied by blackened coding slots. This would effectively solve the vignetting problem on a full frame Leica camera. (The vignetting is not as serious for APS-C and smaller formats.) It may be best if the lens is coded as a Leica 28mm f/2 Summicron rather than as an f/1.4 lens. This is for a couple of reasons. First, the lens does not appear to really be f/1.4, as noted below. But more importantly, the firmware in the Leica M8 and some Leica M9 cameras does not recognize coding for the 28mm f/1.4 Summilux.
Blooming around highlights with the 7Artisans lens can only be addressed by careful selection of subjects, or by using a sufficiently small aperture. Some of the blooming is caused by a sensor cover glass, but most of it appears to be from the lens itself. Blooming is controlled well enough for some off-axis subjects by f/2.8, but the lens should be stopped down past f/4 for strongly backlit subjects.
The 7Artisans 28mm f/1.4 ASPH lens has considerable field curvature when it is used on a Leica M9 full frame camera, and it has noticeable field curvature when used on crop sensor (APS format) Fuji X cameras. Combined with some off-axis blurring at wide apertures (some from the lens, some from the thin Leica M9 sensor filter stack), this requires that the lens be stopped down to between f/4 and 5.6 for a sharp full frame image, and to about f/4 for a reasonably sharp full field APS format image.
It is possible that the "FE-PLUS" version of this 28mm lens might have less field curvature and edge blurring than the tested standard version of the lens had on these cameras. I had acquired the tested standard version because the Leica M9 has a thin sensor filter stack that the standard version of the lens is supposed to be compatible with. Apparently, this version of the lens was not the right choice for the Leica M9!
The helical focusing threads in the 7Artisans 28mm have a slight amount of wobble and longitudinal play. This is a very rare flaw for a Leica M mount lens. At wide apertures, it changes whether or not the lens is focused at infinity, depending on the orientation of the lens. It is enough to cause an image to lack critical sharpness at infinity or at other distances. This puts the lens more in the realm of one that should be used on a camera with Live View, as opposed to a rangefinder camera.
As for the true maximum aperture, there is only about half a stop of difference in the shutter speed that an automatic camera provides between the f/1.4 and f/2 settings. This is unique only in degree, since most wide aperture lenses won't show a full stop of change over the full picture in this situation, due to vignetting. However, the issue persists with the 7Artisans lens even when center weighted metering is used, and the test images also reveal this issue. The actual maximum aperture appears to be around f/1.5 rather than f/1.4, and the f-stop click interval appears to correspond to about f/1.9 when f/2 is set. The f/2.8 click position does not seem quite right either, but the f/4 setting seems more accurate.
The infinity stop in my sample of the lens was not even close to being properly calibrated, and this apparently is not supposed to be user-adjustable. I acquired my lens used, but this area did not show signs of tampering. To fix this (which I assume could void the warranty on a new lens), the three screws around the front of the focusing ring are removed, then the knurled part of the focus ring is free to slide forward a few millimeters. This exposes three focus adjust screws in slots that are normally hidden by the focus ring. The infinity stop can be adjusted quickly via these screws if a camera has live view, or by trial and error if the camera being used with the lens lacks live view. If the camera used for calibration lacks live view, figure on killing up to half a day to get both this and the rangefinder cam adjusted to be right on at infinity.
The available rangefinder cam adjustment is only a partial adjustment. It is not difficult to adjust, but it can be tedious if trying to get it exact. An additional issue with the rangefinder cam is that it projects farther behind the lens than is the case for the cam ANY other Leica M rangefinder lens. This means that if the cam is adjusted improperly (to where it tries to make the rangefinder show a significant distance past infinity) it can DAMAGE the Leica rangefinder! For this reason, position of the rangefinder cam should be checked before the lens is mounted for the first time. The lens should also be focused to a close distance when first mounted, then the focus slowly moved toward infinity to ensure that turning of the focus ring is stopped before the rangefinder shows ANY distance past infinity.
Additionally, the 7Artisans 28mm f/1.4 lens has a significant rangefinder coupling problem that cannot be adjusted out. The problem is that the rangefinder cam itself has the wrong slope angle, so if one end of focus is properly adjusted, the other end will be way off. Specifically, when I adjusted the rangefinder cam to be exact at infinity, the lens near focused about 4 cm at the minimum focus distance of 0.7m. This is a huge error, being at least 3 times larger than any other lens I ever tested. This can only be corrected by removing the rangefinder cam ring (not trivial), and then machining it to have the proper slope (even less trivial).
Lack of a proper slope on the upper part of the back surface of the bayonet claw that is on the viewfinder side of the lens is another issue. And fixing it would be beyond the capability of most users. This slope should exist on the upper half of the bayonet claw so the slope of the rangefinder mechanism cutout in the lens mount can extend onto the bayonet claw. Without sizing the cutout properly, the lens mount can push on the rangefinder mechanism near its pivot point while the lens is being mounted, which is NOT a good idea. This can only be fixed if the lens mount is removed from the lens and machined to have a proper rangefinder mechanism cutout. (This is not easy, partly because small Torx screws are used to attach the lens mount to the lens.) If this modification is not made, the lens should be only mounted to a Leica camera with great care.
Another issue is that the front filter threads are very shallow. So shallow in fact that most filters will bottom out on the retaining ring for the front element of the lens, rather than the filter flange seating on the outer rim of the lens filter thread like it should. This can potentially cause a filter to stress the edge of the front element, or to even cause the front element retaining ring to come loose (or even unscrew and fall out of the lens) when a filter is removed.
A final mechanical issue with this 28mm lens is that the protruding rear element cell is measurably larger than the protruding rear cell of any Leica brand lens or Voigtlander M mount lens. Since the rear element cell projects well behind the lens, this poses two problems for use on Leica M cameras, and an additional problem when the lens is used via an adapter on some crop sensor cameras:
- First, the rear cell interferes with some of the light path between the TTL meter cells of a Leica M camera and the part of the shutter curtain used for metering.
- Second, and more importantly, the diameter of the rear cell is too large to fully clear the rangefinder mechanism in some Leica M mount rangefinder cameras, and this can lead to scuffing of the lens cell by the rangefinder mechanism, or even damage to the rangefinder.
- Additionally, the rear cell diameter is too large to fit into the central bore of a Fujifilm brand Leica M to Fuji X Mount adapter. This means that the Fuji lens focal length selection button can't be used, since third party adapters lack this button.
Dimensions of the 7Artisans 28mm rear cell (compared to accepteble dimensions) are:
- The protruding rear cell of the 7Artisans 28mm f/1.4 lens has a diamete of 30.43mm (1.198").
-- This large rear cell diameter can mechanically interfere with some Leica M rangefinders, as well as the lens contact pins in some crop sensor cameras, if adapted to them.
- The 7Artisans 28mm rear cell diameter is considerably larger than the 29.70mm (1.169") maximum acceptable diameter for a protruding rear cell on a Leica M lens, if mechanical interference with some Leica M rangefinders is to be avoided.
- Even 29.70mm is slightly larger than the 29.36mm (1.156") diameter that will clear the rangefinder mechanism of "worst case" Leica CL film camera rangefinder measured to date, after accounting for lens mount centering tolerances.
- Also, a rear cell diameter larger than 29.70mm will not fit the 30.0mm (1.181") hole in Fujifilm brand Leica M to Fuji X adapters, after allowing for up to 0.15mm lens mount centering tolerance.
- For reference, the rear cell diameter of the 35mm f/2 Summicron ASPH lens, and most other Leica lenses made within the last 25 years, is only 29.1mm.
- And for comparison, diameter of the protruding rear element group cell on the original Voigtlander 28mm f/2 Ultron lens is only 29.51mm (1.162").
In summary, the slope error on the 7Artisans 28mm rangefinder cam is a show stopper for using the lens on Leica M rangefinder cameras, when the rangefinder is relied on as the sole means of focusing the lens. Some of the other noted issues can even pose risk to some Leica M mount cameras. In addition, the excessively large rear cell of this 28mm lens can mechanically inferfere with some Leica M camera rangefinders and the contact pins on certain crop sensor cameras.
It is too bad that 7Artisans didn't spend a few more hours on the design phase, to ensure that the lens was fully compatible with a Leica M mount rangefinder camera, and to address other details such as ensuring that the front filter threads had about 1mm of additional depth.
The 7Artisans 28mm f/1.4 lens does appear to work adequately on some APS (and smaller) format cameras that have live view, provided that the adapters used have enough internal clearance for the large the rear element group, and that the camera contact pins have sufficient clearance from the rear lens cell. On a Fujifilm X-T20 camera, performance of the 7Artisans 28mm f/1.4 ASPH lens is comparable to the Voigtlander 28mm f/2 Ultron lens in many respects. Some field curvature is evident even on crop sensor cameras, but it is acceptable for some flat subjects by f/2.8 to f/4.
It would be interesting to see how the "FE-PLUS" version of this 7Artisans lens (which is optimized for thick sensor filter stacks) would work on both the Leica M9 and on Fuji X cameras. However, I do not plan to purchase a second one of these lenses, owing to the numerous mechanical issues that were not worked out prior to production. These mechanical flaws might still exist even in the FE-PLUS version.
The original version of the Voigtlander 28mm f/2 Ultron (reviewed below) is probably a safer bet for Leica M, in spite of its radial smearing issues on some sensor filter stacks. This is because the Ultron is smaller, has an accurate rangefinder cam, does not mechanically interfere with most Leica M rangefinders, and does not cost much if any more than the 7Artisans, at least if acquired used.
In only weeks, I went back to using the 28mm f/2 Ultron lens on my Leica M (in spite of having to use it at f/4.8 if I need to capture details near the edge of the frame) because it has reasonably accurate rangefinder cam, and for peace of mind in knowing it will not mechanically interfere with the Leica M9 rangefinder. The 7Artisans 28mm f/1.4 has been relegated to limited use on crop sensor cameras.
Based on the above, the 7Artisans 28mm f/1.4 lens is not recommended for Leica M cameras. Its rear cell has non-standard dimensions, its rangefinder cam has an incorrect slope angle, and it has to be stopped down for adequate performance. A used Voigtlander 28mm f/2 lens may be a better choice in this general price range. The 7Artisans 28mm lens may be adequate for some crop sensor cameras, but only just.
The Voigtlander 28mm f/2 Ultron II could be an even better option, but I can't say this for sure until I measure and test one. Leica brand lenses are also an obvious choice if one can afford them. I am not a professional reviewer (so I don't get loaner samples to review), but since I usually test the lenses I do have access to in order to to determine the maximum useful aperture when used with different cameras, I usually document and publish the results so others can benefit from it.
28mm f/2.0 Voigtlander Ultron (Tested in 2012-2013, and again in 2021)
The Voigtlander 28mm f/2 Ultron is a relatively compact lens for its focal length and f/ratio. It does not perform like a Leica Aspherical lens, but (with a few caveats related to image sensor filter stacks) it holds its own in the general appearance of images it captures. Part of this could be because the VC 28mm f/2 lens has very little susceptibility to veiling flare, which gives its images some snap, even when shooting without the sun to your back. The lens does appear to have some field curvature when used on a digital camera, but it is usually workable for most subjects by about f/4. The f/stop range is f/2 to f/16 in half stop clicks, and the minimum focus distance is 0.7 meters.
With most digital cameras used thus far, the 28mm Ultron lens has radial blur (actually smearing) around highlights. This smearing smears inward from imaged highlights that are as little as half way to the edge of the picture. In many cases, the lens has to be stopped down to f/4.8 to f/5.6 to control this problem.
The radial smearing is caused mostly by the short (about 30mm) optical distance between the lens exit pupil and the focal plane. This causes the light bundle from the lens to intersect the edge of the focal plane at a greater angle from perpendicular. This can cause image smearing with some sensors having birefringent anti-alias (AA) filters, or even with an ordinary sensor cover glass and IR filter. The smearing happens around off-axis images of strongly backlit subjects when the lens is used at apertures wider than f/4, even on the Leica M9 (sensor replaced in 2017), which as no AA filter. The lens itself does not produce this blooming or smearing at apertures slower than about f/2.8, so on film cameras, it should work adequately at apertures as wide as f/2.4 to f/2.8.
It is not known if the newer Voigtlander 28mm f/2 Ultron II will have similar radial image smearing problems on the same cameras used to test this original 28mm f/2 Ultron lens.
The diameter of the protruding rear element cell on the Voigtlander 28mm f/2 Ultron lens is 29.51mm (1.162"). This is slightly larger than the 29.36mm (1.156") diameter that will clear the rangefinder mechanism of worst case Leica CL film camera rangefinder measured to date, after accounting for lens mount centering tolerances. However, it does not mechanically interfere with the Leica M9 rangefinder.
Unfortunately, the rear cell does block some of the light path between the M9 light meter cell and the part of the gray shutter blades it takes readings from, so in-camera light metering is not particularly accurate with this lens. For comparison, the rear cell diameter of the 35mm f/2 Summicron ASPH lens, and most other Leica lenses made within the last 25 years, is only 29.1mm.
There have been a few isolated instances of inconsistent focus with the 28mm Ultron lens. However, this was not even close to the extent that it happened with the Zeiss 50mm f/2 ZM lens (at least prior to when the 50mm lens rangefinder cam was widened). It is possible that this is because the rangefinder cam surface of the 28mm lens has the largest inside diameter of that in any lens tested except the Zeiss 50mm f/2 and the Leica 75mm f/2.5. Too large of a cam surface inside diameter may lead to inadequate overlap with the camera rangefinder coupling wheel. (Update: This focus problem with the Ultron disappeared after Leica serviced the M9, since the M9 rangefinder coupling wheel apparently had a little wobble prior to service.)
28mm f/4.0 MS Optical Perar Triplet Pancake Lens (Tested in 2019)
The MS Optical 28mm f/4.0 Perar lens is almost as compact as a Leica M body cap. Using this lens instead of a body cap is a good way to always have a 28mm lens on hand. The f-stop range is f/4 to f/16, with no clicks. The aperture control has no hard stops, so it is important not to accidentally close the delicate apertrure blades too far past f/16. The iris is out in front of the lens elements, as opposed to being between them. The minimum focus distance is 0.8 meters. Focusing is controlled with a small post toward the bottom of the lens. The tested sample also has a custom tiny UV filter that screws into the front.
The 28mm Perar has very noticeable vignetting at apertures wider than about f/9.5. This is caused by off-axis mechanical clipping of the useful aperture. The lens performs well in a bench test at apertures as fast as f/7, but in for real world pictures, slight field curvature requires that it be used at f/11 or f/16 to obtain reasonably sharp detail at the image edges. The reviewed sample also has considerable field tilt, even though the lens is in mint condition, shows no signs of tampering, and the lens cell looks perfectly square with the lens mount.
The sample I reviewed did not focus beyond about 3 meters in the center, but it focused to or past infinity in off-axis areas on one side of the image, but it did not quite reach infinity focus on the other side. This may have contributed its below average edge performance at wider apertures. This is an early sample of the lens, where the engraved word "'Triplet" is spelled "Tpirlet".
The lens has some field curvature that can be used to advantage for certain subjects. For example, if the lens is used at a wider aperture and focused on a centered subject that is 1-2 meters away, the background near the edges may look almost in focus. It's an interesting effect for something like an environmental portrait, where the subject is separated from the background near the center of the image, yet the background toward the edges looks closer to being focus.
The MS Optical 28mm f/4 Perar is a unique lens. It appears to be oriented toward capturing a unique type of wide angle image. Because this lens must be stopped down to f/11 to get a sharp full frame image, it is not a good choice for a wide angle lens that must be used in low light environments. However, it does perform well when used at f/11 to f/16.
Medium Wide (35mm - 40mm)
35mm f/2.0 Contax-G Zeiss Planar T* (Contax G Mount. Tested 2012-2013)
The 35mm f/2 Contax-G Zeiss Planar lens is not the best of the Contax G lenses, but it still performs fairly well. It is a relatively short lens, but the diameter (after adding an adapter) is usually a little larger tham that of medium size Fuji X lenses. The filter size is 46mm and the minimum focus distance is about 0.5 meters. The f-stop range is f/2 to f/16.
The Contax G 32mm f/2 lens has less flare than some modern Voigtlander lenses of similar focal length. Unlike many of the other Contax G lenses, the 35mm has seven iris blades, and each of these is slightly curved. This results in 14 diffraction spikes that are each slightly flared from the blade curvature. An odd number if iris blades, combined with flaring out of the diffraction spikes, makes the spikes shorter and less distracting. I wish more lenses had irises like this. The only improvement to this would be a larger odd number of curved blades, such as 9 or 11. Background bokeh is harsh wide open (bright edges on out of focus highlights) but improves on stopping down. The filter size is 46mm.
At f/ratios of f/2.8 or slower, the 35mm f/2 Contax Zeiss lens can provide images comparable to the 35mm f/2 Leica Summicron ASPH, though it does have to be stopped down about half an f/stop more than the Summicron for the same performance on a given subject. With its iris that consists of 7 slightly curved blades, the 35mm Contax-Zeiss optics would be almost as desirable as the Leica 35mm Summicron ASPH, if housed in a barrel with true damped direct focusing instead of a mount that spins the auto focus shaft in the original lens barrel.
On cameras with thick sensor filter stacks, the Contax G 35mm lens may work as well or even better than the an equivaent Leica M lens, owing to the longer exit pupil to focal plane distance of the Contax lens. The main drawback for use on most cameras having to use cheesy adapters that spin the auto focus (AF) shaft in the lens to focus.
35mm f/2.0 Leica Summicron, Type 1 (8 Elements) (Based on use in 1976-1977)
This is an outstanding lens. The version I had access to in the 1970's was on a Leica M3, so it brought up the 50mm frame lines and had goggles. It has 8 elements and AR coatings that reflect white light as blue and amber colors. Sharpness and contrast are amazing, especially given the period in which this lens was made. There is notable vignetting at f/2, but it is only obvious on slide film. The focus tab has a detent at infinity, which is really handy for landscapes. The iris blades each have a bend with a small radius to provide an almost perfectly circular aperture at f/16.
When I had access to the 35mm Summicron, I also took medium format and 4x5 film pictures. The Summicron is one of those lenses that is so sharp in the center half of the frame that you'd think the pictures are medium format. It is only the film grain that gives away the 35mm format when enlargements are made. This version may work well on the Leica M9, but a version without goggles would be best due to the low 0.68x magnification of the M9 viewfinder. A 35mm f/2 version 1 Summicron, the later 7-element version 4, or the 35mm f/2 ASPH are all quite good. The 35mm Summicron is a lens that can be used to capture the moment.
35mm f/2.0 Leica Summicron ASPH (Current Model as of 2013) (Not Pictured)
The Leica 35mm f/2 Summicron ASPH lens is an improvement over the 35mm Type 1 Summicron in every area except possibly central resolution at medium apertures, susceptibility to flare, the iris shape, and mechanical "feel". The image is only slightly soft in the center at f/2.0, so it requires pixel peeping to even see it. By f/2.8, the center is extremely sharp, and the edges get relatively sharp too, though the edges show blue fringing on backlit objects until f/3.4 to f/4.
Resolution: The 35mm Summicron ASPH has considerably better edge resolution than the 35mm Type 1 Summicron, at the expense of only a little of the real or imagined center sharpness that the Type 1 is known for. Excluding the extreme corners, the least resolution at wide to moderate apertures (f/2 to f/3.4) appears to be between about 12mm and 15mm off-axis. This seems unusual, but it is easy to spot at 100 percent. When I checked the MTF plots, there is a pronounced dip in the MTF 40 line for sagittal structures at this image height (less than 25 percent contrast at f/2.8), so it is a real attribute of the lens. Therefore, unless the lens is stopped down past f/4, it may be best to avoid imaging subject matter requiring the highest resolution in this region. This in turn means that f/4 or slower should be used for landscapes.
Update to the above paragraph, 10/2013: After temporarily lapping and shimming a second bayonet mount plate for this 35mm lens (details in captions of pictures below that were taken with this lens), it was possible to focus the lens all the way to infinity with the Leica M9 (prior to service to correct the M9's flange to focal plane distance), and it was determined that better sharpness was possible between 12mm and 15mm off-axis, at the expense of slightly reduced resolution in other parts of the picture. Therefore, it is possible that low contrast in the MTF plot in this region is due to complex field curvature rather than this being a static area of reduced performance. It is still advisable to use f/4 and slower for landscapes, but this at least shows that the lens is not always of lower performance at f/2.8 and wider apertures in the region around 13mm image height.
Field Flatness: It was observed that when optimum focus on a distant subject is achieved at an image height of about 16mm, the center of the image is focused slightly past infinity. When the center of the image is focused at infinity, focus at a 16mm image height appears to be at somewhere between 40 and 60 meters, but it is difficult to say for sure. This isn't bad, since such minute field curvature is detectable only at f/2.8 and wider apertures, and pixel peeping is needed to see the focus difference between the center and the edge. (Most digital zoom lenses don't even have an f/2.8 aperture, and most are not sharp enough to see such small differences in focus distance.) Slight defocus at wide apertures also introduces some color fringing on backlit objects. At closer distances (5m or less), some minor changes in focus distance versus image height just start to become visible in a 50 percent crop.
Coatings: The tested sample of this lens was made in 1998, based on the serial number. It is not known if a lens of this age has the same AR coatings as a newer version would have, though this lens and photos of newer ones look similar. The optics in this lens are nearly pristine, and most of the AR coatings reflect white light as a dim to medium brightness and low saturation red or green, with the exception of the front element and at least one of the surfaces behind the iris, which reflects a medium brightness but low saturation yellow to amber color. Looking at the lens, reflections from the coatings are brighter than reflections from the coatings in my 50mm f/2 Zeiss Planar ZM, and about the same brightness as reflections from my 40mm VC Nokton optics. This seems unusual given the price range, and it probably does influence the level of flare.
Flare: When the sun is in the picture, flare in the 35mm Summicron is obvious, being a relatively large, medium brightness oval artifact on the opposite side of the image. It is strongest at f/5.6 and faster apertures. This localized flare exceeds that of the VC 40mm VC Nokton (multi-coated version) to an obvious degree, but the Summicron has less veiling flare than the Nokton, and does not appear to flare much in daylight from light sources much dimmer than the sun. This is of course relative, since similar flare is visible in a long exposure of the moon at night.
The Summicron does have some obvious veiling flare when the sun is just beyond an extreme corner of the picture, but using the included compact rectangular lens hood reduces it, and even eliminates it if the sun is enough farther from the edge of the picture. The iris has only 8 blades of minimal curvature, so diffraction spikes around small highlights are relatively long and obvious, at least when compared to lenses having an odd number of iris blades.
Focusing: Focus accuracy and consistency with the 35mm Summicron ASPH is better than with any other lens covered in this section. Every picture was focused just as intended, after accounting for slight near focusing compared to the Leica M9 rangefinder that occurred with all of my lenses before the M9 was serviced. This focus consistency could be due to the Summicron rangefinder cam radius being fairly well matched to the off-axis distance to the center of the Leica M9 rangefinder coupling wheel.
Focus shift with the Summicron is so slight that pixel peeping at 100 percent or more has been needed to see it clearly. When the lens focus coupling is optimized for f/2.8 (as mine turned out to be after its bayonet mount plate was lapped and shimmed), depth of field usually obscures focus shift at smaller apertures, unless you are imaging thin line rulers to measure it.
Bokeh versus aperture: Bokeh is relatively neutral even at full aperture, and at f/2.8 defocused highlights appear relatively round (actually octagonal) over most of the picture, rather than becoming eye shaped from optical barrel clipping.
Bokeh Fringing (unofficial term): At full aperture, white highlights (such as whiskers or white fur on a cat) that are slightly beyond focus show cyan fringing that can be seen as a cyan cast even without pixel peeping. This improves considerably when stopping down to f/2.8, and usually does not appear at all by about f/3.4. This fringing appears most at close focus distances, usually under 1m.
Mechanical: The 35mm Summicron ASPH does not feel as good as the Type 1 35mm Summicron, but what does! The Type 1 was a lens with a special feel, but it lacks the ASPH optics. Focus damping in the ASPH is below average for a Leica lens, though it is more significant than in the new Summarit-M lenses. Focus damping is between that of a Zeiss ZM lens and older Leica M lenses, but has a little more of a stick-slip feel than older Leica lenses I've seen when moving the focus slow. The aperture ring turns easily, with clicks that are not too stiff nor too soft.
The only ergonomic issues are in two areas. The first is that the aperture ring diameter is considerably smaller than the protrusions of the two latch buttons on the lens hood, and this makes the ring hard to turn from either side while the hood (which should be used) is attached, so sliding a finger under it may be the best way to set it. The second issue is that the corners of the plastic focus tab stick out about 1mm too far to clear a flat surface that the camera is sitting on. This prevents focusing closer than about 2m when the camera is on a large tripod head or a smooth tabletop.
Conclusions: The 35mm f/2 Summicron ASPH is an outstanding lens, though its center sharpness, while excellent, does not impress me the way the Type 1 Summicron did. However, the vastly superior edge sharpness of the ASPH, especially at wider apertures, more than makes up for this. The front and rear elements are oversized. This keeps vignetting to a minimum when the lens is used at f/2.8 or slower.
With technical merits of the 35mm Summicron on a Leica M9 aside, the combination captures the moment, instead of being a distraction of menus to set while the moment is lost. A Leica with a 35mm Summicron is a camera that can be used with the heart and not only the mind, since it can often discretely capture the feel of the place or moment one wants to remember. Manual camera settings are almost second nature after using them enough, so many aspects can be pre-set ahead of time.
40mm f/1.4 Voigtlander Nokton Classic (Tested in 2012-2013)
The compact Cosina-Voigtlander (CV or VC) 40mm f/1.4 Nokton Classic lens is not quite in the same league as some Leica 35mm wide angle lenses, but it isn't bad for everyday photos. It is very compact, being only 55mm in diameter (not counting the focus tab) and 30mm long, as measured from the front of a Leica M camera. (A Leica M to Fuji X adapter adds 10mm to the length.) The filter size is 43mm and the minimum focus distance is a relatively distant 0.7 meters. The f/stop range is f/1.4 to f/16, in half stop clicks.
Unlike the VC 35mm f/1.4 Nokton, the 40mm VC Nokton compares fairly well with the 35mm f/2 Leica Summicron Asph (with a few caveats), when stopped down to f/3.4 and slower. The Nokton gets acceptably sharp in the center at f/1.7, really sharp in the center at f/2.4 to f/2.8, and sharp at the edges at about f/4. Focus is reliable on the Leica M9, especially at f/1.7 or slower. The manual focus is smooth and reliable, though it has less focus damping than most Leica lenses. On a crop sensor camera (one without a strong AA filter), the 40mm f/1.4 Nokton Classic can provide good images over most of the field between f/2.4 and f/3.4.
For digital photography on the Leica M9, a slight green fringe is detectable down to f/5.6, but only as color moire on certain subjects. The fringing is otherwise not directly detectable in normal exposures at f/ratios of slower than f/3.4, except at the very edge, and this disappears by about f/4. Fringing on defocused background highlights with the 40mm Nokton usually is not any worse at a given aperture than it is with the Leica 35mm Summicron ASPH.
Focus shift in the 40mm Nokton lens is considerable on the Micro 4/3 format (since the small format with its 2x crop factor amplifies the effect) but this has not been much of a problem with either Fuji C APS format cameras or the full frame format of the M9. There is a little visible field curvature at apertures slower than f/4 on my Leica M9, even on distant subjects. In spite of the focus shift on Micro 4/3, focus shift can be compensated for by using the EVF accessory on Olympus E-P series cameras, the Panasonic equivalent, or the EVF in any other compatible camera. As a result, the 40mm Nokton is one of the lenses I use most often on Micro 4/3 and APS format cameras. (The 60mm equivalent FL on APS cameras is particularly useful.)
The only significant failings of this lens (other than being 40mm focal length instead of 35mm) are field curvature, and susceptibility to veiling flare unless its front element is shielded from bright light. Flare is more of an issue for a rangefinder lens than an SLR because you can't look at a rangefinder lens image in a SLR focusing screen to observe if flare is present. However, the 40mm Nokton has very little localized flare on the opposing side of the image from a bright light source, especially if a filter is not used. In fact, it has less of this local flare than the Leica 35mm f/2 Summicron ASPH.
Background bokeh is harsh wide open (bright edges on out of focus highlights) but it gets better by about f/2.4. The Nokton vignettes heavily at f/1.4, probably in part due to the lack of an oversized rear element. The vignetting also effects bokeh, since out of focus blur areas near the edge have an eye shape (rather than being circular) until the lens is stopped down almost three f/stops.
Field curvature mentioned above becomes quite obvious beyond about 14mm image height at f/stops faster than f/5.6. Here, the edges of the field come to focus in front of the focal plane, so the edges may not reach infinity focus at wide apertures, depending on the sample. This is not an issue when using the lens on Micro 4/3 and APS format cameras, but it is easy to see in the full frame format of the Leica M9.
Fortunately, I found that field curvature could be reduced (though not completely eliminated) in my sample by unscrewing the rear element group about 0.05mm, shimming it in this position, then adding a custom shim to the shim stack in front of the lens mount. The difficulty with this is that the lens barrel retaining ring at the back of the lens is often immovable in VC lenses, and the lens barrel is thin enough that it cannot be held tightly without risk of warping. Therefore, the specific lens sample will determine if field curvature can be improved, or if it needs to be improved.
The 40mm Nokton brings up the 50mm frame lines on a Leica M. Some have shortened the viewfinder side bayonet flange on the lens to make it bring up the 35mm frame lines, but this can't be reversed and keeps the lens from working properly on some Voigtlander bodies. I used a compromise solution that is described in the lens coding section. The coverage of this lens at infinity is extremely close to that of the 35mm frame lines on the Leica M9.
Some reviewers have complained about the 43mm filter size, which is larger than the 39mm Leica filter size. However, unless a Leica lens is used with a special lens hood, a 43mm to 39mm filter adapter can be used for the Leica lenses. A vented metal LH-6 lens hood is available for the front bayonet of the 40mm Nokton lens. The hood makes it look almost like a "wannabe" 35mm Summicron. It isn't bad, but it is fairly large by comparison, due to the larger hood.
In short, with the exception of some veiling flare, the 40mm Nokton can often provide images comparable to the 35mm f/2 Leica Summicron ASPH, provided it is stopped down one f/stop more than the Summicron for a given subject. The VC 40mm Nokton costs 5 times less than the Summicron ASPH, so it's surprising is how well it compares to the Summicron on both the Leica M9 and on Micro 4/3. The only down side for my own photography is that 40mm is a little tight for a surprising proportion of my pictures, so a 35mm focal length gets used more.
A 35mm focal length is my own preference both on the Leica M9 and on Micro 4/3 most of the time (35mm and 70m equivalent focal length), but if a 40mm is not too tight for one's subject matter, it is hard to go wrong with the 40mm Nokton. Even though I use a 35mm Summicron ASPH, the 40mm Nokton is still in use because of its relative lack of localized flare on the opposing side of the picture from bright light sources.
The 40mm Nokton is useful on some Micro 4/3 and APS cameras because it is both high speed and compact. In comparisons between various cameras and lenses in a half to 3/4 length portrait (Appendix J), the Nokton did well in terms of the physical aperture size that could still provide a good image. The relatively large physical aperture at which it became adequately sharp provided the shallow depth of field that is often useful in this type of picture.
Normal (50mm - 60mm)
50mm f/1.4 Leica Summilux-M ASPH (Tested in 2015)
The Leica 50mm f/1.4 Summilux-M ASPH lens is a game changer (in a good way) because it is the lens that at last made it possible to get shallow depth of field but high resolution results on a full frame 35mm (36x24mm) digital format, at least when the subject in the central third of the picture.
I was accustomed to this type of high quality image when using larger format cameras. Since the 50mm Summilux lens can provide both shallow depth of field and high resolution, we'll start some background about the difficulty of achieving such results with a normal focal length lens on a 35mm format.
Some lens reviews that follow the review of this 50mm Summilux lens, especially those for 75mm lenses, will emphasize the maximum aperture at which a lens can control vignetting acceptably, and also at which subjects located near (but not at) the edge of the field of view will be imaged sharply, with little if any observable color fringing.
The desire for this level of performance in shallow depth of field photos was inspired by taking outdoor portraits with a 4x5" film camera long ago. The in-focus image snap and creamy smooth out of focus background in a 4x5 image made for excellent results, even though I only used a 203mm f/7.7 Ektar lens at the time.
The 50mm f/1.4 Summilux-M ASPH is the first 35mm format lens I've tested that can even come close to providing similar results over at least the central part of the field at a relatively wide aperture. Details are in Appendix K. My sample of the 50mm f/1.4 Summilux-M ASPH lens also imaged the rings of Saturn, even at full aperture, as shown in Appendix F.
For background, it is easier for a large format (e.g. 4x5) lens to provide sharp images of a subject at a wide enough aperture to also provide shallow depth of field. This is because it is easier to design slow f/ratio lenses. In the above example of a 4x5" film camera and a 203mm lens, the aperture is 25.4mm when the lens is at f/8.
It gets harder to obtain similar results with medium format (120 film or 53x40mm image sensors), since the lens focal length must be about 2x shorter than the 4x5 lens. This in turn requires a lens to work well at f/4 in order to have a 25mm useful aperture. The "useful aperture" is the aperture at which the lens provides sharp images over most of the field. Sharpness over most of the field is important because the subject's face is rarely centered in a half length to full length portrait. Obviously, the maximum useful aperture isn't necessarily the same as the maximum aperture of a lens.
A Hasselblad medium format camera with a 100mm f/3.5 Planar lens (stopped down to f/4) and a sufficiently large format digital back can provide a sharp image with shallow depth of field. The 100mm Planar lens performs even better at f/5, which reduces the aperture to 20mm. However, a comprehensive Hasselblad camera system is heavy, weighing in at close to 12 kg with a good selection of lenses (40mm through 250mm).
The 35mm format (36x24mm, cropped to 32x24mm), presents a real challenge. Here, the focal length must be almost 4x shorter than the 4x5 format lens to provide the same field of view, indicating a 50mm lens. To get a 25mm aperture, a 50mm lens must be used at f/2. It is very difficult to get outstanding results over most of an image at f/2. Most 35mm lenses (including every M, SLR, and DSLR lens I have tested), are not up to the job, though M lenses come closer than tested SLR lenses.
As the format gets even smaller, it becomes almost impossible to obtain sharp images with shallow depth of field, at least in terms of results with a normal field of view that are comparable to medium to large format film cameras.
When film was the only game in town, the 35mm format was not capable of providing the results I was looking for. This was mainly because film grain was a distraction in enlargements from 35mm. When 35mm format digital cameras reached 12 megapixels, the results were comparable to some 35mm film. If properly implemented, a camera with a pixel count significantly higher than 12 MP could potentially provide the results I was looking for.
Attempting to come close to replicating the 4x5 results, at least in terms of realistic separation between a sharply imaged subject and the defocused background, has long been one of my goals for digital photography. This requires that a lens provide sharp images throughout the central 80 percent of its field of view, and to do so at a large enough physical aperture to adequately defocus the background. This goal is very difficult to achieve in the 35mm digital format. It had proven to be impossible - until Leica got into the digital imaging picture.
As of early 2015, the Leica 50mm f/1.4 Summilux-M ASPH lens is the new winner in terms of the largest "useful" physical aperture size (20.8mm) of any of the tested Leica M mount lenses shorter than 135mm. However, this distinction applies only to the central third of the picture. The 75mm f/2.5 Summarit-M lens, at 19.7mm useful aperture, was the former winner among the lenses tested, and it is still the winner when very high resolution is needed beyond about 8mm image height at a wide aperture.
Central resolution of the Summilux is amazing, but due to its lower wide aperture performance at 10-13mm image height, it is not the winner across the board for all types of photos. For example, a Zeiss 50mm f/2.0 Planar ZM is likely to work just as well as the Summilux for a high resolution half to 3/4 length portrait in which the subject's eyes and hair are well off-center, yet still adequately resolved. Here, both lenses must be stopped down past f/2.8. Only the 50mm f/2.0 Apo-Summicron-M ASPH would be likely to provide a larger useful aperture for this type of image.
For my own applications, the "maximum useful aperture" is the overriding reason to get a lens such as the 50mm f/1.4 Summilux-M ASPH. The maximum absolute aperture is not as important as the maximum useful aperture for a given application. The "useful" aperture is the aperture at which vignetting is controlled to an acceptable level, and at which subjects even in off-center parts of the image are rendered with high resolution and good contrast in a shallow depth of field picture.
The 50mm Summilux-M ASPH has a maximum "useful" aperture of 2.4 (for some of my applications), which results in a physical aperture of about 21mm diameter. This useful physical aperture is what determines the minimum depth of field in really sharp photos of subjects that may not always be centered in the original image. The Zeiss 50mm f/2 ZM lens described below has a maximum useful aperture of f/3.2 to 3.6. This is good, but is equivalent to only a 16mm physical aperture, or perhaps a little less.
Therefore, what is being accomplished in forking over 4 times the cost of the 50mm f/2 Zeiss lens for a Leica Summilux-M ASPH lens, is getting the larger (21mm) maximum useful aperture at f/2.4. Without this attribute, there would be no point in using a Summilux for my applications. This is because, at apertures slower than f/4 to f.5.6, both lenses will perform equally well. In fact, at slow f-stops, the 50mm f/2 Zeiss ZM may even have a slight edge over the Summilux in terms of contrast and resistance to flare. We will now get down to the specific attributes of the 50mm Summilux-M ASPH lens.
Resolution: The central resolution of the 50mm f/1.4 Summilux-M ASPH is high, even at full aperture. It is so sharp that it will provide a useful image of even the moon. This was the first lens that was so good wide open that measurements could be influenced by only slight misalignment of my test setup. In the center of the field, spot sizes at wide apertures are so small that the slightest misalignment of the test optics can make a lens that is this good look less favorable than it actually is.
A star image from the Summilux can be so small that a star is imaged as a pure primary color, because the image is not large enough to significantly illuminate more than one pixel. This made me wonder how well the lens may work as a long distance microscope objective is used reversed on appropriate equipment.
In the 50mm f/1.4 Summilux-M ASPH lens, there is slight (very slight) residual spherical aberration at full aperture, but this begins to diminish at f/1.7, and it is no longer visible at f/2.4. The aberrations do not appear to be purely spherical, as will be detailed below. The bottom line is that the central aberrations are very slight even at wide apertures, with the exception of a region between about 10mm and 13mm image height.
Somewhat like the 35mm f/2 Summicron ASPH lens, the 50mm Summilux ASPH lens has decreased resolution between about 10 to 14mm image height. This is visible in practice, and it also appears on MTF 40 plots for the lens. Outside this region, the image gets better again. However, where field curvature appeared to contribute significantly to issues at a given image height in the 35mm Summicron, this does not appear to be the case for the 50mm Summilux. In the 50mm, reduced resolution of tangential structures between 10 and 13mm image height looks like a glow or streak that extends outward from digital images of bright tangentially oriented features. Images of sagittal structures at the same image height are much sharper.
In high magnification visual tests, Summilux images at 12mm image height appeared to have a slight degree of combined aberrations that may include a little coma, astigmatism, and maybe slight spherical. This is confirmed in digital images having small but overexposed highlights. Combined aberrations in this region looked relatively large (maybe 20 to 25 microns) at wide apertures, but the brighter part of a point light source image in this region is reduced to about 50 arc seconds (12 microns, or roughly 2 pixels in the Leica M9) at f/4. Aberrations are reduced slightly by stopping down to from f/2.4 to f/3.1 or so, but a small amount of aberration is still observable at f/5.6.
Slight coma and astigmatism between 10mm and 13mm image height: Closer examination of imaged small highlights show that the radial glow may be partly from coma. For the in-focus image at f/1.4, the off-axis image of a highlight is relatively round, but as the lens is stopped down past f/2, highlights become slightly elongated in a direction away from the optical axis. This elongation looks like a streak at some image heights, and like a dim fan at others. The elongation diminishes at f/4 and is gone by f/5.6.
Most of the elongation is relatively dim (unlike the bright coma fan in a fast Newtonian telescope), but its size can be significant. Specifically, the full extent appeared to be about 2-3 pixels at 9mm image height, 4-5 pixels at 10mm image height, 5-6 pixels at 11mm image height, and 6-7 pixels at 12mm image height. (Only about half the fan length is visible in typical photos.) The aberrated image starts getting smaller again beyond about 13mm image height.
The spot elongation or fan is larger than noted if a tangentially oriented highlight is on one side of the plane of best focus, but appears smaller just beyond the other side of best focus. The inner part of the elongation is obvious, but the entire dim elongation is not observable unless a bright feature is in front of a dark background. However, as can be inferred from the MTF plot, it is enough aberration to reduce contrast in fine tangential structures such as hair. Examples are at the end of this section, and in Appendix J.
Field Flatness: Tests to date have not emphasized measurement of field curvature, so field flatness has not been accurately assessed at this point. However, the possible presence of increased aberration at a moderate image height tends to rule out much field curvature beyond that for which mild astigmatic spot elongation would explain the difference in MTF40 contrast in images of the related tangential versus sagittal structures. (For now, this is just a guess.)
Coatings: The Summilux has multi AR coatings that reflect white light as a variety of colors. The color of white light reflections are close to those of the Voigtlander (VC) 40mm f/1.4 Nokton lens, but dimmer.
Flare: Veiling flare is much higher than that of the Zeiss 50mm f/2 ZM lens covered below, being similar to the veiling flare seen in images with the VC 40mm Nokton. When shooting into the sun, a lens hood more substantial than the built-in hood should be used. (A comparison of flare versus lens shading is at the end of this section.) If the sun is in the picture, there is a very weak bright area on the opposing side of the picture. However, this bright area is far less obvious than the local flare in the 35mm f/2 Summicron-M ASPH.
To reduce flare, I use an E46 to 52mm filter step up ring and a 52mm vented hood on the Summilux, even though the filter adapter blocks deployment of the short (and minimally effective) built-in hood. The separate hood Leica provides for the newer classic style "Black Chrome" 50mm Summilux-M ASPH lens should improve the flare situation for that version.
Focus Shift: Very little focus shift is observable in the Summilux-M ASPH lens. Actually, no focus shift that I could even see ordinary pictures. These tests include focusing at maximum aperture through a high magnification EVF on a Micro 4/3 camera, then stopping the lens down to take the picture, and comparing results with images that are focused at the working aperture. At f/2.8, results of both tests at were almost indistinguishable.
Tests done specifically to measure focus shift show only slight focus shift that follows an unusual curve, possibly due to the aspheric element. With best focus at maximum aperture as a reference, initial focus shift measurements at a 2 meter subject distance is as follows: Best focus (0mm) is at f/1.4. This goes out to +8-9mm at f/1.7, back down to +4mm at f/2, then up to +5mm or slightly more at f/2.8 and slower. Subject matter pictured near the end of Appendix J was used to assess focus shift.
Bokeh versus aperture: Bokeh is relatively neutral even at full aperture, and at f/2.8, defocused highlights appear relatively round (actually nine-sided) over most of the picture, rather than becoming eye shaped from optical barrel clipping.
Bokeh Fringing (unofficial term): At full aperture, white highlights (such as whiskers or white fur on a cat) that are slightly beyond focus show obvious green to cyan fringing that can be seen as a green cast even without pixel peeping. This improves considerably when stopping down to f/2.4, and usually does not appear at all in most subjects by about f/2.8. However, it can be detected on cat whiskers (if you look for it) until about f/5.6, which is similar to the aperture at which detectable fringing completely disappears in the VC 40mm f/1.4 Nokton . This fringing appears most at close focus distances, usually under 1.5m. Fringing is covered more in Appendix H.
Good in-focus lens performance can be a double edged sword. If a lens is not extremely well corrected, discoloration of defocused highlights (bokeh fringing) would be obscured by the glow of spherical aberration and the blue to purple glow typical of uncorrected chromatic aberration. However, when a lens (such as this 50mm Summilux) is so well corrected that its in focus image is sharp even at f/1.4, the relative lack of spherical aberration will make discoloration of slightly defocused highlights somewhat more obvious than would be the case with a lower performance lens.
In other words, if a lens has nearly textbook performance in the center of the field, it may be more likely to have nearly textbook bokeh fringing in the same region. Bokeh fringing is somewhat reduced in off-axis areas where the in-focus image is not quite as sharp. The only practical way to improve on bokeh fringing without sacrificing resolution is with an apochromatic design. This is what Leica did in the newest version of the 50mm f/2 Summicron, the Summicron-M APO ASPH.
Vignetting: The 50mm Summilux vignettes heavily at maximum aperture when compared to a typical fast SLR lens, with the corners being almost 2 EV (2 stops) dimmer than the center. It is fairly obvious that only the center of the image actually gets the benefit of f/1.4 when the Summilux is used at full aperture. For example, when pictures taken at f/1.4 and f/1.7 (with half a stop of shutter speed change to compensate) are compared, the whole f/1.4 image looks darker than the f/1.7 image. Close inspection reveals that the very center of the f/1.4 image is about the same brightness, but that brightness rapidly starts to fall off in the first few millimeters image height.
Vignetting resistance improves when stopping down, with images at f/1.7 looking fairly evenly illuminated if lens coding is utilized. By a about f/3.1, mechanical clipping of the aperture is controlled to an extent that off-axis image darkening (vignetting) is only visible at the extreme corners. Lens coding compensates for most of the vignetting losses, particularly at f/2 and slower, but it is at the expense of adding some noise to the image edges and corners.
The rear element of the 50mm Summilux ASPH is relatively small, being only slightly larger than the rear element of the VC 40mm f/1.4 Nokton, or that of the 35mm f/2 Summicron. This is necessary in part because the focus mechanism (with its restriction on the maximum local aperture) is located by the rear of the lens. The focus mechanism must also be more complex to accommodate the Floating Element (FLE) feature. Combined, these aspects of the focus mechanism limit the diameter of the rear lens elements.
Based on a cross section view of the lens, the rangefinder cam surface is actually part of an intermediate focusing component that is common to focusing the main barrel (using its outer threads) and focusing for the rear FLE elements (using inner threads). The outer helicoid has a sloped cutout to provide clearance for the rangefinder coupling wheel mechanism. The FLE is worth having, since even images at close focus distances are outstanding.
Mechanical: The lens has a solid build quality, but focus feels a little less smooth than that of most Leica lenses, possibly due to the complexity required to accommodate the Floating Element (FLE) feature. The rear element FLE group moves forward at a different rate than the main body of the lens, with the main body of the lens moving forward about 5.5mm in its full travel, while the rear elements move forward only about 5.0mm.
The back of the FLE cell is about even with the rangefinder cam when the lens is at infinity, but protrudes slightly behind the cam at close focus distances. The FLE elements could be a little larger if the cell did not protrude, but accomplishing that would require a complete re-design, which would not be trivial.
The aperture ring has relatively weak clicks, not too unlike the 75mm Summarit-M lens covered below. It is easy to accidentally change the f-stop setting. However, for those into movies, the clicks will not be overly loud if using the lens to take movies with the newer Leica digital M or other cameras having movie capability.
Ergonomics: Not to be confused with economics (when your bank account evaporates after paying for the lens!), the 50mm Summilux ASPH has relatively good ergonomics. It has good focus damping, though there is more resistance than on some other Leica lenses due to cantilever from the rear focusing mechanism, and from the second focusing thread that controls the rear floating element (FLE). The focus ring actually has some accessible knurling, so it can be focused without relying on the plastic focus tab.
The only ergonomic issue is the same as one exhibited by the 35mm Summicron ASPH. The problem is that the corners of the plastic focus tab stick out about 1mm too far to clear a flat surface that the camera is sitting on. This prevents focusing closer than about 3m when the camera is on a large tripod head or a smooth tabletop
Filter Compatibility: In testing a lens, I routinely mount it on a film camera, open the shutter, and view the lens through the film gate to evaluate mechanical clipping of the aperture, and other attributes related to vignetting.
While evaluating the 50mm Summilux ASPH, I was surprised to find that the inner edge of the cell for a single low profile 46mm B+W UV filter proved to be the operative limit for mechanical aperture clipping by the front of the lens barrel. This means that when even a single 46mm filter is used on the front of the lens, it will increase vignetting beyond that shown in the Leica specs, at least at apertures wider than about f/4. This makes one wonder about how much vignetting a filter will cause on the new classic style "Black Chrome" version of the 50mm Summilux-M ASPH lens, with its smaller E43 filter size.
On the present Summilux, the E46 filter appeared to have the most influence in comparison to the Leica spec at about f/2.8, where vignetting may be increased by up to 10 percent at the picture corner. The effect on vignetting will also be more severe when a thicker filter, such as a CPL, is used.
Based on these filter observations, it appears that a 49mm filter size may have been more appropriate, even at the expense of a larger diameter at the front of the lens, or at the expense of dropping the short built-in hood. A larger filter can be used with a step-up adapter, but this will block deployment of the built-in lens hood. If a larger filter is used with an adapter, the best size is 52mm, since this compensates for the additional distance from the front element of the lens required for the filter adapter, while keeping the filter cell diameter about the same as that of the lens barrel. Additional information about filter size is in Appendix H.
Conclusions: The 50mm f/1.4 Summicron-M ASPH lens has high performance in the center even at full aperture, and reasonably good full field performance by f/2.4 or slightly slower. While it has more bokeh fringing than I've seen in most other lenses, it is important to note that background fringing can potentially increase in proportion to the in-focus performance of a non-APO lens. This can be especially true when spherical aberration is almost completely corrected for at least one color at full aperture. Exceptions would include where a more expensive APO design is used to bring three or more colors to a common focus.
When the central third of the field of view is considered, the 50mm Summilux is one of those optical wonders that is incredibly sharp in the center, and which may make one want to get into a Leica M system. Here, the lens is the real deal, rather than the camera being the only attraction. The camera is just the means to use the lens.
For now, it generally is not practical to use a fast Leica M lens on other full 35mm format digital cameras, because the anti-alias filter in most other cameras will blur the image edges. Also, the back focus of a Leica M lens is not adequate to permit this lens (or almost any other Leica M lens shorter than 75mm) to be used on an SLR, even if modified. In short, if you want to get the most out of this lens, you'll need a Leica camera to go with it.
50mm f/2.0 Leica APO Summicron-M ASPH
The Leica 50mm f/2.0 APO Summicron-M ASPH is not tested here owing to its high price and relative scarcity. Based on Leica's MTF data, it is envisioned that the 50mm APO Summicron lens would perform well in the off-axis areas where performance of the 50mm f/1.4 Summilux-M ASPH is less than stellar. If money was no object, I would have acquired the 50mm APO Summicron lens instead of the 50mm Summilux-M ASPH.
50mm f/2.0 Jupiter 8 (Russian lens)
The tested sample of the 50mm f/2 Jupiter 8 lens had to be modified before it could be safely mounted on a Leica M9. It is not certain if this is normal for a Jupiter 8 lens, since they are only available used. This means there is the potential that a given sample may have been modified or tampered with. Initial tests were on Micro 4/3, but after modification, it was safe to use the lens on the Leica M9.
The Jupiter 8 lens sample was configured for a lens flange to focal plane distance that was considerably less than a standard Leica M39 mount, and the distance was also less than an M mount camera with an M39 to M adapter. Specifically, the its rangefinder cam and focus did not appear to be compatibly calibrated. In my Leica CL, the rangefinder showed infinity focus when the lens focus setting was at 7 feet (2m). To safely test the lens, it was mounted while set at its closest focus setting, then slowly focused toward infinity, so as to never try to make the CL rangefinder move past infinity.
This error in the lens was corrected by drilling and tapping a new location for the infinity stop screw in the base section of the lens helical thread. Once this was
done, the Leica CL rangefinder showed infinity focus when the lens was at its infinity setting. It was then safe to mount the lens on the Leica M9.
The Jupiter 8 lens is very compact and focuses down to about 1 meter. It takes 40.5mm filters, and the front of the lens rotates when focusing. The mechanics of the lens are very simple compared to Leica brand lenses, but functionality is still adequate. The aperture ring moves easily and has no click stops, and the focus ring is fairly loose as well.
The tested sample of Jupiter 2 lens is not coated on several surfaces, so it has relatively low contrast. Most of the lens flare appears to be of the veiling type. This is acceptable in some situations, since it can help prevent clipping of shadows when shooting high dynamic range subjects.
Central resolution is not too bad even wide open at f/2, and it is quite good by f/4. The edge of the picture is reasonably sharp by f/5.6, but the lens must be stopped down to f/8 before the image corners become very sharp. Reduced corner sharpness at wider apertures is due mostly to astigmatism.
Provided that the Jupiter 8 lens is adjusted to be safe for use on a Leica camera, it can be useful in high dynamic range situations, including those where a subject is strongly backlit.
50mm f/2.0 Zeiss Planar ZM T*
I bought this lens years before getting a Leica brand 50mm lens. At the time, I had been holding out for the newer version of the (non-APO) Leica 50mm Summicron that has the built-in hood, but the price of these (even used) kept going up faster than the rate I could comfortably allocate funds for one, given the state of the economy. Therefore, I "cheaped out" and went with the 50mm f/2 Zeiss Planar ZM. It is a relatively good lens, but it does have some focus shift.
The Zeiss 50mm f/2 Planar ZM is only about half the price of a used Summicron, and MTF plots for both show mostly similar resolution versus contrast, though the Summicron appears to be better at the corners. They say you get what you pay for, and I was in for some unplanned adventures with the 50mm ZM lens, as will be shown below. It all turned out well though. In fact, the 50mm ZM still gets used instead of the Leica 50mm lens some of the time.
The 50mm ZM lens takes 43mm filters, has a minimum focus distance of 0.7 meters, and has an f-stop range from f/2 to f/16, in 1/3 stop clicks. This description will gradually be updated, because it was ultimately found that the large rangefinder cam size of this lens was not really the sole cause of initially inconsistent focus discussed below. The focus issue was apparently at least partly related to calibration of the Leica M9 rangefinder, and to focus shift at wider apertures.
In the discussion below, the Zeiss lens is compared to much more expensive Leica lenses, which does not make it look its best. However, to put things in perspective, it is important to note that resolution of the 50mm ZM is better than that of any 50mm SLR lens I have ever tested.
Whether Leica or Zeiss, I had decided that a 50mm f/2 was the only way to go, in large part because the f/4 MTF plots for the f/2 lenses are so much better than those for affordable f/1.4 and f/1.5 lenses. (This excludes the expensive 50mm f/1.4 Summilux-M ASPH, which is quite good even wide open.) In general, when the MTF 10 and MTF 20 lines take a dive along with the MTF 40 line toward the lower right corner (as it does more dramatically with the faster lenses, even if they are stopped down), it could indicate low contrast and maybe even some flare that gets worse with image height. In general, the lens is for frequent use between f/2.4 and f/2.8, for shallow depth of field images that have less darkening in the corners than would be the case if the lens was used wide open. The Zeiss lenses for Contax and Hasselblad are quite good, so I went for the Zeiss 50mm f/2 ZM.
The Zeiss 50mm f/2 ZM appears to have an oversized rear element, which should reduce vignetting at wide apertures. Observation of the aperture through the back of a film camera shows that clipping at wide apertures occurs at the front element (with is also oversized) rather than the rear. These oversize elements help reduce overall aperture clipping by the lens barrel.
Visual tests of this sample (under high magnification) show strong green-cyan color fringing at wide apertures, to a degree that would influence white light MTF 20 and MTF 40 contrast levels. Visually, fringing at the center extends up to 2 arc minutes (0.03mm) from a highlight at full aperture and about 1 arc minute (0.015mm) at f/2.3. Fringing is gone at the center at f/2.8 and gone at the corners by f/4. These results are validated in photos taken with the lens. Some of the fringing is similar to that in the 75mm Voigtlander lens, but an important difference is that the Zeiss appears to have only about half as much focus shift.
In photographs, green fringing is obvious around highlights in all parts of the picture at full aperture, even when viewing the image in the camera review screen at moderate zoom levels. When the lens is stopped down to about f/2.5, no fringing is observed in ordinary pictures out to an image height of about 8mm, but it begins to show beyond an image height of 9mm. When the lens is stopped down to f/3.6, outright fringing usually is not visible anywhere in the picture.
Fringing can still be imaged f/3.6, but it is generally limited to a green cast on slightly out of focus thin black features in the immediate background. Such features can still appear green even at f/4, and slightly out of focus thin black foreground features may have a slight magenta cast. The foreground appears to be imaged with more contrast than the background, so if depth of field is relied on, it may be best to focus slightly beyond the middle of the intended DOF range.
After seeing this background fringing effect (visible in Leica M9 image with the 50mm ZM, in the above comparison with a Hasselblad digital back) it would be fun to put the Zeiss head to head with currently cheap f/1.8 to f/2 35mm SLR lenses and see if they have the same foreground versus background color cast issues. I never noticed it with such lenses in film pictures. For now, it is known that the ZM is good enough that it blows away any of the faster (f/1.2 to f/1.4) SLR lenses I have tested, even when they are stopped down to f/2.
Compared to the 50mm f/1.4 Summilux-M ASPH, the 50mm f/2 Zeiss Planar ZM is slightly softer in the center until it is stopped down to f/2.5. At f/2.8, the Zeiss comes close the Summilux in the center, exceeds its performance between about 8 and 15mm image height, then falls behind again toward the format edges. However, this performance difference is only true if focus shift is accounted for when using the Zeiss lens. Otherwise, focus shift in the Zeiss puts the Summilux slightly in the lead.
Focus Shift: A few preliminary measurements of focus shift at a 2 meter subject distance appeared to indicate the following, with best focus at f/2 being the reference point: Best focus (0mm) is at f/2, +4mm (or slightly more) at f/2.5, +8mm at f/2.8, +13mm at f/3.6, and +15mm at f/4. Focus shift at wide apertures appears to get a little worse at closer subject distances.
The Zeiss lens has about two arc minutes of astigmatism and maybe a little coma in and near the corners at f/2.8 and wider, but I have not observed these aberrations in an actual pictures after stopping down to about f/3.6. Combined with the color fringing, this means that the lens must be stopped down to about f/3.6 to get really good image quality over most of the format. I'd hoped for better performance at f/2.5 to f/2.8, but a good image at f/3.6 and slower isn't bad compared to most 50mm rangefinder lenses in this or a lower price range. The lens is better at f/2.8 than at f/2, but just not as good at f/2.8 as it is at f/3.6 or f/4.
There initially appeared to be a bit of field curvature at close distances, because when I focus on something with the rangefinder and then pan over so the subject is near the edge, best focus near the edge is noticeably closer than the subject. It took several shots before I was able to adequately compensate for this. It is possible that this is instead related to the large rangefinder cam ring diameter mentioned below, and its possible influence on focus accuracy.
The good thing is that once proper focus near the format edge is achieved, the Zeiss images have more snap than the edges of pictures with most Voigtlander lenses I've tried to date. It is closer to my Leica lenses in image quality, though the Leica lenses don't have as strong of fringing at wide apertures. It also has an image quality reminiscent of the outstanding Zeiss 90mm Contax G Sonnar T* lens. There is very little flare under average conditions. This could be due in part to good knife edge baffles on the inner surface of the rangefinder cam, aft of the optics.
Background bokeh is a little harsh wide open (bright edges on out of focus highlights) but the bright edges disappear in the image center by about f/2.5, with the blur circle appearing of relatively uniform brightness. Bokeh wide open is not quite as harsh as with the 40mm VC Nokton, but it is notably more harsh than with the 75mm Leica Summarit-M.
Mechanically, the feel of the lens is fine, though it doesn't feel like a Leica lens. Its focus is a little easier to turn than some Leica lenses, to an extent that the light spring force on the camera's rangefinder wheel makes it noticeably easier to turn toward a close focus distance than toward a far focus distance. There have even been times I thought the focus setting may have slowly crept toward a closer distance over time because of this.
The focus tab is a simple bump on the focus ring rather than a finger notch, but it's adequate. It's actually nice in a way because it doesn't protrude as far as a finger notch, making it a little easier to nest in a gadget bag. In addition to the focus tab, the 50mm ZM also has a knurled focus ring, which makes it easier to use on a tripod. The grip at the back of the lens has shallow knurling and is not any wider than the focus ring, so it is harder to mount on the camera than some lenses. The lens accepts the same Voigtlander LH-6 lens hood that fits the VC 40mm Nokton, which is handy.
The aperture clicks are weaker but sharper than in most Leica lenses, but still feel precise. However, the click stops don't quite line up with the index lines on the aperture ring.
When mounting the ZM lens on the Leica M9, it feels like part of the lens has to gently wiggle past something toward the upper right of the lens mount if mounted on the camera while focused at infinity, but it doesn't have as much of this unusual feel if focused close before mounting to the camera. This could be related to the comparatively large rangefinder cam diameter noted below. It could also be from the rangefinder coupling cutout taper failing to extend as far onto the viewfinder side bayonet claw as it does on Leica brand lenses, making it shallower.
Wobble is not seen or felt in either the lens barrel or rangefinder cam, but focus was not always consistent. I can take one picture of a subject at 1 meter and it will be fine, but another picture that is focused on a subject a few tens of cm farther away won't be as sharp. This doesn't happen with any of my other lenses. It seems random, other than that focus seems less consistent when I'm pointing the camera downward. There is a faint rattle when the lens is gently shaken, but it sounds more like the light aperture blades than something heavier like a lens element.
I later found possible causes of inconsistent focus at closer distances. One possible cause is the relatively large rangefinder cam radius. This is covered below, and in more detail just after all the lens descriptions. In addition, after comparing the feel with a newer Leica lens, I determined that the 50mm ZM lens does have a little rotational play, though it is very slight and not easy to detect. Improved results after modifying the lens rangefinder cam width (covered below) would seem to indicate that the slight rotational play is not a functional problem.
The rangefinder coupling cam (which is a rotating ring behind the rear element) has a larger inside diameter than most cams, at 33.63mm, plus it has a slight chamfer on the inside. This larger inner cam diameter just barely engages the top of the rangefinder coupling wheel in my Leitz-Minolta CL (only about 0.6mm engagement; even less when chamfers are considered!), but seems to have almost 1mm of contact with the Leica M9 rangefinder coupling wheel. This larger cam diameter does not seem entirely consistent with Leica standards, based on measurements of Leica lenses and cameras.
The fact that the cam engages less than half the width of the Leica M9 rangefinder coupling wheel could be related to the inconsistent focus, particularly since the coupling wheel in the camera can tilt or wobble a little when the cam contact is all on one side of its center line. Either way, this ZM lens doesn't appear to have as good of an interface to either the Leica M9 or CL rangefinders as my Leica and Voigtlander lenses have. Surprising, given the price range.
I had considered other Zeiss ZM lenses such as the 35mm f/2 Biogon (cheaper than a 35mm Summicron) but other ZM lenses were temporarily ruled out due to focus inconsistency with the 50mm lens. Focus issues may be due in part to focus shift, but the large rangefinder cam diameter was also suspected to have a potential (perhaps even actual) adverse effect on focus accuracy.
When also considering the funny feel and greater resistance when mounting the ZM on a camera, my impression is there are just to many apparent quirks versus cost for my wallet. Also, color fringing of the ZM at wide apertures is strong enough versus the cost of the lens that I'd be inclined to hold out for Leica brand lenses in other focal lengths if I was going to spend more than what a Voigtlander lens costs.
The rangefinder cam being so far off-axis that it has minimal contact with the Leica rangefinder coupling wheel is actually a greater concern than color fringing. The RF cam is not an issue I've seen even in the lower cost Voigtlander lenses said to be made in the same factory. I was somewhat surprised to see this in a Zeiss branded lens.
I checked with Zeiss in March 2013 to see if they consider a rangefinder cam inside radius as large as the one on this 50mm lens to be in spec, and they declined to answer that particular question. My hat is off to them for a speedy response though. Tests below appear to show that the cam inside diameter is too large.
I haven't decided whether to permanently widen the rangefinder cam on my 50mm ZM with J-B Weld and plane it off to match the original cam height prior to curing, or to perhaps instead attach a strip of brass to widen the cam. Only a small amount of width can be added without potentially interfering with removal of the rear element group. The temporary widening of the cam (discussed below) seems quite effective.
I've seen one photo of a sample of the 50mm ZM lens that appeared to have a slightly wider cam of slightly smaller inside diameter, but many photos I've seen of the rangefinder cam on 50mm f/2 ZM lenses look like the cam on mine. The sample that appeared to have a smaller diameter cam was SN 15842004, shown in a March 2013 eBay listing.
UPDATE of March 2014: After warranty service of the Leica M9, the camera focused much more consistently with lenses having larger rangefinder cam radii, including the 50mm Zeiss ZM that is covered here. However, when the rangefinder cam of the Zeiss lens is temporary widened (to provide a smaller effective inside cam diameter) focus continues to be more consistent, even after service of the camera. Therefore, I still keep the can fitting on the lens.
Oddly, after service of the Leica M9, the image from the 50mm Zeiss lens has been consistently far-focused by a distance equivalent to about 35mm past the rangefinder setting at a 1 meter subject distance, while images from my 75mm Summarit-M lens substantially agree with the rangefinder. Both lenses used to near focus just a little.
Also, even after the Leica M9 was serviced to get its focal plane to agree with the infinity stops on Leica brand lenses shorter than 90mm, the 50mm Zeiss ZM lens still did not focus quite to infinity. To obtain infinity focus, it was necessary to remove a 0.05mm shim (the thinnest shim in the stack) from the Zeiss lens.
Fortunately, it was not difficult to access the shims in this lens, though a spanner wrench with relatively narrow ends was needed for the rear spanner ring. Once the spanner ring is spun off of the rear threads on the lens (the spanner does not actually come clear out due to the RF cam at the very back) the whole lens assembly pulls out the front, making the shims easily accessible. Unlike many VC lenses, the spanner on the 50mm ZM lens was not seized.
After removing the shim, the 50mm Zeiss Planar ZM focuses about 0.015mm past infinity when set at the infinity stop (since I don't have a shim that thin), and the landscape images this lens takes on the Leica M9 are now outstanding. As a result, the 50mm lens now gets used as much or more as the 35mm Summicron or 75mm Summarit-M lens. It is now the lens I usually leave on the camera when it is kept in the modified Leica system case.
50mm f/3.5 Industar 22 (Russian lens)
The 50mm f/3.5 Industar 22 lens is not as sharp at the edge as the 50mm f/3.5 Leica Elmar, but the version I have uses considerably better coatings. This results in far less flare than with the Elmar, to the extent that I actually use the Industar on occasion. I never have collapsed lenses like this on a Leica camera (seems pointless), and only collapse them to put in the camera bag.
My main use of the Industar 22 lens is for close up photography with a Micro 4/3 camera. When paired with an extension tube, the collapsible nature of the lens then gives it a good range of focus.
50mm f/3.5 Leica Elmar, Collapsible, Single Coated (Based on use in 1976-1977)
I did not use the 50mm f/3.5 Elmar lens very often when I had access to it in the 1970's. This was in part because it was subject to such extreme flare when shooting into the sun (as in when the sun is in the picture at sunrise, for example) that the foreground subject matter was almost obliterated in the image.
Short Tele (65mm - 90mm)
65mm f/3.5 Leitz Elmar, Black Version (Requires Leica Visoflex and Focus Tube)
Descriptions of some of the 75mm lenses below will refer to how useful I've found the slightly shorter 65mm focal length to be over the years. Therefore, I eventually decided to get the Leitz 65mm f/3.5 Elmar lens, even though it can only be focused by using the Visoflex II or III, plus a focus tube. I already had a Visoflex III, so I only had to pick up one of the focus tubes in order to use the lens.
The Leitz 65mm Elmar aperture range is f/3.5 to 22. It has ten iris blades. The iris blade edges are almost straight at all apertures except f/22, where a transition in the iris blade edges causes the aperture to be round. The Elmar is a pre-set lens, with two aperture rings. The front aperture ring is simply a click stop ring that does not actually operate the iris, but that instead serves as a stop for the rear aperture ring. Setting the f-stop on the front aperture ring lets the user open the iris from wide open to the "pre set" f-stop by feel, without having to look at it. This permits focusing with the aperture wide open, then stopping down to take the picture without looking away from the Visoflex focusing screen.
The filter size is Series VI. For those not familiar with Series VI (etc.) filters, the cell of the filter itself has no threads. Instead of threading directly into a lens, a Series filter is sandwiched between a front threaded ring and either the lens, or an adapter for use. A Series VI filter is about 41.3mm in diameter and about 4mm thick. The front of the 65mm Elmar lens has a shallow recess having threads with a major diameter of just under 44mm. A flanged cell screws into these lens threads and secures the Series VI filter in the recess at the front of the lens.
The front element of the 65mm Elmar is located in a deep conical recess that is about 3 cm deep. This gives it the appearance of a macro lens. However, the primary reason for the recess is to locate the optics close enough to the camera to permit infinity focus when the lens is used with a focusing ring and a Visoflex.
Before seeing the 65mm Elmar in person, I'd read posts that said the image from it was a little soft, but other posts mentioned that the newer black version had different, sharper optics than the older silver version. I don't know if this is true, but figured that AR coatings on a the newer version may give it slightly better contrast, even if the optics were otherwise the same as the old version. Evaluating the 65mm Elmar lens in person was the only way to be sure, but getting one was not all that easy since the cost has been going up.
Initial evaluation of the Leitz 65mm Elmar lens shows that it is relatively sharp at the center at its maximum aperture of f/3.5, but that it has about 1.5 arc minutes of astigmatism near the corners of the frame. The astigmatism ceases to be observable at about f/4.8. Surprisingly, there is no observable color fringing at all. The contrast is relatively low, but not as low as the 50mm f/3.5 collapsible Elmar lens I used decades ago. Illumination of the field is good at all apertures, so there is almost no observable corner darkening even at maximum aperture.
It would be nice if Leica had made a rangefinder coupled focusing adapter for this lens, or offered same optics (or preferably, faster f/ratio 65mm optics) in a rangefinder coupled lens. There are no frame lines for a 65mm lens, but the coverage can be estimated by interpolating between the 50mm and 75mm frame lines. If I can find the right adapter stack to use the 65mm lens without a Visoflex, I may try using without the Visoflex, at least for pictures of subjects at infinity. Leica makes a 41mm M-mount extension tube that can be used in place of the Visoflex III.
75mm f/2.0 Leica Apo-Summicron M ASPH
I don't have a 75mm f/2 APO-Summicron-M ASPH, and it is unlikely I'll be able to afford or test one, but this place holder for one is here because it's the closest thing to the non-existent 65mm f/2 dream lens that I wish would become a reality some day. A 65mm focal length on the Leica M9 corresponds to the angle of view for the final cropped versions of many of my best landscape and shallow depth of field pictures, taken over the years with 35mm, medium format, and 4x5 film cameras. For half and full length portraits, a 65mm focal length provides a good perspective that does not make the subject look two dimensional.
A 75mm will work in many cases, though the extra working distance can lose some connection with the subject. The 75mm Summicron-M Asph lens is probably the best thing out there in the absence of a fast and sharp 65mm. Steve Huff's web site shows impressive results with this lens. I'd probably use one of these a lot if I had it, because it would work for available light pictures at or near full aperture, yet not be so heavy as to make the Leica M9 camera system cumbersome. Fortunately, the 75mm f/2.5 Summarit-M covered below turned out to be so good that I'm no longer drooling as much over the unaffordable (for me) 75mm Summicron.
I also began to realize that, in the absence of a fast 65mm lens, it may be better to emphasize funding of a good, fast lens that is slightly shorter than 65mm, rather than longer, but which produces nearly flawless images at no slower than f/2.8. A lens slightly shorter than 65mm would also be good due to increasing trends toward landscape format images, even for portraits. (This trend may be driven in part by large computer monitors, and by prints larger than 16x20 getting less common.) A 50mm lens that is excellent across the format at f/2.8 or faster didn't even exist until recently, but the recently introduced, though financially unobtainable, Leica 50mm f/2.0 Apo Summicron Asph appears to meet this requirement. Such a 50mm lens would probably be my most often used lens if I had one. The 50mm ZM just doesn't cut it off-axis at wide apertures, mainly due to fringing.
75mm f/2.5 Leica Summarit-M
The 75mm f/2.5 Summarit-M lens is sharp and relatively compact. It takes 46mm filters, has a minimum focus distance of 0.9 meters, and has an f-stop range from f/2.5 to f/16 in half stop clicks. Leica later introduced a 75mm f/2.4 lens that is almost identical in many respects, but it focuses down to 0.7 meters.
In 2021, a used Leica 75mm f/2.5 Summarit-M can occasionally be acquired for not much more than 2 times more than some mint Voigtlander 75mm f/2.5 lenses go for, and not much more than what many Zeiss ZM lenses cost new. Performance of this lens is very good, and it is excellent to amazing when stopped down to f/3.8 or slower.
Summarit M lenses are made with the same maximum aperture in other focal lengths, including 35mm, 50mm and 90mm. An Optical Limits (formerly photozone.de) review of the 50mm f/2.5 appeared to show focus shift and coloration of out of focus background versus foreground that did not seem a great deal better than results from normal and short tele Voigtlander and Zeiss ZM lenses. However, Leica's MTF plots of the 75mm Summarit-M looked really good, and the real world performance of the 75mm appears to be better than that if the 50mm I had seen tests for.
After experiencing inconsistent focus with the 50mm f/2 ZM lens (prior to almost completely correcting it by widening the rangefinder cam surface), I decided to get only Leica brand lenses if the cost was more than a Voigtlander lens. Used Leica lenses a couple of models old can be acquired for less than a new Zeiss ZM lens, and most Leica lenses (unless they have been abused) have provided predictable and satisfying results.
The Leica 75mm Summarit-M can occasionally be acquired used for not much more than 2-3 times more than some mint Voigtlander 75mm f/2.5 lenses go for, and not much more than what many Zeiss ZM lenses cost new. A used 75mm Summarit-M was not quite a bank breaker, but it did prove to be the most I ever spent on a camera lens (with the exception of the 35mm f/2 Summicron ASPH), so I'll have to sell some of my other gear to fund it. No regrets though, since the performance of this lens is amazing. Even better, it's a 75mm, which is the closest available focal length to the fictional 65mm focal length, fast f/ratio lens I'd consider ideal for the Leica M.
The only review I'd seen of any Summarit-M lens that included uniform sample images was one at photozone.de (now Optical Limits) for the 50mm f/2.5 lens. Images of the ruler lines in that review appeared to show focus shift and coloration of out of focus background versus foreground that did not seem a great deal better than results from normal and short tele VC and Zeiss ZM lenses. However, Leica's MTF plots of the 75mm Summarit-M looked really good, so I decided to give it a try. I'm glad to say that optically, this lens could be one of the best 35mm format lenses I've ever used.
The 75mm Summarit-M lens arrived mint with the box with all the paperwork, so I got to have what some may consider the religious experience of unboxing a pristine Leica lens for my first time. It was a neat experience, though not one I'd put on a religious level.
This lens is very sharp (check out the mantle clock crop above!), but is also an odd pairing of high quality Leica optics housed in a lens barrel with focus damping (or should I say, a lack of focus damping) that feels like a 1960's 50mm f/1.9 Miranda lens, and weak aperture ring clicks that don't even feel as good as a low cost 1970's 55mm f/1.8 Mamiya-Sekor DTL lens. Not a Leica feel. Not even a Nikon feel. Not even a Canon FD or a Pentax feel. But at least it's sharp and appears to have minimal flare.
Optically, the 75mm Summarit-M is quite impressive. It may be the sharpest 35mm format lens I have. Even at maximum aperture, less than 1 arc minute of cyan color fringing is visible, and this disappears in the center at f/3.4, with less than 30 arc seconds of fringing remaining at the edges. Fringing visible in everyday subject matter is gone even at the edges by about f/3.8. Beyond f/3.8, the image does not improve dramatically, nor does it need to.
Therefore, out of all Leica mount lenses in this section except 135mm lenses, the 75mm f/2.5 Leica Summarit-M stands out as the lens that can be used at the widest physical aperture size (19.7mm at f/3.8) that will get even an off-center subject tack sharp in a shallow depth of field image. The only real complaint is that the minimum focus distance is 0.9m rather than the 0.7m of the 75mm Summicron M.
At maximum aperture, slightly out of focus thin black background objects appear slightly cyan, while slightly out of focus foreground objects have a slight red to magenta cast. This problem disappears in all but a few subjects by f/4, making results at f/4 and slower predictable. The 75mm appears to have LESS of the foreground and background color artifacts than the 50mm Summarit-M did in the photozone.de tests. I also have not detected any focus shift, though I haven't as yet taken to photographing rulers with it.
The optics look clear and have good AR coatings. There appears to be a fixed stop inside the lens, about 10mm to 12mm behind the iris. This stop appears to be the cause of most of the relatively high (60 percent at the corners) off-axis light falloff at full aperture, but it may also be part of why the lens performs so well. It's so sharp I keep wanting to find things to photograph with it!
Bokeh is neutral at wide apertures, and is relatively similar on either side of focus. A very slight brightening of the background blur boundary is visible at maximum aperture, but this disappears by about f/3.2 at the center of the image, with the blur circle then appearing to be of almost uniform brightness.
The filter size is 46mm, and the lens accepts a rigid metal lens hood that screws onto the outside of the lens barrel. A short ring covers the external threads when the hood is not used. (This is something Voigtlander should have made for their 75mm.) I decided not to use the hood for now because it has to be removed when changing filters, and another solution for a hood that was much more compact. This is related to the filter sizes I was adopting.
Some of my lenses use 43mm filters, so I'd begun to standardize on this size, even though it is an unusual size for Leica. Before I got the 75mm Summarit, I was using 3 lenses (40, 50, and 75mm) with this filter size. The 43mm filters are easily used on 39mm thread Leica lenses via adapters.
The 46mm filter thread of the 75mm Summarit-M is enough farther off-axis than the marginal ray optical path that a 43mm to 46mm step down adapter can be left in the 46mm filter threads without any change to light falloff, even at the corner. This acts as a compact lens hood of sorts, though a short one. A single 43mm filter can usually be used, but two 43mm filters can't be stacked without (theoretically, at least) darkening the image corners at wide apertures.
The click stops in the 75mm lens aperture ring are so weak it's hard to tell they are there without being attentive when setting the f-stop. This makes it more difficult to set by feel or in the dark, but for those who take movies with later versions of a digital Leica M, the weak clicks are not likely to be excessively loud in movies shot in surroundings with average noise levels.
Mechanically, this lens got off to a rough start, but this was quickly resolved. As I usually do with any item before mounting it on the Leica M9, I went to first fit check the lens on my Leitz-Minolta CL body, partly to verify the mount is OK, and partly to look through the back of the camera while the shutter is open and evaluate the f/ratio at which clipping of the light bundle by the lens barrel becomes acceptably low for my applications at a 20mm image height. (Leica's data appears to indicate this is about f/4, and tests appear to show about the same.)
So, I start to mount the 75mm f/2.5 Summarit-M on the CL body, and it turns about a third of the way to the lock position, but won't go any farther. It is not that it is hard to turn it more. It just won't turn in the mount far enough to lock. I then tried another lens in the CL, and there was a new place where it felt like it was catching the first time I put it on, but it easily went on. The next time I mounted the other lens, the feeling of it catching was reduced.
It then occurred to me to inspect the 75mm Summarit lens bayonet for burrs, but I was thinking to myself: "Nah! This lens can't have burrs. It's a modern Leica lens!" After this brief hesitation, I inspected the lens, and sure enough, there were chrome plated burrs on the corners of the top and shutter release side bayonet claws! Nothing was bent. It was just burrs. The burrs were similar to those on some Chinese adapters, where it appears the lens mount was plated without having been de-burred in a few places, resulting in chrome plated burrs, most projecting ever so slightly forward of the bayonet claw corners.
After staring in disbelief at the burrs through a magnifying glass, I deburred the lens. It then mounted on the CL, though not as smoothly as some of my other lenses. This could be because I was more conservative than usual in deburring this lens, since I didn't want it to show. After the test fit on the CL, it worked fine on the M9. I later realized I should have photographed this rare occurrence of burrs on a current model Leica lens!
From then on, it was smooth sailing with the lens, though good results at subject distances of less than 2m is not always consistent. I suspect that this is due to the large inside diameter of the rangefinder cam, so I'll eventually try the same temporary widening of the cam surface that seemed to fix the same symptoms on the 50mm f/2 Zeiss ZM lens. In the meantime, I'll use the 90mm for close up subjects.
75mm f/2.5 Voigtlander Color Heliar
The VC 75mm f/2.5 Color Heliar is a light and compact lens, but has an unusual rigid metal lens hood that must be removed to change filters. The lens isn't particularly attractive with the hood off because the front of the barrel has external threads that accept the hood. The VC 75mm f/2.5 has some focus shift at wider apertures, as well as a green color cast over thin black aspects of subject matter that are slightly beyond the distance of best focus. The latter could be due in part to relatively bright color fringing that extends out to about 1 arc minute from highlights at maximum aperture, and that does not disappear until about f/5.6.
The table at the beginning of this section indicates f/4.8 as a recommended aperture for this lens. However, this is for the full 35mm format. Since edge resolution is what drove the f/4.8 recommendation, the lens can be used on smaller formats (Micro 4/3, for example) at wider apertures, as long as a little color fringing is acceptable. On Micro 4/3, the lens can be used at f/ratios as fast as f/3.4 or f/4 for decent 12 MP images. It can be used at even wider apertures for good movies on this format.
90mm f/2.0 Leica APO-Summicron-M Asph
This 90mm f/2 lens is not actually reviewed here because it was known early on that I would not acquire one. This is not a professional review site with support from ads or donations, so I rarely acquire a lens (especially an expensive one) purely for testing it unless I need to test lenses in person in order to decide which one I want to acquire and keep long term.
Compared to the Leica 90mm f/2.8 and 90mm f/4 lenses, the 90mm f/2 APO-Summicron-M ASPH has a relatively large size and requires larger E55 filters. The performance for most subjects is quite good, being comparable to that of the 90mm f/2.8 Elmarit-M at any given aperture. However, the Summicron does have considerably more coma near the frame edges than the 90mm f/2.8 Elmarit-M. Since I use a 75mm lens a great deal more than a 90mm, there was no point in making the investment in a large and expensive 90mm lens that would not be used much. It could be a good lens for astrophotography (if stopped down enough to reduce coma), but I don't do much of that in recent years.
The 90mm f/2.8 Tele-Elmarit-M (Type 2) lens reviewed below is very compact, and the newer (but now discontinued) version of the 90mm f/2.8 Elmarit-M appears to perform even better than the Tele-Elmarit, based on both my own tests and Leica's MTF plots. Resolution performance of the faster 90mm f/2.0 APO-Summicron-M ASPH lens is again comparable to the 90mm f/2.8 Elmarit-M lens. Flare characteristics of the 90mm APO Summicron have not been evaluated.
90mm f/2.8 Contax-G Zeiss Sonnar T* (Contax G Mount)
The Contax G 90mm f/2.8 Zeiss Sonnar lens has both high resolution and contrast. I first acquired this lens to use on Micro 4/3, and it takes pictures so sharp at f/5.6 that the small 4.3 micron camera pixels (and the in camera color mapping) were the limiting factors. The only flaws are that it has some fringing at wide apertures, and one has to use cheesy adapters that spin the auto focus (AF) shaft in the lens to focus. But in fairness, the lens was not intended for cameras other than the Contax G.
This 90mm Zeiss lens is better than all of the Leica 90mm f/2.8 and f/4 lenses than have been tested to date. It is notably better than most of the Leica 90mm lenses, but it only has a slight edge over the 90mm f/2.8 Elmarit-M in the region around 14mm image height at apertures wider than f/5.6. When both are stopped down to f/5.6, the performance is about equal.
The Contax 90mm lens is so good that I was going to get it converted to Leica M rather than getting a Leica 90mm lens, but I could not bring myself to have it chopped up for this. Also, I found that I'd rather have a lens with a real infinity stop for landscapes, so I picked up the Leica Tele-Elmarit-M below, which has slightly less contrast and color saturation. Color fringing versus aperture is similar on this 90mm Zeiss and on the Tele Elmarit-M discussed below. I later upgraded to the Leica 90mm f/2.8 Elmarit-M, mainly because it has less flare than the Tele-Elmarit-M.
I really like the Zeiss 90mm, but will probably sell it to a Contax G owner so it can stay intact, and to help pay back my wallet for the 90mm Leica lenses below. The Leica Elmarit-M lens is good enough that I don't use the Contax Zeiss lens much any more. It would be neat if the 90mm Contax Zeiss optics lens could be re-introduced in one of the Zeiss ZM lenses, assuming the rangefinder cam diameter is kept closer to that of most Leica lenses.
90mm f/2.8 Leica Elmarit (original M mount version)
My sample of this lens may be in worse condition than any lens I have ever used, so I won't attempt to review it here, other than to say it is obvious that its original build quality was good. Its front element is pitted and scratched, while its barrel also has mechanical problems that make its focus stiff and its infinity stop inconsistent. I've gradually corrected some of the lens barrel problems, but it will never be a fully functional lens. One good thing is that it was cheap because of these flaws. I still hang on to it because the flaws on the front element provide an unusual soft focus effect wide open that I have not been able to replicate with any filters. It has higher resolution core image that is surrounded by a glow and some softness, rather than the whole image being fuzzy.
90mm f/2.8 Leica Tele-Elmarit-M, Type II
I picked up this 90mm tele lens partly because I didn't want to have the excellent 90mm Contax-G lens cobbled up to make it fit Leica M mount. I also wanted a real infinity stop. The Leica Tele-Elmarit-M Type II is tiny, as in so tiny you won't believe it until you see one. It focuses down to 1 meter and its 10-blade iris stops down to f/16. The iris has an interesting shape, which may give it more subtle and less distracting diffraction spikes (sunstars) around bright objects. It has 4 elements in 4 groups and takes 39mm x 0.5mm filters. Mine came with a well designed, compact collapsible rubber lens hood.
This lens has excellent center sharpness at f/2.8, with only a little dim purple fringing that extends out to about 1.5 arc minutes from highlights. Fringing in the center disappears at f/3.4. Dim purple fringing toward the corners is almost gone at f/4.8 and gone by f/5.6. The lens does not appear to have any objectionable coma or astigmatism at any aperture, and the mentioned fringing at wide apertures is so dim that it may not even be noticed in black and white photography.
The sample I have was made in 1981. Its optics are in almost perfect condition, but it suffers from some localized flare, though not to the extent of the original 90mm f/2.8 Elmarit. Upon looking into the back of this lens and the 90mm Contax Zeiss lens (both side by side and backlit), it became obvious that the source of flare was not in the Leica optics, but was instead from low angle reflections from inner parts of the lens barrel aft of the rear element. The thread peaks on these parts are not sharp, leading to more reflection and flare. The Zeiss 90mm lens has no rangefinder coupling, so its barrel aft of the rear element can be larger, reducing the risk of low angle reflection.
Flare in the Leica 90mm lens can probably be reduced by adding 2 or 3 thin light baffle rings of 0.7mm to 1mm radius to the inner side of the two main lens barrel surfaces that reside aft of the rear element. This would add to vignetting at maximum aperture, but reducing flare may be more important in many cases. Once flare is reduced by the addition of such baffle rings, this lens may work for the types of pictures I used take with a 105mm f/2.5 Nikkor on a Nikon F.
90mm f/2.8 Elmarit-M (most recent Leica 90mm f/2.8 lens)
The 90mm f/2.8 Elmarit-M lens performs far better than the original 90mm f/2.8 Elmarit. It also performs better than any version of the Tele-Elmarit-M or the 90mm f/4 Elmar-C. MTF plots for the 90mm f/2.8 Elmarit-M appear to show that it could perform as well or better than the Contax G 90mm f/2.8 Sonnar, with the exception of parts of the image around 14mm image height.
The off-axis area of reduced resolution appears to be caused by a combination of slight astigmatism and field curvature. This is supported by testing, where the Leica lens equals the Contax Zeiss lens in all areas except the region around 14mm image height. Here, the Zeiss has a slight edge until both lenses are stopped down to f/5.6. Then, they both perform about equally.
The central image of the 90mm Elmarit-M shows considerable fringing in visual optical tests when used wide open, but in real world photos, only slight fringing has been observed. Usually no fringing is visible in ordinary photos at f/3.4. If a subject has strongly backlit thin features, fringing on these is all but gone at f/4.8.
Contrast of the 90mm f/2.8 Elmarit-M is similar to that of the Contax Zeiss lens, and higher than that of either version of the Tele-Elmarit. Contrast is about the same as that of the 90mm f/4 Elmar-C lens. The aperture ring of my sample has fairly loose clicks that do not feel very precise, but this could be due to the lens sample being almost 20 years old and heavily used.
The outer dimensions are about 55mm outer diameter by 76mm long. It takes 46mm filters and the minimum focus distance is 1 meter. The f-stop range is f/2.8 to 22, in half stop clicks. The built-in lens hood is longer than the inadequate built-in hoods on Leica 50mm lenses, but is still a little short for a 90mm lens. This is particulary true, given the internal lens barrel reflections, which will be covered below. The lens has not been tested for "bokeh fringing", but I have not seen it in photos taken to date.
Oddly, the 90mm Elmarit-M has some astigmatism that is visible at apertures wider than about f/4, while the older Tele-Elmarit M has no observable astigmatism even at the edge of the frame. The older Tele-Elmarit-M also does not have the reduced resolution in the region around 14mm image height, so the tele would actually be slightly better for portraits at f/3.4 to f/4, where the subject's eyes are more than about 10mm from the center of the frame.
Somewhat like the 90mm Tele-Elmarit-M, the inside of the Elmarit-M rear element cell and rangefinder cam have surfaces that are smooth enough to reflect considerable stray light onto the focal plane, which lowers contrast. This barrel related flare is not as bad as that of the 90mm Tele-Elmarit-M, but it is more than that of the 75mm Summarit-M. Contrast of the 90mm Elmarit-M could be slightly higher if the rear element cell had a knife edge baffle near the rear element, and if one or two knife edge baffles were used just forward of the rangefinder cam surface.
I do not use a 90mm lens often, so I had put off acquiring a 90mm f/2.8 Elmarit-M and tried some of the other, lower cost Leica lenses first. The others fell a little short when compared to the Contax Zeiss 90mm lens, though the Tele-Elmarit-M may have performed adequately if knife edge baffles had been added to its rear element cell and rangefinder cam ring. The 90mm f/2.8 Elmarit-M appears to be the best of the Leica 90mm f/2.8 lenses for most applications, so my wallet may have fared better if I'd just bought the Elmarit-M as my first and only 90mm lens.
90mm f/4.0 Leica/Minolta Elmar-C (originally made for Leica CL film camera)
The 90mm f/4.0 Elmar-C lens was made primarily for the Leica CL, which is a compact, moderate cost Leica M-mount film camera that was made in the 1970's. Unlike Leica M cameras, the Leica CL was a collaboration between Leica and Minolta. In fact, some versions were labeled "Leitz Minolta CL" rather than "Leica CL". A later version of the camera was the Minolta CLE.
Compared to a Leica M camera, the Leica CL is a compact and less robust design having a vertically traveling cloth focal plane shutter. The viewfinder magnification is less than 0.72x, and the rangefinder baseline is shorter than that of M cameras. Both of these attributes lead to less accurate focus, so the Leica CL does not even have frame lines for lenses longer than 90mm. The shorter rangefinder baseline, plus the front shutter speed dial on the CL, also prevents use of any lenses having goggles. In addition to the 90mm, Leica made a moderate cost 40mm f/2 Summicron as the normal lens for the CL, which is how the odd 40mm focal length got into the Leica M lens selection.
The center of the rangefinder coupling wheel in the CL is about 0.5mm lower than that of a Leica M rangefinder, but it still works with most Leica M lenses, including the 50mm Summilux-M ASPH. This makes it a compact "film backup" camera to use when electronics or batteries in digital cameras let you down. The VC 40mm Nokton works relatively well on the CL, though it is not quite as good at the edges as the Leica 40mm.
As for the 90mm f/4.0 Elmar-C lens itself, its physical size and its weight are almost identical to the 90mm Tele-Elmarit-M (Type 2) lens covered above. It even has the same look in terms of the focus and aperture rings. It is an unassuming little lens, and is one of the lowest cost used Leica M lenses available. The filter size is 39mm, but the thread pitch 0.75mm, which is different than the 0.5mm filer threads used on other Leica lenses having the same filter thread diameter. The minimum focus is 1 meter and the f-stop range is from f/4 to f/22.
The tested sample of the 90mm lens has good optics with the exception of slight clouding on what appears to be the second element. The lens is also coated, though the coatings are not quite as good as those on the 90mm Tele-Elmarit-M mentioned above. However, the coatings are better than most lenses of its era, with the coatings on various elements reflecting white light in a different color, rather than the blue tint seen on reflections from many lens coatings from that time.
At maximum aperture, axial images from the lens have slight (about 30 arc seconds) of color fringing that is orange on one side of focus and purple at both best focus and the other side of focus. This color disappears from the in focus image by f/4.8 and is not visible in even defocused images by about f/5.6. The edge of the frame has about 1 arc minute of color fringing wide open, which is reduced to 30 arc seconds by f/4.8, and is all but gone at f/5.6. I did not get to test the lens for field curvature, so the following will assume that it is minimal.
The build quality seems almost equal to the 90mm Tele-Elmarit-M in almost every way, though the focus was a bit stiff on the tested sample. The rangefinder coupling cam differs from that of most Leica lenses, being a sloped surface that is milled into the cam, as opposed to a flat-backed cam that moves forward as the lens is focused. The inside diameter of the cam is quite large, to an extent that it does not engage much of the rangefinder focus coupling wheel in a Leica CL camera. This is probably due in part to the need to reduce the vignetting that the cam can cause in the outer 2mm of the frame corners until the lens is stopped down to about f/6.8.
The optics of a pristine 90mm Elmar-C should produce minimal flare under average conditions. Flare is possible when a bright light source is under 20 degrees outside the edge of the picture (even when the hood is used), but this is due to reflection from inner components of the lens housing and the inside of the rangefinder cam. This situation is similar to that of the 90mm Tele-Elmarit-M, though slightly less severe due to sharper baffle thread peaks in the Elmar-C lens.
About half of the flare caused by reflection from mechanical parts in the Elmar-C is due to reflection from metal surfaces in front of the rear element. The lens does not have knife edge baffles like some of the older Leica lenses. Considerable fare due to reflection from mechanical components seems specific to the 90mm lenses tested thus far, since I have not seen as much flare related to mechanical components in shorter or longer focal length M lenses. I don't know if flare by reflection from mechanical components was addressed in the newer 90mm Summicron-M.
The 90mm Elmar-C lens has 39mm filter threads, but the pitch is 0.75mm rather than the 0.5mm pitch of E39 filters. The intended way to use filters on the Elmar-C is to use a Series 5.5 filter holder to secure a Series 5.5 filter in front of the lens. (Series type filters are not threaded, and are held in place with threaded retaining rings that screw into a lens. Please see the review of the 65mm f/3.5 lens for a discussion of how Series filters are used.) A compact and well designed rubber hood also has the means to hold a Series 5.5 filter in front of the lens. Some E39 filters can be used directly on the lens, but only if the filter is not screwed in past a point where resistance is encountered.
In conclusion, the 90mm f/4 Elmar-C obviously lacks the f/2.8 maximum aperture of the 90mm Tele-Elmarit-M, and it is not as sharp in the center versus f/ratio as the Tele-Elmarit-M until it is stopped down to f/5.6. However, since both lenses must be stopped down to between f/4.8 to f/5.6 to get good edge sharpness, there is little difference in the quality of the images they provide at f/5.6 and slower f-stops.
For landscapes, the only drawback of the 90mm Elmar-C is the vignetting in the outer 2mm of the corners. If the lens is stopped down to f/5.6, and the extreme corners of the image will be cropped out or processed, the Elmar-C will provide excellent images for a fraction of the cost of most other Leica brand lenses. If the lens is stopped down to f/6.8, it will not exhibit as much corner vignetting.
Tele / Long (135mm and up)
135mm f/2.8 Leitz Elmarit (with Goggles)
The 135mm f/2.8 Elmarit lens for Leica M is large by Leica M standards, but it is not all that large when compared to SLR lenses. Not counting the goggles, it is smaller than the old 135mm f/2.8 Nikkor-Q lens, and only slightly larger than the newer 135mm f/2.8 Nikon AI lens. It is not any larger than a typical AF 135mm lens, though it is probably 1.5x heaver than most 135mm SLR lenses. Of course, the build quality of the Leica lens is excellent, even when compared to an older manual focus Nikon lens.
The 135mm Elmarit lens has goggles like those of some short focal length Leica lenses, but the goggles on the 135mm lens magnify the image by about 1.5x, rather than reducing the visual image size. To compensate, the viewfinder side bayonet flange of the lens is keyed to bring up the 90mm frame lines.
The built-in telescoping lens hood has two stages, so when it is deployed, it is long enough to actually be useful. The filter size is Series 7 (54.5mm) and the lens is usually used with a Series 7 filter holder. My sample did not come with the filter holder. (If I could still machine, I'd make a threaded adapter that would allow the lens to accept 52mm filters.) The front part of the lens unscrews from the rangefinder coupled focus mount so it can be used on a Leica Visoflex with a different helical focus assembly.
In spite of its age, the coatings look better than the usual blue coating that most lenses of the era usually have. In terms of performance, it is slightly better than the somewhat newer 135mm f/2.8 Nikkor lens at all apertures, but not quite as good at wide apertures as the older 135mm f/2.8 Nikkor Q.
Compared to Leica's other 135mm lenses, colors with the 135mm f/2.8 Elmarit are noticeably warmer. It's hard to say if the lens rendered this warm when it was new, since some types of optical glass can yellow slightly over several decades.
The 1.5x goggles show very little subject matter outside of the frame lines, so it is a bit more of a tunnel vision experience than other Leica lenses. In spite of its age, the 135mm f/2.8 lens and its goggles were almost perfectly calibrated, having even better rangefinder performance on distant subjects than even my 135mm f/4 Elmar.
Wide open at f/2.8, the 135mm Elmarit has considerable chromatic aberration (CA) that is most obvious as blue to purple fringing. This is too much CA for my own taste on small format cameras (e.g. Micro 4/3) but it is not objectionable for the majority of subjects on a full frame camera such as the Leica M9. In fact, vignetting at maximum aperture is actually more obvious than the fringing on a full frame camera.
Performance improves by stopping down only half a stop, to f/3.4, but considerable purple fringing still remains on backlit subjects, even near the center of the picture. This much CA may be perfectly acceptable on film, but it's excessive for color digital photography of certain subjects unless the lens is stopped down somewhat more. On the other hand, it may be fine for monochrome digital imaging even at full aperture, especially if a yellow filter is used to suppress the blue-purple fringing. And of course, there is no substitute for the large aperture in narrow band astrophotography.
At f/4, the 135mm Elmarit lens is almost equal to the 135mm f/4 Elmar in terms of chromatic aberration, and resolution across the frame is also almost as good as the f/4 lens. At the edges of the frame, the resolution and contrast at f/4 are slightly better than that of the 135mm f/4.5 Hektor lens, when the Hektor is used at its maximum aperture. This comparative trend continues until all of the lenses are stopped down to f/6.8. At f/6.8 and slower apertures, all three of the noted Leica 135mm lenses provide excellent images.
The table at the top of this section shows f/4.8 as a recommended maximum aperture. However, this is based on a slightly lower level of image quality than what the other 135mm lenses provide at f/6.0 and f/6.8
Since the 135mm f/2.8 Elmarit has little to offer for certain types of color digital photography unless stopped down to f/4, there may be little point in carrying around the extra glass of an f/2.8 lens for everyday pictures. The much lighter 135mm f/4 Elmar equals the f/2.8 lens in every way (except for slight vignetting), when both are used at f/4.
Applications where the 135mm f/2.8 Elmarit may be of more value include film photography and monochrome digital photography, as well as astrophotography in conjunction with a filter that excludes shorter wavelength (violet) light. Of course, the added weight of the f/2.8 lens may actually help when hand holding pictures in dim light.
The primary inconvenience of the 135mm Elmarit lens is that it cannot be attached to the Leica M9 while the Leica grip is attached to the camera. Specifically, the grip prevents the lens from being mounted on the camera because mechanical interference with the goggles keeps the lens from being rotated far enough in the CCW direction, as seen from the front. This keeps it from be attached to or removed from the camera without turning off the power and removing the grip while changing the lens. However, this obviously is no fault of the lens, since the lens and its goggles existed well before the Leica M9 grip was designed. I modified my Leica M9 grip to make it compatible with this lens.
135mm f/3.4 APO-Telyt-M (Tested in 2020)
The 135mm f/3.4 APO-Telyt-M is Leica's ultimate 135mm lens, at least optically. Its mechanical attributes are a little bit lacking in comparison to most older Leica 135mm lenses. The minimum focus is 1.5 meters and the aperture range is f/3.4 to f/22 in half stop clicks.
For example, the tested sample has just enough backlash in the helical focus threads to cause it to focus slightly past infinity when pointed up, but just barely focus to infinity when pointed sideways. The difference in focus is so slight that pixel peeping is required to see it, but it is there, and it is something that should be accounted for when using the lens for astrophotography.
The field of best focus is nice and flat even at full aperture, but a little coma is visible in star images at the very edge of the frame for apertures wider than f/4.5. There is slight focus shift, with the area of best focus moving slightly closer to the lens as it is stopped down. The focus shift is most pronounced between f/3.4 and f/4.8.
In general, the Leica 135mm APO Telyt-M provides a given quality of image at about an f/stop wider aperture than is the case for most of the other Leica 135mm lenses. The APO provides a good image wide open at f/3.4, and an excellent image at f/4.8, while most of the other Leica 135mm lenses have to be stopped down to slightly past f/5.6 or even f/6.8 to produce what I'd call an excellent image.
The exception is the relatively large and heavy 135mm f/2.8 Elmarit. It also produces an excellent image at f/4.8, though at f/4.8, it is susceptible to a little fringing on images of bright highlights or strongly backlit subjects.
On the other hand, the Elmarit, when used at f/4.8 or slower, has less obvious color fringing (bokeh fringing or spherochromatism) on slightly out of focus highlights than is the case for the APO Telyt at the same aperture. This is partly because the Elmarit is not as highly corrected as the APO Telyt, so its color fringing f/4.8 looks less pronounced than with the APO. This may seem counterintuitive, but this is because the fringed color is spread out over a wider area with the Elmarit, making it dimmer and less visible under some conditions. (This subject is covered more in Appendix J.)
Focusing with the 135mm APO Telyt-M does not seem to be quite as repeatable as it is with my 135mm Elmar and Elmarit lenses. The rangefinder cam in my sample APO lens also did not quite agree with best focus for the lens at infinity. Unlike older Leica 135mm Leica lenses, there is no straightforward way (other than shimming) to adjust the rangefinder cam relative to the lens focus.
Unfortunately, the rangefinder cam in the 135mm APO consists only of a rotating cylinder with two curved milled slots, with each slot controlling the motion of a screw in which the head is surrounded by a plastic washer. By moving these screws, the dual cams move the rangefinder coupling interface. This is similar to the zoom mechanism in zoom camera lenses, and it is more subject to wear (and is thus becoming less repeatable) than the older Leica 135mm rangefinder cam mechanisms. This seems like a step backwards for such an expensive lens! The lens focus is a helicoid, but it has a little play compared to older 135mm Leica lenses, while the rangefinder cam is controlled by the relatively cheap dual slot cam at the back end of the lens.
The inside of the rangefinder cam section also lacks knife edge light baffle stops, so flare will result when the sun is slightly outside of the picture, where its image can reflect off the relatively smooth inner back end of the lens barrel, then get scattered toward the focal plane. (Some Leica 90mm lenses also have this problem.) Light baffling features in forward parts of the 135mm APO are much better than those at the back.
In spite of its possible mechanical shortcomings, the Leica 135mm f/3.4 APO-Telyt-M lens is a worthwhile upgrade from older 135mm Leica lenses, provided that A.) one needs to use a 135mm lens at wide apertures, and B.) its cost is within one's budget. The lens also works well on many other full frame and crop sensor mirrorless cameras.
135mm f/4.0 Leica Elmar
The 135mm f/4 Elmar lens is better on the edges at wider f-ratios than the 135mm Hektor lens below, but both are of similar image quality when stopped down to their optimum apertures. The Elmar is pretty sharp even on the edges just past f/5.6 (to about f/6.0), and the whole format is almost flawless at f/8. The lens provides really good images on crop sensor cameras by f/5.6 to f/6.
If you are pixel peeping, the Elmar can achieve slightly higher edge resolution and edge contrast than the f/4.5 Hektor. The front of the Elmar does not rotate while focusing, but the focus on my sample does not feel quite as smooth as the Hektor. The minimum focus distance is 1.5m and the filter size is 39mm. The f-stop range is from f/4 to f/32. The lens does not have modern multi-coatings, but still appears to have good contrast.
135mm f/4.0 Tele-Elmar
The 135mm f/4 Tele-Elmar was introduced well after the 135mm f/4 Elmar. The Tele Elmar is only slightly shorter, but is slightly sharper at wide apertures. It has a little more vignetting than the original 135mm Elmar, but this is only noticeable at maximum aperture. There is some pincushion distortion that is not present in the original Elmar, but it is not significant enough to be a problem for most subjects.
The 135mm Tele Elmar was made in two different mechanical configurations. The first uses 39mm filters and is wide toward the back and tapered down toward the front. The second version takes 46mm filters and its barrel looks similar to the 135mm APO-Telyt-M.
At f/5.6, resolution of the 135mm Tele-Elmar is so good that you can't really see any flaws, unless of course you do some extreme pixel peeping while comparing images from this lens to images from a 135mm APO lens. When any color fringing is visible, it usually does not look any more pronounced than in an APO image, since the light that is not brought to a given focus is spread out over a larger area than is the case with an APO, which causes the fringing to be a little dimmer.
135mm f/4.5 Leica Hektor (Leica M39 mount w/adapter, Tested in 2011)
The 135mm f/4.5 Hektor lens has a minimum focus distance of 1.5m and the iris stops down to f/32. Older versions like mine have the M39 screw mount thread use 34mm filters, while some newer ones have an M mount and use larger 39mm filters. This Hektor lens sometimes gets a bad rap in reviews. However, I've found the single coated (rather than uncoated) version to be quite good when used at f/ratios slower than f/6.8.
The front of the lens rotates as the lens is focused, so this needs to be compensated for if using a polarizing filter. The damping and feel of the focus on the Hektor is among the best I have experienced, and the Hektor can be acquired for a song compared to most other Leica lenses. Examples of the 135mm Hektor performance are shown in previous sections. These examples include imaging backlit fence wires from 200 meters, and some crescent moon photos.
280mm f/4.8 Telyt, Type 3, for Visoflex
Leica made multiple telephoto and long lenses for the Visoflex, including 200mm, 280mm, and even longer lenses. The Leica 280mm f/4.8 lens was made in three versions, but only the last two were very common. All versions are made for use on the Visoflex.
The M-mount versions are intended only for the Visoflex II and III, but can also be used at infinity with a 41mm long M-mount extension tube instead of the Visoflex, provided that the lens infinity stop is calibrated for this. The second version has a modular focus assembly much like that on the 135mm f/2.8 Elmar M lens, and focuses down to 6 meters. The filter size is Series 8.
The reviewed Type III version has a less modular M-mount focus assembly that focuses down to 3.5 meters, which is even closer than the 4-meter minimum focus distance of the 250mm f/4 Leicaflex (R-mount) Version 1 lens that is covered in the next section. Any comparisons to the 250mm f/4 Leicaflex Version 1 lens will be made here, since this 280mm lens will not be mentioned in the 250mm Leicaflex lens review.
The 280mm Type III lens has a tripod socket that can be rotated, and which has a detent every 90 degrees. It does not have a lock screw for the rotating tripod mount, so the mount is not entirely solid. The mounting surface is relatively small, having about the same area as the tripod mount of the 250mm Type 1 Leica lens.
My sample of the 280mm lens had slight haze and fungus, but the fungus was dealt with, leaving only slight etching in the outer 20 percent of the aperture that the fungus had done over the years. The aperture blades had been oily, and there was an oil film on the lens immediately behind the iris, which probably helped grow the fungus. The oil and fungus were removed during the repair.
Including the length of the Visoflex, the physical length of the 280mm lens is about 50mm longer than the 250mm f/4 Telyt-R Version 1 lens, but is slightly lighter, not counting the Visoflex. It is about the same size as the 250mm f/4 Telyt-R Version 2 lens. After allowing for the slight fungus etching, most aspects of performance at a given aperture are similar to that of the 250mm f/4 Telyt-R Version 1 lens. Both exhibit about the same degree of red fringing on the inner side of a highlight at apertures wider than f/8. However, unlike the 250mm lens, the 280mm Telyt still shows some faint purple chromatic aberration at f/8.
Unlike the eight slightly curved aperture blades of the 250mm lens, the 280mm lens iris has 12 blades of relatively complex shape. These cause the aperture to be round at full aperture, then to have inward pointing curved edges at moderate apertures, and then a perfectly round aperture at the minimum f-stop of f/22. At f/11, the inwardly curved iris edges are the most symmetrical and have diffraction effects similar to that of a round aperture, with the subtle sunstar fans being almost as wide as the interval between them.
Of the many 250mm to 300mm lenses tested to date, the Leica 280mm f/4.8 Telyt lens ranks about fourth. Slightly better lenses include the Hasselblad 250mm f/5.6 Sonnar, the Leica 250mm f/4 Telyt Version 2, and the 300mm f/4 and f/4.5 ED Nikkors. The 250mm f/4 Telyt-R Version 1 is almost a tie. Lenses including the 300mm f/6.3 Pentax Tele-Takumar are not quite as good as the 280mm Leica lens. Most 300mm mirror lenses don't even hold a candle to the 280mm Leica lens.
Komura 2x Telemore 95 (Tele-converter for Leica M)
A little known third party vintage accessory for Leica M is the Komura 2x Telemore 95, a 2x rangefinder coupled tele-converter for Leica M. The Telemore 95 adds less than 25mm of additional length to a lens, and includes a variable viewfinder with a flash shoe with a PC terminal that is electrically connected to a camera's hot shoe.
In many ways, a 2x tele-converter goes against the high resolution associated with Leica M lenses. The Telemore 95 is not an apo converter, so results obtained with it will not even come close to results from a prime lens of the same working focal length.
However, if a lens that is used with the Telemore is stopped down enough, the results are better than enlarging the final image twice as much. At least this is the case out to about 16mm image height on film cameras and with the Leica M9. The extreme corners never do get sharp. So, it is worth using if one wants to extend the range of a 90mm lens to 180mm, or get the reach of a 270mm lens from a 135mm.
The 2x Telemore 95 is designed for Leica M lenses that do not have protruding rear elements. Its viewfinder has settings for prime lenses between 40mm and 135mm.
In practice, a prime lens must be stopped down to well past f/4 before the image quality will be acceptable. A prime lens on the Telemore 95 must be stopped down to f/5.6 before the central image will be sharp enough that it exceeds the quality of cropping or enlarging an original image twice as much. The final working f-stop is f/11 because of the 2x enlargement of the image.
For adequate image quality out to about 15mm image height, the prime lens must be stopped down to f/8, for a working f-stop of 16. There is little point in stopping down further because diffraction losses will begin to counteract any gains from reducing aberrations by stopping down. Better long focal length pictures would result from using Leica R or Nikon, etc., prime lenses in the 180mm to 300mm range.
As far as practicality in modern times, the Komura 2x Telemore 95 is only worth using with 90mm and longer M lenses. This is mainly a financial consideration, since the cost of a used Telemore 95 can be relatively high. In fact, a used Telemore 95 may cost as much as a 90mm f/4 Elmar-C or 135mm f/4.5 Hektor lens. Therefore, if the object is only to double the focal length of a 50mm or 75mm lens, it is cheaper to buy a low end 90mm or 135mm prime lens. Results are also better with these prime lenses.
Precautions about the Telemore 95. The Komura 2x converter has rangefinder coupling. This means that, if properly calibrated, it can get focus in the ball park using the rangefinder. However, it generally will not enable exact focus. This is because of its design. The rangefinder coupling assembly in the Telemore 95 can tilt slightly, and this will lead to inconsistent focus. Of course, at the slow f-stops that must be used with the Telemore, it may not be necessary to get the focus spot on.
Further precautions. The Telemore 95 is a relatively old item that is only available second hand. This means that the history of each one is unknown. This also means that it is not known if a unit has been tampered with until it is tested. Therefore, an item like this should never be connected directly to a Leica M camera without first having a qualified technician verify its suitability for use, and make repairs if necessary. I tested my Telemore 95 on a Micro 4/3 camera, using a calibrated Leica M to micro 4/3 adapter.
It turned out that my sample of a Telemore 95 had been tampered with before I got it. This was obvious because of two things. First, when it was used with a 90mm Elmarit-M lens, the combination would only focus to 15 meters away when the lens was set to infinity. This meant that optics in the Telemore had been moved back farther than their original location.
Second, the rangefinder coupling assembly was longer than the outer body of the converter. This meant that if it had been attached to a Leica M camera with a lens that was focused to infinity, it would have forced the rangefinder past infinity by a significant margin, possibly damaging it. Both of these problems had to be corrected before the Telemore 95 could even be mounted on a Leica camera.
If a 2x converter was made today for Leica M, a version with optics similar to those of the Nikon TC-201 would be more suitable, and would not be as expensive as an apo converter design. Such optics would protrude slightly in front of the M mount, and thus would only be compatible with Leica M lenses of 90mm or longer focal length. An APO converter would be even better, and may be the only approach a company would be inclined to put R&D into, since the selling price must be high enough to recover development cost.
Wide Angle Close-Ups with Leica M9 and M39 Version of Voigtlander 12mm Lens
Close up with M39 thread version of Voigtlander 12mm f/5.6 Ultra Wide-Heliar lens.
© Copyright 2013 Jeffrey R. Charles. All Rights Reserved.
 |
|
Leica M9 with 12mm f/5.6 Voigtlander Lens, Close Up at Only 4 cm from Cat's Nose!
At the time this picture was taken, the 12mm f/5.6 Voigtlander Ultra Wide-Heliar was the widest angle rectilinear (non fisheye) lens available for 35mm format. The old version with M39 mounting threads used for this picture adapts to the Leica M9 with an M39 to M adapter. This old version can be partly unscrewed from the M adapter to get interesting close up shots. Here, the closest focus setting of 30 cm was used, then the 12mm lens was unscrewed from the M adapter just under two turns to get this close up of my cat. Her nose was less than 4 cm from the front element! The Leica M9 is not an SLR, so this type of shot can be sort of hit and miss, but this is not as much of a problem with digital. I just looked down on the camera to position it for the photo. (It would be nice if the newer Voigtlander 10mm f/5.6 lens could focus this close!)
|
Wide Angle Perspective with Leica M9 and M39 Version of Voigtlander 12mm Lens
Perspective and Abstract Images with M39 version of VC 12mm f/5.6 Ultra Wide-Heliar lens.
© Copyright 2013 Jeffrey R. Charles. All Rights Reserved.
 |
 |
Perspective Test and Abstract Photo with Leica M9 and 12mm f/5.6 Voigtlander Lens.
The rectilinear 12mm f/5.6 Voigtlander Ultra Wide-Heliar has less perspective than a fisheye lens when the nearest subject is at the center, but more perspective than a fisheye when the nearest subject is at the edge.
LEFT: The cat's paw was only a few cm from the front element for this picture, with her face less than another 18 cm away, yet the perspective of the VC 12mm lens makes her leg look really long.
RIGHT: The VC 12mm lens makes it easier to get lots of perspective to photograph the inside of an object. This abstract picture was made by photographing a cylinder of brightly colored cloth from the inside, with the top edge of the cloth being wrapped around an LP record to permit holding it over the camera. The wide angle of the 12mm lens imaged the inside surface of the cloth from a less oblique angle at the edge of the frame, for more perspective. The blur effect is from slowly rotating the subject. For the vanishing point, an annular area of the subject was copied over the LP record image in successively smaller sizes. I found the cloth while looking for a view camera focusing cloth, and envisioned an abstract picture like this, so I got it just to use for this and similar pictures.
|
High Resolution Even Near Image Corners with 35mm f/2 Summicron-M ASPH Lens!
High Resolution near image corners with 35mm f/2 Summicron-M ASPH lens.
© Copyright 2013 Jeffrey R. Charles. All Rights Reserved.
 |
Low Contrast Subject Near Corner of Frame with 35mm f/2 Summicron Asph (cropped)
These pictures show the relatively high resolution of the Leica 35mm f/2 Summicron ASPH lens, even near the corner of the picture. The inset at upper right shows the width of the full scene, and red arrows in the upper left of the inset define the width of the 100 percent crop above. The subject was backlit, with the sun only about 30 degrees away (I shaded the lens with my hand to reduce flare) so subject matter that is not at the transition line with the sky has low contrast. This picture was taken at f/4. There is quite a bit of blooming at the transition from the saturated sky background, but very little color fringing when the strength of the backlighting is taken into account. Blue fringing is evident in this part of the frame at wider apertures, and it shows up at about 19mm image height (less than 3mm from the corner) at all f/ratios.
Comment: This picture was taken on the original Leica M9 image sensor. This sensor later developed the "corrosion" problem and was replaced by Leica in early 2017. When used with this lens, the new Leica M9 sensor has some radial blurring that runs toward the center of the image from bright highlights unless the lens is stopped down, so it does not show the silhouette of the horizon this sharply unless the lens is stopped down to f/4.8 or f/5.6.
|
 |
Extreme Enlargement (400 Percent) Showing Resolution of White Iron Fence from 200m.
This 400 percent (yes, 400 percent!) crop shows that the 35mm Summicron Asph lens just begins to image thinner vertical members of the white wrought iron fence railing from about 150 meters away, and this is near the edge of the picture while the fence is backlit! When the fence is sunlit, the thin vertical members are easily imaged when the lens is wide open at f/2. At the scale this crop is displayed on a 15 inch WXGA (HD 720) monitor, the full image would be 5.5 meters wide!
Comments: It was possible to get results like this even with the apparent lens flange to focal plane error of my particular Leica M9 (prior to service in 2015) because I bought a used Leica brand lens mount plate for the Summicron, so I could code it without risking the original mount plate. This provided the opportunity to (painstakingly) lap and shim the used 35mm Summicron lens mount plate to match the distance and tilt of the existing lens mount to focal plane distance in the M9 to better than 0.002mm over the whole focal plane. (This was be re-done on this lens after the Leica M9 was serviced.) The railing and other subjects are now imaged at close to the same sharpness in each corner of the image sensor when the camera is rotated or otherwise pointed to position the test subject in different parts of the frame. When in sunlight, the fence railing can barely resolve with a good 28mm lens, but it is difficult to resolve with any wide angle lens when it is shaded.
|
Simple Modification to Use 35mm f/2 Summicron-M ASPH Lens on Large Tripod Head
Simple modification of 35mm Summicron-M Asph focus tab, to permit use on large tripod head.
© Copyright 2013 Jeffrey R. Charles. All Rights Reserved.
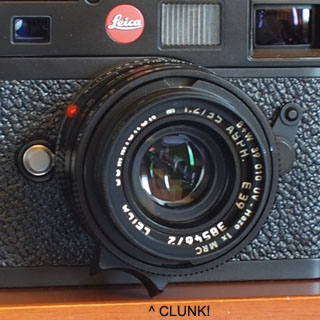 |
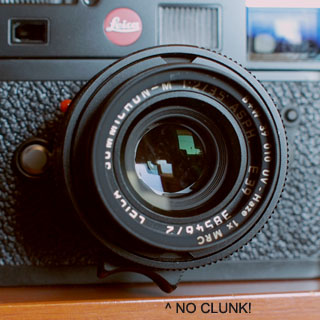 |
|
Modifying 35mm f/2 Summicron Focus Tab for Compatibility with Large Tripod Heads.
While taking test pictures with various lenses, with the Leica M9 on a tripod, and using my usual large Gitzo tripod head (which does not position the front of the camera near an edge unless used backwards), I was surprised to find that the corner of the plastic focusing tab on the 35mm f/2 Summicron-M ASPH lens would hit the tripod head and prevent focusing to closer than 2 meters. The tab also complicated attaching and removing the lens while the Leica M9 was on the tripod. This was surprising, and would not do, since in recent years, I often use a tripod even for small cameras due to tremor. While some Leica purists may consider this sacrilege, I modified the focus tab so the full focus range could be utilized while the camera was on a tripod, then matched the finish on the newly exposed plastic surface to the rest of the tab as best I could. The result is a much more useable lens, with no adverse impact on focusing via the tab. The focus tab on the 50mm f/1.4 Summilux-M ASPH also limits the focus range when the M9 is used on a large tripod head. However, since the mechanical interference of the tab in my Summilux sample is less than 0.7mm, only the rear 25 percent of the focus tab has to be lowered for the lens work on a large tripod head.
|
A Quick Look at the 50mm f/1.4 Summilux-M ASPH Lens: Sample Micro 4/3 and M9 Images
Initial Results with the 50mm f/1.4 Summilux-M ASPH lens.
© Copyright 2015 Jeffrey R. Charles. All Rights Reserved.
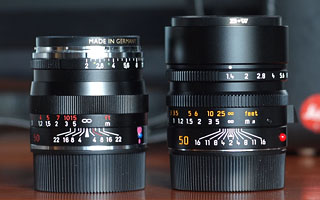 |
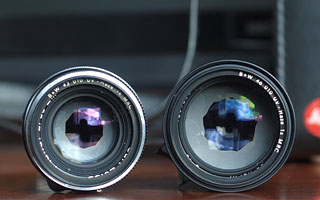 |
Leica 50mm f/1.4 Summilux-M Asph: Comparison to Zeiss 50mm f/2 Planar ZM Lens.
Size: The LEFT photo shows the Zeiss 50mm f/2 ZM and Leica 50mm f/1.4 Summilux-M ASPH from the side. The Summilux is larger than a most 50mm f/2 rangefinder lenses, but it is not huge.
Performance: The RIGHT photo shows the maximum aperture that keeps about 85 percent of the visible encircled energy from significant aberrations (sans fringing) to a size smaller than 2-3 pixels on a Leica M9, out to an image height of about 18mm. (Based on high magnification visual tests.) The Summilux provides a notably larger useful aperture. The exception is resolution of tangential structures at 10-13mm image height, where the Summilux must be stopped down to about f/4 to meet the above criteria. Specifically, the Zeiss 50mm ZM must be stopped down to about f/3.2 to keep off-axis aberrations below two pixels (this is better than average for 50mm lenses), and to prevent excess "bokeh fringing". This results in only 16mm of aperture. By contrast, the 50mm f/1.4 Summilux-M ASPH provides similar central image quality at about f/2.4, for a larger 21mm useful aperture. More "useful" aperture provides shallower depth of field and sharp images of subjects that are off-center in the picture. While quite good, the Summilux does not best the Zeiss ZM lens across the board. For example, if a subject's hair is running in a tangential direction in a half length portrait, and the hair extends out to beyond about 10mm image height, the Zeiss lens will resolve the hair better at the same aperture. Details are in Appendix J.
|
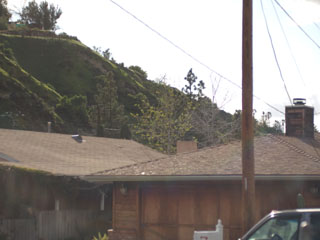 |
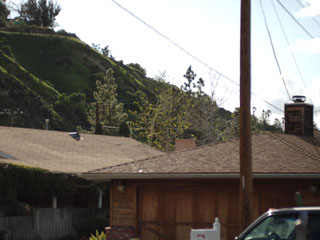 |
|
50mm f/1.4 Summilux-M Asph: Flare when Lens Unshaded (left) and Shaded (right).
Flare: When shooting into the sun, the 50mm Summilux-M ASPH should be used with more than the built-in lens hood. The LEFT photo was taken at full aperture, when the sun was about 30 degrees above the top of the picture, using only the built-in hood. The Summilux was observed to have more veiling flare than the Zeiss 50mm f/2 ZM, with flare appearing similar to that of a VC 40mm f/1.4 Nokton. It is not all that unusual for a faster lens to have more flare than a slower one. Surprisingly, the inner edge of a 46mm filter cell has line of sight to the focal plane corners. This further increases risk of flare, and can also increase vignetting. A larger filter will prevent use of the built-in lens hood. The RIGHT picture shows improved contrast that resulted from simply shading the front element of the Leica lens with my hand. My Leica M9 was in for service at the time, so these Summilux tests are with an Olympus E-P2 Micro 4/3 camera. Blue fringing in the upper left tree is from the Olympus camera's anti-alias filter, not from the lens.
|
 |
 |
|
50mm f/1.4 Summilux-M Asph: Bokeh Fringing (Spherochromatism) at Wide Apertures.
Bokeh: Purple whiskers in front, green whiskers behind! "Bokeh fringing" (not an official optical term) is obvious at wide apertures, even when the picture is not enlarged. These are 27 percent crops. The LEFT photo is taken at f/1.4, and bokeh fringing is so strong that it is visible in even a thumbnail of the image. Up close, some whiskers beyond focus look almost like glowing green tubes. A faint blue glow is also present just over the white fur above the cat's nose. The RIGHT picture shows that the situation improves at f/2, though it is not completely eliminated. Bokeh fringing gets more manageable at about f/2.4, and is only rarely seen in pictures taken at f/2.8 and slower f-stops. It does not completely disappear until about f/5.6, which is the same aperture at which background fringing disappears in the VC 40mm Nokton. Fringing is only obvious when highlights in front or behind focus are imaged with a neutral to dark background.
|
 |
 |
|
50mm f/1.4 Summilux-M Asph Lens: Grab Shots of the Moon.
Resolution: Unexpected lunar grab shots. While testing the 50mm f/1.4 Summilux-M ASPH lens, I noticed the moon over an interesting cloud formation, and knew the opportunity to photograph it would last only seconds. Since the Summilux ASPH was on the camera, I just used it. These photos were taken only a few seconds apart, but motion of the clouds resulted in an interesting 3D effect when both photos are merged. Since two clouds were moving independently, the stereo pair quite oddly (and erroneously) makes the moon look closer than the most distant (lower right) cloud! These are 60 percent crops, and resolution is limited only by the 4.3 micron pixels and color mapping in my Olympus E-P2. (The lens is that good!) The exposure is 1/800 sec. at f/4, ISO 100. A 50mm lens has to be pretty good to provide decent moon pictures.
|
|
50mm f/1.4 Summilux-M Asph: High Resolution and Minimal Color Fringing:
|
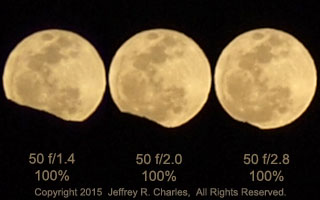 |
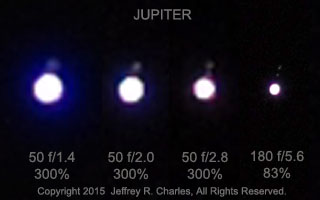 |
| Resolution: More grab shots of the moon, this time a moonrise. These are 100 percent crops from an Olympus E-P2 Micro 4/3 camera, all at ISO 100. The pixel interval is only 4.3 microns. The left image is 1/2000 sec. with the 50mm Summilux-M ASPH at f/1.4. The middle one is 1/1000 sec. at f/2.0, and the right one is 1/500 sec. at f/2.8. The f/1.4 image being almost as sharp as the others is impressive, since I never got a good lunar image at faster than f/2 before. All are taken at the same focus setting, and do not show focus shift. It isn't every day that you get this much detail on the moon with a fast 50mm lens that is at its maximum aperture! Images of Saturn with this lens are in Appendix F.
|
Slight Color Fringing: These pictures of the planet Jupiter (maximum angular size under 50 arc sec.) is beyond what is usually imaged with a 50mm lens. The left three images are 300 percent crops, taken with the Summilux. The left one is 1/4 sec. at f/1.4, ISO 100. It is overexposed to show fringing, which is well controlled for f/1.4. The dim object above Jupiter is one of its moons. Second from left is 1/3 sec. at f/2.0. Third from left is 1/3 sec. at f/2.8. At right is an 83 percent crop from a 180mm f/4.0 Elmar-R lens, working at f/5.6, to show the relative size of Jupiter and the positions of its visible moons. Even a 4.3 micron pixel size contributed to the moons looking larger with the 50mm lens.
|
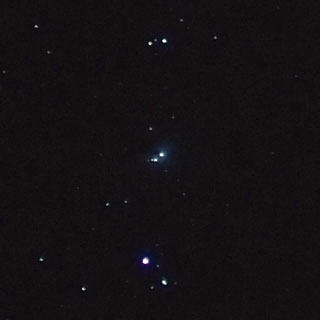 |
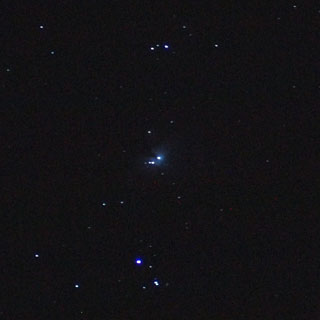 |
|
Star Test of 50mm f/1.4 Summilux-M Asph (left). Comparison to 180mm lens (right).
Good resolution, only slight in-focus fringing: Here again, we compare a 50mm lens to a 180mm lens. The LEFT 100 percent crop is of the M42 nebula in Orion is taken with the 50mm Summilux, working at f/1.4, and exposed for 2 seconds. The Olympus E-P2 is set to ISO 100. Even though stars near the bottom are overexposed, there is only slight blooming and very little color fringing for f/1.4. My SLR lenses don't even come close to this. The RIGHT image is a 28 percent crop of an image taken with the 180mm f/4 Elmar-R lens. Even though this image is shown at less than 1/3 the scale of the left image, it also shows a little fringing. In order to get the nebula to show better, this is a 2 second exposure at f/4, with ISO set to 800.
|
 |
 |
50mm f/1.4 Summilux-M Asph: Mid-Field Dip in Resolution of Tangential Structures.
At moderate image heights, resolution of the 50mm f/1.4 Summilux-M ASPH is less dramatic on small tangential structures. These overexposed images, taken at f/2.4 with the Leica M9, reveal a faint blur extending out from subject matter between about 8 and 15mm image height. At wide apertures, the blur reduces contrast on tangential structures at moderate image heights. Blur is better controlled by stopping down to f/3.1 to f/4.4, but this increases depth of field. (See Appendix K for details.) Another way to control blur is to deliberately bias focus ever so slightly. However, a rangefinder can't show if focus is appropriately biased in off-axis areas. An EVF will only show proper focus bias if the magnified focus assist area can be positioned off-center in the frame.
At LEFT is a 60 percent crop of a bar code, from the left side of the original. The bar code extends from 12.6 to 16.0mm image height. The seven-pixel blur is mostly horizontal, so it lowers contrast on thin, tangentially oriented, bar code lines. The left end of the bar code sticker is blurred, while the right end is not, showing that it is more or less in focus, and that blur extends away from the optical axis. The fanned spot just left of the bar code is suggests coma. Aberration can lower contrast on features in a portrait subject's hair, though blur may be less obvious on dark hair. Blur is reduced on the green pen in the background, just beyond best focus, but can increase in the foreground.
The RIGHT picture is an 80 percent crop showing the same bar code, but imaged with the camera oriented vertically, so the bar code lines point almost toward the center of the format. The bottom of the bar code is at 14mm image height, and blur is now in the vertical direction. Here, focus is biased slightly closer to the camera than the bar code, reducing the blur to 5 pixels and dimming it. As in the other image, there is a little less blurring on the green pen that is beyond best focus. The blur can be a little worse slightly closer to the center of the picture, at about 12mm image height. The nature of the aberration usually does not obscure thin bright features, but can obscure dark features that are near brighter ones. It usually is not quite as obvious on low contrast features, but it reduces detail.
|
Bokeh and Grab Shots with Leica M9 and 50mm f/2.0 Zeiss Planar ZM
Bokeh with 50mm f/2 Zeiss Planar ZM lens, working at f/2.5.
© Copyright 2013 Jeffrey R. Charles. All Rights Reserved.
 |
 |
 |
Zeiss 50mm f/2 Plannar ZM Lens. Bokeh (left 2). Low Lag Time of Leica M9 (right).
The LEFT picture shows an example of bokeh with the 50mm f/2 Zeiss Planar ZM, when used at f/2.5. The background is smooth, but not creamy smooth like if might be with the 50mm f/1.5 ZM.
At CENTER is a 50 percent crop of the bright area just right of the cat's whiskers. Blur circles for out of focus highlights are relatively uniform. These had bright outlines at f/2, but improve to this at f/2.5.
The RIGHT image shows that low shutter lag in the Leica M9 makes it easier to catch brief moments such as this unflattering one of my cat in mid-yawn. This was also taken at f/2.5 with the 50mm. Her teeth look longer than they really are because the top of her mouth moved during the exposure.
|
High Resolution using Leica M9 with 75mm f/2.5 Summarit-M and 250mm f/4 Telyt-R Lenses
High Resolution with 75mm f/2.5 Summarit-M lens, used at f/4 and 250mm f/4 Telyt-R at f/5.6.
© Copyright 2013 Jeffrey R. Charles. All Rights Reserved.
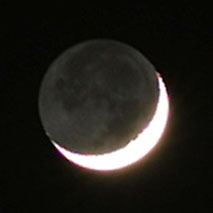 |
 |
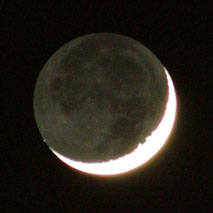 |
75mm f/2.5 Summarit-M: Moon at Image Center (left) and 15mm Image Height (center).
The LEFT picture is an example of high central resolution with a 75mm f/2.5 Summarit-M lens. This 133 percent crop of the crescent moon is a 4 seconds exposure at f/4, using the Pull 80 ISO setting. Like the other lenses, the Summarit-M does not focus to infinity on my Leica M9, but I used a filter having slight negative optical power to get the lens to focus closer to infinity. Even though in-camera sharpening was at the minimum setting, some dark sharpening artifacts are visible just inside the ends of the crescent.
At CENTER is a 133 percent crop of the crescent moon, imaged 15mm off-axis, toward the upper left of the picture. Exposure is the same as the left picture. The moon image is slightly out of round due to pincushion distortion, and slight fringing is visible at lower right. Not bad compared to most other lenses.
The RIGHT picture shows the advantages of additional image scale. This 45 percent crop is a 1 second exposure through a 250mm f/4 Telyt-R (Type 1) lens, used at f/5.6, with the Leica M9 camera at ISO 800. The additional image scale makes aliasing and residual in-camera sharpening artifacts less of a problem. These pictures were all taken on the same night (130512) as the lunar images with the VC 40mm f/1.4 Nokton in Appendix A.
|
75mm f/2.5 Summarit-M Moonrise Shot, Cropped to Under 10 Percent of the Picture Width!
75mm f/2.5 Summarit-M moonrise shot, cropped to under 10 percent of original picture width.
© Copyright 2013 Jeffrey R. Charles. All Rights Reserved.
 |
|
Leica M9 and 75mm f/2.5 Summarit-M Lens: Hand Held Moonrise Grab Shot (cropped).
While I was taking pictures of flocks of birds flying over with the 75mm f/2.5 Summarit-M lens, I noticed that moon had just come up behind some towers on a distant mountain. A longer focal length lens would obviously have been preferred for the moonrise, but the 75mm was what I had on the camera. If I had gone inside to get a different lens, the moon would have risen enough to be farther from the towers that the shot would not be the same, so I took this hand held picture with the 75mm lens, set at f/4, before switching lenses. This picture does not look as sharp as some of the others, but it isn't bad when you consider that this is a 133 percent crop that utilizes less than 10 percent of the original picture width! It would have been even better than this if the lens focused clear to infinity on this particular Leica M9, and if there had not been slight camera shake. A filter having slight negative optical power was used to get focus acceptably close to infinity.
|
250mm f/4 Telyt-R moonrise shot, cropped only a third as much.
250mm f/4 Telyt-R (Type 1) moonrise shot, taken at f/5.6.
© Copyright 2013 Jeffrey R. Charles. All Rights Reserved.
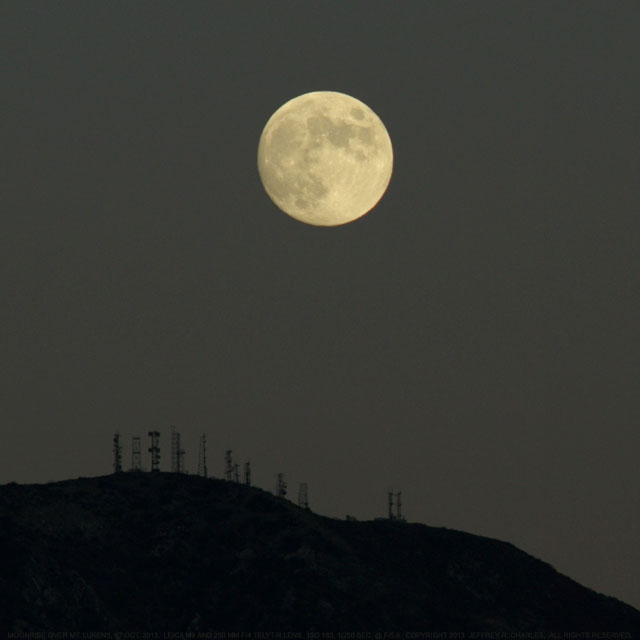 |
|
Leica M9 and 250mm f/4 Telyt-R Type 1 Lens: Picture of Moonrise (cropped).
After shooting the moonrise with the 75mm lens I had on the camera, I went inside and got out the 250mm f/4 Telyt-R lens to take this higher resolution picture. The exposure is 1/250 sec. at f/5.6, ISO 160. The moon is higher above the foreground, and there is less light on the foreground. It was worth taking, but is not quite as good of a composition as the previous shot. This goes to show that the lens you have with you is the one that gets used at critical times! For this reason, it would be nice to see a slower 240mm f/4.8 to f/5.6 up to a 320mm f/4.8 to f/6.3 rangefinder coupled lens made that can be used on a Leica M camera without a Visoflex, since infinity shots like this do not even require accurate rangefinder coupling, as long as the lens has an accurate infinity stop. Such a lens could be based on optics from the Zeiss 250mm f/5.6 Sonnar lens that is made for Hasselblad, or be of a simpler and lighter (even collapsible) design. A few of my own notional renderings for compact versions of such lenses are shown in Appendix L.
|
Rear Cell Reflections in 90mm f/2.8 Tele-Elmarit-M, Compared to 90mm Contax G Zeiss 90mm
Flare from Low Angle Reflections in Rear Cell of Stock 90mm Tele-Elmarit-M lens.
© Copyright 2013 Jeffrey R. Charles. All Rights Reserved.
 |
 |
Flare in Leica 90mm f/2.8 Elmarit-M when Bright Light Just Outside Left Side of Picture.
The 90mm f/2.8 Tele-Elmarit-M lens is sharp, but is more subject to flare than the Contax G 90mm f/2.8 Zeiss Sonnar T* lens. Flare is often on the same side of the picture as a bright object that is just outside the field of view. The Leica optics are not the cause, as shown below.
The LEFT picture shows flare caused by a sunlit lamp shade that was 10 degrees beyond the left edge of the field of view, so the flare wasn't even caused by direct sunlight. The lens hood was used.
The RIGHT picture shows a dramatic reduction in flare that resulted from simply moving the camera position below the level of the sunlit lamp shade, and to a slightly larger angle from it.
|
 |
 |
Reflections in 90mm f/2.8 Tele-Elmarit-M (left) vs Contax G Zeiss 90mm Sonnar (right).
The LEFT picture shows the back of the 90mm Tele Elmarit-M lens, backlit at an angle by the sun. Bright low angle reflections from inner parts of the lens cell aft of the rear element are obvious at the 9:00 position, and this reflects stray light onto the focal plane. The rear cell does not have knife edge baffles or sharp thread peaks. Flare in the Leica 90mm Tele Elmarit-M lens can be reduced by adding 2 or 3 knife edge light baffle rings. Flare would also be reduced if the inner cell extension behind the rear element (the area with the largest reflection) was simply removed. The smaller reflection at the very back is from the inside surface of the rangefinder cam ring. The 90mm f/4 Elmar-C and 90mm f/2.8 Elmarit-M lenses have similar reflections, but to a lesser degree.
The RIGHT picture shows that there is little reflection from the larger diameter, black flocked rear cell of the Contax G 90mm f/2.8 Zeiss Sonnar T* lens. The Zeiss 90mm lens has no rangefinder coupling, so its barrel aft of the rear element can be larger and less complex, reducing the risk of low angle reflection. The optics also show slightly less flare than the Leica lens, but flare from the Leica 90mm optics has a great deal less influence on the picture than flare from the lens cells.
|
Amazing Reach with the Leica 90mm f/2.8 Elmarit-M Lens
The 90mm f/2.8 Elmarit-M lens can provide good results even on small pixel cameras.
© Copyright 2016 Jeffrey R. Charles. All Rights Reserved.
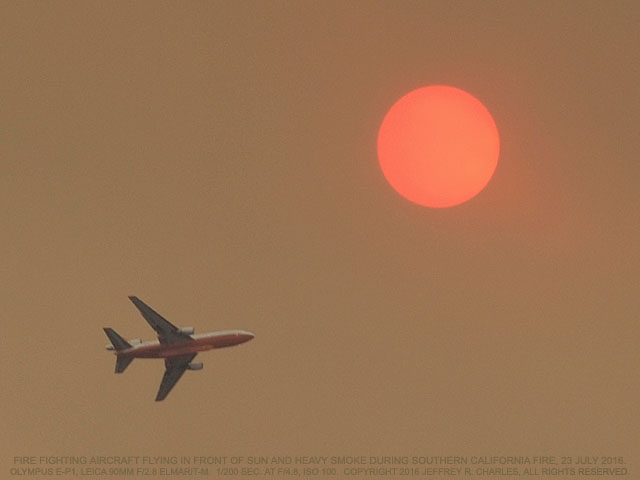 |
Reaching Out with 90mm f/2.8 Elmarit-M and Crop Sensor Camera with Small Pixels.
The 90mm Elmarit-M is sharp enough to provide considerable reach with small pixel cameras.
This picture of a fire fighting plane flying in front of the sun and heavy smoke captures detail normally associated with much longer focal lengths. This 32 percent crop is a 1/200 sec. exposure at f/4.8, using an Olympus E-P1 camera (4.3 micron pixels) at ISO 100. The smoke was so thick that the sun was very dim and ambient light on the ground was an unusual yellow-orange color. A 135mm lens would have to be used on the Leica M9 to capture this much detail, owing to the M9's larger pixels.
|
Colorful Results at f/2.8 with a 135mm f/2.8 Elmarit Lens, Much Improved by f/4.
Colorful results wide open with the 135mm f/2.8 Elmarit lens, much improved at f/4.
© Copyright 2013 Jeffrey R. Charles. All Rights Reserved.
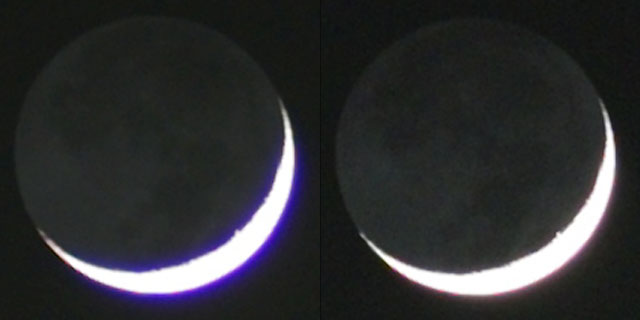 |
Leica 135mm f/2.8 Elmarit Lens. Color Fringing at f/2.8 (left) and f/4 (right).
These 150 percent crops are from the center of two images with the 135mm f/2.8 Elmarit lens. (This is the 135mm lens with goggles.)
The LEFT picture is taken at full aperture, and shows considerable chromatic aberration. It is a 2 second exposure with the M9 at ISO 160. Vignetting is noticeable near the edges of the format when the 135mm lens is wide open, even though the reduction in illumination at the corners is only slight. It is not known if this change in illumination is a function of the camera's offset micro lenses, which are probably optimized for shorter focal length lenses.
The RIGHT picture is a 2 second exposure at f/4, with the ISO set to 320. It shows very little chromatic aberration, but considerably more noise from the ISO 320 setting. When stopped down to f/4, the 135mm f/2.8 has less chromatic aberration the center of the field than the well regarded 135mm f/4 Elmar does at f/4. However, the Elmar does better at the edges until both lenses are stopped down to f/6.8, at which point both lenses perform about equally.
|
Non-Leica M Mount Lenses
As covered in the Astrophotography and "Using Various Accessories with the Leica M9" sections, other lenses, including long telephoto lenses and telescopes, can be used with the Leica M9, if appropriately adapted. Use of such lenses will be even easier on later models of the digital Leica M, since it will have live view and an EVF to accurately display a live magnified view of the image from each lens.
Photo of Some of the Leica Mount and Non-Leica Mount Lenses, etc., Described in this Section
Photo of some of the Leica and Non-Leica Mount lenses, etc., described in this section.
© Copyright 2013 Jeffrey R. Charles. All Rights Reserved.
 |
|
Photo of Some of the Many Tested Lenses of Various Mounts that are Reviewed Below.
Group portrait of some of non-Leica M mount lenses and various accessories by Leica and others that are described in this or other sections. From back to front and left to right, starting at the upper left, we have an 8mm f.3.5 Samyang fisheye lens (covered in a separate review), 16mm f/2.8 Fisheye Nikkor lens, telescope adapter with Leica M mount, Contax G 90mm f/2.8 Zeiss Sonnar T* lens (covered above), 55mm f/2.8 Micro-Nikkor, Leica Visoflex III with eye level prism, Nikon 180mm f/2.8 ED Nikkor, Leica 250mm f/4 Telyt-R (3 cam, Type 1 version), and a Nikon 400mm f/5.6 ED Nikkor lens. At the front is a Contax G 35mm f/2 Zeiss Planar T* with M4/3 adapter, a Peak 15x magnifier, a Leica R to Leica M adapter, and a customized Nikon to Leica M adapter that sets the Leica rangefinder parallax correction to infinity.
|
The same type of lens performance tables for visual tests and recommended apertures for each lens are included here. These are shown according to the same column definitions as for Leica mount lenses above.
Category / Lens    Ser.N. ShVid ShAx Sh34 FAFm FA34 UseAt PhAp C/F Notes:
    WIDE ANGLE (Shorter than 50mm)
8   f/3.5 Samyang   None    4.8  3.5  6.8  5.0  4.0  6.8   1.2  G  29mm cov.No Filt.
12  f/2.8 Samyang   None    4.8  2.8  5.6  6.8  4.8  6.8   1.8  G  FullFrm; Rem.Hood
14  f/3.5 Sigma AF  2000489 5.6  5.6  6.8  9.5  8.0  6.8   2.1  G  Sharp cnr. f/5.6.
16  f/2.8 M. RokXok 1616493 2.8  2.8  3.5  4.0  3.5  3.5   4.6  G+ f/2.8 acceptable
16  f/2.8 FE Nikkor 193040  4.0  4.0  5.6  5.6  4.0  5.6   2.9  E  f/4 OK most sub.
    NORMAL/ZOOM
55  f/2.8 Mic. Nik. 222706  3.3  2.8  3.4  5.0  4.5  4.0  13.8  E  Excel. Lens 52F
60-200 4-5.6 Sigma  1013710 6.8  6.0  8.0  7.5  6.5  6.8  15.4  G+ At 105mm; 3.3"lng
    MEDIUM TELE (75mm - 200mm)
135 f/2.0 AI Nikkor 197333  3.4  2.2  3.2  3.2  2.8  3.2  42.2  V  LessSphThn105/1.8
180 f/2.8 ED Nikkor 411153  4.0  2.8  3.4  3.8  3.0  3.4  52.9  V  Excel. Lens 72F
180 f/4.0 L.Elmar-R 2989694 5.6  4.0  5.6  5.0  4.5  5.6  32.1  G  Edge frng to 5.6
180 f/4.0 VALanthar 9340862 4.0  4.0  5.0  6.3  5.0  5.0  36.0  V  AlmostNoCA,49filt
200 f/5.6 P.TeleTak 3877826 7.2  6.8  7.5  14   10   9.5  21.1  V  Vignette wide opn
    LONG TELE (250mm - 450mm)
250 f/4.0 L.Telyt-R 2406831 5.6  4.8  6.8+ 5.0  4.5  6.8+ 36.8  G  42umRdFrng to f/8
250 f/4.0 L.Tel-Rv2 3051014 5.2  4.4  5.6  8.0  6.8  5.6  44.6  V- Edg50umLCA,V2,LTMt
250 f/5.6 Z.SonnarT 6187163 5.6  5.6  5.6  7.5  6.8  6.8  36.8  V+ No Obsv'd lat. CA
300 f/4.0 ED Nikkor 217294  4.8  4.0  5.6  5.6t 4.5t 5.6  53.6  V  AF w/Override 82F
300 f/4.5 ED Nikkor 226301  6.8  5.0  6.3  7.5  5.6  6.3  47.6  V  Edg55umRdFngTof/8
300 f/5.6 P.TeleTak 1471325 9.5  8.0  9.5  11   9.5  8.0  37.5  V- Fringing to f/8
350 f/5.6 SoligorPS T40968  7.5  8.0  9.5  11   8.0  9.5  36.8  G+ Sim. to Z. 350 TT
400 f/5.6 ED Nikkor 294892  9.0  6.8  9.0  8.0  6.8  9.0- 44.4  V  Fringe f/5.6~9.0
400 f/6.9 TamNestar 40251   11.0 6.9  10.0 22   12   10   40.0  V- Has int. reflect.
    EXTREME TELE (Longer than 500mm)
500 f/5.0 Ref.Nikkor TBD
500 f/8.0 Tele-Tess 5572215 11.0 9.5  13.0 10*  9.0* 13.0 38.5  G+*Data f/35mm fmt.
560 f/6.8 L.Telyt-R 2849409 11.0 9.5  11.0 11   9.5  9.5  58.9  E  Follow Focus
600 f/8.0 VivitarT 37901615 11.0 9.0  10*  11*	10*  9.0  66.7	V+ f/8 ok full fmt.
800 f/8.0 Sol/VivT  v10991  13+  8-9  10.0 11   10   8-10 80.0  E  Only minor vig.f8
    TELESCOPES
1400 f/16 Questar
2032 f/10 Celestron
Mini Reviews of Each Lens:
WIDE ANGLE LENSES (i.e. Lenses Shorter than 50mm)
Samyang 8mm f/3.5 Fisheye (Nikon F Mount)
Even though the Samyang 8mm lens covers only a 29mm circle, it is still useful on the Leica M9 for applications such as capturing a full sphere in about 4 shots. It also has a proportional projection that is more natural looking than images from other fisheye lenses. A masked fisheye door peeper can be used as a viewfinder of sorts. On the Leica M9, the lens provides full frame coverage when used with an appropriate Nikon 1.4x tele-converter. I previously reviewed this lens in depth. That review [4] is at the versacorp.com URL in the references section.
Since this is a retrofocus lens for an SLR, light from it does not arrive at the edge of its coverage on the focal plane at as large an angle as would be the case for an ultra wide rangefinder lens. This reduces light falloff, so to keep the Leica M9 from making too much compensation for light falloff and IR cut filter color shift, it should be coded in the menu as a slower f-ratio 50mm to 75mm lens (50mm to 75mm is usually better), depending on which look you prefer.
Samyang 12mm f/2.8 Fisheye (Nikon F Mount)
The Samyang 12mm f/2.8 full frame fisheye lens has not been reviewed yet. It has a front element group similar to the 8mm f/3.5 lens, but with ED glass in at least one additional element. It has the same proportional projection as the 8mm f/3.5.
Sigma 14mm f/3.5 Rectilinear (Nikon F Mount)
The Sigma 14mm lens (not pictured) is physically quite large, but it is a good way to get ultra wide images without red shift toward the left of the image that many get with the VC 15mm f/4.5 lens. Like the 8mm Samyang, this is a retrofocus lens for an SLR, light from it does not arrive at the corners of the focal plane at as large an angle as would be the case for a rangefinder lens of about the same focal length. This reduces light falloff to a degree, so to keep the Leica M9 from making too much compensation for light falloff and IR cut filter color shift, it should be coded in the menu as a slower f-ratio 50mm to 75mm lens, depending on which look you prefer.
Minolta 16mm f/2.8 Rokkor-X OK Fisheye (Minolta MD Mount)
The 16mm f/2.8 Minolta Rokkor-X is a full frame fisheye lens that has exceptionally high resolution and illumination toward the edges of the format. Its actual field of view exceeds 200 degrees, but the radial image scale is highly compressed toward the edge of the field, and nothing beyond about 180 degrees is actually included in the picture. The lens was made in at least three configurations. Most of the difference is in the coatings, though some early versions also have a depth of field preview feature right on the lens.
The earliest version is the Rokkor-OK, which has optical coatings that reflect white light as an amber color. The next is the Rokkor-X OK, which has coatings that provide mostly green reflections, with some elements also reflecting white light as red and amber colors. The newest is the Rokkor-X, which has coatings that provide mostly dim red and green reflections. The first two versions don't control flare as much as the Rokkor-X, through the Rokkor-X OK comes close.
The 16mm Rokkor-X has almost as much flare resistance as the 16mm f/2.8 Fisheye Nikkor. Minolta later made a more compact version of a 16mm fisheye lens, but I have never seen it in person. Edge performance of the Minolta Rokkor 16mm fisheye is superior to the Nikkor in terms of both resolution and illumination at wide apertures. Coding should be similar to the wide angle lenses above.
Nikon 16mm f/2.8 Fisheye Nikkor (Nikon F Mount)
The 16mm f/2.8 Fisheye Nikkor is useful when a wider field than even that of the 10mm or 12mm VC lens is desired, or when a fast f-ratio is needed. The viewfinder for the 12mm VC lens will approximate the angle this lens (and other 16mm fisheye lenses) will provide if the image is converted to a rectilinear projection in post processing. A masked door peeper will provide a more accurate view of what the 16mm Nikkor lens will capture in the raw image. Coding should be similar to the lenses above.
NORMAL AND ZOOM LENSES
Nikon 55mm f/2.8 Micro-Nikkor (Nikon F Mount)
There is little point in using the 55mm f/2.8 Micro Nikkor at normal subject distances, since 50mm rangefinder lenses are so much smaller. The 55mm Micro Nikkor will lend itself better to newer M cameras that have Live View, but it can be used for close ups (extreme close ups) when adapted to the front of a Visoflex and used on the M9. This lens can be coded as a slower 50mm or 75mm lens for normal subject distances. Coding as a 90mm or 135mm lens, or use uncoded, may work best if it is used on a Visoflex for macro photography.
Sigma 60-200mm f/4-5.6 Beta II (Nikon F Mount)
I never thought a zoom lens would end up in a list of potential lenses to use with a Leica M camera, but the 60-200mm f/4-5.6 Beta II from Sigma is in a class by itself for optical performance versus portability. I was never aware of this lens being sold new in the US (if I'd seen one, I would have bought it!), and even used ones appear to be uncommon in the US. It seems unusual that this lens did not see wide distribution, because it appears to be one of Sigma's best efforts in compact zoom lenses. The 60-200mm focal length range is also more useful than that of a 70-200 or 80-200.
The Sigma lens is noted because it is very compact, being only 83mm long at the 60mm zoom setting, but slightly longer with an M adapter. It also encompasses the desirable 60~65mm focal length, and provides a portable solution for focal lengths longer than 135mm. The minimum focus is 1.5 meters. This focus distance is a bit long for a 60mm lens, but is more than reasonable for a 200mm lens. It is possible to modify the lens to focus down to 1.4 meters, but there is not enough margin in the helical threads to let it focus any closer.
On a Leica M9, a lens of this type can be used at infinity by using its infinity stop (provided it is well calibrated), but it must be zone (or scale) focused for closer distances. It can of course be focused via an EVF on the Leica M240 and newer EVF-compatible M cameras.
The lens has good resolution and field illumination when stopped down only one f-stop, which is unusual for a small zoom lens. (The Soligor CD 45-150mm f/3.5 is one of the few other zoom lenses that performs this well at wide apertures.) The 60-200mm Sigma also has less distortion than most zooms with this much range, though distortion is high compared to most fixed focal length lenses. The coatings are fairly good and flare resistance is better than average for a zoom, except when the sun is actually in the picture.
Like many Sigma lenses of its era, calibration tolerances may make it impractical use on a Leica M9 unless it is serviced first. The aperture of most Sigma zoom I've seen from this period is not well calibrated, and it is not always as repeatable as the aperture in many other manual camera lenses, unless serviced at some length. The aperture is more stable than the Sigma 35-70mm zoom, but that isn't saying much.
The Sigma lens tolerance is also a bit wide for the rear shims, and this results in a slight focus shift as the lens is zoomed. Once the shim stack is the correct thickness (which may require thinning an existing shim or making a new custom shim), the infinity focus calibration for the front element group can be easily adjusted to match, then the lens should be capable of providing good results at infinity on a Leica M camera.
If the Sigma 60-200mm is serviced to tweak the shims, infinity stop, and aperture (when necessary), it can be a handy lens even for the Leica M9. It should also work well on APS and Micro 4/3 cameras, with appropriate adapters. When used at 200mm and stopped down to f/8, this lens has a slight edge over the 200mm f/5.6 Tele-Takumar covered below, though it has somewhat more pincushion distortion.
MEDIUM TELE LENSES (75mm - 200mm)
Nikon 135mm f/2.0 Nikkor (Nikon F Mount, Original and Ais)
TBD
Nikon 180mm f/2.8 ED Nikkor (Nikon F Mount)
This lens is mentioned because its fast f-ratio and relatively good correction of chromatic aberration make it relatively good for astrophotography. It can be used for good astro photos in the f/3.4 to f/4 range. It can also be used on the Leica M9 via an adapter. It will not be rangefinder coupled, but that will not be an issue for astrophotography if its infinity stop and the adapter are properly calibrated. Moderately long subject distances, as may be appropriate for wildlife photos, can often be estimated.
The 180mm lens coverage can be estimated with a custom shoe mounted finder, or a modified adapter (like the one in the picture above) that sets the Leica rangefinder parallax correction at infinity. Interpolating between the rangefinder patch size and the 135mm frame lines can then be utilized to estimate the field of view. So far, I typically use an uncoded setting for longer lenses such as this and the lenses below, though the 135mm f/3.4 coding (53, or 110101) might work too.
This fast 180mm lens was used for a most of the nebula photos in the astrophotography section of this web page. Coding can be uncoded, or the 135mm f/3.4 code can be used. The 001001 code for the 135mm f/2.8 lens usually will not work because the adapter must select the 28/90mm frame lines, and most adapters are made with a short finder side flange that selects only the 35/135mm frame lines. One shortcoming of this lens is the lack of an infinity stop.
Leica 180mm f/3.4 APO Telyt-R (Leica R Mount)
The Leica 180mm f/3.4 has not yet been tested or reviewed. If it is reviewed, it will be tested head to head with the 180mm f/2.8 ED Nikkor. Resolution, fringing, color, and vignetting at f/4 and faster will all be compared and evaluated. If it performs as well as the 180mm Nikkor in all respects, it will be preferred owing to its smaller size, even though it has an odd filter size. If the 180mm ED Nikkor does better even in terms of vignetting at f/4, it will get top billing, provided that an infinity stop can be retrofitted. It is very unlikely that the 180mm f/3.4 will be acquired or tested, owing to the high performance of the more compact Voigtlander 180mm f/4 APO Lanthar covered below.
Leica 180mm f/4.0 Elmar-R (Leica R Mount)
The Leica 180mm f/4.0 Elmar-R lens (not pictured) is not as impressive as either the Nikon ED or Voigtlander APO 180mm lenses. It also falls short when compared to the larger 250mm f/4 lenses below, but it is unusually portable for a 180mm lens (12cm long including M adapter), and focuses down to 1.8m.
The 180mm f/4 Elmar-R has a faint glow around central highlights at f/4, but not enough to make the image look soft. At the edge, fringing and other aberrations slightly soften the image at f/4, but fringing is almost gone at f/5.6, and it is effectively gone even at the edges of backlit objects by about f/6.8. Under most conditions, the 180mm f/4 Elmar provides a good full frame image at f/5.6. Surprisingly, edge illumination is good at all apertures.
The aperture ring has half stop clicks and the minimum focus distance is 1.8 meters. The filter size is E55, but 52mm filters can be used with a step down adapter without causing any vignetting. The built-in lens hood is long enough to be quite useful.
This lens is not a viable replacement for the 180mm f/2.8 ED Nikkor lens described above when good performance is needed at fast f/ratios. However, it is very portable and works for about everything that I have used the 180mm f/2.8 ED Nikkor for, except for astrophotography and other low light imaging.
The focus ring of my sample seemed a bit unusual in that rapidly turning the focus ring caused its rotary position to slip with respect to the helicoid, reducing infinity stop accuracy. It turns out that a thin rubber ring is all that prevents slippage between the two. The rubber had gotten hard, split, and slick, which made it easier for the focus ring to spin relative to the helical thread.
This focus slip was initially repaired by gluing the remainder of the brittle rubber ring to a fitting the focus ring presses against when it is screwed down. However, the repair with glue did not last, so I ultimately had to add a set screw to the focus ring and drill a small dimple in the brass helicoid tube (to keep from having to tighten the set screw enough that it made the focus ring get out of round) to keep the focus ring and the helicoid from spinning relative to one another. Unfortunately, even though I hardly ever break taps, my No. 1-72 tap broke in the soft aluminum focus ring, so I had to remove it and go up to a more obvious 2-56 screw. The set screw is effective, though it does not look all that good.
The 180mm Elmar lens would be more attractive for the Leica M9, etc., if it was packaged in a thinner barrel and had rangefinder coupling. Prior to acquiring this lens, I'd thought of adapting a Mamiya 180mm f/4.5 Super lens (for Mamiya TLR system) to a Leica helical focusing mount. However, the 180mm Elmar-R is sharper, focuses closer, has a relatively good feel, and needs no modification. I have not used the Leica 180mm f/2.8 or f/3.4 lenses, but the small size of the 180mm f/4 Elmar-R lens is useful at times. In practice, I used the 180mm f/4 Elmar-R and 180mm f/2.8 ED Nikkor lenses more than any other 180mm or 200mm lenses, until I got the Voigtlander 180mm lens noted below.
Voigtlander SL 180mm f/4.0 APO Lanthar (Nikon F Mount, Tested in 2016)
At long last, it was possible to acquire and test the outstanding Voigtlander 180mm f/4 APO Lanthar lens in 2016. And after I tested it, I hung on to it. This extraordinary lens sold for only about $400 when it was in production years ago, but it was discontinued after a short time, so not many were made. Too bad, since it's a great lens.
After production stopped, the price of a used 180mm Lanthar went through the roof, with some selling for upwards of 2-3 times the new price. I was able to get mine for less than 2x its new cost, but it is a sample with the not-to-uncommon aperture blade asymmetry, and it needed some other work.
This brief review of the Voigtlander 180mm APO Lanthar lens does not include sample pictures, though a crop from one image is in Appendix H.
I had read reviews that said the Voigtlander 180mm APO Lanthar did not perform very well at long subject distances. This was initially true of my sample, until I quickly discovered that the reason for this was that the lens only focused to about 150 meters away when the focus ring hit the infinity stop. This may not sound like much, but it has quite an effect on the resolution of landscapes at wider apertures.
Infinity stop calibration is more obvious in the Lanthar than with other lenses because this lens is so sharp on the subjects it is focused on. The lens also has slight spherical aberration at infinity, which makes optimization of infinity focus even more important. The lens focuses all the way down to 1.2 meters, so optimum performance was probably designed for the middle of the focus range.
The initial infinity focus problem was compounded by Chinese Nikon to Leica M and Micro 4/3 adapters that were too thick. Combined, the lens with the adapters could only focus to about 100 meters away. I noticed a further drop Chinese lens adapter quality starting in 2016.
After the lens calibration and adapter thickness issues were both corrected, the lens took extremely sharp and contrasty landscapes. In fact, it takes sharper landscapes than any lens longer than 90mm focal length I have ever used. It is the sharpest tele I have ever had on a Nikon SLR.
The 180mm Lanthar is remarkably free of color fringing. The only color fringing I ever saw on an in-focus subject was a little faint color around a very over-exposed highlight. In visual tests, the lens has some lateral red fringing toward the edges of the field, but I have not seen this fringing in any ordinary photos thus far. I did get a little of it to show by positioning the moon at the edge of the frame and overexposing it several f-stops, but that is not a normal situation.
The filter size is 49mm, and the length (on a Nikon) is only about 83mm, not counting a hood. The hood is absolutely necessary because the lens can flare even if the front element is illuminated from a 45 degree angle. Minimum focus is really close, at only 1.2 meters. In fact, due to the compact telephoto design and long focus travel, the effective f-stop changes by almost a full stop at the minimum focus distance! The glass looks clear, and does not have a yellow cast that some associate with prolonged proximity to Lanthanum glass.
The lens is small and light enough that it does not look or feel at all out of place on a Leica M camera, and framing in the M is just a matter of leaving a generous margin inside the 135mm frame lines. As with the 180mm Nikkor lens, the 180mm Lanthar can be used on a Leica M via a customized adapter. The lens obviously is not rangefinder coupled, but the hardware and techniques mentioned for adapting the 180mm Nikon lens can be used to enable framing and proper focus at long subject distances.
The only weak points of this lens are slight field curvature and vignetting at full aperture. Vignetting is obvious at full aperture and does not reach acceptable levels on a full frame camera until the lens is stopped down to about f/5. Some aperture clipping persists until the lens is stopped down to roughly f/6.3 or f/6.8. Vignetting is not an issue for small format cameras such as Micro 4/3, but it is for full frame. Strong points of the 180mm lens include close to Leica M lens performance, but only after a few calibration issues are addressed.
A brief comparison of the 180mm APO Lanthar on a full frame camera shows that the Lanthar bests the Leica 180mm f/4 Elmar-R at all f-stops wider than f/8, but performance is similar at slower apertures. Compared to the 180mm f/2.8 ED Nikkor, the APO Lanthar is sharper than the Nikkor at f/4, but the Nikkor image looks better due to less vignetting. At f/5.6, the Lanthar is slightly sharper and has a little more zip than the Nikkor. Both lenses perform about the same at f/8 or slower.
On Micro 4/3 format, the 180mm f/4 APO Lanthar achieves astounding performance at f/5.6, to the extreme that the camera pixels (including color mapping) in a 16 MP Panasonic GX7 proved to be the limiting factor for resolution. It is a nice little lens.
Used with a Nikon TC-201 2x tele-converter, the APO Lanthar had to be stopped down to f/8 (for a final f-stop of 16) before the images were relatively free of artifacts and fringing around highlights. I may try an ordinary Vivitar 2x converter and see if that works any better. (Sometimes, odd pairings like this can work.) There is always a chance that the correction in a Nikon 2x converter is optimized to negate fringing in some Nikon lenses. If so, it could introduce fringing when used with an APO lens.
Needless to say, I now expect to part with most other lenses of 180mm to 200mm focal length, except for retaining the 180mm f/2.8 ED Nikkor for astrophotography.
Given that the same factory that made the Lanthar now makes pricey lenses bearing the Zeiss name, and given that used 180mm Apo Lanthar lenses command such a high price, one would think that this lens could be re-introduced new, even at prices the used APO Lanthar lenses now cost. If people knew how good it was, there could be quite a demand. However, it would be nice to see a more symmetrical aperture and better control of vignetting in a new version.
The small size is great, since there is no point in carrying around the glass in an f/2.8 lens if you don't need f/2.8. The small 49mm filter size (comparable to the filter size of standard 50mm camera lenses) also eliminates the need to acquire and carry large filters.
On APS and Micro 4/3 formats, the 180mm f/4 APO Lanthar achieves astounding performance at f/5.6, to the extreme that the 3.8 micron camera pixels (including color mapping) in a 16 MP Panasonic GX7 proved to be the limiting factor for resolution. It is a nice little lens.
Pentax 200mm f/5.6 Tele-Takumar (Pentax M42x1 Screw Mount)
It may seem odd that an old Pentax Takumar lens (from before the days of SMC coating) would be mentioned here, but this lens is unique. In the 1960's and early 1970's, the Leica rangefinder was the most compact full frame 35mm camera system, at least when used with lenses up to 135mm focal length. SLR cameras and their lenses all tended to be larger by comparison, with the exception of only one - Pentax.
At a time when full frame Canon, Fujica, Konica, Mamiya-Sekor, Minolta, Miranda, Nikon, Olympus (before the OM-1), Yashica, and other SLRs and lenses were relatively large, Pentax SLR cameras such as the H2 and Spotmatic were quite compact. I used many cameras during this period, and the reduced size and weight of a Pentax 35mm SLR made a difference in whether or not I had a camera with me. This brings us to the diminutive Pentax 200mm f/5.6 Tele-Takumar lens.
The 200mm f/5.6 Tele-Takumar is probably the smallest 200mm full frame lens ever made. When adapted to the Leica M, it is only 13 cm long and less than 5.8 cm in diameter, including the M adapter. It is comparable to the size of the original 135mm f/4 Leica Elmar lens. This makes it an excellent choice for getting more reach than a 135mm, while keeping size and weight to a minimum.
The weight is notably less than the above Leica 180mm f/4 Elmar lens. The Tele-Takumar is a pre-set lens in which the aperture is operated in much the same way as the Leica 65mm f/3.5 Elmar. The f-stop range is from f/5.6 to f/22. The filter size is a tiny 49mm, and E46 filters will not cause vignetting if used with a step down adapter ring.
The Takumar lens is has some visible color fringing wide open, but the color is significantly reduced at f/6.8, and it is well controlled at f/8. Beyond f/6.8, the Tele-Takumar has slightly less fringing and slightly better resolution than the 180mm f/4 Leica Elmar-R does at the same aperture.
The weakness of the 200mm Takumar lens is that its undersized rear baffles and small rear elements cause significant vignetting unless it is stopped down to at least f/9.5. Mechanical clipping of the aperture persists all the way to f/14, but becomes acceptable for a 4:3 crop from the frame at f/9.5 to f/10. Using the lens at f/9.5 and slower limits hand held use to relatively bright conditions. If it was not for this vignetting limitation, I'd use the 200mm f/5.6 Tele-Takumar lens more than the 180mm f/4 Elmar-R, or maybe even instead of the 180mm Elmar lens.
Of course, vignetting of the 200mm Tele-Takumar is not an issue on smaller format digital cameras, so the lens can be used at f/6.8 to f/8 on these. The 200mm Takumar does not have a tripod mount, but it doesn't need one owing to its light weight. At f/6.8, its images have a little more snap on small format cameras than do images from the 180mm f/4 Elmar-R at the same f-stop. The minimum focus distance of the 200mm Takumar is fairly long, at 2.5m.
The 200mm f/5.6 Tele-Takumar is not as sharp at a given f-stop as the compact 180mm f/4 APO-Lanthar lens above, but the Takumar can usually be had for 1/8 the cost of the APO lens, or even less.
COMPARISON OF SELECTED 180mm - 200mm LENSES:
TABLE GOES HERE (OR ADD TO APPENDIX H).
The short story for this focal length range is: The 180mm f/2.8 ED Nikkor is an excellent lens, including for low light applications. The Voigtlander 180mm f/4 APO Lanthar is the sharpest in this focal length range, but has noticeable vignetting until stopped down to f/5.6. If the Apo-Lanthar did not have vignetting, it might be the only lens a person may need in the 180mm to 200mm range. This is partly because the 180mm f/2.8 ED Nikkor has to be stopped down to about f/4 to control color fringing in images of high contrast subjects.
LONG TELE LENSES (240mm - 450mm)
Proposed Compact 180mm, 240mm, and 320mm Leica M Mount Lenses:
In Appendix L of this document (Photo Products and Versions it would be Nice to See Made by or for Leica, etc.), four new focal lengths are proposed for rangefinder coupled Leica M Lenses. These include a 63 to 65mm f/1.7 to f/2 APO, a 180mm f/4 APO (which could potentially be based on the optics of the discontinued Voigtlander 180mm f/4 APO-Lanthar SL lens), a 240mm f/4.8 to f/5.6 APO, and a 320mm f/4.8 to f/6.3 APO. All of the lenses except one use the same filter sizes as other Leica M lenses (E46, E49, E55). A few proposed basic specifications are shown here. The physical length of each proposed lens is measured from the camera lens mount:
FOCAL		Phys.	Outer	Filter	Minimum
LENGTH  f/No.   Length	Dia.	Size	Focus	Note 1          Note 2

65mm    2.0      57     56.5    E46     0.4m    Built-in Hood   1:3.5 Reprod.Ratio
63mm    1.7      61     58.5    E49     0.5m    Built-in Hood   RF couple to 0.7m
180mm   4.0     107     58.5    E49     1.4m    Built-in Hood   -
240mm   5.6     141     58.5    E49     1.7m    Built-in Hood   OptionTelescopeConv
240mm   4.8     142     59.0    E55     1.7m    CompactNoHood   OptionTelescopeConv
240mm   4.8     142     62.6    E55     1.7m    Built-in Hood   OptionTelescopeConv
320mm   6.3     205     62.6    E55     2.8m    Built-in Hood   OptionTelescopeConv
320mm   4.8     208     81.0    72mm    2.8m    Built-in Hood   OptionTelescopeConv
1.34xTC  -       25     55.0     -       -      APO Tele-Conv.  For 90mm/LongerLens
2xTelCv  -       41     55.0     -       -      APO Tele-Conv.  SameLengthAsVisofl.
Details about these proposed lenses (including renderings of most of them), and how they can be effectively used on Leica M cameras (in spite of the lack of Leica M frame lines for these focal lengths) are in Appendix L, which is near the end of this web page.
If only two M lenses longer than 135mm are made, a good range might be the 180mm f/4 and 240mm f/5.6. If only one longer lens is made, a 240mm f/5.6 or f/4.8 may be best, though 280mm f/6.7 might be another option. A 180mm lens is not all that much longer than 135mm, but 240mm increases the reach of a Leica M significantly. 240mm is also about the longest focal length telephoto that can physically be made almost as short as older Leica 135mm lenses, and this makes it easier to fit in with a Leica M system than is the case for physically longer lenses.
A matched rangefinder coupled tele-converter for the Leica 135mm f/3.4 APO that is also compatible with proposed 180mm and longer lenses is also a good addition. The tele-converter would also be compatible with some 90mm and older 135mm Leica M mount lenses. Even if none of the proposed lenses are made, a good rangefinder coupled tele-converter is another way to use longer focal lengths on a Leica M without losing rangefinder coupling. (Or at least retaining use of the parallax correction of the rangefinder patch to center a subject.) Now, back to reviews of existing lenses:
Leica 250mm f/4.0 Telyt-R, Version 1 (Leica R Mount)
The Leica 250mm f/4 Telyt-R lens is very heavy, but its weight can actually help in hand held situations. This lens can take outstanding shallow depth of field pictures at f/5.6, but it performs best when stopped down to about f/6.8. It has quite a bit of red fringing wide open, but the fringing may not be too obvious in images of low contrast subjects that are not backlit. Vignetting is reasonably low even at full aperture, being less than is the case for the 250mm Version 2 lens.
The aperture ring on the 250mm has half stop clicks, and the closest focus is 4 meters. The collapsible lens hood is actually long enough to be useful. For my sample, I bought a 72mm to 74mm step down ring, and modified the 74mm threads to be almost a press fit on the front of the lens hood that could be further secured with removable glue. This permits the use of standard 72mm filters on the front of the hood.
As with the 180mm Nikon lens, the 250mm f/4 Leica lens can be used on the Leica M9 via an adapter. It will not be rangefinder coupled, but the same hardware and techniques noted for the 180mm Nikon lens can be used to frame and focus at long subject distances. The build quality is excellent and the focus has good damping that feels way better than even the best Nikon lenses.
In practice, I used the 250mm Telyt-R lens on the Leica M9 more than any other lens longer than 135mm, until acquiring the optically superior (but physically longer) 250mm f/4 Telyt-R (Type 2) lens below. Frequent use of the 250mm Telyt-R may be due in part to rarely getting camera shake when the heavy lens is used on a tripod. The next most frequently used long focal length lenses are the 400mm f/5.6 ED Nikkor, and the compact high performance Voigtlander 180mm f/4 APO Lanthar.
Leica 250mm f/4.0 Telyt-R, Non-APO, Version 2 (Leica R Mount)
The Leica 250mm f/4 Telyt-R Type 2 lens is an improvement of the first version in almost all respects except vignetting and physical length. The improvements are both optical and mechanical. The physical length of the Type 2 version is almost 5 cm longer, but its color fringing is a relatively dim purple, as opposed to the strong red fringing of the Type 1.
The Type 2 version has a large rotating tripod socket with detents every 90 degrees, rather than the small fixed tripod interface of the first version. This is a nice feature, but it does have a slight amount of play owing to its use of a quick release detent lock rather than a solid rotation lock screw or clamp.
This second version 250mm f/4 Telyt-R focuses down to 1.7 meters, compared to 4 m for the original. Focus damping is not as good as the Type 1, but is adequate. In addition, the version 2 lens is a little lighter and takes standard E67 (67mm) filters. As with the original 250mm, the version 2 lens has a built-in hood that is actually long enough to be useful. Sliding the hood is a little stiff in my sample, however.
Color fringing is considerably less than that of the original 250mm Telyt-R. The new version takes acceptable pictures wide open at f/4, and does even better at f/4.8, since central color fringing is better controlled. Vignetting is fairly obvious until the lens is stopped down to about f/5.6. Measurable mechanical aperture clipping persists in the image corners until the lens is stopped down to about f/8.
The entire picture is pretty good at f/5.6, which is half a stop faster than where the original version achieves similar performance. It has slightly less fringing at f/5.6 than even the Hasselblad 250mm f/5.6 Sonnar T* lens, and the images are extremely good at f/6.8.
However, owing to vignetting, the version 2 Leica lens should be stopped down to f/6.8 (on a full frame camera) when there is much sky in the picture. Other than vignetting, the Type 2 version 250mm f/4 Telyt-R lens is as good as the 300mm f/4.5 ED Nikkor in many respects. And it is smaller.
On crop sensor cameras such as Fuji X or Micro 4/3, the Leica 250mm f/4 T2 lens can take good pictures at f/4.8, and excellent pictures at f/5.6.
Leica APO tele lenses have not been reviewed, in large part due to their high cost. In addition, older lenses like the non-apo Telyt-R Type 2 lens may be less likely to have distracting bokeh fringing.
Hasselblad 250mm f/5.6 Zeiss Sonnar T* (Hasselblad V Mount)
Unlike many tele lenses, the Hasselblad 250mm f/5.6 Zeiss Sonnar T* is sharp wide open, and has almost no color fringing when stopped down only half an f-stop. In fact, it is diffraction limited in the center (showing an Airy disk and diffraction rings) at f/6.8 and slower apertures. The 250mm f/5.6 Sonnar is physically a little longer than the Leica 250mm f/4 Telyt-R Type 1 lens covered above, but it is also lighter. Many aspects of performance are similar to the version 2 Leica 250mm f/4 Telyt-R.
At all apertures, the 250mm Sonnar slightly outperforms the Leica 250mm Telyt-R Type 1, with the greatest differences being between f/5.6 and f/8. The 250mm Sonnar provides a very good lunar image on Micro 4/3 at f/6.8, meaning that the larger size of the Leica M9 pixels may often be the limiting factor for resolution with this lens.
On some occasions, I've used the Zeiss 250mm f/5.6 Sonnar even more than the excellent Leica 250mm Telyt-R Type 1 lens, but later used the 250mm Telyt-R Type 2 lens more than the Sonnar. The Sonnar was favored partly due to its lighter weight.
The 250mm Sonnar can be used on a Leica M camera by means of a Hasselblad to Nikon F adapter, which is in turn used on a Nikon F to Leica M adapter. The Zeiss 250mm Sonnar T* lens has less flare than either of the Leica 250mm f/4 Telyt-R lenses, while the non T* version of the Sonnar has about the same amount of flare as the 250mm Leica lenses.
Repackaging: The Zeiss 250mm f/5.6 Sonnar lens can be used without modification by simply adding adapters, but a notional custom version (or alternate commercial version) is mentioned below because this may be one of the easiest existing high performance lenses to "repackage" as a Leica M lens.
Of the many existing lenses out there, the Zeiss 250mm f/5.6 Sonnar may be the most practical lenses to "repackage" in a slender barrel for use on a Leica M camera. This is partly due to the small physical diameter of its optics. Such a lens could have a low profile tripod mount, take E55 filters, and have an outer barrel diameter similar to that of the Leica 90mm f/2 APO Summicron ASPH.
If the 250mm Sonnar is packaged in a barrel having a focus mechanism diameter smaller than that of the Hasselblad version (possible because the leaf shutter and larger rear element sizes are not needed for a Leica M), while also retaining the 2.5m minimum focus distance of the original, it could be very useful for an M lens with excellent reach, while retaining a reasonably small physical size. The physical size of a customized 250mm Sonnar lens could be even smaller if the optics were slowed to f/6.3 and the barrel was collapsible.
While I previously was of the opinion that a slower (f/6.3), compact version of a 250mm lens may be best for a Leica M, f/5.6 has proven to be a useful aperture on a number of occasions when using the 250mm Telyt-R lens, so sticking with the original f/5.6 aperture of the Sonnar lens may be best. This will provide high performance at f/5.6 without carrying around the extra weight of a 250mm f/4 lens.
If the Zeiss 250mm Sonnar T* lens is ever packaged as a Leica M lens (either by Leica or as a Zeiss ZM lens, etc.), it would be preferable if it had rangefinder coupling, even though the Leica rangefinder would not be particularly accurate at this focal length. If the infinity stop is properly calibrated, it can provide accurate results on distant subject matter, and the Leica rangefinder patch could be used for centering the subject in much the same way described for the 400mm f/5.6 ED Nikkor lens in an earlier section of this document.
The Zeiss 250mm f/5.6 Sonnar T* lens has the advantage of good central and edge sharpness over a field even larger than the 35mm format, along with the advantage of being a time tested design.
A simpler and lighter alternative (for a compact long focal length Leica M lens) would be a slower 240mm to 320mm lens, such as a collapsible 250mm f/11 lens I once designed. The collapsible lens design consisted only of an achromatic doublet and two field flattening corrector lenses, but had a small physical size (when collapsed) about the same as that of the 135mm f/4.5 Hektor lens. Since there are obvious limitations to a maximum aperture of f/8 to f/11, the 250mm f/5.6 Sonnar is a good compromise between performance, speed, size, and weight.
I have long considered 240mm to 250mm to be the minimum focal length that can provide good images of details on the moon with a full frame camera, even when resolution is limited only by the camera pixels. A focal length of 300mm to 320mm would be even better for this. A good 400mm lens provides an even better lunar image, but 400mm is too long for many other subjects.
The object is to propose a single longer focal length lens for the M. If only a single longer lens is available for the M, a focal length between 240mm to 320mm would be a good compromise. Another possibility would be matched 1.4x and 2x tele-converters for the 135mm f/3.4 Apo Telyt-M lens, though these may not provide as sharp an image as a longer focal length prime lens. Side exterior views of some of my proposed 180mm, 240mm, and 320mm Leica M lenses are in Appendix L.
Leica 280mm f/4.0 APO Telyt-R (Leica R Mount, Not Tested)
The Leica 280mm f/4.0 APO has not yet been tested or reviewed. If it is reviewed, it will be tested head to head with the Leica 250mm f/4 Telyt-R (Version 2) and the 300 f/4.5 ED Nikkor. Resolution, fringing, color, and vignetting at f/5.6 and faster will all be compared and evaluated. The ED Nikkor is excellent at f/5.6 and as good as it gets by f/6.8, so it will be hard to beat. The main shortcoming of the Nikkor is the lack of an infinity stop. None of the long focal length (200mm or longer) f/2.8 lenses will be tested here because their outer diameters can be large enough to block the Leica M viewfinder.
Nikon 300mm f/4.0 ED-Nikkor AF (Nikon F Mount)
TBD
Nikon 300mm f/4.5 ED-Nikkor (Nikon F Mount)
The Nikon 300mm f/4.5 ED Nikkor has internal focusing and a very solid rotating tripod mount. It is sharp at wide apertures, but wide open, it is not as sharp in the center as the newest non-APO version of the Leica 250mm f/4 Telyt-R is at the same aperture. At the edge of the frame, the 300mm ED Nikkor does better at a given f-stop. The minimum focus is about 2.5 meters, which is adequate for many subjects.
Even though the new version Non-Apo Leica 250mm lens and the Hasselblad 250mm Sonnar lens are used for most subjects, I find myself resorting to the 300mm ED Nikkor when photographing subjects such as earthshine on the crescent moon that reveal chromatic aberration in the other lenses. Here, the ED Nikkor at f/5.0 to f/5.6 does as well as the Leica or Hasselblad lenses do at f/6.3 to f/6.8. Being able to use the lens at up to a full f/stop wider aperture is important for dim subjects that are next to small highlights which reveal strong chromatic aberration when a given lens is used at too wide an aperture.
The 300mm Nikkor would be used instead of all other lenses in the 250 to 300mm focal length range if it was not for the slightly sharper central resolution of the newer Leica 250mm lens, the smaller envelope of some of the other lenses, and the fact that the 300mm ED Nikkor lacks an infinity stop. The extra resolution of the Leica 250mm f/4 Version 2 lens gives a digital picture some extra snap in situations that do not make its chromatic aberration obvious. The Leica lens is also a little smaller, though it is heavier.
The 300mm f/4.5 ED Nikkor provides really good images at f/6.8, which is almost a full stop faster than the f/9 aperture at which the longer 400mm f/5.6 ED Nikkor provides similar image quality.
Pentax 300mm f/6.3 Tele-Takumar (Pentax M42x1 Screw Mount)
The Pentax 300mm f/6.3 Tele-Takumar was not one of the better efforts by Pentax, but its light weight makes it a useful lens for the Leica M. It weighs a great deal less than the 250mm Leica lenses covered above, while providing 20 percent more focal length. The physical length with an M adapter is about 20 cm, and the maximum outer diameter is only 7cm. Like the 200mm Tele-Takumar, the 300mm f/6.3 is a pre-set lens. The f-stop range is from f/6.3 to f/32.
The 300mm f/6.3 Tele-Takumar has a tripod mount socket that can be spun around to different angles, or removed entirely. However, the knob that tightens the tripod mount rotational position is very large, and projects well below the bottom of the tripod mount. This prevents use of the lens on many large tripod heads - unless the large knob is replaced with a suitable metric screw (which is what was done).
The weakness of this lens is that it has strong color fringing and some other visible aberrations wide open, so it must be stopped down to f/8 to get reasonably good images, and to f/9.5 to get sharp images. The 300mm Takumar lens vignettes at wider apertures, but not as badly as the 200mm Takumar. This means that vignetting usually is not objectionable by f/8 to f/9.5. Since the above 250mm lenses can provide good results at wider apertures than this, I use either of the 250mm lenses a great deal more than this compact 300mm lens.
The filter size of the 300mm f/6.3 Takumar is 58mm, but E55 filters will not cause vignetting if used with a step down adapter ring. The minimum focus distance is way out there, at 5.5m. For portability and use in bright conditions, the 300mm f/6.3 Takumar is a reasonable compromise that costs less than the above 250mm f/4 Leica lens or the 300mm and 400mm ED Nikkor lenses covered below.
Leica 350mm f/4.0 Telyt-R (Leica R Mount)
The Leica 350mm f/4.8 is very large and heavy for a lens of its focal length and aperture. It weighs as much as several Soligor or Vivitar 350mm f/5.6 lenses, but it performs significantly better. It does not have much of an edge over the lighter 300mm f/4.5 ED Nikkor, however.
The 350mm f/4.8 is significantly bulkier than the 400mm f/5.6 ED Nikkor, but it provides central images with as less fringing than the 400mm when stopped down to only about f/6.8. The Leica 350mm lens does have considerable lateral chromatic aberration (LCA) at the edge of the field, but curiously, it does not seem to have a corresponding degree of longitudinal chromatic aberration. Details are in Appendix G, as are a few basic head to head comparisons with the 300mm and 400mm ED Nikkor lenses.
The industrial (e.g. ornamental) design of the 350mm f/4.8 lens is clearly paired with that of the 250mm f/4, version 2 Telyt-R. The 350 is not as sharp as the 250mm at a given f-stop, but its performance is acceptable in the center. LCA at the image edge is considerable compared to that of the 250mm f/4.
Various posts on the 350mm Telyt-R indicate that it may have strong vignetting at maximum aperture, and that it is not critically sharp until stopped down to between f/6.8 and f/9.5. These impressions have some basis in fact. Fortunately, central color fringing is fairly well controlled at f/6.8 (almost a full stop faster than the 400mm f/5.6 ED Nikkor), which makes it useful in lower light conditions.
It would still be nice to see a really good compact 320mm f/4.8 to f/6.3 lens that performs well and has minimal vignetting at full aperture. After all, there is no point in carrying around the extra weight of a fast lens if its maximum aperture is rarely if ever used due to mediocre performance. A few comparisons of resolution and fringing at f/5.6 are in Appendix H.
Soligor 350mm f/5.6 Pre-Set (M42x0.75 T2 Mount)
The Soligor 350mm f/5.6 Pre-Set lens is extremely lightweight and focuses down to about 5 meters. It performs better than most Soligor and Vivitar tele lenses in the 300mm to 400mm range, though it is not quite as sharp as the physically longer Soligor 450mm f/8 lens.
The Soligor 350mm has not yet been used on the Leica M9 for purposes other than testing, but test results over the 35mm format are comparable to the Hasselblad 350mm f/5.6 Tele-Tessar T* lens. The shortcomings of the 350mm Soligor are its small and somewhat flimsy tripod mount, and the presence of fringing until it is stopped down to f/9.5. It is possible that the Soligor 350mm will later see as much use as the 400mm f/5.6 ED Nikkor because both must be stopped down to f/9.5 for really good results, and 350mm often seems to provide a more pleasing composition than is the case for a 400mm.
A 320mm to 360mm focal length is just about right when the full frame is used, while 400mm is often a bit tight. If a photo is cropped to a 16:9 aspect, a 320mm focal length would be closer to optimum.
Nikon 400mm f/5.6 ED Nikkor (Nikon F Mount)
The Nikon 400mm f/5.6 ED Nikkor lens has a lot of reach, and was used for some of the hawk pictures in this web page. It performs best when stopped down to about f/9.5, though I have gotten good results at f/6.8 on some occasions. As with the 180mm Nikon lens, it can be used on the Leica M9 via an adapter. It will not be rangefinder coupled, but the same hardware and techniques as mentioned for the 180mm Nikon lens can be used to frame and focus at long subject distances.
The difference with the 400mm lens is that the Leica M9 rangefinder patch closely approximates the field of view. The position and size of the tripod socket on this lens is relatively optimum for reducing camera shake from the Leica M9 shutter. The 300mm f/4.5 ED Nikkor is also a good lens. Like the 400mm Nikkor, it has to be stopped down to about f/9.5 for really sharp results.
Of the long focal length lenses listed here (not counting telescopes), the 400mm ED Nikkor lens has consistently provided the best lunar images when used on the Leica M9 or Micro 4/3 cameras, provided that it is stopped down to f/9.5. This may be due in part to the reduction in camera shake that is provided by its relatively large tripod mount. The user-adjustable infinity click stop may also help.
The runners up for good lunar images are the 450mm f/8 Soligor (not described separately) and the 500mm Tele-Tessar noted below. Both of these other lenses must be used at slower f-stops than is the case for the 400mm f/5.6 ED Nikkor. Camera shake is the main thing that limits resolution with the other lenses. The 350mm f/4.8 Telyt-R lens has not yet been used for lunar images due to local weather.
Tamron 400mm f/6.9 Nestar (M42x0.75 T-T2 Mount)
The old Tamron 400mm f/6.9 Nestar is noted because it can collapse down to only 18 cm long, not counting the camera adapter. Combined with a 62mm filter size, this makes the lens small enough to fit in some older Leica hard leather gadget bags.
If the stowed length is not important, Tamron also made f/6.8 and f/7.5 non-collapsible versions. Even wide open, these slower Tamron lenses, if at least single coated, will usually provide sharp, high contrast images compared to the faster 400mm f/6.3 lenses by Astranar, Spiratone, etc.
The only shortcomings are that light falloff (vignetting) in the corners is severe enough that it will be obvious at the Pull 80 ISO setting when the aperture is wider than about f/16. The tripod mount surface is also tiny, which can lead to camera shake.
EXTREME TELE LENSES (Longer than 500mm)
Nikon 500mm f/5 Reflex Nikkor (Nikon F Mount)
The 500mm f/5 Reflex Nikkor deserves mention because it provides a lot of aperture and a reasonable f/ratio, while still being relatively light and portable. It does not focus as close as smaller f/8 mirror lenses (closest focus is 15 meters), but it has the light grasp to capture a distant subject in dimmer light than many other lenses, but without the weight, price tag, and chromatic aberration of the large aperture ED Nikkor and Canon lenses. However, diffraction from the large (almost 50 percent diameter) central obstruction limits resolution to less than what the refracting lenses can provide when they are stopped down. The 500mm f/5 Reflex Nikkor was used for one of the nebula photos in the astrophotography section of this document. Unlike smaller 500mm f/8 mirror lenses, there usually are not camera shake issues when the f/5 Reflex Nikkor is used on a stable tripod (Gitzo Studex or larger).
Hasselblad 500mm f/8 Zeiss Tele-Tessar (Hasselblad V Mount)
The Hasselblad 500mm lens is mentioned because its weight and the position and size of its tripod socket is relatively optimum for reducing camera shake from the Leica M9 shutter. This lens works well and has very little fringing if stopped down to about f/13. At f/13, the 500mm Tele-Tessar provides a better image than do the 500mm Reflex Nikkor lenses. In addition, the back focal distance of the Tele-Tessar lens is long enough that it is theoretically possible to adapt it to the front of the Visoflex III and still achieve infinity focus, though the back plate of the adapter would have to be thin. A thin adapter such as this does not yet exist, but is mechanically possible.
The fact that this lens actually gets used even when it has to be stopped down to f/13.5 (less than 40mm aperture) for really good results, it shows that a slow (and thus smaller) long focal length lens would be useful. Then, one would not be carrying around the bulk of an f/8 lens when an f-stop of 13.5 is the fastest that may be used in practice.
Leica 560mm f/6.8 Telyt-R Follow Focus (Leica R Mount)
TBD
Soligor / Tokina / Vivitar 600mm and 800mm f/8 "Stovepipe" Lenses (T2 Mount)
These lenses are mentioned because some versions have only two air to glass surfaces, providing high contrast and color saturation that is difficult to find in a long lens. The physical length of this type of lens is about equal to the focal length, but most versions can be separated into two shorter parts for transport.
The 800mm 2-element version in particular has a section just in front of the focus ring that can be replaced with a shorter custom part, to increase back focus distance for compatibility with the Leica Visoflex and other flip mirrors. The 800mm usually has some spherical aberration wide open, but it is reduced significantly at f/9.5. Some samples produce diffraction limited on-axis images at f/13, while others have to be stopped down to f/16. An 800mm Soligor was my first "good" telescope in 1979.
The long physical length of these 600mm and 800mm lenses usually means that something in addition to the tripod supporting the lens must be used to stabilize the camera body in to prevent visible camera shake in the image.
TELESCOPES
Borg and Takahashi ED and FL Telescopes up to 90mm Aperture
Small fast f:ratio ED and FL refractor telescopes, including those made by Borg and Takahashi, can be used to advantage on Leica M cameras, provided that they are used with appropriate field flatteners and an infinity focus reference is incorporated. Many Borg telescopes have calibrated helical focusers that can be used to obtain a repeatable infinity focus setting.
Focal lengths of some of these telescopes are short enough that the Leica rangefinder patch can be used in acquiring a subject, assuming that an adapter with a modification similar to that described for the 180mm f/2.8 ED Nikkor lens is used. Larger aperture telescopes can also be used, but their outer diameters may be large enough to obstruct the Leica M viewfinder.
Borg 76ED (76mm Aperture f/6.6 500mm FL; 540mm f/7.1 w/field flattener)
The Borg 76ED is a 76mm f/6.6 two element refractor telescope. It has some field curvature, but it is suitable for some types of photography with crop sensor cameras. For full frame cameras it is best to use Borg 1.08x field flattener. When used with the field flattener, the Borg 76ED works as a 540mm focal length f/7.1 telescope. The 76ED with the field flattener has excellent wide field photographic performance, both for terrestrial (wildlife, etc) photography and astrophotography. (Most astronomical photos in my separate Fujifilm X camera system review web page were taken with this telescope.)
Meade 2045 (1,000mm f/10) Telescope with Equatorial Fork Mount
The Meade 2045 Schmidt-Cassegrain telescope (not pictured) was made many years before the newer computer controlled ETX telescopes. There has been considerable variation in the optical quality of the 2045 over the years. The best samples have been diffraction limited, while the worst sample resolved only to about 20 arc seconds, which is over ten times worse than the best sample.
A good Meade 2045 is preferred over the ETX for astrophotography with a Leica M8 or M9 because it is easier to align, and because its metal fork mount is solid. It is not very fussy about counterbalancing even for piggyback photography. Most required AC power, though some of the later LX versions could run on 12 Volts DC.
The very earliest versions of the Celestron 5 (C5) telescope were almost as portable as the Meade 2045, but by the mid 1970's, Celestron used the larger C8 motor base for the C5, which made it less portable.
Questar 3.5 (1400mm f/15.7) Telescope with Equatorial Fork Mount
As of when this was written, the Questar 3.5 telescope (shown in the astrophotography section) is the only telescope I have actually used with the Leica M9. This is due in part to its built-in flip mirror, which permits checking to see that the subject (usually the moon) is staying in the field of view. I use a Micro 4/3 and APS format cameras on telescopes more often than the Leica M9, mainly due to available (even built-in) EVF finders for Micro 4/3 and other cameras.
For its size, the Questar 3.5 is one of the most expensive telescopes ever made, but compared to the cost of a digital Leica M camera or some Leica M lenses, the price does not seem out of line.
Much like the Leica M camera, it is a pleasure to use a Questar for visual applications, though it is not quite as fun to take pictures through one. A Gitzo Studex tripod with a large head is adequate for visual use of the Questar, but a larger tripod (such as a large Davis and Sanford) is better for photography. The Duplex Questar can be removed from its mount and used directly on a tripod for terrestrial photography.
The mount of the Questar telescope is a little less stable than the Meade 2045 or Celestron 8 mounts, in that accurate sidereal tracking is very fussy about the use of proper counterweights. Because if this, it is somewhat painful to set up for piggyback photography. In addition, special accessories are required because the Questar does not use the same camera or eyepiece interfaces as other telescopes. (Back when I could do machining, I made my own accessories that were faster and easier to use.)
Since the late 1980's, the Questar sidereal drive has been battery powered, requiring only a single 9-volt battery to run it for up to 24 hours. This battery powered drive can be retrofitted to older Questar 3.5 telescopes by Questar, but at considerable cost.
Celestron 8 (203mm f/10) Telescope, Equatorial Fork Mount Version
The Celestron 8 Telescope, or "C8" (not shown), particularly the early version that is not computer controlled, is a good, simple way to get into astrophotography with the Leica M9. Unlike the computer controlled altitude over azimuth telescopes, a Celestron 8 with equatorial fork mount, wedge and tripod can be used (with a piggyback camera adapter) as a platform for piggyback photography that will not have field rotation. The telescope itself can be used for good lunar and planetary photos, but dust on the camera sensor will be more obvious in such pictures due to the required slow f/ratios (f/10 and slower).
There are some parallels between the simplicity of using the Leica M9 and the simplicity of using a telescope that is not computer controlled. A simple telescope like the early C8 can make it easier to get into the basics such as observing and photographing the moon and planets, plus piggyback photography. However, more advanced activities, such as locating dim nebulae using star charts and setting circles, or photographing nebulae through the telescope, may be more difficult for some than it would be with a newer telescope. A C8 has 203mm of aperture, so it is about twice the diameter of the 89mm aperture Questar telescope shown in the astrophotography section.
Conclusions: Which of the Above Non-M Mount Lenses Actually Get Used the Most?
To date, the 250mm f/4 Telyt-R, Version II is the most frequently used lens that is not originally Leica M mount. It was acquired more recently than the other lenses, so it could end up being used less over time. The 250mm gets used more than the 400mm ED Nikkor because color fringing is well controlled at f/6.8 (rather than f/9.5) and because it is more portable and has an adequately long built-in lens hood. On the Leica M9, this 250mm lens is used with a customized adapter that sets the Leica rangefinder and parallax correction to infinity. Scale focusing at closer distances has sometimes worked as well.
The next most often used lenses are the Samyang 8mm f/3.5 fisheye (but now more often the Samyang 12mm f/2.8 full frame fisheye), the Voigtlander 180mm f/4 APO Lanthar, the 180mm f/2.8 ED Nikkor (for low light) and the 400mm f/5.6 ED Nikkor. Most of the other tested lenses are seldom used on the Leica M9, though a 600mm f/8 Vivitar is occasionally used with a Micro 4/3 camera. A 350mm f/4.8 Telyt-R lens was acquired more recently, but it has not been used as much as the ED Nikkor lenses due to its size and weight.
It is worth noting that the tele lenses longer than 180mm, including the fast ones, are rarely used at f-stops faster than f/5.6. This is mainly due to inadequate wide aperture performance. Therefore, it is my opinion that the Leica M system could benefit from compact slower f/ratio lenses up to about 320mm focal length, provided that the lenses are sharp and have under 1/3 stop of vignetting at maximum aperture. Such compact lenses, if sharp at full aperture, could be used at the same f/ratios that I use with the exising comparatively large lenses reviewed above. A few specific compact lenses (180, 240, and 320mm) are proposed in Appendix L, below.
ACCESSORIES
Visoflex III, Peak Magnifier, and Other Widgets.
The Leica Visoflex III converts the Leica M9 into a Single Lens Reflex (SLR) camera. It will accept the eye level prism shown in the photo, or a simpler chimney finder for critical focusing. This was usual way to use long focal length or macro lenses on a Leica M until the Leica electronic eye-level viewfinder (EVF) attachment was introduced for the Leica M240 and later model digital M cameras.
For more accurate focusing, I use a 15x Peak magnifier with the Visoflex. Even though the 15x Peak magnifier does not actually attach to the Visoflex (though it can with a simple adapter plate), it is a good way to see the focusing screen under higher magnification for critical focus. The Visoflex is relatively old, its calibration should be checked if you don't get sharp images. It should also be cleaned and inspected prior to mounting on a Leica M9.
Leica has long made focusing adapters to use lenses such as the 135mm f/4.5 Hektor on the Visoflex, but the adapters I've seen to date appear to be for older units than the Visoflex III. The same focusing adapters can also be used with other lenses (if they are adapted) for use at various subject distances. Photographic enlarging lenses can be ideal for macro work. Among the tested enlarging lenses, I've found Schneider Componon lenses to be quite sharp at relatively moderate (f/6.8~f/9.0) apertures.
Filters
While not a camera lens, filters deserve some mention. Even with a digital camera that has white balance, there are still times that filters are useful. Brands of filters can be important, especially when they must fit the fine 39mm x 0.5mm pitch thread of many Leica lenses. Some manufacturers make 39mm filters with a coarse thread pitch that would damage the Leica lens threads if forced. After some research, I tried a B+W filter, and it fit fine. After that, I got only B+W UV (010) or clear (007) filters with MRC or Nano coatings for any lenses I leave filters on.
In digital photography, the quality of anti-reflection (AR) multi-coatings (MC) is more important than for film photography. This is because film is not a specular (optically smooth) surface that can efficiently reflect light back and forth between its surface and a filter. But the cover glass on a digital camera image sensor is. This increases susceptibility to flare and ghost images when filters are used.
Evaluating filter coatings: These days, some filters that are not multi-coated are marketed as though they are. I've measured some, and they reflect just as much light as an uncoated glass microscope slide, which is 3 to 4 percent per surface. A single coated filter reflects about 1.5 percent per surface, but side by side, some so-called MC filters reflect even more than the single coated filter. Using such uncoated (or improperly coated) filters is an invitation to veiling flare and ghost images. Good AR multi-coating reflects about 0.5 percent per surface, and the best coatings reflect even less than that.
One way to tell if a filter has good AR coatings is to compare it to Nikon L37C filter. The L37C has good enough AR coatings that it can used for a reference. Clear or UV filters with AR coatings that reflect significantly more light than an L37C can degrade image quality in many situations.
I've long used Nikon L37C filters (which have good AR coatings) to protect lens surfaces. However, when photographing the moon at night, I'd get a strong ghost image of the moon on the opposing side of the image, even with the L37C. This usually happens when overexposing the sunlit part of the moon to capture the earthshine, like that on some of the lunar images in this web page.
Fortunately, the MRC AR coatings of the B+W filters I've used so far have been enough better than the already good Nikon L37C coatings that the ghost images are not as objectionable. There are still occasions when a ghost image from MRC coatings is strong enough that I temporarily remove the filter. So far, B+W UV filters with MRC coatings have not had any adverse effects that I can detect on images of other subjects.
Suspected Counterfeit Filters: Durability of black finish on filter cells and filter adapters was not an issue decades ago, but it has become something to look out for in recent years. Some filters have metal cells, while others even use plastic cells. Among filters with metal cells, I've encountered many in which the black finish feels sticky, and even rubs off and soils cloth such as clothes or the inside of a camera bag. Cleaning the cell (not the filter) with alcohol often turns the cleaning cloth completely black, but after thorough cleaning, the cell ceases to be sticky and is still black, though usually a more glossy black.
I've encountered this delicate finish problem mostly with Chinese filters, but in 2013, even one high end 43mm B+W KSM CPL filter had the same sticky finish problem. I suspect that this filter was counterfeit, because fonts used in the nomenclature did not quite match that of a genuine B+W filter.
APPENDIX E: Comparison of Various 35mm and 40mm Lenses
This section shows side by side comparisons of a few lenses in the 35mm to 40mm focal length range. It is intended to quantify user impressions of images taken with four specific 35mm format lenses. Mini-reviews in previous sections indicated that the performance of certain lenses were not radically different in field conditions, so a few lenses are compared here. The lenses briefly compared are:
- Contax G Zeiss 35mm f/2 Planar T*
- Leica 35mm f/2 Summicron-M ASPH
- Nikon 35mm f/2 Nikkor-O (Nikon SLR lens)
- Voigtlander (VC) 40mm f/1.4 Nokton Classic, MC version
- Zeiss 40mm f/4 Distagon (for Hasselblad medium format)
Tests of 35mm and 40mm Lenses at f/5.6:
The purpose of the first test is to show which lenses can provide the best absolute results (as opposed to only which lenses are best at wide apertures), so the tests that follow are all at f/5.6 unless noted otherwise. The f/4 maximum aperture of the 40mm Hasselblad Zeiss Distagon is another reason that the tests are at slower f/ratios. The Hasselblad lens is included only to show what might be expected when comparing medium format digital cameras and their wide angle lenses to the Leica M9 with its moderately wide lenses. The distance to the subject is slightly less for the 35mm lenses (versus 40mm lenses) in order to provide a uniform reproduction ratio.
Images of central resolution are imaged on a 12 MP Micro 4/3 camera (Olympus E-P2), and are 100 percent crops, to display at the same subject scale as the enlarged Leica M9 crops. Leica M9 images are 142 percent crops (approximate), to allow for the way different browsers may display pictures, and to match the displayed image size with the Micro 4/3 camera, while keeping crops at 100 percent or greater. Edge resolution tests for lenses except the Contax G Zeiss 35mm f/2 are with the Leica M9. Micro 4/3 was used for the Contax G lens, since it is the only digital camera I have on hand that will work with the Contax G lenses. Edge resolution tests are for 16mm to 17mm off-axis, rather than at the extreme corners.
Comparison of 35mm and 40mm Lenses, all at f/5.6.
Sample pictures from two 35mm lenses and two 40mm lenses, all at f/5.6.
© Copyright 2013 Jeffrey R. Charles. All Rights Reserved.
 |
 |
| Contax G Zeiss 35mm f/2, center performance at f/5.6. Images in this column were taken with an Olympus E-P2 Micro 4/3 camera. |
Contax G Zeiss 35mm f/2, edge performance at f/5.6. Actual edge performance is a little better, since lens was translated and tilted for this image.
|
 |
 |
| Leica 35mm f/2 ASPH, center performance at f/5.6. Center performance of all lenses is similar when they are stopped down this far. Color balance differs from the Leica M9 images at right, which have a yellow-green color relative to the Olympus E-P2. |
Leica 35mm f/2 ASPH, edge performance. The out of round clock face (relative to Contax G 35mm lens image) shows the Summicron has some pincushion distortion. Color balance in this image was adjusted toward blue to reduce the relative yellow cast.
|
 |
 |
| Nikon F 35mm f/2, center performance at f/5.6. The Nikon lens had the lowest central contrast of the tested lenses, but it is not multi-coated. Shadow and mid range contrast was boosted a little here, by about the same amount that gets images from other older Nikon lenses to match the contrast of a newer Nikon AI multi-coated lens. Even with contrast enhanced a little, shadow areas still lack detail. |
Nikon 35mm f/2 Nikkor-O, edge performance. Other than being a little more washed out and having some green fringing on the left side of the clock bezel, the Nikon lens holds up about as well at f/5.6 as most of the other 35mm format lenses. Neither Nikon lens picture images small letters on the clock face with as much contrast as the other lenses. The Nikon lens costs considerably less than the others.
|
 |
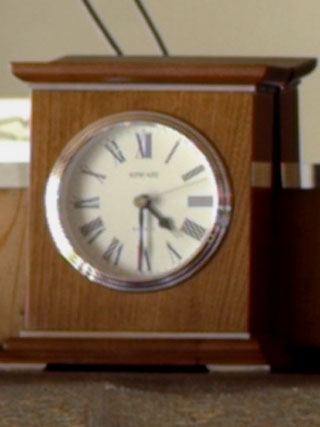 |
| Voigtlander (VC) 40mm f/1.4 Nokton Classic, multi-coated version, center performance at f/5.6. |
VC 40mm f/1.4 Nokton, edge performance. Some yellow BG fringing is visible left of clock.
|
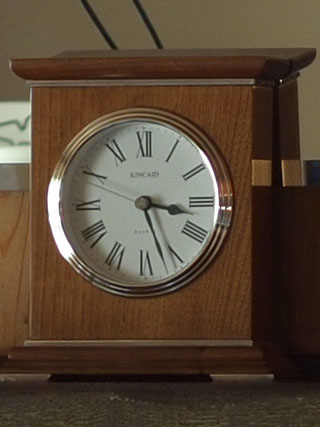 |
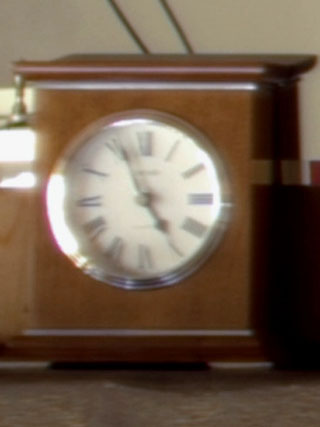 |
| Hasselblad Zeiss 40mm f/4, center performance at f/5.6. |
Hasselblad Zeiss 40mm f/4, edge performance. Edge does not get sharp until f/8 with this lens.
|
Photos above with 40mm lenses were imaged at the same distance from the clock as images in Appendix C that compare the Hasselblad-Imacon V96C digital back and the Leica M9. Photos above with 35mm lenses were imaged from slightly closer, to get the same image scale for the clock at the focal plane. Therefore, it is clear that the image sensor pixels, and not the central resolution of the 40mm lens, are the limiting factors in the Hasselblad and Leica M9 comparisons.
Center resolution at f/5.6 (photos to left in table above) is too close to call for most of the lenses, even in the 100 percent crops from an Olympus E-P2 Micro 4/3 camera with its small 4.3 micron pixels.
Most of the lenses above have slight barrel distortion, but the 35mm Summicron-M ASPH has slight pincushion distortion. The difference is visible above, where the clock face looks a little less round in the right Summicron picture, even though the focal plane is not far from being parallel with the clock face. Part of the difference is also because the 35mm Summicron is wider than a 40mm lens, so it would naturally expand features at the image edge slightly more than a 40mm lens would. The Summicron edge picture above was enlarged slightly less than the other edge samples in order to get the same subject matter into the 320 pixel width of the crop.
Tests of 35mm and 40mm Lenses at f/2:
The following compares the Leica 35mm f/2 Summicron-M ASPH at its maximum aperture of f/2, with the Voigtlander (VC) 40mm f/1.4 Nokton Classic lens, set at f/2. As above, photos with the 35mm lens were taken just enough closer to the subject for both original images to have about the same image scale. I did not have a way to get adequate wide aperture off-axis images from the Contax G 35mm lens, so it is not compared here. The following use a Micro 4/3 camera for the central images (the smaller pixels provide a better comparison), and the Leica M9 for the edge images.
Comparison of 35mm and 40mm Lenses, Both at f/2.
Sample pictures from 35mm and 40mm lenses, both at f/2.
© Copyright 2013 Jeffrey R. Charles. All Rights Reserved.
 |
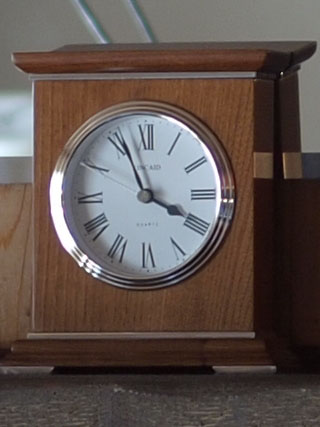 |
| Leica 35mm f/2 ASPH, center performance at f/2. Color looks bluer with both lenses at wide aperture. (100 percent crop) |
VC 40mm f/1.4 Nokton, center performance at f/2. Both images in this row taken with Olympus E-P2.
|
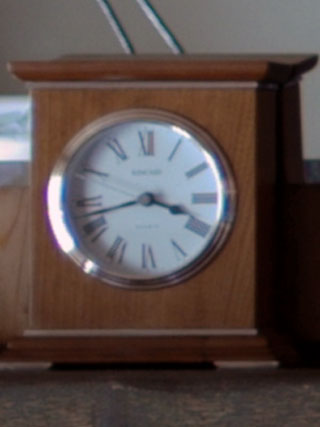 |
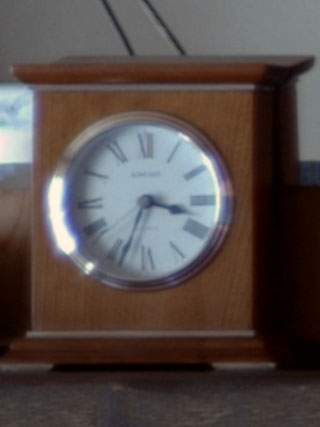 |
| Leica 35mm f/2 ASPH, edge performance at f/2. Slight distortion of circular clock face is evident. |
VC 40mm f/1.4 Nokton, edge performance at f/2. Both images in this row taken with a Leica M9.
|
Comparing the 35mm Summicron-M ASPH and the VC 40mm Nokton, center resolution even at f/2 (see above) is really close, maybe even too close to call. At the edge, the Leica Summicron ASPH has a decided advantage in terms of reduced fringing. Yet, with the exception of the Nokton having more fringing, plus a color tint on backlit background objects (all significant), the results even at the edge may at first appear remarkably close.
The apparent similarity in the results may be partly because resolution of high contrast details is surprisingly similar even at the edge. For example, in the edge pictures, either lens resolves the clock face numbers about as well as the other. However, a closer look shows that the 35mm Summicron ASPH does provide a better image, in that the numbers are imaged at higher contrast. It is here at the edge, at maximum aperture, where the Leica Summicron-M ASPH shows what it's got!
The Summicron provides a relatively zippy edge picture of the clock face, while The Nokton edge picture is more washed out, yet shows slightly better separation in the vertical and horizontal lines of the numerals.
The Summicron edge picture at left shows wood grain on the clock with good contrast, while this is more washed out with the Nokton. The Summicron also has less fringing on the upper left edge of the clock's wood and the left part of the chrome bezel. The Summicron also has virtually none of the purple cast that shows up on the right part of the bezel in the Nokton picture. In the background at the upper left, the Summicron images the defocused dark wire in the lamp with a more neutral color than is the case with the Nokton.
Both aren't bad even on the edge, considering that the edge samples are more than 100 percent crops, but the Summicron shows remarkably low fringing or other artifacts at the edge.
In both edge pictures (shot as in camera JPEGs with the Leica M9), contours are visible in the grayish background above the clock. These became visible after processing out a cyan cast in the originals, in order to get a reasonable color match to the central pictures that are from a Micro 4/3 camera.
Bokeh at f/2 for slightly out of focus details (reflection of wires above clock) is better in the Summicron in the center, but better with the Nokton at the edge. Bokeh farther in the background (wire in reflection of lamp shade left of clock) is better with the Nokton in the center, but better with the Summicron at the edge.
It is possible that the surprisingly good f/2 edge performance of the Nokton (unless compared to the Summicron!) is in part due to the lack of an oversized rear element in the Nokton. The rear element of the f/1.4 Nokton is smaller than the f/2 Summicron rear element, but farther from the focal plane. The smaller rear element of the Nokton may clip the aperture enough to prevent many aberrations that would otherwise be visible if the aperture of the Nokton was not clipped at the edge as much as it is at f/2.
It is also easier to design a good 40mm focal length lens that covers the 35mm format than it is to design a good 35mm focal length lens for the same format. The 40mm f/1.4 Nokton having better performance than the 35mm f/1.4 Nokton shows this to a degree, though the rear element of the 35mm VC Nokton is oversized more than that of the 40mm.
Also, for decades, camera manufacturers have used lenses of 38mm or longer equivalent focal length in point and shoot cameras, with few offering a 35mm equivalent focal length until relatively recent times. Examples in film cameras are the use of 38mm to 45mm lenses in fixed lens cameras by Rollei, Petri, Olympus, Konica and others. In zoom film cameras, an example is the 38-135mm zoom in the Canon Photura 135. In digital cameras, the earliest models also had a 38mm or longer equivalent focal length lenses. In addition, many of the earliest zoom lenses for digital point and shoot cameras also did not get as wide as a 35mm equivalent for years, with only a few early exceptions.
Thus, a non-retrofocus 40mm (or equivalent) focal length lens is something that many camera manufacturers have more experience working with, even though it often seems to be a less useful focal length than 35mm. Leica has made lenses in the useful 35mm focal length for decades, and it shows in the image quality from Leica 35mm lenses.
Leica 35mm f/2 Summicron-M ASPH Lens
Leica 35mm f/2 Summicron-M ASPH lens, shown at f/2 and f/4.
© Copyright 2013 Jeffrey R. Charles. All Rights Reserved.
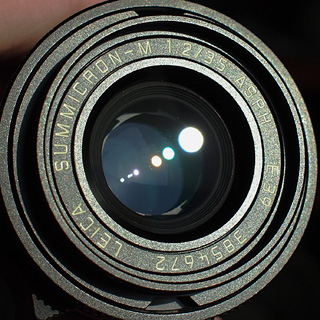 |
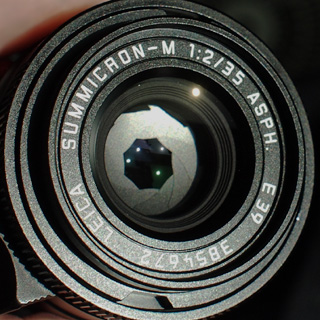 |
The Leica 35mm f/2 Summicron-M ASPH lens has good central and edge resolution even at full aperture, but must be stopped down to about f/2.8 to control fringing on slightly defocused background objects, and to f/4 to control fringing on backlit subjects near the edge of the frame.
LEFT: The front and rear elements of the 35mm Summicron-M ASPH are oversized to reduce clipping of the aperture by the lens barrel in off-center parts of the image. Here, the aperture is set to f/2. At f/2.8, mechanical aperture clipping is almost eliminated. Anti-reflection coatings on the Summicron reflect white light more brightly than many contemporary wide angle VC and Zeiss ZM lenses, with a couple of surfaces behind the iris having the brightest reflections, and the front element having among the dimmest. The small round reflections are of the sun. The lens has relatively little veiling flare under most conditions. However, it does have some local flare on the side of the image opposing a bright light source.
RIGHT: At f/4, the iris blades have a slight inward curvature that serves to reduce the intensity of diffraction spikes, though not to the extent that would result from an odd number of aperture blades that are more strongly curved, such as those in the Contax G Zeiss 35mm f/2 Planar lens.
|
Voigtlander (VC) 40mm f/1.4 Nokton Classic Lens
Voigtlander (VC) 40mm f/1.4 Nokton Classic lens, shown at f/1.4 and f/2.8.
© Copyright 2013 Jeffrey R. Charles. All Rights Reserved.
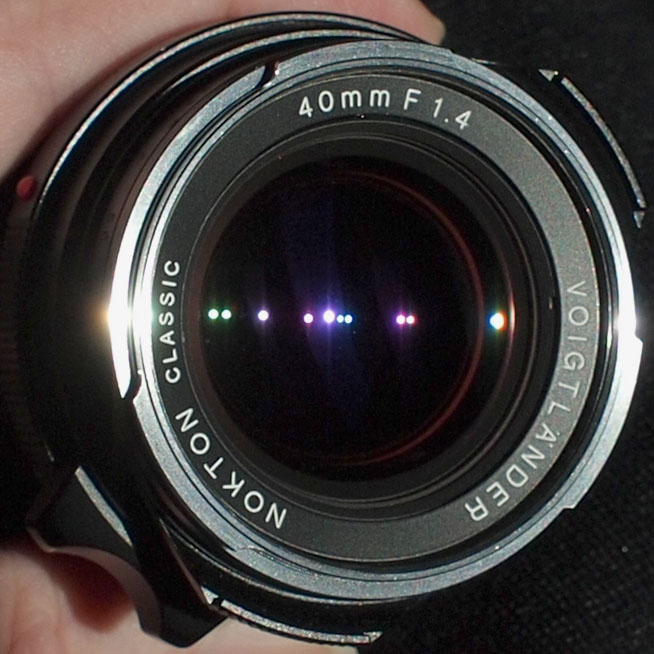 |
 |
The Voigtlander (VC) 40mm f/1.4 Nokton Classic lens provides good central resolution at f/1.7, but at a given f-stop, its edge performance is not as good as the as the Leica 35mm f/2 Summicron-M ASPH. The Nokton image gets reasonably sharp at the edge by f/3.4, but fringing on backlit objects is visible unless the lens is stopped down past f/4. In defocused backgrounds, thin black features may appear to have a green to yellow cast until the lens is stopped down past f/5.6.
LEFT: The front and rear elements of the VC 40mm Nokton are not oversized as much as in the 35mm f/2 Summicron-M ASPH, so more mechanical aperture clipping by the lens barrel occurs in off-center parts of the image with the Nokton. Here, the aperture is shown at f/1.4. Mechanical clipping of the aperture occurs at the picture edges until the lens is stopped down to about f/3.4.
RIGHT: At all apertures except wide open, the operative edges of all 10 iris blades are straight. Here, the aperture is shown at f/2.8.
|
Flare in 35mm Leica Summicron-M ASPH and Voigtlander (VC) 40mm f/1.4 Nokton Lenses
Local flare in Leica 35mm f/2 Summicron-M ASPH and Voigtlander 40mm f/1.4 Nokton lenses.
© Copyright 2013 Jeffrey R. Charles. All Rights Reserved.
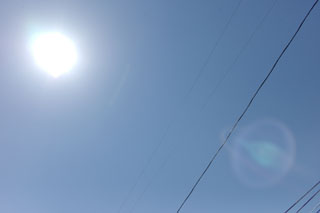 |
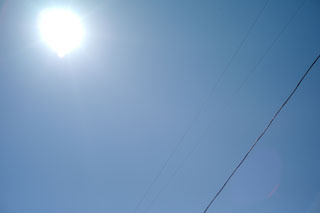 |
| The Leica 35mm f/2 Summicron-M ASPH lens has relatively strong local flare on the part of the image opposing a bright light source. Even on the bright daytime sky, a ring shaped flare artifact appears at lower right. There is also a small, dim, arc between the sun (upper left) and the center of the picture. |
The Voigtlander (VC) 40mm f/1.4 Nokton Classic lens produces only dim local flare opposing a bright source, which is just barely visible as a small and slightly brighter area at lower right. While not obvious in this picture, the 40mm Nokton has more veiling flare than the Leica 35mm Summicron ASPH lens.
|
In summary, many Leica M lenses, and some other lenses that fit the Leica M mount, are quite good. Center resolution examples above were imaged with a Micro 4/3 camera having a small 4.3 micron pixel interval, yet it is still difficult to tell the difference between tested lenses at the image center. Edge performance differs significantly.
Since some pictures on this web page hold up when doubled in size (i.e. 200 percent crops), certain lenses would probably support a at least a 50 MP image sensor for the 35mm format. This is further illustrated by the fact that the pixel interval of the 12 MP Micro 4/3 sensor would produce close to 50 MP if enlarged to a 36mm x 24mm size. However, the larger pixels of an 18 MP camera are likely to have less noise or artificial artifacts from noise reduction processing.
Some of the high resolution results above show that the monochrome version of the Leica digital M can take full advantage of a variety of lenses. For now, I'd just like to see a color camera like Leica M9 have a low ISO mode that retains at least as much dynamic range in a color image as at the base ISO 160 setting, rather than increasing highlight clipping in the way the Pull 80 ISO setting does. A high dynamic range and low noise setting would be acceptable even if it was only the equivalent of ISO 25.
APPENDIX F: Comparison of Various 50mm Lenses
This section shows side by side comparisons of a few lenses in the 50mm focal length range. It is intended to quantify user impressions of images taken with a few specific lenses. Mini-reviews in previous sections indicated that the performance of certain other lenses were not radically different in field conditions. Unlike comparisons of other lenses, some of the differences in the 50mm lenses below are obvious even in field conditions. The lenses briefly compared are all in mint condition, and include:
- Leica 50mm f/1.4 Summilux-M ASPH
- Nikon 50mm f/1.4 Nikkor AIs (Nikon SLR lens)
- Zeiss 50mm f/2.0 Planar ZM
Tests of 50mm Lenses at f/1.4, f/2, and f/2.8:
Unlike the above section on 35mm and 40mm lenses, this section will compare only the central resolution of each lens, at least for now. The purpose is to show which lenses provide the best wide aperture results, as well as the best absolute results when stopped down. Tests that follow are for all lenses at maximum aperture, and range through performance when stopped down to f/2.8. The emphasis on this section is to assess performance for images having shallow depth of field.
The images showing central resolution are taken with a 12 MP Micro 4/3 camera (Olympus E-P2). The subject distance is 5m, so the reproduction ratio at the sensor is about 1:100. The clock face diameter is 8cm, which translates to about 800 microns (186 pixels) at the focal plane. The top 4 images are 67 percent crops. This display size won't quite show the full resolution, but it allows the crops to cover enough field to evaluate bokeh in background features. A Micro 4/3 camera is used because some of the 50mm lenses are so good that the relatively large pixel size of the Leica M9 would be the limiting factor for resolution. In comparisons below, the Leica 50mm f/1.4 Summilux-M ASPH images are shown on the left, with images from other lenses shown on the right.
The results here, as well as those in the lens reviews section (Appendix D) show that high lens performance can be a double edged sword. If a lens is not extremely well corrected, discoloration of defocused highlights (bokeh fringing) may well be obscured by the glow of spherical aberration and the blue to purple glow of uncorrected chromatic aberration. However, when a lens is so well corrected that its in focus image is sharp and has good contrast even at f/1.4, the relative lack of spherical aberration may make discoloration of defocused highlights somewhat more obvious than would be the case with a lower performance lens.
Comparison of 50mm Lenses, at f/1.4 and f/2.
Sample pictures from 50mm lenses, working at f/1.4 and f/2.
© Copyright 2015 Jeffrey R. Charles. All Rights Reserved.
 |
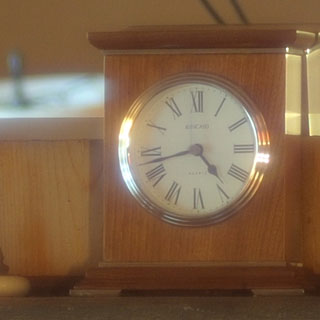 |
| Leica 50mm f/1.4 Summilux-M ASPH lens, center performance at f/1.4. In focus performance is amazing for such a fast f-stop, but there can be a slight green discoloration in certain types of defocused background features (such as the whiskers on a cat) that are not imaged here. All central resolution test images in this section are taken with an Olympus E-P2 Micro 4/3 camera. |
Nikon F 50mm f/1.4 AIs, center performance at f/1.4. The glow is real, and does not disappear until the lens is stopped down to about f/2.4. This image is at f/1.4, yet the background looks less defocused than in the left image, owing in part to the nature of the lens spherical aberration. This helps show why there may be more than a 10:1 difference in the price of camera lenses.
|
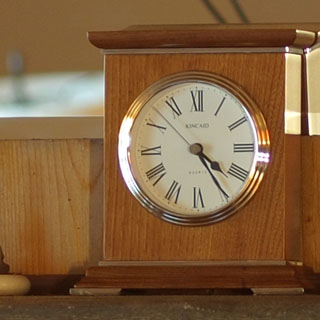 |
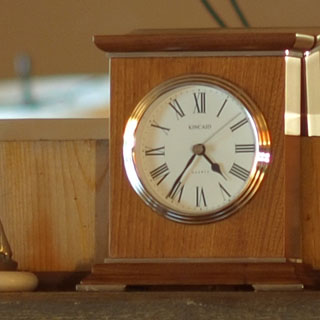 |
| Leica 50mm f/1.4 Summilux-M ASPH, center performance at f/2. The slight purple fringing visible around highlights at f/1.4 is significantly reduced, and image contrast is high. Stunning performance to say the least. Bokeh on the blur circle of the background highlight at left is neutral to excellent. |
Zeiss 50mm f/2.0 Planar ZM, center performance at f/2. The in focus image is almost as good as that of the Summilux, with the Zeiss showing only a little softness, and slight glow around only the brightest highlights. The blur circle on the background highlight shows only a slight outline. This improves by f/2.5.
|
Comparison of 50mm Lenses, all at f/2.8
Sample pictures from 50mm lenses, each working at f/2.8.
© Copyright 2013 Jeffrey R. Charles. All Rights Reserved.
 |
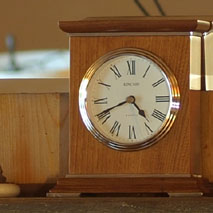 |
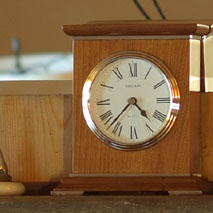 |
These pictures show that there is relatively little difference in the in-focus central image from the tested 50mm lenses, when used at f/2.8. All three examples are 44 percent crops.
The LEFT picture is an example of high central resolution with a Leica 50mm f/1.4 Summilux-M lens, when working at f/2.8. There are almost no color artifacts in the background at this aperture.
The CENTER picture shows that the Nikon 50mm f/1.4 lens does not exhibit any of the previously discussed "glow" when working at f/2.8.
The RIGHT picture is from a Zeiss 50mm f/2 Planar ZM lens, working at f/2.8. This lens provides good bokeh at f/2.8, but is subject to color artifacts on some high contrast backgrounds unless stopped down to about f/3.6.
|
In summary, many Leica M lenses, and some other lenses that fit the Leica M mount, are quite good. In terms of central resolution, both of the tested Leica M mount lenses completely blew away the Nikon SLR lens at apertures wider than f/2.8. Once f/2.8 is reached, the lenses all perform about the same, and by f/4, it becomes difficult to tell the difference between the images provided by any of them.
This shows that there is little point in making the investment in a Leica M lens unless high performance at wide apertures (such as for shallow depth of field images at normal focal lengths) is needed. However, if high performance at a wide aperture is needed, there presently does not appear to be a low cost option. You get what you pay for.
The above center resolution examples were imaged with a Micro 4/3 camera having a small 4.3 micron pixel interval. At some point, an SLR lens having a maximum aperture of f/1.8 to f/2 will also be compared, to see if such a lens has the "glow" that was exhibited by the f/1.4 Nikkor lens and a few of the other f/1.4 SLR lenses I've tested to date.
Pushing the envelope with a 50mm f/1.4 Summilux-M ASPH lens: Imaging the Moon up close!
Now that we've covered the basics, let's push the envelope on the central resolution of the Leica 50mm f/1.4 Summilux-M ASPH and image the moon up close! To obtain a large image of the moon, a Leitz 95x fluorite microscope objective was used behind the Summilux lens, just beyond focus, to enlarge its image.
A shorter than normal image projection distance from the microscope lens was used in order to keep the optical assembly size manageable, so the working magnification was 50x, providing a final working focal length of about 2,500mm (50 x 50). The camera was a Panasonic GX7, used because its EVF made acquisition and focusing easier. The final image is inverted due to the microscope lens being used to project the image onto the focal plane.
The vertical axis of the picture below includes just under half of the moon's diameter. The result does not compare to that of a good telescope, but it is quite good when you consider that the objective is just a 50mm camera lens!
Moon with 50mm f/1.4 Summilux-M ASPH. Image Enlarged using Microscope Objective.
Moon with 50mm f/1.4 Summilux-M ASPH. Image Enlarged using Microscope Objective.
© Copyright 2017 Jeffrey R. Charles. All Rights Reserved.
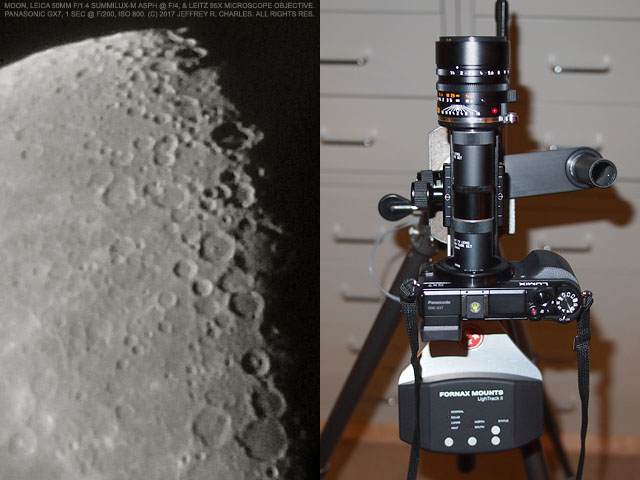 |
Using 50mm f/1.4 Summilux-M ASPH Lens as a "Telescope Objective" to Image the Moon!
LEFT: Moon, imaged by using the 50mm f/1.4 Summilux-M ASPH as a "telescope" objective lens, and enlarging the image via projection with a Leitz 95x fluorite microscope objective. This 15 percent is from a 1 second exposure at f/200 (working f-stop) with a Panasonic GX7 camera set to ISO 800. Since the microscope objective is not ideal for projecting images, red did not come to the same focus as green and blue in the final image, so the lens was stopped down to f/4 and focus was optimized for green. In post, the red (channel) was removed from the image data, and the remaining colors were converted to monochrome, then back to an RGB image. Since the f-stop was f/200, several dozen dust particles shadows were sharply imaged and had to be retouched out of the image.
RIGHT: To image the moon up close with the 50mm f/1.4 Summilux-M ASPH, a fluorite microscope objective was positioned behind the lens (in the pictured black tube), where it projected an enlarged image onto the camera focal plane. The assembled setup is mounted on a ball head, which is in turn mounted on a sidereal tracking mount, in this case a Fornax LighTrack II mount (made in Hungary).
|
Pushing the envelope even more with a 50mm f/1.4 Summilux-M ASPH lens: Imaging Saturn!
Now that we've covered the basics and acquired a close up of the moon, let's push the envelope even more on the central resolution of the Leica 50mm f/1.4 Summilux-M ASPH lens and image a planet! The test object is Saturn, which has an angular size smaller than even one Leica M9 pixel if it was to be imaged directly with the 50mm lens alone. To obtain a large enough image, the Leitz 95x fluorite microscope objective was again used behind the Summilux lens.
Normally, dozens planetary images would be stacked. Over 60 images were acquired, but the combination of seeing conditions and the odd way the GX7 handles image edges reduced the useful number of frames to only a few. Some aspects of this are seen in the way the lower right part of the rings sharpened up more than the upper left part. In fact, sharpening of the lower right edge was so sharp that the image looked phony, so a little blur was added back into that edge of the rings. The utilized GX7 also offsets the blue channel by a pixel or two, even in the center, regardless of the optics used. This was corrected in post.
Saturn with 50mm f/1.4 Summilux-M ASPH. Image Enlarged using Microscope Objective.
Saturn with 50mm f/1.4 Summilux-M ASPH. Image Enlarged using Microscope Objective.
© Copyright 2016 Jeffrey R. Charles. All Rights Reserved.
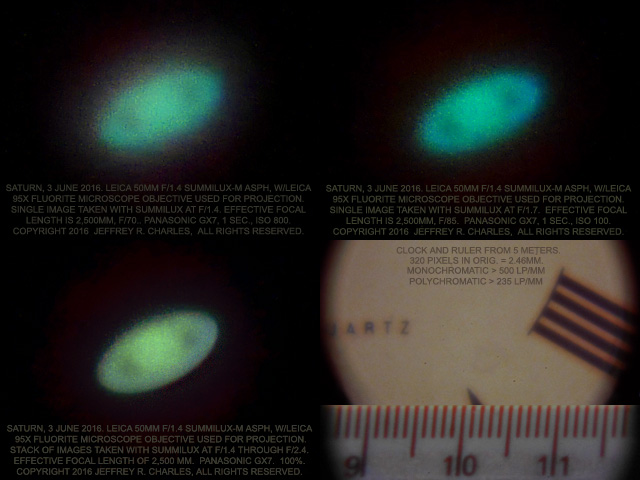 |
Using 50mm f/1.4 Summilux-M ASPH Lens as a "Telescope Objective" to Image Saturn!
Saturn, imaged by using the 50mm f/1.4 Summilux-M ASPH lens as a "telescope" objective lens, and enlarging the image via projection with a Leitz 95x fluorite microscope objective.
* Upper Left: Saturn imaged with Summilux-M ASPH lens set at f/1.4, for a working f-stop of 70. The inner ring edges show some definition, but the image has a few arc seconds of glow around it.
* Upper Right: Saturn, imaged with the lens set to f/1.7, for a working f-stop of 85. This image has less glow around it, but is shifted toward cyan to an extent that there is little red in the image.
* Lower Left: Stack of five different images, plus a monochrome image of the green channel from the sharpest single image, plus some sharpening. Original images were acquired at Summilux lens f-stops from f/1.4 through f/2.4, with ISO settings of 800 and 3200. Some low contrast ring detail was lost due to considerable noise reduction and asymmetrical sharpening in the GX7 camera.
* Lower Right: Separate images of a clock face and a ruler from a distance of 5 meters show that the Micro 4/3 format covered about 34mm, so the lens system provided a half scale image at the focal plane. The polychromatic resolution (before the microscope objective) exceeds 235 line pairs/mm. Monochromatic resolution (in the sharpest channel) exceeds 500 line pairs/mm. These high spatial frequencies are imaged at relatively low contrast, but at least they are resolved.
|
Under such high magnification, the color of the entire image shifts slightly as the lens is adjusted through focus. An example is the upper right image below, which has more cyan than the other images. This is partly due to what is informally referred to as "bokeh fringing" in another section. Different colors come to focus at slightly different longitudinal positions, and the color of the image visibly shifts as the lens is adjusted through focus. However, this is not anything to be concerned about in the present context. After all, we're using a 50mm camera lens to image a subject normally reserved for telescopes! The setup used to acquire the Saturn images is shown below.
Setup Used to Image Saturn with the 50mm f/1.4 Summilux-M ASPH Lens.
Setup to Image Saturn with 50mm f/1.4 Summilux-M ASPH and Microscope Objective.
© Copyright 2016 Jeffrey R. Charles. All Rights Reserved.
 |
Using Microscope Objective Behind 50mm f/1.4 Summilux, to Enlarge Image of Saturn:
To image Saturn with the 50mm f/1.4 Summilux-M ASPH lens, a fluorite microscope objective was positioned behind the lens, where it projected an enlarged image onto the camera focal plane.
* Upper Left: The microscope objective is held inside a set of C-mount extension tubes with a C-mount to RMS adapter and one custom made C-mount tube. The front of the assembly (foreground) is a Leica M to C-mount adapter, and the rear part is a C-mount to Micro 4/3 adapter.
* Upper Right: Assembly with 50mm Summilux on the front and a Panasonic GX7 camera on the back, with a bracket used to support both the camera and the front C-mount tube for better stability. The bracket is also useful for pointing the optical system.
* Lower Left: The assembled setup is mounted on a slow motion tripod head, which is in turn mounted on a sidereal tracking mount, in this case an AstroTrac TT320X.
* Lower Right: Wider view of the setup, showing a tripod and the AstroTrac (made in the UK).
|
APPENDIX G: Comparison of 135mm Focal Length Lenses: A 135mm Lens Shootout!
This section compares 135mm focal length Leica M mount lenses. As with other sections, this material is intended to quantify user impressions of images taken with specific lenses under similar conditions. A few lenses other than Leica M mount are also briefly covered for comparison.
The Leica mount 135mm lenses compared here are:
- 135mm f/2.8 Elmarit-M (with goggles)
- 135mm f/3.4 APO Telyt-M
- 135mm f/4.0 Tele-Elmarit-M
- 135mm f/4.0 Elmarit-M
- 135mm f/4.5 Hektor (M39 with M adapter)
The other lenses briefly compared are all Nikon SLR lenses:
- 135mm f/2.0 AI Nikkor (not AIs)
- 135mm f/2.8 AI Nikkor
- 135mm f/2.8 Nikkor Q
In general, all of the above lenses will provided an excellent image at f/8 or slower, so the emphasis of the comparisons will be at apertures wider than f/6.8.
The Nikkor lenses are included because they have differing imaging characteristics, and under certain circumstances, they can provide a better image than the newer Leica lenses. The difference is mainly one of flare. The Nikon lenses are comparatively well baffled, in order to prevent concentrated sunlight from reflecting off the rear part of the lens barrel when the sun is just outside the picture. Older Leica 135mm lenses were also well baffled, but the newer ones, including the 135mm f/3.4 APO Telyt-M, are not baffled very well at the very back.
TBD
APPENDIX H: Comparison of Various Long Focal Length Tele Lenses
This section includes descriptions and a few sample images from comparisons of selected tele lenses, most in the 180mm to 400mm range. It is intended to quantify user impressions of images taken with specific lenses. In addition, this section briefly describes the effects of atmospheric "seeing" on telephoto photography, and how this can limit the maximum practical focal length, especially with digital cameras.
Mini-reviews in previous sections indicated that the performance of certain tele lenses were not radically different in most field conditions, while others were. Some differences in the tele lenses below are obvious even in field conditions, at least when the images are compared side by side. The tele lenses briefly compared here are all in mint condition (except as noted), and include:
- Voigtlander SL 180mm f/4.0 APO Lanthar
- Leica 250mm f/4.0 Telyt-R, Type 2 (beat up, but optics clear)
- Nikon 300mm f/4.5 ED-IF Nikkor (scratched front element)
- Leica 350mm f/4.8 Telyt-R (light internal fungus)
- Nikon 400mm f/5.6 ED-IF Nikkor
- Tamron 400mm f/6.9 Nestar (collapsible 400mm lens)
Lenses above were among the best of the tele lenses reviewed in a previous section, so the present section is mostly a comparison of lenses that stood out from the rest.
COMPARISON OF SELECTED 180mm - 400mm LENSES:
In this comparison, it was interesting that the 250mm Telyt-R Type 2 lens is so sharp that it could still resolve about as well as most longer lenses up to 400mm, when its image was scaled up to match the size of the longer lens. The same was almost true of the Voigtlander 180mm f/4 APO Lanthar lens.
The comparisons were performed on a Micro 4/3 camera, partly because it has an EVF finder that can zoom in on the image for finding optimum focus, but mainly because smaller camera pixels (within reason) can better bring out differences between the lenses.
For a Micro 4/3 camera of 12 MP or more, resolution of a good lens will begin to visibly drop at f-stops slower than about f/8, owing to diffraction and the small pixel size. Here, where an f-stop slower than f/8 is shown, it is because the image is better than at f/8 due to a reduction in aberrations, in spite of the diffraction loss at f/9.5.
Most tests were performed with a 16 MP Panasonic GX7 camera, which has a relatively small 3.8 micron pixel pitch. With this camera, an additional variable of somewhat excessive in-camera noise reduction comes into play. Even with noise reduction at its lowest setting, some noise reduction still remains. This is telling in images from lower resolution lenses, since the noise reduction will often create a watercolor appearance that is worse in images that don't sharply resolve low contrast subject matter. The comparison images of yellow flowers (below) is one example.
Test results are shown as rankings for the lenses in each category, along with the maximum aperture at which acceptable (and very good) performance is achieved. Reduction of fringing is often what sets the maximum useful aperture. Highlight blooming has not yet been compared on a crescent moon.
The tests were originally going to be limited to 250mm to 400mm lenses, but performance of the 180mm f/4 APO Lanthar (once its infinity stop was properly adjusted) was so extraordinary that it had to be included. Later comparisons may incorporate the APO Lanthar and a Nikon TC-201 Tele-converter.
Center sharpness:
* 250mm f/4.0 Leica Telyt-R, Type 2 at f/4.8 (5.6)
* 180mm f/4.0 Voigtlander APO Lanthar at f/4 (5.6)
* 400mm f/6.9 Tamron Nestar at f/8 (11)
* 350mm f/4.8 Leica Telyt-R at f/5.6 (6.8)
* 300mm f/4.5 ED Nikkor at f/5.6 [OK at f/5] (6.8)
* 400mm f/5.6 ED Nikkor at f/6.8 (9.0)
Edge Sharpness (Micro 4/3):
* 180mm f/4.0 Voigtlander APO Lanthar at f/4 (5.6)
* 250mm f/4.0 Leica Telyt-R, Type 2 at f/4.8 (5.6)
* 300mm f/4.5 ED Nikkor at f/5.6 (6.8)
* 400mm f/5.6 ED Nikkor at f/6.8 (9.0)
* 350mm f/4.8 Leica Telyt-R at f/5.6 (6.8) Limited by LCA
* 400mm f/6.9 Tamron Nestar at f/8 (11)
Contrast and Flare Resistance:
* 400mm f/5.6 ED Nikkor at f/6.8 (9.0)
* 300mm f/4.5 ED Nikkor at f/5.6 (6.8)
* 180mm f/4.0 Voigtlander APO Lanthar at f/4 (5.6)
* 350mm f/4.8 Leica Telyt-R at f/5.6 (6.8)
* 250mm f/4.0 Leica Telyt-R, Type 2 at f/4.8 (5.6)
* 400mm f/6.9 Tamron Nestar at f/8 (11)
With the exception of the 180mm lens, test results are a mixed bag, with no lens being a clear winner when all criteria are considered. For example, the 350mm Telyt-R is good in the center at a relatively fast f-stop, while the Tamron Nestar can do almost as well in the center, but only at a slow f-stop. Then on the other hand, the 350mm Telyt-R has more lateral chromatic aberration (LCA) than any of the other tested lenses (and it doesn't get better by stopping down), while the Nikon lenses have less LCA.
Another consideration is that a lens much larger than the 250mm Leica Telyt-R V2 or 300mm f/4.5 ED Nikkor may be harder to carry, and that it may also be hard to fit a larger lens into a case, or even find a case for it. This is even been true of the 400mm f/5.6 ED Nikkor.
The even larger 350mm Telyt-R lens is about 29 cm long with its front and rear caps, but it is more like 31cm with an M or Micro 4/3 adapter and caps. The 350mm f/4.8 Leica lens came with a case, but the case isn't long enough to include an M or Micro 4/3 adapter.
By contrast, some existing Canon and Sigma lens cases will fit the 250mm f/4 Leica-R lens or 300mm f/4.5 ED Nikkor. These lenses are only about 24 cm long with a filter, M or Micro 4/3 adapter, and caps.
The 250mm f/4.0 Telyt-R and the 300mm f/4.5 ED Nikkor are comparable lenses in many respects. Both have a similar size, though both have different good and bad points. The Nikkor has good contrast and color saturation, while the Leica R lens has slightly higher resolution but lower contrast.
The 350mm f/4.8 Leica Telyt-R lens proved to be a mixed bag. It is large and heavy, even compared to the 400mm f/5.6 ED Nikkor. The 350 has some purple fringing wide open, which is expected in a fast 1981 era non-ED lens. However, fringing in the central image is rarely a problem at f/5.6 to f/6.8 or slower. The downside is that the 350mm Leica R lens has nearly 100 microns of lateral chromatic aberration (LCA) at the image edge, which is twice as much LCA as in the 400mm ED Nikkor. Visible LCA in the 350mm is mostly blue-purple and yellow, while the 400mm Nikkor LCA is green and red.
Central fringing is almost gone in the Leica 350mm at about f/6.8, versus f/9.0 for the 400mm Nikkor. When both lenses are used at f/5.6, the Leica 350mm lens resolves more angular detail than the slightly longer 400mm ED Nikkor. (This is in bad seeing. They both do about the same when the air is stable.)
The added detail from the 350mm in average to bad seeing conditions was sufficient to keep the Panasonic GX7 noise reduction from turning the tops of distant flowers and surrounding vegetation into a "watercolor" to the same extent that it did to the 400mm Nikkor image. As shown in examples below, the 350mm resolves yellow dots for many of the flowers, which are probably 2 km away, while many of the same flowers look like a yellow mass of color in the Nikon 400mm image.
While the 350mm and 400mm lenses both have color fringing, the nature of the fringing is different. The 350mm tends to have some violet glow at full aperture (which is more or less gone by f/6.8) and central fringing is blue-violet on one side of focus, and mostly yellow on the other. The Nikkor has mostly red and green fringing, with red being predominant when the image is in the best focus.
When the 350mm lens is in focus, it has no observable blue-yellow or green-red fringing in the center, even at full aperture. It does have color fringing in parts of the image that are slightly out of focus (and at the edge, from LCA), but not at focus in the center of the image. This revealed by the fact that the red, green and blue components of the 350mm image are all more or less in focus at the same time. This is most obvious in the small off-white features near the top of the photo in the last row below.
By contrast, the 400mm Nikkor has red fringing at the point where the image looks the sharpest, unless it is stopped down. One one side of focus, more red fringing appears, and on the other side of focus, the red fringing gives way to green fringing. So, red and green light do not come to focus at the same point. Best focus for many colors is not best focus for either green or red (especially red), and red fringing is often present when the image "looks" sharpest - unless the lens is stopped down.
The intensity of red fringing in the ED Nikkor is actually a casualty of the moderately well corrected ED design, since (for a given amount of energy in the fringing) the fringing will be brighter if it does not extend as far from highlights. Fringing is not adequately controlled until the 400mm lens is stopped down to f/9, which is almost a full f-stop slower than where the 350mm lens controls central fringing.
In the long range flower images below, the red component of the Nikkor image is in better focus than the green component. Since green is what makes up half of the yellow in the flowers, and most of what makes up the surrounding vegetation color, the Nikon image has less green resolution, and this may contribute to the water color effect.
When seeing is good or the subject is nearby and an f-stop of f/9 can be tolerated, the 400mm Nikkor will do slightly better than the Leica lens, mainly because the 400mm will have higher contrast owing to its better coatings. So, the 400mm ED Nikkor provides the best final image when f/9 can be tolerated, but at wider apertures, the Leica 350mm Telyt-R wins.
It is worth noting that the 300mm f/4.5 ED Nikkor is somewhat better than the 400mm f/5.6 ED Nikkor at a given aperture, being about as good as the 350mm Leica R lens, while also being a lot smaller.
Sample images below reveal how a good tele lens can out-resolve one of slightly longer focal length.
Sample Photos Showing High Angular Resolution with some Medium FL Tele Lenses
Examples of high angular resolution with relatively short focal length tele lenses.
© Copyright 2016 Jeffrey R. Charles. All Rights Reserved.
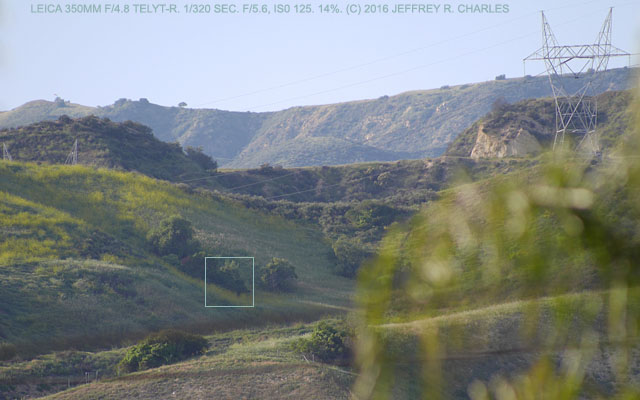 |
|
Context Image Showing Subject Matter Used for Comparison in Small Blue-Green Square.
This image shows the small area of subject matter being compared. A thin lined blue box, just below and left of center, shows subject matter used in the comparison. The yellow flowers and surrounding green vegetation are emphasized. The self timer and electronic shutter feature of Panasonic GX7 were used to prevent camera shake. Subject distance is at least 2 km. Photo taken with Panasonic GX7 MFT camera and Leica 350mm f/4.8 Telyt-R lens.
|
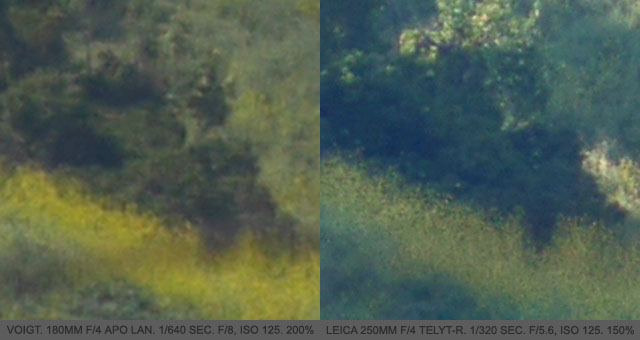 |
|
Comparison of VC 180mm f/4 Apo Lanthar (left) and Leica 250mm f/4 Telyt R T2 (right).
These enlarged crops from the 180mm f/4 Voigtlander APO Lanthar (200 percent crop at LEFT) and the 250mm f/4 Leica Telyt-R (150 percent crop at RIGHT) were not taken in the same lighting conditions, but are still useful comparisons to longer focal length lens results below. The 180mm APO image is very clean, without a trace of fringing in the shadows, even in a 200 percent crop. The mostly horizontal shadow near the bottom is a foreground power line that was obscured by the larger apertures of longer focal length lenses. Even though the flowers are in the shade for the 250mm Telyt-R image at the right, it resolves almost as many individual flowers (as yellow dots) than what are visible either the 350mm Telyt-R or 300mm or 400mm ED Nikkor images below. This shaded part of the 250mm image was underexposed considerably, so it was lightened a little. These pictures show how excessive noise reduction in some small pixel cameras (such as the Panasonic GX7 used here) causes photos of certain subjects to look like "watercolor" paintings instead of photos. This is most obvious in the yellow flowers.
|
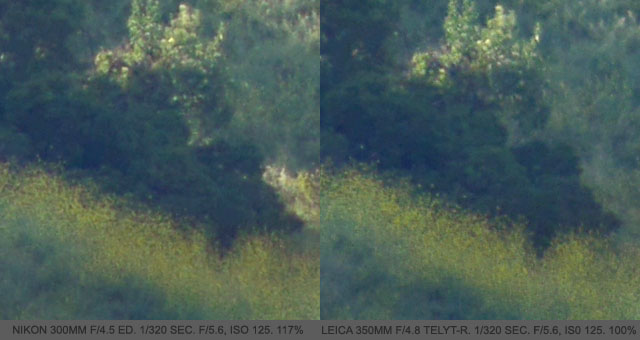 |
|
Comparison of 300mm f/4.5 ED Nikkor (left) and Leica 350mm f/4.8 Telyt R (right).
The LEFT image is a 117 percent crop from an image taken with a 300mm f/4.5 ED IF Nikkor lens, working at f/5.6. It shows slightly more detail than the 250mm image, and the original image has a little more contrast. The RIGHT image is a 100 percent crop from an image taken with a 350mm f/4.8 Leica Telyt-R lens. It shows slightly more detail than the 300mm in the vertical direction, but not as much in the horizontal direction. For example, just left of center, the thin curved gap in the flowers and the small arc of flowers just above the gap are resolved slightly better by the 300mm f/4.5 ED Nikkor. The shaded parts of these images were underexposed just as much as for the 250mm photo above, so they were also lightened a little to match.
|
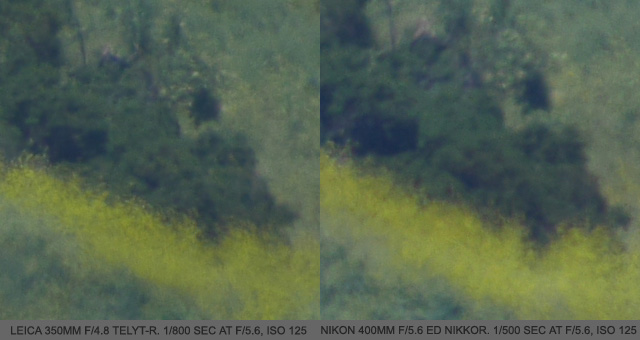 |
|
Comparison of Leica 350mm f/4.8 Telyt R (left) and 400mm f/5.6 ED Nikkor (right).
These 100 percent crops from the 350mm f/4.8 Leica Telyt-R (LEFT) and the 400mm ED Nikkor (RIGHT) show that the 350mm has slightly more angular resolution than the Nikkor at f/5.6. Using large apertures on the 350mm and 400mm lenses may actually reduce resolution during bad seeing.
|
 |
Lateral Color Fringing in Leica 350mm f/4.8 Telyt-R is Mostly Limited to Blue Channel.
LEFT: The Leica 350mm f/4.8 Telyt-R lens has considerable color fringing near the edge of even the Micro 4/3 format. However, it is not strictly caused by lateral chromatic aberration (LCA) across the spectrum. Red, green, and blue colors all align fairly well at the edge of the image. This 100 percent crop is from near the upper right corner of the original image.
CENTER: This image shows that blurring in the blue channel is the main cause of the fringing. It is probably caused by LCA in blue versus violet light. A not-so-faint double image is to the lower left of dark features that have a tangential orientation. A minus violet (not UV) filter would help. The blur is similar to radial blurring that can occur when a wide angle rangefinder lens is used with a sensor having an anti alias filter. However, an anti alias filter is not the cause of blur here.
RIGHT: The green channel has good resolution with little blurring and no double imaging. The same is true for the red channel.
|
Atmospheric Turbulence, and its Influence on Maximum Practical Focal Length
Before acquiring an extreme tele lens (one much longer than 400mm), it is important to point out that daytime atmospheric turbulence ("seeing" conditions) can begin to limit the maximum practical focal length. This is due to the effects of atmospheric turbulence on small angle features.
For maximum angular resolution during daylight, lens focal lengths of 1,000mm and beyond may have been useful, or even necessary, in the days of color film. Most color film could resolve only about 40 to 60 lines/mm.
However, with some digital cameras, the ability to capture well over 100 lines per millimeter may come into play. Up to 130 lines per millimeter is possible with the 3.8 micron pixels in the Panasonic GX7 camera that was used in some tests. With this pixel size, daytime atmospheric conditions can easily become the limiting factor well before 1,000mm focal length is reached, even at short subject distances.
The maximum practical working focal length for digital will depend on the aperture, pixel size, range, and atmospheric coherence length (air cell size) on a given day. It recently became obvious that 1,000mm was too much focal length for typical daytime atmospheric conditions in my area, even when photographing birds that were only a few tens of meters away.
Specifically, when the air was still the night before, I observed Jupiter at 200x through a 1,000mm f/11 Reflex Nikkor-C lens, and noticed that the lens was almost diffraction limited. However, when photographing birds with the same lens the next day, the results were terrible, even if focusing was performed at 10x magnification through an EVF, and an electronic shutter was used to avoid camera shake. Photographs of the same bird from the same distance, but with a 400mm lens, were sharper.
So, how can we know whether or not a 1,000mm lens will be of any benefit before actually trying one? Answer: Number crunching!
For example, it is usually a good idea to at least double sample the atmospheric effects with the pixel size. So, if a camera has 4.3 micron pixels and the seeing is 5 arc seconds with a given aperture, the pixels should each take in no more than 2.5 arc seconds, which is a ratio of 206,265/2.5, or 82,505:1. This ratio may initially make it appear that a really long focal length will be needed, but when the small pixel size is considered, the focal length isn't all that long.
For a 4.3 micron pixel size (such as that in a 12 MP Olympus E-P2), this relationship would indicate a maximum "practical" focal length of only 355mm during 5 arc second seeing conditions!
A longer focal length will just provide a larger image with little to no additional resolution! Lateral seeing conditions may be even worse at times, since even the 180mm f/4 APO lens has been "seeing limited" on some days. Fortunately, in many locations, lateral daytime seeing is not always this bad.
A few other aspects also apply. Seeing effects are worse when optics have a secondary obstruction (as a mirror lens would have), and this gets worse as the relative size of the secondary obstruction increases.
Based on average daytime conditions during prior tests, the following criteria may apply most of the time, especially when you exclude still air that may occur during parts of "golden hour" late in the day:
A.) The maximum useful unobstructed aperture for the best daytime (mid day) resolution on an average to good day (at my elevation) is often only about 100mm.
B.) In bad horizontal seeing during the day, the best maximum aperture may be as small as 25mm, but it is usually more like 65-75mm. As the optimum maximum aperture is reached, the image begins to transition between being locally distorted by atmospheric effects, and looking outright blurred.
C.) The maximum useful obstructed aperture on an average day is about 90mm. (So, for example, a 1,000mm Reflex Nikkor lens may have too much aperture for average to bad seeing in some locations.)
D.) All of this could help explain why one may rarely get terrestrial pictures that match those of a good 800mm FL refracting lens, even when using a 4" f/15 refractor or a large aperture Cassegrain telescope.
In practice, there have been times when the pixel size was the limit of resolution when using a 600mm f/8 Vivitar lens, but this was rarely and barely the case, since seeing was beginning to lower resolution.
* This probably means that an 800mm refracting lens is close to the maximum practical focal length for a small pixel digital camera, and that the 800mm lens may be best used at about f/11 (73mm aperture) to better address poor seeing conditions. Seeing may be better at high elevations, however.
* This also probably means that 500-600mm is the practical maximum for a mirror lens in bad seeing.
The above may explain why "medium" focal length tele lenses such as fast 400mm to 500mm APO lenses are so popular with wildlife photographers that use 24 MP or higher full frame digital cameras.
If seeing conditions impose aperture limits of about 100mm, even for wildlife that is only tens of meters away, a faster f-stop is possible by staying in the 400mm to 600mm range (f/4-f/6 for average seeing, f/5.6-f/8 for bad seeing). This is still almost double sampling average to poor seeing with the pixel pitch. In other words, there may be no need for more than a 600mm lens in bad seeing conditions!
When seeing conditions are better, there can be some benefit in going up to 800mm or even longer. I've taken good pictures (on film) at 1,600mm in good seeing during "golden hour" at high elevation sites, but the seeing is rarely that good at low elevation sites such as where I live now.
APPENDIX I: Effect of Pixel Size on Dynamic Range and Low Contrast Detail:
The relatively low noise and high dynamic range results with the older Hasselblad back and its larger pixels (see Appendix C) illustrate the benefit of large pixels for some applications, even if at the expense of fewer pixels in the picture area or, a using a low ISO equivalent. Larger pixels cover more area at the focal plane, so more light is falling on each one.
Smaller pixels have less light falling on each one, so it may take considerable development to significantly increase the pixel count of a 36x24mm sensor beyond about 25 MP or so, without losing too much real image information to the greater noise reduction that is required for sensors with smaller pixels. On the other hand, if the pixel density and performance of the Sony DSC-F707 camera was extrapolated to encompass a full frame 35mm format sensor, such a sensor would have over 70 MP.
The effect of pixel size is illustrated in the comparisons below, where two older digital cameras, one with large pixels, and one with small pixels, are compared, along with a Micro 4/3 camera and the Leica M9. The cameras compared are:
- Panasonic ZS-7 (1/2.5" format, 12 MP, 1.3 micron pixel interval) with fixed 12:1 zoom lens.
- Sony DSC-F707 (2/3" format, 5 MP, 3.4 micron pixel interval) with fixed 5:1 zoom lens.
- Olympus E-P2 (Micro 4/3, 12 MP, 4.3 micron pixel interval) with 17mm f/2.8 pancake lens.
- Leica M9 (36x24mm, 18 MP, 6.9 micron pixel interval) with 35mm f/2 Summicron ASPH lens.
The pixel size comparisons below are shown in two ways, and all comparisons are done at the lowest available ISO settings. The first comparison shows the effect of taking the pictures from the same distance, with the same angle of coverage, then cropping each image to show the same amount of subject matter, regardless of the original pixel width. This comparison enlarges the image from a low pixel count camera to more than 100 percent.
The second comparison varies the camera distance according to pixel count, with a camera having fewer pixels used closer to the subject than a camera with more pixels. This causes all of the compared images to be roughly 100 percent crops. In all comparisons, the lenses were set at f/4, so as not to put the camera with the smallest pixels at undue disadvantage due to diffraction.
Comparison of Large and Small Pixel Sizes: Crops from Images with Same Coverage at Subject.
Sample pictures from a camera with small pixels and cameras with larger pixels, showing loss of real detail with the noise reduction associated with small pixels. Crops from similar FOV images.
© Copyright 2013 Jeffrey R. Charles. All Rights Reserved.
 |
 |
| Example of very small pixels. Panasonic ZS-7 with a 12 MP, 1/2.5" format (5.2x3.9mm) image sensor. Pixel interval is 1.3 microns. Base ISO 80 setting. Images in this group are cropped from originals with a similar field of view at the subject distance. |
Example moderate pixels. Sony DSC-F707 camera (circa 2000) with a 5 MP, 2/3" format (8.8x6.6mm) image sensor. Pixel interval is 3.4 microns. ISO 100. While only a 5 MP camera, it retains low contrast detail on the calendar at left almost as well as ZS-7.
|
 |
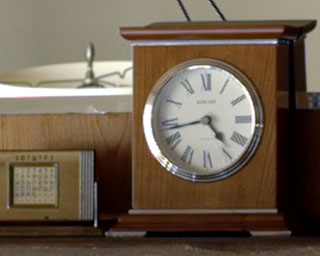 |
| Example of larger pixels. Olympus E-P2 with a 12 MP, 4/3" format (17.3x12.98mm) image sensor. Pixel interval is 4.3 microns. Base ISO 100 setting. The pixel count of the E-P2 is similar to the ZS-7, but larger pixels in the E-P2 provide a better image. |
Example of still larger pixels. Leica M9 with 18 MP, 36x24mm (roughly 8/3") format image sensor. Pixel interval is 6.9 microns. Pull 80 ISO setting. The wood left of the clock shows less noise than the Olympus E-P2, and aliasing is about the same.
|
Comparison of Large and Small Pixel Sizes: All Roughly 100 Percent Crops.
Sample pictures from a camera with small pixels and cameras with larger pixels, showing loss of real detail with the noise reduction associated with small pixels. Approx. 100 percent crops.
© Copyright 2013 Jeffrey R. Charles. All Rights Reserved.
 |
 |
| Example of tiny pixels. Panasonic ZS-7 with 12 MP, 1/2.5" format (5.2x3.9mm) sensor. Pixel interval is 1.3 microns. Color is flat compared to others, even after saturation added. Color moire is at left. Images in this group are roughly 100 percent crops. |
Example moderate pixels. Sony DSC-F707 camera (circa 2000) with a 5 MP, 2/3" format (8.8x6.6mm) sensor. Pixel interval is 3.4 microns. Pixel for pixel, the old Sony DSC-F707 beats the ZS-7, with results comparable to newer cameras having larger pixels.
|
 |
 |
| Example of larger pixels. Olympus E-P2 with a 12 MP, 4/3" format (17.3x12.98mm) sensor. Pixel interval is 4.3 microns. The E-P2 has less noise than the Sony, but not by much. Noise not related to "JPEG jaggies" may look similar if saturation of the Sony image was reduced to that if this image. |
Example of still larger pixels. Leica M9 with 18 MP, 36x24mm (roughly 8/3") format image sensor. Pixel interval is 6.9 microns. This image has less noise of any in this group, but does not capture more real detail per pixel than either the Olympus or Sony, possibly due to aliasing, a so-so JPEG engine, and a weak blue channel.
|
Small pixels cannot accumulate as many photon events as large pixels before saturating. This reduces the ratio between the image data, or signal, and the sensor noise. Small pixels also reduce bit depth outright:
When pixels become fairly small, the full well capacity in terms of how many photon events a pixel can accumulate and read out (read noise adds to the total) becomes the limiting factor in the bit depth of a camera. At this point, an image sensor's actual full well capacity in PE (e-) may be far less than the camera's A-D converter spec. Here, a camera's A-D converter spec is not what drives the camera's bit depth. The image sensor becomes the limitation.
With CCD sensors, even fairly large pixels may fail to provide 16 bits of true grayscale or color information. In order to obtain 16 bits of gray scale information (as opposed to interpolation from a lesser bit depth), a typical CCD sensor must have close to 9 micron pixels, and a good CMOS sensor must have 6 micron pixels (approximate). A few examples, some with interpolation, are in the table below.
Full Well Capacity (FWC e-) for Various Image Sensors:

* CAMERA / SENSOR SPECS-PIXEL SIZE    /    EST. USEFUL FULL WELL CAPACITY (e-/bits)

HIGH DYNAMIC RANGE, LOW ISO 100 NOISE:
* Hasselblad V96c (16 MP; 36.9^2; 9.1 um): 62,472 e- (15.9 bit) KNEE 1 (CCD)

GOOD DYNAMIC RANGE, MED-LOW ISO 100 NOISE:
* Leica M9 (18 MP, 36x24mm, 6.9 um):       35,916 e- (15.1 bit) (M9 not this good)
* Canon 5D Mark II (24MP,36x24,6.0-(6.4):  27,158 e- (14.8 bit) (65,536 best CMOS)
** Noise visible at low ISO: (5.8 um):     25,378 e- (14.5 bit) Min. Sz f/high ISO

MEDIUM DYNAMIC RANGE, MOD. ISO 100 NOISE:
* SBIG ST-8300M (8MP, 17.3x13, 5.3 um):    21,191 e- (14.3 bit) 3264x2448 KAF-8300
* Olympus E-P2 (12MP, 17.3x13, 4.3 um):    13,949 e- (13.7 bit) CMOS
** Noise reduction loss obvious: (4.0um):  12,070 e- (13.5 bit) KNEE 2 (CMOS+NR)

FAIR DYNAMIC RANGE, MOD. ISO 100 NR ARTIF:
* Panasonic GX7 (16mp,17.3x13,3.72um)(Kn): 10,440 e- (13.3 bit) (or 3.77um)
* Sony DSC-F707 (5M,8.8x6.6, 3.44um)(p&s):  8,927 e- (13.1 bit) (2560x1920)
** Noise/NR artifact problems: (2.82 um):   6,000 e- (12.5 bit) Sony DSC-F828=2.69

ACCEPT. DYNAMIC RANGE & ISO 100 NR ARTIF:
* Panasonic TZ-1 (5M,1/2.5:5.8x4.3,2.27u):  3,872 e- (11.9 bit) (2560x1920)
* Canon G12 (10 M,1/1/7:7.44x5.58;2.04um):  3,138 e- (11.7 bit) 3648x2736
* Panasonic ZS-3 (10mp,5.8x4.3mm, 1.59um):  1,907 e- (10.9 bit) KNEE 3 (ANY+NR)
** Noise reduction loss unaccept: (1.55um): 1,812 e- (10.8 bit)

POOR DYN. RNG, OBVIOUS ISO 100 NR ARTIF:
* Panasonic ZS-7 (12.1M,5.8x4.3mm,1.41um):  1,500 e- (10.4 bit) (14.5m,6.08x4.56)

* Note 1: In general, camera sensor FW capacity (e-) is far < A-D converter range.
* Note 2: Useful FWC allows 25% margin for noise floor/pixel non-uniform/exp.incr.
* Note 3: Multiplier is 754.4 e-/um^2 for 25% margin, 943.1 e-/um^2 with no margin.
* Note 4: Some CMS sensors 1.93x more well depth vs CCD. Olympus E-P2 is CMOS.
* Note 5: Some references say high end silicon sensors have up to 2,000 e- / um^2.
* Note 6: Ref. (Clark) shows 16 bit=8.46um for CCD (no margin), 6.2-6.9um for CMOS.
* Note 7: Cutting edge prorotype (TI Japan) claims 3.2um 16 bit w/inorganic ML cap.
* Note 8: Additional losses caused by interpolation, in-camera processing, etc.

References for Above Table:

* Kodak KAF-8300 8MP sensor in SBIG ST-8300M has 25,500 e- FWCap. Is ref. point.
* Digital Camera Reviews and Sensor Performance Summary (Pixel Full Well, etc.):
http://www.clarkvision.com/articles/digital.sensor.performance.summary/ (Clark2006)
* Note: Photon to e- conversion layer only 1-2 electrons thick dielectric boundary.
* Ref. 1500-1800 electrons per um^2. Sanford notes 6.5 um best at short wavelength.
* Handbook of Digital Imaging, edited by Michael Kriss, 500p. 10 um = 300k FWC
* SBIG STX-16803 Kodak KAF-16803 4096^2 9x9 microns, FWCap 100,000 e-.
APPENDIX J: Rangefinder Cam Diameters, Filter Sizes, Bokeh Fringing, and MTF Basics:
This appendix expands on a few points covered in earlier sections, as well as covering miscellaneous subjects such as filter size, and presenting a few basics about modulation transfer function (MTF).
Specific subjects covered in this chapter include:
* Rangefinder Cam to Rangefinder Coupling Wheel Alignment (2013-2014)
* Mechanical and Optical "Keep-Out" Zones for Digital Cameras (2016-2021)
* Appropriate Filter Size for when Two Filters are Stacked (2015)
Bokeh Fringing (spherochromatism) Explained (2015)
* Lens Performance and MTF Plots (2013-2015)
Details About Rangefinder Cam to Rangefinder Coupling Wheel Alignment (2014)
UPDATE of March, 2014: Most of the rangefinder cam related material below was written in 2013, which was prior to warranty service of the Leica M9. Before service, the Leica M9 did not focus reliably with lenses having an inside cam radius exceeding about 16.4mm. The same was true of my Leica CL film camera, based on tests with a fine focusing screen on the back.
* After warranty service, the Leica M9 focused much more consistently with lenses having large rangefinder cam radii, including the 50mm Zeiss ZM that is emphasized below. However, when the rangefinder cam of the Zeiss lens is temporary widened as shown below (to provide a smaller effective inside cam diameter) focus continues to be more consistent than without it, even after service of the camera.
* Oddly, after service of the Leica M9, the image from the 50mm Zeiss lens has been consistently far-focused by a distance equivalent to about 35mm past the rangefinder setting at a 1 meter subject distance, while images from my 75mm Summarit-M lens agree with the rangefinder to within about 10mm at the same subject distance.
* Also, even after the Leica M9 was serviced to get its focal plane to agree with the infinity stops on Leica brand lenses shorter than 90mm, the Zeiss 50mm lens still did not focus quite to infinity. It was necessary to remove a 0.05mm shim from the Zeiss lens to get it to reach infinity. It currently focuses about 0.015mm past infinity, but the landscape images it takes are now outstanding. The 50mm Zeiss lens was used a lot more after this.
* The original version of this section follows:
In the above user impressions of the Zeiss 50mm f/2 Planar ZM lens, it was noted that rangefinder cam of the tested sample has a larger radius than any I've seen in other lenses up to that time, especially Leica lenses, with 2-3 exceptions. The following compares rangefinder cam radii of different lenses, and includes a few rangefinder coupling wheel measurements for reference. The table below shows both inside and outside radii of the rangefinder cams in several lenses.
Dimensions below are from measuring available product samples, and do not represent a manufacturer's official specifications. Rangefinder cam dimensions are shown according to the following definitions for each column:
* Lens           = Brief description of each lens.
* RF CAM INSIDE  = Inside radius of lens rangefinder cam surface, in mm.
* RF CAM OUTSIDE = Outside radius of lens rangefinder cam surface, in mm.
* M9 RF OVERLAP  = Lens cam overlap (+) or shortfall (-) vs M9 RF wheel center.
                   NEGATIVE value means RF cam doesn't touch wheel center line.
* NOTES          = Relevant notes, if any. Most elaborate on the cam overlap.

                    RF CAM  RF CAM    M9 RF
Lens                INSIDE  OUTSIDE  OVERLAP   NOTES:
21 f/4.0 VC C.Sk    15.43    16.70    +0.18    Relative to cam outside radius.
28 f/2.0 VC Ultron  16.51    17.78    +0.01    Wheel center just outside cam ID.
35 f/2.0 L.Sum.Asph 15.77    16.74    +0.22    Relative to cam outside radius.
40 f/1.4 VC Nokton  16.07    17.65    +0.45    Relative to cam inside radius.
50 f/1.4 L. Slux A  14.94    16.54    +0.02    Relative to cam outside radius.

50 f/2.0 Jupiter 8  15.07    16.70    +0.18    Relative to cam outside radius.
50 f/2.0 Zeiss ZM   16.82    18.33    -0.30    Wheel center well INSIDE cam ID.
50 f/3.5 Indust.22  15.21    16.71    +0.19    Relative to cam outside radius.
75 f/2.5 L.Sum't-M  17.25    18.25    -0.73    Wheel center well INSIDE cam ID.
75 f/2.5 VC C.Heli  15.49    16.70    +0.18    Relative to cam outside radius.

90 f/2.8 Elmarit-M  17.22    18.22    -0.70    Wheel center well INSIDE radius.
90 f/2.8 T-ElmaritM 16.00    16.97    +0.45    Relative to cam outside radius.
90 f/2.8 L.Elmarit  15.09    16.79    +0.27    Relative to cam outside radius.
90 f/4.0 L.Elmar-C  16.76    17.81    -0.24    Wheel cntr. slightly INSIDE cam ID.
135 f/2.0 L.Elmarit 15.89    17.74    +0.63    Relative to cam inside radius.

135 f/4.0 L. Elmar  15.29    17.17    +0.65    Relative to cam outside radius.
135 f/4.5 L.Hektor  14.68    16.64    +0.12    Relative to cam outside radius.
Leica CL RF Wheel   14.80    17.44   C=16.12   Leica CL wheel lower than M9 wheel.
Leica M9 RF Wheel   15.24    17.80   C=16.52   16.52 is RF wheel center reference.
Comments:
* Dimensions above are for cam surface, and do not include width lost to chamfers.
* All but two of above Leica brand lens RF cams have good overlap with the RF wheel.
* Leica 135mm Hektor is an M39 thread lens that is used with a Leica M adapter.
* All VC lens cams except on 28mm f/2 have good overlap with RF wheel center line.
* 50mm Summilux-M ASPH FLE cell is small enough to clear the Leica CL RF wheel.
* 50mm f/2 Zeiss Planar ZM has only non-Leica cam radius notably deviating from rest.
* 75mm f/2.5 Leica Summarit-M has only Leica cam radius notably deviating from rest.
* To date, focus has been most consistent with the 35mm f/2 Summicron ASPH, which
  has a relatively small (15.77mm) RF cam inside radius.
* Data above indicates the inside radius of a lens rangefinder cam probably should
  not exceed 15.87mm (for Leitz-Minolta CL) to 16.27mm (for Leica M9 compatibility).
* If a lens design is incompatible with these maximum inside cam radii, a transfer
  bar similar to that in some Leica 90mm and 135mm lenses could be resorted to.
* Leica's 2015 M9 service indicated cam radius issue had been addressed, meaning
  that at least some of the large cam incompatibility may have been in the camera.
Several things were observed or confirmed about the Zeiss Planar ZM 50mm f/2 rangefinder cam issue:
1. The rangefinder coupling wheel in both the Leitz-Minolta CL and the Leica M9 will tilt a little if touched either above or below its center line. It appears to have a relatively loose fit on its shaft, plus a little end play. This is not a problem if the wheel exerts pressure against a rangefinder cam that spans across its center line. However, the wheel is subject to tilt and wobble if rangefinder cam pressure is applied on only one side of its center, and this can affect on the rangefinder reading. This means that the rangefinder performs best when a lens RF cam has at least 0.2mm overlap margin past the RF wheel center line. All Leica brand rangefinder lens cams except one seen to date span well across the center line of the RF coupling wheel.
2. The Zeiss Planar ZM 50mm f/2 lens rangefinder cam does not cross the center line of the rangefinder coupling wheel in either the Leica M9 or the CL. This is illustrated in photos below. A typical Leica lens (one having the next to largest inside radius to its cam of any Leica brand lens I have, to show the near worst Leica brand case) shown for comparison.
3. The rangefinder wheel in the CL has been observed to tilt a little when changing directions the Zeiss Planar ZM 50mm f/2 Planar lens is focused. This was observed from the rear in my Leitz-Minolta CL, with the shutter open. Tilting is more pronounced at close focus distances, possibly because less spring force is being applied to the RF wheel. This could explain the inconsistent focus results I was getting when pointing the Leica M9 camera downward while using this lens, since those pictures were usually at short focus distances. If others have also experienced inconsistent focus with a ZM lens, it could be related to the large rangefinder cam radius illustrated below.
4. When taking a picture with a Leica M9 pointing upward, with the Zeiss Planar 50mm f/2 ZM lens focused at about 0.8 meters, the camera viewfinder frame lines occasionally "jump" toward a parallax correction position for a closer focus distance when the shutter is fired. This happens on about half of the pictures with the ZM lens, but has never happened with any other lens. The jump is about the width of one of the 50mm frame lines. This was happening when I took the last cat picture in the "Everyday Pictures.." section, and only about 25 percent of the pictures from that shoot were in focus, compared to over 90 percent being in focus with my other Leica M mount lenses. It has been hit and miss on if the 50mm ZM photos are in focus at close distances. Other lenses (even $50 Russian lenses) have not been associated with frame lines jumping on any Leica I've used.
5. Focus accuracy issues with the 50mm ZM lens ceased to be a problem after its rangefinder cam surface was temporarily widened to reduce its inside radius.
6. The Leica 75mm f/2.5 Summarit-M lens cam has a slightly larger inside radius than even the 50mm ZM lens, but its surface is smoother and it has less chamfer. Inconsistent focus at close distances also occurs with this 75mm Leica lens, but not to the extent it did with the 50mm ZM prior to widening its rangefinder cam surface.
Rangefinder Cam of Zeiss 50mm ZM has Minimal Engagement with Leica RF Coupling Wheel.
(Tests appear to show this is the primary, maybe even the sole, cause of inconsistent focus.)
Comparison of Lens Rangefinder Cam Engagement with Leica Rangefinder Coupling Wheel.
© Copyright 2013 Jeffrey R. Charles. All Rights Reserved.
 |
Differing Overlap Between Lens Rangefinder Cams and Camera RF Coupling Wheel.
These photos compare the Leica rangefinder coupling wheel overlap on the rangefinder cam of my 50mm f/2 Zeiss Planar ZM lens, and on the cam of a 90mm f/2.8 Leica Tele Elmarit-M lens. Most Leica lenses have more cam overlap with the rangefinder coupling wheel than even the shown 90mm Tele Elmarit-M.
LEFT: The rangefinder cam ring of the Zeiss 50mm f/2 lens has a large diameter barely engages the upper edge of the Leitz-Minolta CL rangefinder coupling wheel, shown by the shadow of the wheel inside of the cam ring. Wobble was observed on the wheel while focusing, which can lead to inaccurate focus.
SECOND FROM LEFT: The rangefinder cam of the Leica 90mm Tele Elmarit-M lens has a smaller inside diameter that almost centers the cam surface on the rangefinder coupling wheel. Virtually no shadow of the wheel is cast into the cam ring. Focusing is consistent with this lens.
THIRD FROM LEFT: This view through the front of the Zeiss 50mm f/2 ZM lens shows about half of the height of the Leica M9 rangefinder coupling wheel is protruding down inside the ZM rangefinder cam ring. This prevents the cam from applying pressure across the coupling wheel center line, in turn making the wheel subject to tilting slightly, such as when the focus ring direction is reversed at close focus distances.
RIGHT: Far less of the rangefinder coupling wheel extends inside the cam ring of the Leica 90mm Tele Elmarit-M lens, providing better contact that supports the wheel across its center line, reducing the risk of tilting the wheel, thus providing more reliable focus and leading to less and more even long term wear on the rangefinder wheel shaft. Less of the wheel protrudes than this picture seems to show, since low angle reflection from the inner surface of the cam makes it look like more of the wheel is showing than is actually the case. Low angle reflection from the same area of the 90mm lens causes the flare that is summarized above. The M9 RF coupling wheel is slightly higher than the Leitz-Minolta CL wheel. 130321.
|
Modifications to Improve ZM Lens Rangefinder Cam Engagement and Focus Performance.
Modifications to Improve ZM Lens Rangefinder Cam Engagement and Focus Performance.
© Copyright 2013 Jeffrey R. Charles. All Rights Reserved.
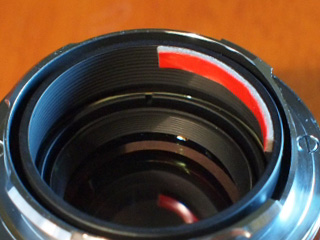 |
 |
Improving Rangefinder Accuracy by Widening Rangefinder Cam on Lens.
To test the hypothesis that the inside radius of the rangefinder cam of the 50mm f/2 Zeiss Planar ZM is too large to couple well with the RF wheel in my Leica M9, a test was performed where the radius of the cam was temporarily reduced with an adhesive fitting. Results appear to confirm that the original large rangefinder cam radius is the sole cause of inconsistent focus with this lens. It may be a good idea if the inside radius of a rangefinder cam never exceeds 16.1mm.
The LEFT picture shows a crude but effective temporary adhesive cam fitting inside the Zeiss ZM lens rangefinder cam. The fitting's inner surface fitting is colored red for clarity. This fitting effectively decreases the inside rangefinder cam radius by about 1mm, providing about 0.7mm of overlap past the center line of the Leica M9 rangefinder coupling wheel. The shown short fitting is only for close focus distances. 130325.
The RIGHT image is a 67 percent crop, showing typical focus performance of the 50mm ZM lens after the temporary adhesive cam fitting was installed. Focus was set on the near side of the cat's nose, which is within ~1 cm of the actual plane of best focus. The exposure was 1/500 sec. at f/2.5, ISO set at 800. Out of more than 20 pictures, the M9 viewfinder frame lines "'jumped"' only once (on the second picture with the camera pointed up after installing the fitting, maybe from a notch in the fitting), then performance was stable after that. (Previously, the M9 frame lines "jumped" regularly with this lens.) Thus far, almost every subsequent picture has been in focus. As with other lenses, I leaned forward about 2 cm after focusing to compensate for a consistent and predictable rangefinder calibration issue, covered earlier. There's a chance I'll eventually make permanent modifications (with J-B Weld, etc.) to any of my lenses that have a large to marginal rangefinder cam radius. You'd think manufacturers would have figured this cam radius thing out.
|
Prior to discovering that a Leica camera rangefinder coupling wheel had a loose enough fit on its shaft that it could visibly tilt, I'd assumed the Leica coupling wheel was a small ball bearing race that was tightly affixed to its coupling shaft. This would make the rangefinder more tolerant of radial cam misalignment. On the other hand, with the exception of an entry level Summarit-M lens, I haven't seen Leica brand lenses with cams that fail to align with the coupling wheel to the extent that they span the wheel's center line. I also have not seen any Leica lenses having a rangefinder coupling cutout depth that obviously differs from other Leica lenses. It's a different manufacturer that seems to have departed from both of these basic design points in the same product.
There is some logic to using a not-so-tight fitting coupling wheel instead of a ball bearing race. First, its manufacture can be controlled, including selection of the material it is made of. Second, there is less risk of lubrication leakage and less risk of lubrication becoming gummy and preventing the wheel from turning. It is also relatively easy to clean and re-lubricate a simple wheel if necessary. Third, the ability to tilt slightly allows the wheel to conform to the average surface of a rangefinder cam, rather than just one high edge, for example. A simple and slightly loose wheel can also potentially "wear in" to the lenses most frequently used.
Leica may have had entirely different reasons for designing the coupling wheel the way they did, but back when the Leica M3 was new, manufacturers usually arrived at designs for reasons other than mere chance. Based on the lens data above, third party manufacturers seem to have then done a better job of adhering to established interface standards than they have in recent years.
This sub-section Copyright 2013-2014 Jeffrey R. Charles, All Rights Reserved.
Mechanical and Optical "Keep-Out Zones" for Selected Digital Cameras.
When I extensively reviewed the
Samyang 8 mm f/3.5 proportional projection Fisheye lens in 2009, I had my first experience with a lens adapter from China that mechanically interfered with the interior of a digital camera. Specifically, I had bought a Nikon F mount to 4/3 mount adapter with an "AF Confirm" chip that enables use of the focus confirm light in an Olympus E500 camera when using manual focus lenses. A second adapter had the wrong clock angle on the electrical contacts and froze the camera when it was attached.
When I mounted the first Nikon to 4/3 adapter on my E-500 camera, it went on without any undue resistance. However, when I removed it from the camera, I found that the top of the adapter's AF confirm chip had rubbed (actually more like gouged) an area inside of my E-500 camera body that was immediately behind the lens mount. It turned out that the adapter's AF confirm circuit board was just glued into the adapter, and the top of the AF confirm protruded slightly behind the adapter's 4/3 bayonet mount flanges. This protrusion was enough for the AF confirm chip package to mechanically interfere with he inside of the camera, but just barely. There was not undue resistance while mounting the adapter because the mechanical interference was less than the range that could be accommodated by the flat springs in the camera lens mount. It was also evident that the manufacturer had already filed down the top of the AF confirm command chip package, but not far enough.
After this experience, I started measuring or otherwise checking every lens or adapter I bought before I mounted it on a camera, especially an expensive one. Over time, I developed tables and drawings for mechanical and optial "keep-out zones" for various cameras. Some details are in the drawing below.
Mechanical and Optical "Keep Out Zones" for Leica M and Some Mirrorless Cameras
(The "externalclearance" drawing at left is mostly relevant to external lens barrel diameters.)
(The "internal clearance" drawing on the right is mostly relevant to lens mount clearances.)
Mechanical and Optical "Keep Out Zones" for Leica M and Some Mirrorless Cameras.
© Copyright 2016, 2017 Jeffrey R. Charles. All Rights Reserved.
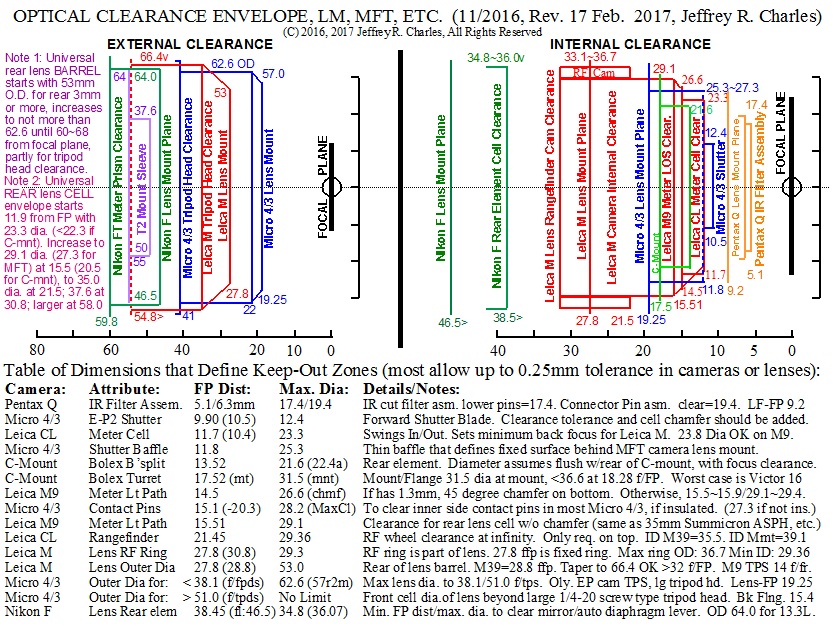 |
Mechanical and Optical "Keep Out Zones" for Leica M, Some Mirrorless Cameras.
In the drawings above, numbers across the top of each draeing indicate the acceptable limits for diameters, while those at the bottim indicate the distance from the focal plane. These drawings and the associated table obviously do not cover all cameras or lenses. Accodingly, it is not unreasonable to assume that that a different camera, evein if made by the same manufactuerr, could have more stringent keep out zones than those shown here.
|
This sub-section Copyright 2016-2021 Jeffrey R. Charles, All Rights Reserved.
Appropriate Filter Size for when Two Filters are Stacked.
The table below shows empirical results for the minimum practical filter size to use on a full frame camera when two filters are stacked in front of the listed lenses. To prevent vignetting when filters are stacked, the front filter usually must be larger than the filer treads on the lens. Filter stacking is relevant when a UV filter is left on a lens, but a second filter is added in front of it to save time. (However, it is really best to only use only one filter at a time.) Filters I use most are: CPL, 80B, 81A, ND, and gradient ND.
Leica M lenses, minimum practical filter size, if two filters stacked.
The following table shows the smallest front filter size that will not
cause vignetting even at full aperture on the Leica M9 when two filters
are stacked in front of each listed lens.

Lens                 Filter   Filt. Size
Data:                Thread:  for stack:  Notes:

12 f/5.6 VC Type 1     77*      N/A	  * Voigtlander adapter
21 f/4.0 VC Type 2    E39       52        E39-52mm step-up ring
28 f/2.0 VC Type 2     46       52+       Single 46-52mm step-up
28 f/4.0 MS Perar ST   19       32        19-32 step-up (rare)
35 f/2.0 Sum-M ASPH   E39       43        E39-43 step-up adapter

40 f/1.4 VC Nokton     43       49        43-49 step-up adapter
50 f/1.4 S-Lux ASPH    46       52        Even 1st 46mm filter vig.
50 f/2.0 Summicron-M  E39       46        Estimated (no sample)
50 f/2.0 Zeiss ZM      43       48        43-48 step-up adapter
50 f/3.5 Industar-22   23       28        23-28 step-up (rare)

75 f/2.5 Leica Sum't   46       46        Same as lens filter size
75 f/2.5 VC Heliar     43       46        43-46 step-up adapter
90 f/2.8 Elmarit-M     46       46        Same as lens filter size
90 f/2.8 Tele-Elm't-M E39       43        E39-43 step-up adapter
90 f/4.0 Elmar-C       39       39        Pitch not same as E39

135 f/2.8 Elmar       Ser7      55        Ser. VII to 55mm (rare)
135 f/4.0 Elmar       E39       43        E39-43 step-up adapter
135 f/4.5 Hektor       34      E39        34-E39 step-up adapter
180 f/4.0 Elmar-R      55       52        Leica R lens, step-down
250 f/5.6 Z. Sonnar   Bay50     52        Hasselblad C Lens

Discussion 1: Based on the above, a front filter size of 52mm, when used
with the appropriate filter adapter ring, will work on any of the lenses.
However, 52mm filters are relatively large, and can block part of the
viewfinder. In addition, some original lens hoods may not be compatible
with filter thread sizes larger than those on the lens.
Therefore, if VC or Zeiss ZM lenses are used, one filter can be a 43mm
that is used with an E39-43mm step-up adapter, and the larger size can
be 52mm, if used with appropriate step-up adapters. It is interesting to
note that if one of the 50mm lenses was a Summicron rather than a Leica
Summilux or Zeiss ZM, the front filter could be 46mm for the other listed
lenses between 35mm and 135mm f/4, with the exception of the 40mm Nokton.

Discussion 2: Filters and adapters for lenses such as the MS Optical 28mm
Perar Super-Triplet and the 50mm f/3.5 Industar 22 may be hard to come by.
A Perar is listed because I rarely use 28mm, so a small 28mm makes sense.
This sub-section Copyright 2015 Jeffrey R. Charles, All Rights Reserved.
Bokeh Fringing (often related to secondary longitudinal chromatic aberration) Explained:
These lens characteristics are often referred to as background fringng, or "bokeh fringing" (these are not real optical terms, though they are descriptive). It often manifests as color fringing that is one color in front of focus and another color behind focus. Fringing in imaged subject matter that closer to the camera than best focus tends to have an a purple to magenta color, while fringing on imaged subject matter farther away than best focus tends to have a yellow-green to cyan color.
An obvious amount of "bokeh fringing" is not uncommon in a fast f/ratio, non-apochromatic lens. It can even be obvious with fast asperical lenses, but it is less common in true apochromatic lenses. One of the most common causes of this fringing is secondary longitudinal chromatic aberration (LCA), where the effective focal length is slightly different for various colors. As a result, all colors are not in focus at once. With most lenses, blue and red light have a common focus that is slightly farther from the lens than the focus for green light, while the focus for violet light is farther from the lens than all other colors. Lesser causes can include spherochromatism, where the degree of spherical aberration correction differs according to color.
An "achromatic" lens is designed to bring two colors to a common focus. In such a lens, the two colors brought to the same optimized focus are usually blue (C light, at 486nm wavelength) and red (F light, at 656nm), though some lenses are instead designed to bring violet-blue and red to a common focus. In reality, there is a continuum of color pairs that are brought to a common focus with an achromatic lens, but best focus for each pair of colors is not quite in the same place as the focus for C and F light. This continuum of colors usually straddles green or yellow-green light, and these colors come to focus closer to the focus position for green light as the wavelengths in each color pair get closer together.
When a lens is designed to bring blue and red light to a common focus, it is not unusual for the best focus of green light (about 520nm) to be at a slightly different longitudinal position, and for the best focus of violet light to be at yet another position. This causes a red or purple fringe to occur on one side of focus (typically the foreground) and yellow-green to cyan fringing to occur around highlights in the immediate background. The effect is usually the most severe at wide apertures, and in the region that is just barely out of focus. This is often only noticeable on slightly defocused subject matter, since the blur circle gets larger for more defocused backgrounds. The difference between best focus for red and blue verus green light depends on the optical design and the optical glasses used.
The diagram on the right (below) illustrates bokeh fringing that is caused by secondary longitudinal chromatic aberration in a non-apochromatic lens. In reality, the inner part of the light bundles would consist of white light, but these are shown as red and purple triangular areas to make it easier to follow the colors on either side of focus. The color at or near the outer edge of the light bundle usually has the most influence on visible fringing color.
Illustrations of "Bokeh Fringing" (Longitudinal Chromatic Aberration)
Illustrations of only one of many possible causes of "bokeh fringing".
© Copyright 2015 Jeffrey R. Charles. All Rights Reserved.
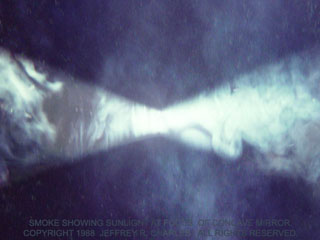 |
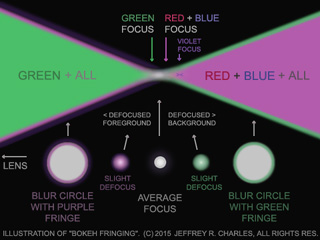 |
| This photo is a side view of the light bundle from a 46 cm diameter f/2 concave mirror coming to focus. The light bundle does not come to a fine point because the sun, which has notable angular size, is imaged at focus. Smoke was used to make the light bundle visible in this 1988 image, since conditions were not compatible with using mist. No color fringing here, since a mirror forms the image. A similar view of a light bundle, but of one from a lens that forms a very tiny image of a point light source, is shown on the right. |
Illustration of but one of many ways that "bokeh fringing" can occur. This simplified enlarged example shows focus at top center, and a fraction of a millimeter of the light bundle on either side of focus. Renderings of images at the focal plane are shown below this. The lens is corrected to bring red and blue light to a common focus, but does not quite bring green to the same focus. This causes a purple outline to surround a slightly defocused blur circle on one side of focus, and a green outline on the other side of focus.
|
In the absence of aspheric elements or other means to substantially correct spherical aberration, common focus for two wavelengths may be based only on a given zone (radius from the center) of the lens. This is because without aspheric elements, or without a very complex optical design, focus for a given color is not quite at the same spot throughout the diameter of the lens, due to spherical aberration.
In other words, only one zone of a spherical lens can be completely optimized, since spherical aberration causes the best focus from different zones of the lens to have different longitudinal positions. Because of this, spherical aberration can cause focus shift. As a lens is stopped down, outer parts of the lens no longer contribute to the image (and thus the best average focus), so the best average focus shifts slightly.
Aspheric elements can correct spherical aberration to the extent appropriate for a camera lens, and will simplify descriptions of bokeh fringing. Therefore, a lens with at least one appropriate aspheric surface is assumed for the rest of this description.
In a situation where highlights in a defocused foreground have slightly red or purple fringing, and the background has green fringing, this usually means that best focus for green light is closer to the lens than is the case for blue and red light. Best focus for foreground objects resides farther from the lens than is the case for the in-focus subject. Therefore, the blurred foreground will be "inside focus" with respect to best focus for the foreground verus the lens position. In other words, the camera focal plane is closer to the lens than what would be required to bring the foreground into focus. As a result, the blur circle for slightly defocused foreground highlights will have a red or purple outline fringe.
The opposite is true for the defocused background, since the blur for the background, as imaged at the focal plane, resides "outside focus" with respect to best focus for the same background. In this case, the outer fringe on the image of a defocused background highlight will often be green or cyan. This is obvious on the background cat whiskers in sample images from the Leica 50mm f/1.4 Summilux-M ASPH. This lens provides an extraordinarily sharp central image at wide apertures, but since it's not an APO (in a true sense where it would bring 3 colors to a common focus), it has bokeh fringing.
In addition, some lenses bring violet light to a significantly different focus than is the case for any of the primary colors. In an achromatic lens, the focus for violet light is usually farthest from the best focus for green light. Here, under high magnification (such as when using an EVF with magnified focus assist) it is not uncommon for the bright image of a point source (such as a star) to be smallest when it is surrounded by a faint violet glow. Then as the lens is focused only a little, the violet quickly disappears while the spot begins to enlarge slightly and take on a green cast or outline.
An additional cause of bokeh fringing can occur when adequate correction of spherical aberration is only provided for a limited range of colors. In an image of a point source, this causes the in-focus size of the least corrected color to be larger than is the case for other colors, which can also result in bokeh fringing.
Bokeh fringing can occasionally occur when three colors are brought to a common focus, as in some apochromatic lenses. This is uncommon, but it can occur if the light bundles for different colors have slightly different diameters where they exit the rear element.
This sub-section is Copyright 2015 Jeffrey R. Charles, All Rights Reserved.
About Lens Performance and MTF Plots:
As mentioned above, my own user tests don't generate Modulation Transfer Function (MTF) plots to include in this web page. However, some mention of their benefit and how to interpret them at a basic level may be helpful for those who view MTF plots on other web sites. A far better (and by necessity much longer) explanation of MTF is in a paper by H. H. Nasse [15] at the Zeiss.de web site. The URL is in the references section of this web page.
Good MTF plots can be used to evaluate many aspects of lens performance, though they often do not capture subtle flaws such as faint color fringing. MTF plots may also fail to reveal focus shift, depending on the degrees of freedom utilized in the test.
MTF plots for most lenses were not always available to prospective customers. When I first got into 35mm photography in the early 1970's, MTF information for a typical camera lens was almost unheard of. Most accessible lens test information was in hard copy publications by Modern Photography or Popular Photography, etc. Their lens test results were then simply a brief description, followed by table showing the maximum number of line pairs (black lines and white lines of equal width) per millimeter that the lens could resolve at the center and edge of the picture, with one set of numbers for each f-stop. An additional column rated the resolution as Excellent, Very Good, Good, etc.
With simple lines per millimeter information, there was little to go on about the type of image a lens would actually deliver on film, beyond mention in the description of whether the lens had high or low contrast, or if the lens had flare problems. For example, I once visually tested a 400mm f/6.3 lens that then cost only $35 new, and I could detect up to 130 lines/mm when it was stopped down a little. This would translate to about 4 arc seconds of resolution, which would be amazing, though not as good as a true telescope of the same aperture. However, the lens never delivered this much angular resolution on film, even when optically oversampled by stacking two 2x tele-converters behind it.
I believe the first MTF plot I actually saw was in a mid 1970's ad where Vivitar introduced the first version of the 70-210mm f/3.5 Series 1 zoom lens. Being in my teens, I had no idea what I was looking at, and back then, you couldn't just get on the Internet to research something. Years later, some publications began publishing MTF plots rather than simple lines per millimeter tables.
The thing that was missing from outright lines per millimeter tests, be they visual or on film, was the contrast at which the line pairs are imaged. As the line pairs get smaller in the image, the contrast at which they are imaged becomes lower. This is partly because a lens cannot produce an infinitely small point at the focal plane when imaging a point source. Therefore, a lens can't resolve the edges of the lines as with absolute sharpness, so the line boundaries are blurred.
As the line pairs in the subject matter get closer together, they are imaged closer together at the focal plane, where the width of the imaged blur at the line boundaries becomes larger in comparison to the width of each line. As the imaged lines get still closer together and the blur approaches a line width, the lines no longer look like defined black and white lines, but instead look like gradual transitions from thinner but poorly defined nearly black lines to thinner and also poorly defined nearly white lines.
Eventually, a point is reached where the obvious part of the blur from the white lines on either side of a black line completely overlap the black line, causing even the center of the black line to plainly be imaged as gray instead of black. The centers of the white lines are also imaged as shades of gray, but brighter. As the line pairs are imaged smaller, the difference in brightness between the centers of the imaged black and white lines becomes even less, until a point is reached where a group of the thinner black and white lines is imaged as a mere patch of gray.
MTF plots quantify the degree to which the lines of a given interval become gray in the in-focus image as opposed to their original absolutes of black and white. An MTF plot doesn't show the maximum number of line pairs/mm a lens can resolve. Instead, MTF plots show the contrast at which line pairs of different frequency are imaged. This says much more about lens performance than lines per millimeter tables, especially when the MTF measurements are made using a full visible spectrum white light source.
MTF plots have two axes. On the left side, values for percent contrast are indicated, with 100 percent contrast being at the top. Along the bottom, values for "Image Height" are shown, usually in millimeters. Image height is simply optical speak for the distance from the center of the image.
Better MTF plots (such as those for Leica and Zeiss lenses) usually include multiple sets of plots that indicate lens performance. Each set of plots is for a certain resolution in line pairs per millimeter, with one line in the plot being for resolution of line pairs that are oriented to run in the in the tangential direction (tangent to a circle defining a given image height) and the other being for resolution of line pairs oriented the sagittal (radial) direction. Plots for Zeiss lenses usually have a sets of plots for 10, 20, and 40 line pairs per millimeter (as shown in the examples below), while plots for Leica lenses may include sets of plots for 5, 10, 20, and 40 line pairs per millimeter.
Comparison of Zeiss MTF Plots for Two Lenses.
Example Zeiss MTF Plots for 50mm f/1.5 and 50mm f/2 Zeiss ZM Lenses.
These are from PDF flyers for Zeiss lenses. There are no Copyright notices on these, but it is assumed © by Zeiss.
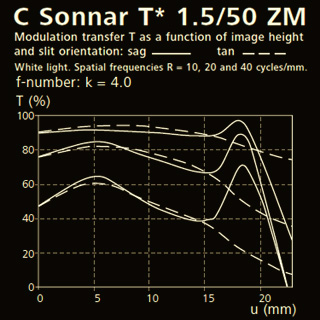 |
 |
|
MTF Plots for Zeiss 50mm f/1.5 ZM Lens (left) and 50mm f/2 ZM Lens (right).
These are the very Zeiss MTF plots that steered me toward purchasing the 50mm f/2 Zeiss Planar lens over the f/1.5 version. Since my interests are good performance over almost the entire focal plane, performance at wide apertures (or even having a wide aperture) is less important than the f-stop at which the image becomes good over the central 32~34mm of the focal plane. These plots show that the 50mm f/2 on the RIGHT achieves the desired degree of performance by f/4, while the plot of the 50mm f/1.5 on the LEFT shows that its performance at f/4, especially outside the central 20~26mm of the focal plane, isn't as good. The f/2 versions was selected for this reason. Other than focus shift and a green cast in slightly out of focus thin black background objects at wide apertures, optical performance of the f/2 lens doesn't disappoint, and is about what I expected from the MTF plot above. A few observations about the plots are below.
|
As previously noted, the vertical axis of each sample Zeiss MTF plot is percent contrast. The horizontal axis is the off-axis distance, or "image height" in optical speak. The three sets of plots are for 10, 20, and 40 line pairs (black and white pairs) per millimeter. The lower plots are for the highest resolution. The dashed and solid lines show the tangential and sagittal plots. The plots are all for the image at best focus, so they do not show characteristics such as bokeh in out of focus features.
The better looking MTF plot on the right (lines for even MTF 40 are above 60 percent contrast out to 17mm off-axis!) is the 50mm f/2 Zeiss lens discussed above, when stopped down to f/4. The less impressive one is for a 50mm f/1.5 lens, also stopped down to f/4. The difference between these plots are why I didn't get the Zeiss f/1.5 lens, even though the cost is not that much more than that of the Zeiss f/2 lens.
For the f/2 lens, the MTF 10 plots remain at a contrast of 93 percent or better all the way out to about 16mm off-axis, and the MTF 20 plots stay above 84 percent in the same part of the image. For a medium price 50mm lens with all spherical elements, this is almost as good as it gets for a zippy image that has very little veiling flare over most of the format. The MTF 40 line stays above 60 percent in the same area, meaning that the lens will also be tack sharp clear out to about 2mm from the edge of the picture. Things don't really start to fall apart until about 19~20mm off-axis, which is getting into the corners.
For the f/1.5 lens, the MTF 10 plots are only a little lower than the f/2 lens, but most of the MTF 20 plot is quite a bit worse than the f/2 lens. This means that the f/1.5 lens could have more fringing, spherical aberration, or both, even at f/4. However, this lens is known for having outstanding background bokeh, and the nature of residual spherical aberration it may have could contribute to this, though there is no way to be sure from an MTF plot. Also, these plots are not bad for an f/1.5 lens when used at f/4. The f/2 lens was more appealing simply because it was better at f/4.
Dashed plots for the MTF 20 and MTF 40 tangential plots of the f/1.5 lens start a shallow dive toward the lower right corner at only 6mm off-axis, while the same plots for the f/2 lens don't even peak until beyond an image height of 11mm. This means that the f/1.5 lens just won't take as sharp of a picture over as much of the format as the f/2 lens, even when stopped down to f/4. It would look good if there was not the f/2 version to compare to, and the difference won't be detectable in a standard size photo print. The plots at wider apertures are not as good as these for either lens, but the f/2 lens still remains better than the f/1.5 lens at wider apertures.
Basically, if the MTF plots for low resolution (5 to 10 lines/mm) show really high contrast, it usually means a lens will have snappy images with very little veiling flare. As mentioned above, the MTF plot for the 50mm f/2 Zeiss ZM lens shows that the plots for both 10 and 20 line pairs per millimeter both remain above 84 percent contrast until out very close to the edge of the format. On the other hand, the dashed tangential plots for the 50mm f/1.5 lens do not show as high of contrast as those for the 50mm f/2 lens.
MTF 40 plots are good for judging outright resolution. The 50mm f/2 does better here too. Comparing the MTF 20 and MTF 40 lines can show if a lens has aberrations other than flare (such as spherical aberration) that lower contrast. Generally, if the MTF 20 and MTF 40 plots are both low and also trend the same way, the lens has aberrations that reduce contrast, probably even when stopped down. As previously noted, this becomes evident in the tangential plots for the f/1.5 lens beyond about 10~13mm image height, while the equivalent plots for the 50mm f/2 lens don't get as low until at least 18mm image height.
When comparing the Zeiss 50mm f/2 lens to still other lenses, details such as observed focus shift (which is not evident in the MTF plot) become applicable. For example, at f/4, a Leica 50mm f/1.4 Summilux-M ASPH lens images sagittal structures at slightly better resolution versus contrast than the Zeiss 50mm f/2, but does not do as well on tangential structures between about 8 and 15mm image height. However, since the Leica Summilux ASPH lens has very little focus shift, the actual performance realized in the 8 to 15mm image height range is similar for either lens.
This sub-section Copyright 2013-2015 Jeffrey R. Charles, All Rights Reserved.
APPENDIX K: Leica Optics and Images Compared to 4x5" Film, etc., Images:
Can a 35mm Format Digital Camera Hold Up Against Hasselblad Digital and 4x5 Film Cameras for Shallow DOF Photos? Let's Find Out!
Background:
The desire to obtain sharp photos with shallow depth of field (DOF) from a normal focal length lens was inspired by using a 4x5" film camera starting in the 1970's, then a Pentax 6x7 cm film camera starting in the 1990's. Digital cameras were not then in the picture, so to speak.
Early Digital Cameras
Digital imaging was not very impressive in its early days, but it improved a great deal since its infancy. Up to about the year 2000, I was not interested in digital photography because the flaws in digital camera photos were so distracting that it was difficult to just look at a full screen digital photo and enjoy it. At about that time, things began to change with the introduction of the Sony DSC-F707 digital camera. The DSC-F707 was a 5MP camera having 2/3" format sensor a 5:1 zoom lens with a maximum f-stop of f/2.
As I read reviews for the Sony camera, I found that I was actually enjoying looking at sample pictures taken with it. Digital images from cameras like the F707 were at least getting close to the quality of medium resolution scans from 35mm film pictures. Shortly after this, I bought a DSC-F707 and was very happy with it. I then put together an optical system that allowed "afocal" use of the Sony camera on long telephoto lenses and even telescopes. I still use a DSC-F707 on some occasions to this day. It has some useful features that seem to have since fallen out of style. The Sony obviously was not capable of shallow depth of field when using a normal focal length, but it could provide shallower depth of field at the long focal length end of its zoom range.
The Sony F707 camera images were good enough that I did not even want to upgrade to a better digital camera until almost eight years later. Even then, it was failure of the electrical connections between the lens and the articulated back end of the camera that spurred the change. At the time, I briefly considered the 8MP Canon Pro1, but someone who had a Pro1 showed me that it had reliability issues, including where even briefly pointing the camera in the general direction of the sun (not at the sun) allowed the front elements to concentrate sunlight onto plastic baffles surrounding the zoom elements, causing the baffles to warp or locally melt.
When I did get another digital camera, it was a used Olympus E-500 4/3 format DSLR to use with my existing tele lenses and telescopes. The E500 was soon followed by a couple of Olympus PEN Micro 4/3 digital cameras. The Olympus E-P2 Micro 4/3 cameras could take an EVF, which at least for me, made focusing easier than was the case with an SLR.
Micro 4/3 cameras worked out well until I tried to use fast rangefinder lenses on them to get shallow depth of field pictures, and got poor results at the edges. Poor results from fast rangefinder lenses on my Micro 4/3 cameras proved to stem from the anti-alias filters in the cameras, not the lenses. Being used to a small camera system, I was not anxious to get into a large and heavy full frame DSLR system in order to obtain good shallow depth of field pictures. I was then also using a Hasselblad 500C camera with an Imacon V96C digital back (which could out perform most DSLRs), but wanted to get shallow depth of field images without carrying around as much equipment.
The Leica M9
When introduced, the Leica M9 was the only viable option for a compact full frame camera. This remained the case through early 2013, when took the plunge and bought one. I obviously was not expecting a Leica digital camera to equal the quality of my earlier 4x5 film pictures, but I figured that if any 35mm format digital camera and lens could come close to doing so, a Leica would have the best chance. This opinion was based on my prior experience with various 35mm camera optics, and on looking at sample pictures from a Leica M9.
How I had Time to Write this DOF Tradeoff Material
Starting in early 2015, I had to get a lot of bed rest, so I usually did not get up to do a lot of writing. At that time, I had to use a handicap transit (e.g. paratransit) service to go to medical and physical therapy appointments. The service was also relatively unpredictable in arrival times, so I had to allow up to two hours to travel the distance that I could formerly drive in half an hour. In addition, available ride times could differ from desired ride times by a considerable margin. This combination of circumstances sometimes led to arriving at appointments well over 1-2 hours early.
Since I could not rest in bed at a doctor office for up to hours on end, the resulting waiting time at appointments provided the opportunity to work off line on a computer when I was up to it, so I was able to use the time to gradually compare several digital lens test photos I had taken against published MTF data for each lens, as well as comparing the images to my earlier 4x5 film pictures, then write this text. I copied one of my older photos rather than take new portraits with all of the lenses. This is partly because I could not transport the cameras and lenses on a paratransit ride, and because most would find it tedious to be photographed with over ten different camera and lens combinations. Also, test conditions are idential if photographing print, even when the work is spread out over a few days.
This "little" project, which I had intermittently done with various film and digital cameras and lenses since the 1990's, would show if certain film cameras (and more recently digital cameras), including 35mm format digital cameras such as the Leica M9, can compete with medium format and 4x5 film cameras in terms of the detail that can be obtained in shallow depth of field pictures, and especially outdoor portraits. The comparison is not as much about the absolute degree of captured detail as it is about the amount of detail that can be retained (and noticed) in a 16x20" or smaller print.
Before getting to the comparison, it may be worth noting that the Leica has been far easier to keep using as strength and abilities decline. This is because of its small size and simplicity of operation. Conversely, the complex menus and indirect controls of most other digital cameras can be difficult to learn, and easy to forget if camera is unused for a while, leading to losing time re-learning it. This may be partly because I used a Leica in my youth, but didn't use digital cameras until 15 years ago. Sometimes, skills learned early can be the ones that last longest. Thus, some other photographers with health issues may find the Leica easy to use, even if the menus of most other digital cameras seem daunting. This was one selling point for me.
Digital Versus Film:
Right out of the gate, there is no contest between the Leica M9 and most 35mm film. The M9, when used at the Pull 80 ISO setting, handily beats all except the very finest grain 35mm color films. The only difficulty is that the high contrast that is unique to the Pull 80 ISO setting is a bit harsh for portraits. At the base ISO 160 setting, the Leica M9 provides results that still exceed most 35mm films, while reducing contrast (and increasing dynamic range) somewhat. Dynamic range is the main drawback in comparison to film.
Dynamic range would be less of an issue if I frequently took RAW images, but I usually shoot JPEG because I don't have the overhead in terms of time or energy to process every picture. Therefore, all of the comparisons here use JPEGs straight out of the camera.
Dynamic range is rarely an issue with a Hasselblad camera and digital back. This is partly because the Hasselblad back has large pixels and it only saves 16 bit RAW images. Here, the pixel full well depth in electrons is relatively close to the capability of a 16 bit A-D converter.
Smaller pixels give up something in terms of full well depth, so an image with 16 bits of real dynamic range data may not be the result - even when the output image file is 16 bits per primary color. The next step is comparing digital camera images with medium format and larger film camera images. For digital, emphasis will be on a Leica because it's more portable.
Context of the Comparison: Half Length to 3/4 Length Outdoor Portrait:
In the area of portraits, my best former work was in the area of half to 3/4 length portraits, often where the subject was sitting on the ground in a bucolic setting. In this type of portrait, the subject's face usually is not centered, so off-axis performance of the lens is very important. In such portraits, two technical details are particularly important. One is the clarity with which eyes are imaged.
The second detail is that hair should be resolved fairly well. For the type of portrait discussed here, longer strands of hair (on a person with long hair) tend to run in the tangential direction; that is, perpendicular to a line extending from the center of the photo. This makes MTF performance for small angle tangential structures important, particularly for image heights corresponding to between one third to one half the distance to the corner of the frame.
In fact, to come close to the quality of my large format film portraits, empirical measurements have shown that a 35mm format lens must have MTF 40 contrast for tangential structures that exceeds about 50 percent (60 percent is better), and it must maintain this performance out to an image height of at least 13mm. (Image height is simply the distance from the center of the frame. Image heights discussed here are normalized for the 35mm format.)
The MTF 40 requirement out to at least 13mm image height plays a role in determining the maximum "useful" aperture of a lens for certain portraits. Fortunately, the long aspect ratio (3:2 rather than 4:3) of the 35mm format allows the subject's face to be positioned up to 3mm closer to the center of the picture. For a carefully framed photo, this can reduce the maximum critical image height for the subject's hair down to between 9mm and 10mm.
Sample Portrait with 4x5" Film Camera, used here to Evaluate Digital Cameras and Lenses.
Portrait taken with 4x5 camera, with cropped features used in camera and lens comparisons.
Copyright 1975, 1995, 2015 Jeffrey R. Charles, All Rights Reserved.
 |
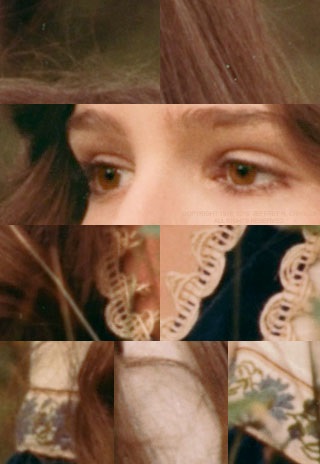 |
Assessing Optical Performance for High Resolution Portraits with Shallow DOF.
The LEFT image is a circa 1997 scan the sample portrait. I took the original photo in 1975. The print has faded toward red since the 1997 scan, so there is a color balance difference in recent cropped samples. The subject is a gal who worked a summer job at the same place I did. She kindly let me take her photo to use in my portfolio and for other purposes. (I was then a part time professional photographer, even though still in high school.) In exchange, her family got prints for only the cost of processing. I could have placed the camera a little better, to increase the distance between her head and background trees, but it was one of those times that the expression would have been lost if I moved the camera. Besides, local mosquitoes were eating us alive! To make areas detailed in crops on the right more obvious, the portrait has been blurred and lightened, with the exception of the crop areas. This image may later be updated with a sharp version having red rectangles to indicate cropped areas.
On the RIGHT are 100 percent crops of some features used to evaluate lens performance. A 16 x 20" print was copied with each of the tested Leica M mount (and other) lenses, using a range of apertures. The widest aperture that provided a sharp image at a given image height was entered into the table (below) in this section. A 75mm Summarit-M lens was used at f/5.6 for these sample crop images, and it easily resolves almost everything at f/5.6. In addition to the features in the original photograph, small specks of dust on the print were used to assess focus and further evaluate lens performance. This increased accuracy, since there were some losses from the analog printing of the photo. Comment: Right or left features below are described according to the subject's right or left.
Starting at the center, and working out to greater image heights, we have the following:
* The subject's middle right dress sleeve, at transition from blue to white, is centered in test shots.
* The upper right lacing of the dress would be at 2.3mm image height on a 35mm format image.
* The upper left lacing is at 4.3mm image height.
* The middle right side of the subject's hair begins at about 6.6mm image height.
* Features on the middle part of the left dress sleeve are at about 7.9mm image height.
* The subject's eyes average about 9.4mm image height.
* The outer extent of the subject's most visible hair corresponds to 11.8mm image height.
* Lastly, 13.5mm is the maximum extent of the subject for which resolution would be a factor.
Technical details: The original photo was taken with an older 4" x 5" Kodak Master View Camera (similar to metal view cameras Calumet was selling new at the time) and a 203mm f/7.7 Ektar lens. The exposure was 1/10 second at f/7.7 on VPS 100 film. The original is one of my benchmarks for sharp in-focus detail with reasonable separation from the background. De-centering a subject's face can provide a more open feeling, since the subject is then looking across the picture. A 4x5 camera with a good lens can easily do this. However, good results can be more challenging with smaller formats, partly because most of the subject's hair runs close to a tangential orientation. Good MTF 40 performance on tangential structures is not easy to achieve with a fast 35mm format lens. A 16x20" print of the portrait was copied with each lens for the comparisons. For this document, a lot of the left and bottom of the image, and a little of the top and right, are cropped out to make noted features larger and easier to see. The resulting tight crop covers an area similar to what a 75mm lens would cover on the 35mm format, if used for the original photo. Will a Leica M9 with a modern lens work for a high resolution, shallow depth of field portrait like this? We'll soon find out!
|
Scope of the Comparison: Copying a 16x20 Print, Not a Life Size Print:
The comparison between large format film images and 35mm format digital photos is based on inspection of a 16x20 analog print from one of the best portraits I had taken on 4x5" negative film. The print was viewed carefully with reading glasses and often a strong magnifying glass, and the digital images are viewed at more than 100 percent for the comparison. Later tests may image samples of human hair. If such tests are ultimately done, the results will be in a separate chapter.
The concept is to copy the print using various lenses, taking a picture at half f-stop intervals between wide open and f/4 or slower, then comparing the images to the original print. In the comparison, the maximum lens aperture at which loss in digital image detail (compared to the 16x20 print) cannot discerned at various image heights is used to determine the maximum useful f-stop versus image height for each digital lens. Images of light dust specks on the print provide additional information.
If a lens cannot faithfully reproduce details on the print out to the image heights encompassed by the subject's eyes and hair, when used at roughly a 20mm or larger physical aperture, it means that the lens and camera combination will not be capable of taking a portrait as sharp as the example, while still maintaining adequately shallow depth of field.
This is not a perfect test in that the tested lens does not need any depth of field to image a flat 16x20 print. However, since the original photo exhibits shallow depth of field, the resulting copy image may be relatively close to what would result if the test lens was used at the same physical aperture size to photograph the original subject. This obviously will not reveal the bokeh characteristics of each tested lens, but other tests can easily sort that out.
If a digital camera and lens does capture all of the visible detail on the print, this does not mean that a digital photo of the original subject will actually equal the detail captured on a 4x5 film image, but it does provide some comparison for the amount of detail from the 4x5 image that is actually utilized (or noticed) by most people.
In other words, most people are not going to make life size prints that must hold up to inspection with a magnifying glass. If they did, a good 4x5 image could show the weave in some areas of the subject's dress, and even some woven structure in the lace and draw strings.
Emphasis of the Comparison: Maximum Useful Aperture Verus Image Height:
The table below emphasizes the maximum useful aperture that can be achieved while maintaining a relatively good resolution and contrast in a normal to short tele field of view (e.g. 50mm to 75mm equivalent focal length).
One of the large format lenses compared below will provide good results at apertures exceeding 35mm. However, in practice, the depth of field provided by a 26mm or smaller aperture is needed to get the whole subject adequately sharp. This depth of field would require some safety margin (e.g. the use of slightly less than 26mm aperture) in cases where a lens has notable bokeh fringing near transition zones. At the same time, the subject often will not be adequately separated from the background if the aperture is much less than 20mm. Therefore, the range of apertures that are actually optimum for certain types of good half to 3/4 length portraits can be limited.
Field of View
The emphasized field of view is for a 35mm-format-equivalent focal length that is slightly longer than 50mm. For reference, the original portrait print, after compensating for the focus extension to get a 1:12 reproduction ratio with a 203mm lens, has about the same field of view that a 220mm lens would have at infinity. For the print, an 82 x 102mm area of the 4x5 negative was used. The utilized field of view (with the lens focused to infinity) would be equivalent to using a roughly 240mm focal length lens to fill the 90x112mm maximum printable area of the 4x5 format. At the 1:12 focus distance, the utilized field of view would be similar to that of using a 220mm lens to fill the maximum printable area of the format.
On a 35mm format (cropped to 24x30mm), the resulting field of view for the original vertical format portrait print is about the same as that of using a 63mm lens at a 1:45 reproduction ratio for the original picture, then printing a 5:4 (30x24mm) cropped area. This accounts for the lesser focus extension required to get a 45:1 reproduction ratio. The 60 to 65mm equivalent focal length has been useful for a variety of subjects, but very few 60-65mm lenses are available for the 35mm format.
The 63mm equivalent focal length puts 50mm lenses on a 35mm format at some disadvantage, since 50mm is a little too wide to get the proper perspective on portraits like those examined here without some cropping. Also, a 75mm lens is enough longer that it loses some sense of closeness to the subject. A 90mm lens is entirely too long for the type of portrait considered here, so the table does not even include data for 90mm lenses. In the comparison, a 50mm lens is assumed for either a horizontal or a vertical composition, while the 75mm is considered only in terms of a relatively tight vertical composition. The tested 65mm Elmar is considered for an optimal vertical composition.
The Question of Hair Looking Like Hair, Rather than Like a Watercolor of Hair:
In digital portrait photography, real detail in hair is often one of the first things to be lost. This is because clearly imaging hair requires relatively high contrast at high spatial frequencies. The resolution actually captured in a good 4x5" film image may exceed 1/5000 of the picture width, though this much detail is not necessarily visible in a 16x20 print without using a magnifying glass. To image hair, it is not necessary that resolution be so high that the circle of confusion formed by a lens is as small as the angular width of a strand of hair. However, resolution and contrast do have to be high enough that many small groups of hair strands can be detected.
In digital imaging, more than just lens resolution comes into play. For example, the Bayer grid pattern of typical camera pixels is not very well suited to imaging fine structures that run through the picture in a variety of directions. Loss of hair detail, especially if combined with too much in-camera digital processing, can result in hair having a "watercolor" appearance, where the "real" visible structure of the hair is lost and replaced with blotchy color. In order to minimize this "watercolor" effect in certain zones, a lens has to be stopped down to a point that it has sufficient contrast on fine tangential structures.
Cameras and Lenses Considered in the Comparison:
The following cameras and lenses are compared:
- Olympus E-P2 camera and Leica 25mm f/1.4 DG Summilux. Average for small format.
- Fujifilm X-T20 camera and Fujinon 33mm f/1.4 lens. Very good for a small format.
- Olympus E-P2 camera and VC 40mm f/1.4 Nokton lens. Very good for a small format.
- Fujifilm X-T20 camera and VC 40mm f/1.4 Nokton lens. (Not tested yet.)
- Fujifilm X-T20 camera and VC 40mm f/1.2 Nokton lens. (Not tested yet.)
- Fujifilm X-T20 camera and 50mm f/1.4 Leica Summilux-M ASPH lens. (Not tested yet.)
- Leica M9 and 50mm f/1.4 Summilux-M ASPH. Does well except at extent of subject's hair.
- Estimate of 50mm f/2.0 Leica Summicron-M APO. Better than any tested lens under 75mm.
- Leica M9 and 50mm f/2.0 Zeiss Planar ZM. Does well except for focus shift near center.
- Leica M9 and 50mm f/1.4 AI Nikkor lens (results also based on lens test data and analysis).
- Leica M9 and 63mm f/2.8 EL-Nikkor. Provides about same useful aperture as Nikon 50mm.
- Leica M9 and 65mm f/3.5 Elmar (TII). Provides about same useful aperture as Nikon 50mm.
- Leica M9 and 75mm f/2.5 Leica Summarit-M lens. Superb results over entire subject at f/3.8.
- Hasselblad 500C with 100mm f/3.5 Zeiss Planar C lens (based on lens tests and analysis only).
- Pentax 6x7 with 135mm f/5.6 Caltar II lens (based on lens tests and analysis only; not in table).
- 4x5 Camera with 210mm f/5.6 Apo-Symmar (based on lens tests, plus results w/203mm Ektar).
About the Comparison Table for Maximum Useful Aperture vs Image Height:
In the table below, some evaluation criteria include resolving (or at least detecting) isolated strands of hair. As in the description of the portrait, right and left will be according to the subject's right or left. For each full frame 35mm format equivalent image height (i.e. distance from optical axis at focal plane) and lens, each cell in the table shows:
* The maximum useful f/ratio, followed by:
* The physical aperture size, followed by:
* The percent contrast for MTF 40 (when it can be estimated from MTF data or photos).
- (MTF 40 contrast was estimated from the images or interpolated from existing MTF charts.)
Data that shows relatively good performance at a given image height is shown in blue.
* Data for the image height that limits useful aperture of a given lens (for sample portrait) is in red.
* Incomplete data or possible anomalous data is shown in light gray.
* Note 1: Micro 4/3 and APS cameras have smaller image sensor formats, so the image height in the table below should be divided by 1.5 for APS format, and by 2 for Micro 4/3 format.
* Note 2: 44x33mm, 645, 6x7 cm, and 4x5" formats are larger, so the image height in the table below should be multiplied by 1.37 for 44x33mm sensors, 1.54 to 1.65 for 645 format, 2.17 for 6x7 cm format (65 x 52mm utilized area at most photo labs), and 3.75 for 4x5" format.
Table for Maximum Useful Aperture Versus 35mm Format-Equivalent Image Height.
Performance in Copying 16x20" Portrait Print of "Susan". Original Photo Taken with 4x5 Camera.
Max. Useful Apertures for Sample 3/4 Length Portrait. Copyright 2015 Jeffrey R. Charles. All Rights Reserved.
Note: If this table does not display correctly, try reducing the display font size in your browser.
Image
Height: |
0 mm |
2.3 mm |
4.3 mm |
6.6 mm |
7.9 mm |
9.4 mm |
11.8 mm |
13.5mm |
Feature: >
/ Lens v /
Max. Ap. |
Center +
R. Dress
Sleeve |
Lower
Right
Lace |
Upper
Left
Lace |
Hair 1
(Mid.
Right) |
Left
Dress
Sleeve |
Eyes |
Hair 2
(Top and
Back) |
Maximum
Extent |
25 f/1.4
S'lux Asp
(Mic.4/3) |
f/1.8
13.9mm
TBD |
f/2.0
12.5mm
TBD |
f/2.2
11.4mm
TBD |
f/2.5
10.0mm
TBD |
f/2.5
10.0mm
TBD |
f/2.5
10.0mm
TBD |
f/3.2
7.8mm
TBD |
f/3.2
7.8mm
TBD |
33 f1.4
Fujinon
(APS/FX) |
f/1.4
23.6mm
57% |
1.4
23.6mm
56% |
1.4
23.6mm
55% |
1.6
20.6mm
56% |
1.8
18.3mm
56% |
2.0
15.0mm
55% |
2.2
15.0mm
54% |
2.6
12.7mm
55% |
40 f1.4
V.Nokton
(Mic.4/3) |
f/2.4
16.7mm
57% |
2.4
16.7mm
57% |
2.4
16.7mm
57% |
2.4
16.7mm
56% |
2.4
16.7mm
54% |
2.4
16.7mm
53% |
2.4
16.7mm
53% |
2.8
14.9mm
54% |
40 f1.4
V.Nokton
(APS/FX) |
f/2.2
16.7mm
57% |
2.2
18.2mm
57% |
2.4
16.7mm
56% |
2.6
15.4mm
55% |
2.6
15.4mm
53% |
2.6
15.4mm
52% |
2.8
14.9mm
54% |
3.4
11.8mm
55% |
40 f1.2
V.Nokton
(APS/FX) |
f/2.0
20.0mm
57% |
2.0
20.0mm
57% |
2.0
20.0mm
57% |
2.0
20.0mm
56% |
2.0
20.0mm
54% |
2.0
20.0mm
53% |
2.0
20.0mm
53% |
2.4
16.7mm
54% |
50 f/1.4
S'lux Asp
(35mm) |
f/2.2
22.7mm
61% |
2.4
20.8mm
61% |
2.4
20.8mm
59% |
2.6
19.2mm
52% |
2.8
17.9mm
48% |
3.1
16.1mm
48% |
4.4
11.4mm
46% |
3.4
14.7mm
48% |
50 f/2.0
Apo S'crn
(Estimate) |
f/2.0
25.0mm
72% |
2.0
25.0mm
72% |
2.1
23.8mm
71% |
2.2
22.7mm
68% |
2.3
21.7mm
66% |
2.4
20.8mm
65% |
2.6
19.2mm
62% |
2.6
19.2mm
60% |
50 f/2.0
Zeiss ZM
(35mm) |
f/2.2
22.7mm
53% |
2.3
21.7mm
54% |
4.4
11.4mm
63% |
2.6
19.2mm
58% |
2.8
17.9mm
55% |
2.5
20.0mm
54% |
3.6
13.9mm
58% |
3.6
13.9mm
56% |
50 f/1.4
Nikon AI
(35mm) |
f/2.5
20.0mm
51% |
2.8
17.9mm
50% |
3.0
16.7mm
TBD |
3.0
16.7mm
TBD |
3.0
16.7mm
TBD |
3.0
16.7mm
TBD |
3.4
14.7mm
TBD |
3.4
14.7mm
TBD |
63 f/2.8
EL Nikkor
(35mm) |
f/3.5
18.0mm
50% |
TBD
TBD
TBD |
TBD
TBD
TBD |
TBD
TBD
TBD |
TBD
TBD
TBD |
TBD
TBD
TBD |
TBD
TBD
TBD |
4.5
14.0mm
TBD |
65 f/3.5
Elmar T2
(35mm) |
f/4.0
16.3mm
51% |
4.0
16.3mm
50% |
4.4
14.8mm
TBD |
4.4
14.8mm
TBD |
4.4
14.8mm
TBD |
4.4
14.8mm
TBD |
4.5
14.4mm
TBD |
4.5
14.4mm
TBD |
75 f2.5
Summarit
(35mm) |
f/2.8
26.8mm
65% |
2.8
26.8mm
64% |
2.8
26.8mm
62% |
2.8
26.8mm
60% |
3.1
24.2mm
57% |
3.4
22.0mm
55% |
3.8
19.7mm
57% |
3.8
19.7mm
61% |
100 f3.5
Z. Planar
(6x4.5cm) |
f/4.0
25.0mm
57% |
4.0
25.0mm
56% |
4.0
25mm
55% |
4.3
23.3mm
54% |
5.0
20.0mm
52% |
5.2
19.2mm
53% |
5.3
18.9mm
46% |
5.4
18.5mm
44% |
105 f2.4
P.Takumar
(6x7cm) |
f/2.8
37.5mm
57% |
2.8
37.5mm
56% |
3.4
30.9mm
55% |
3.4
30.9mm
54% |
3.4
30.9mm
52% |
4.0
26.2mm
53% |
4.0
26.9mm
46% |
5.4
18.5mm
44% |
210 f/5.6
Apo-Sym.
(4x5") |
f/5.6
37.5mm
TBD |
5.6
37.5mm
TBD |
5.6
37.5mm
TBD |
5.6
37.5mm
TBD |
5.6
37.5mm
TBD |
5.9
35.6mm
TBD |
6.3
33.3mm
TBD
| 6.7
31.3mm
TBD |
Discussion:
This test is obviously limited in scope, so it cannot be used to assess how well lens may work for general use. However, it does provide some results that can be used to determine the optimum aperture of each lens for this specific type of portrait, in the context of the comparison criteria. A larger aperture usually results in better separation between the subject and background, though other factors, such as the bokeh of each lens, also contribute to the character of the defocused background at a given aperture. Bokeh is not assessed in these tests, since a flat print is photographed with each lens.
For Leica rangefinder lenses, empirical results were amazingly similar to what could be expected from Leica's MTF plots. With the 50mm Summilux-M ASPH, this was the case right down to reduced resolution in tangential structures that starts to be pronounced beyond about 8mm image height, but then recovers a little beyond about 15mm image height. Reduced wide aperture performance of the 50mm Summilux beyond 8mm image height was more detrimental to resolving the subject's hair than I had anticipated, but actual contrast levels versus image height were not far from the MTF plots. In my opinion, this means that you can probably hang your hat on the high accuracy of Leica's MTF data. For in-focus aspects of the subject, newer Leica lenses perform about as you'd expect based on the MTF plots.
There are times when a Leica lens does not match the MTF data, but in most cases so far, Leica lens performance exceeds what I'd have expected from MTF data, rather than falling short. For example, MTF 40 plots for the 35mm f/2 Summicron-M ASPH at f/2.8 show only 30 percent contrast in sagittal structures at 10mm image height, and 20 percent at 12mm image height, which is only half the MTF 40 tangential structure contrast of the 50mm Summilux at the same f-stop and image height.
However, the 35mm Summicron resolves sagittal structures in this region almost twice as well as what the Summilux can manage on tangential structures at similar image heights. This may be due in part to lows in the Summicron MTF reduction being partly from mere field curvature, while the Summilux appears to have complex aberrations at 10-13mm image height. Aberrations are slight in comparison to most other fast 35mm format lenses, but considerable if comparing to large format results.
The Zeiss MTF data was also a relatively good match to the empirical data, with the exception of a curious loss in resolution in a limited area around 4-5mm image height, which had the appearance of slight linear blurring until the lens was stopped down past f/4. (This turned out to be from focus shift, as covered below.) MTF data for the VC 40mm Nokton lens was not available, but results here tend to indicate good performance versus cost in the central half of the field of view. Specifically, MTF 40 contrast at f/2.4 may exceed 50 percent out to an image height of 6mm, and 45 percent out to an image height of 10 to 11mm. Based on tests by other reviewers, the faster 40mm f/1.2 Nokton may perform even better.
A half length to 2/3 length portrait that is comparable to the sample large print of a portrait taken with a 4x5 film camera, and that has high resolution over the full subject, plus shallow depth of field and minimal vignetting in the central 2/3 of the image, is a very high goal for 35mm format. That I know of in 2015, only one compact 35mm format lens having a normal field of view has a chance of pulling this off with close to a 20mm aperture. This is because all of the 50mm full frame lenses (save the Leica 50mm f/2 APO ASPH) must be stopped down to less than 16mm to cover outer parts of the subject with adequate resolution. To cover the entire 27mm diameter tested region with good resolution, all lenses shorter than 75mm (except the 50mm APO) must be stopped down to less than 15mm.
The noted exception is the Leica 50mm f/2 APO-Summicron-M ASPH. It is not tested for the table above (can't afford one), but based on its MTF and vignetting plots, it is estimated that it will provide close to 29 percent more useful aperture than any tested lens shorter than 75mm focal length. The smallest aperture of f/2.6 (for 19.2mm aperture) in the table is required only to address vignetting. The lens has adequate resolution over the entire test area at its f/2.0 maximum aperture. Another exception might be the Zeiss Otus 50mm f/1.4, but it is large and is not available for rangefinder cameras.
The 50mm f/1.4 Summilux-M ASPH could just squeak by if it was not for having to stop it down to f/4.4 to retain adequate hair detail at out to 11.8mm image height. This part of a subject's hair is usually noticed right away in certain portraits. On the other hand, if the subject is offset 2-3mm toward the center of the wide aspect format of the Leica M9 (so all of the subject's hair above shoulder height is within 9.5mm of the center of the format), the Summilux could be used at f/3.1 (16.1mm aperture) for all except the very outermost extent of the subject. This is about the same aperture at which bokeh fringing becomes relatively well controlled.
At moderate 10mm to 13mm image heights, MTF 40 resolution of tangential structures by the Summilux gets worse than at any region except at the corners of the image, then rebounds between 15mm and 18mm image height. Sagittal structures are much more clearly resolved. This may be allowed in the design to extend good wide aperture resolution out to almost 20mm image height. Reduced resolution of tangential structures between 10 and 13mm image height looks like a glow that extends outward from a bright tangentially oriented feature. The glow is not very bright, but it is enough local aberration to notably reduce contrast in fine tangential structures such as hair.
The 50mm f/2 Zeiss Planar ZM lens is very close at f/3.6 (13.9mm aperture), but it seems to have a slight anomaly in a limited area between 4-5mm image height. It was first thought that this was a matter of faulty data rather than a real aspect of the lens. However, a closer look showed that the anomaly was real, and was caused by focus shift. (Focus shift can be compensated for while focusing, but this adds unwanted complexity.)
Specifically, it was found that focus shift began to blur subject matter at this image height before adequate resolution was achieved at a wider f-stop. Then, as the lens was stopped down past f/4, depth of field increased to where this area became adequately sharp. Focus shift was also found to occur at the center of the image, and it reduced resolution even there when the lens was used between f/2.5 and f/4. (Landscapes at wide apertures have been a mixed bag with the lens, and this may be why.) It is not known how much effect focus shift would have on near field three dimensional subjects. It may have less effect, since I've gotten good cat pictures with the ZM lens working at f/2.5.
Excluding this anomaly (from focus shift) in the Zeiss 50mm f/2 ZM lens data, if the subject is biased toward the center as is suggested for the Summilux, the f-stop could be increased to f/2.8 (17.9mm aperture). In cases where bokeh fringing may be obvious on images of the subject, the Zeiss lens must go back to being used at about f/3.6. The image scale of the Zeiss is slightly less than that of the Summilux. The image scale difference is not detrimental, but is simply noted.
Of course, the above mentioned but expensive 50mm f/2.0 Leica Apo-Summicron-M ASPH lens could easily provide the desired performance for a portrait when used at f/2.6, since its MTF 40 contrast exceeds 50 percent even at maximum aperture. Here, stopping down is only needed to reduce vignetting. This lens can do the job.
The Nikon AI 50mm f/1.4 lens came in at f/3.4, for a maximum useful aperture of 14.7mm. At wide apertures, the Nikon lens is not as good in the center as the Leica and Zeiss ZM lenses, but it does about as well as either rangefinder lens on imaging fine tangential structures between about 10mm and 13mm image height. The results for this lens are based both on testing the lens visually under high magnification, and from using it on the Leica M9 after setting optimum focus. Results on the Leica M9 have somewhat lower contrast than results from the 50mm Summilux-M ASPH or the Zeiss ZM lenses. The reduced contrast is most obvious in shadow areas. It is not bad enough to describe as a flaw such as veiling flare.
Since 65mm is very close to the optimum focal length for this type of portrait, the 65mm f/3.5 Elmar was eventually tested even though it is a slow lens. (Leica 66mm Elcan and Konica 60mm f/1.2 Hexar lenses were not available to test due to their high cost.) The black version of the 65mm Elmar, which some refer to as Type II, was tested with Visoflex III flip mirror on the Leica M9. Numbers in the table are based iterative tweaking of focus in the camera, as opposed to using only on the Visoflex for fine focus. (This in-camera method was also used to optimize focus for the Nikon 50mm and other lenses.)
If the Visoflex with its prism or chimney finder is the sole means for focusing the 65mm Elmar, the lens should be used at about half an f-stop slower setting than shown in the table, to allow for slight focus errors. However, focus can be more accurate if a 15x class loupe is used instead of either of the Leica finders for fine focus on the Visoflex. The Elmar lens comes in at about 14.4mm of useful aperture. The 63mm f/2.8 EL-Nikkor enlarging lens had similar performance. Both are very similar to the performance of the Nikon 50mm f/1.4 SLR lens, and surprisingly, slightly better than the Summilux-M ASPH and the Zeiss ZM 50mm lenses in the region around 11.8 mm image height.
When significantly longer than "normal" focal length lenses are considered, the Leica M9 with the 75mm f/2.5 Summarit-M lens, working at f/3.8, easily resolves the entire subject, while retaining 19.7mm of useful aperture. Stopping down this far is also good because it restricts vignetting to a reasonable level. (This resolution versus physical aperture size is about the same as that of the Hasselblad with the 100mm Zeiss Planar and an older digital back.) The only drawback of the Leica with a 75mm lens is that a 75mm focal length is longer than the 60 to 65mm that would be more appropriate for this type of portrait.
For further comparison, the same test was performed with a couple of lenses on an Olympus E-P2 Micro 4/3 camera and a Fujifilm X-T20 APS format digital camera. With these smaller format cameras, shorter focal length lenses provide the best field of view for a half length portrait, in comparison to full frame.
The real surprise is how well the Voigtlander (VC) 40mm f/1.4 Nokton Classic lens did on the Olympus E-P2 and the Fujifilm X-T20 cameras, even when used at the relatively wide aperture of f/2.4. This lens provided a 16.7mm useful aperture clear out to the outer extent of the subject's hair.
Based on other reviews, the 33mm f/1.4 Fujinon lens should provide adequate resolution at f/2 on the Fujifilm X-T20 camera, for 16.5mm of useful aperture. Also based on other reviews, the even faster Voigtlander 40mm f/1.2 lens should be useful at f/2 (for a 20mm aperture), especially on smaller format cameras.
The tests also demonstrated that a 12 MP digital camera is just barely adequate for the job, at least when the results are viewed on a computer screen. A higher pixel count may be needed if the resulting image is printed in a large size. On the other hand, watercolor-like artifacts from in-camera noise reduction resulted in more loss of real detail when a 16 MP Micro 4/3 camera (Panasonic GX7) was used. Therefore, if more than 12MP resolution is needed, the camera format should be larger than Micro 4/3. A Fujifilm 16 MP APS format camera (X-T10) appears to perform adequately, while a 24 MP APS camera (X-T20) begins to show some noise reduction artifacts.
Since a typical Micro 4/3 or APS format mirrorless camera with the VC 40mm Nokton lens can be acquired for well under $1k used, the few extra millimeters of useful aperture (for an equivalent, or wider, field of view) that is gained via the Leica M9 is expensive. However, there is no "normal" focal length option for Micro 4/3 that can provide as much useful aperture versus resolution as either the Leica 50mm f/1.4 ASPH or the Zeiss 50mm f/2 ZM lenses do on the M9. This partly is due to limitations imposed by a Micro 4/3 camera's anti alias filter, and partly due to the difficulty of getting good performance with a sufficiently wide aperture at only 25mm to 32mm focal length.
APS format digital cameras get a little closer to the full frame performance in this application, since a focal length of up to 43mm works for the corresponding portrait on APS format. (More tests with a Fujifilm X camera may be done later.) Of course, even APS format could not approach the Leica M if a fast high resolution 60mm to 65mm lens was still made for Leica M.
The Panasonic-Leica 25mm f/1.4 DG Summilux ASPH Micro 4/3 lens provided really sharp images out to a (35mm equivalent) image height of 9.4mm (actual image height of about 5mm) at a respectable f-stop of f/2.5. However, since the focal length is only 25mm, this is only 10mm of actual aperture. Beyond this image height, it had to be stopped down to f/3.2 to get a really sharp image. The results are very sharp, but the depth of field is so great that there is little separation between the subject and background, at least in a half length or wider portrait. Chromatic aberration was not a problem on this test at apertures smaller than f/1.8, but stopping down to at least f/2.8 is best for landscapes with backlit subject matter.
Unfortunately for the 25mm Micro 4/3 lens, I'd be reluctant to use it on an Olympus camera for a relaxed portrait such as the one above, mainly because the noise the lens makes on an Olympus camera is far from relaxing. This noise, which some call a "rattlesnake" sound, is caused by the camera rapidly changing the lens aperture as light levels vary. It is almost like the plastic lens barrel acts like a soundboard for the aperture mechanism. The sound can occur even when the camera is on a tripod if light levels changes or a shadow moves across the subject.
In my sample of the 25mm, the aperture does not sound like a rattlesnake, but makes a brief plasticy grinding sound every second or so if the camera is carried around, and less often if the camera is on a tripod. Most of the time, it is changing the aperture between wide open and f/2.8 to f/5.6, regardless of the actual aperture setting. (It makes less noise on a Panasonic GX7 camera.) The 25mm lens also appears to default to wide open for manual focus assist in dim light, which can cause soft images at f/2 (maybe from focus shift), but sharper images at f/1.4 and f/2.8. I have not tried the Voigtlander 25mm f/0.95 for this portrait test.
Correlation of Maximum Useful Portrait Aperture and MTF 40 Plots for Tangential Structures
Correlation Between Maximum Useful Aperture for Portrait and Tangential MTF 40 Plots.
Copyright 2013, 2015 Jeffrey R. Charles, All Rights Reserved.
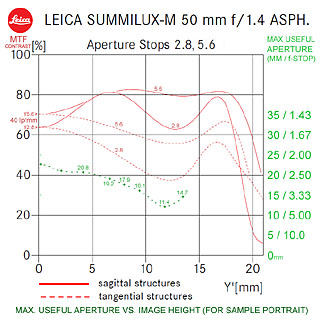 |
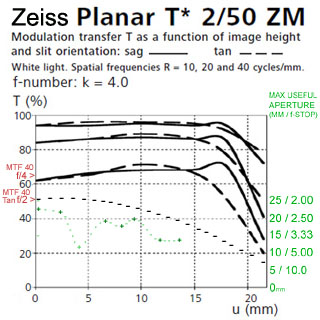 |
Plot of Maximum Useful Aperture Versus Image Height (dashed thin green line toward lower left of each graph) Closely Correlates to MTF 40 Plot for Tangential Structures.
The LEFT graph shows only MTF 40 plots for the 50mm Summilux-M ASPH lens for f/2.8 and f/5.6. MTF 40 plots are the most applicable since the object is to assess high resolution. The lower red dashed line is the plot for tangential structures at f/2.8. The faint green plot below that shows the maximum useful aperture versus image height for the sample portrait, out to an image height of 13.5mm. The aperture is indicated by green text in the right margin. This aperture plot was derived from comparing different zones of photos taken at various f-stops, including examination of how well hair is resolved by the camera and lens. Most of the subject's hair beyond about 8mm image height runs in a mostly tangential direction. This may be why the shape of the maximum useful aperture plot matches the f/2.8 MTF 40 plot so well. Tests to date show a correlation between MTF 40 and the "useful aperture" versus image height for the sample portrait with multiple lenses, so accurate MTF data can be useful to assess a lens for a given purpose before buying it. MTF data in this plot was compiled from Leica's data sheet for the 50mm f/1.4 Summilux-M-ASPH lens. (17)
The RIGHT graph shows similar data for a Zeiss 50mm f/2.0 Planar ZM lens. All MTF plots for f/4 are shown in heavy black lines, with the lower pair of these being MTF 40. Below these is a lighter dashed line for an MTF 40 plot, for tangential structures only, at f/2. The useful aperture verus image height plot is in green below this. This plot matches the f/2 MTF 40 plot fairly well, as well as some aspects of the f/4 plot, such as the increased tangential contrast at 9.4mm image height. The exception is an unusual low point at 4.3mm image height. It was at first thought that this low point was from anomalous data. However, every test picture taken with the lens had lower resolution in this area between about f/2.5 and f/4. The cause was found to be focus shift. Focus shift also occurs at the very center, but good resolution was achieved there by f/2.2, before the lens had been stopped down enough to shift the optimum focus distance, so it wasn't noticed at first. MTF data in this plot was compiled from data in the Zeiss data sheet for the 50mm f/2.0 Planar ZM lens. (16)
|
Comparison of Aberrations that Influence Resolution of Fine Tangential Structures
Comparison of Aberrations that Influence Resolution of Fine Tangential Structures.
Copyright 2013, 2015 Jeffrey R. Charles, All Rights Reserved.
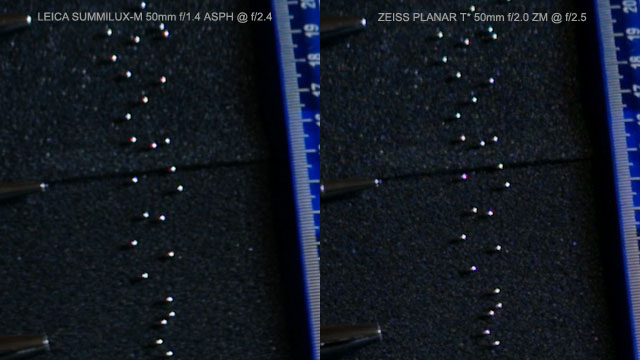 |
Aberrations at 10mm Lateral Image Height (Toward Left of Frame). 100 Percent Crops.
These 100 percent crops of reflections from several small 2mm ball bearings on a dark gray foam background help show aspects of lenses that can influence resolution of fine tangential structures. Combined with the ruler, this ensures that identical features will be on both sides of best focus. Two 50mm lenses were used at a subject distance is 2 meters. In each picture, the bearing array is at 10mm image height, toward the left in each original picture. Imaged reflections of a window in the bearings are larger than one pixel, so this does not simulate a point light source situation.
The LEFT picture is taken with a Leica 50mm f/1.4 Summilux-M ASPH lens, working at f/2.4. The plane of best focus is about 2 cm toward the camera from a horizontal line formed by a joint in the foam. At this plane, the reflections from the bearings are streaked slightly toward the left.
The RIGHT picture is the same bearing array, photographed with a Zeiss 50mm f/2.0 Planar ZM lens, working at f/2.5. Imaged features are at the same image height as for the left image.
|
 |
Aberrations at 10mm Lateral Image Height (Toward Left of Frame). 300 Percent Crops.
These 300 percent crops from the above pictures show the region around the plane of best focus.
At LEFT, elongation of small features by the 50mm Summilux is obvious. Small details in the foam are also a little soft. Spot elongation is probably due in part to slight coma and astigmatism. The lower inset is a picture of the lower left ball bearing with a 90mm lens, scaled to the same size, to show the actual size and shape of the window reflection. About 3 cm beyond best focus (past cropped area), fine detail in the foam is out of focus, but reflections from the bearings are more round. Beyond that, the reflections change to a slightly vertical elongation, which reveals slight astigmatism. Slightly beyond best focus, vertical elongation from astigmatism begins to obscure the left to right elongation of fine details. This is close to the worst case image height for the 50mm Summilux, when used at f/2.4. Spot elongation in this region is not well controlled until the lens is stopped down to slightly past f/4. While slight, spot elongation prevents clearly resolving hair in the sample portrait at apertures wider than f/4. Resolution at wider apertures is adequate for average portraits, but just isn't enough to rival medium format film in shallow depth of field portraits. Elongation is absent in the center, and reduced in a small region outside 15mm image height.
The RIGHT crop is from the Zeiss 50mm f/2.0 Planar ZM. It has very little spot elongation at best focus, and also captures more fine detail in the foam rubber. Obvious spot elongation with this lens (from slight astigmatism and other aberrations) only occurs outside the plane of best focus. At focus, reflections from the bearings have only a subtle plus sign shape from astigmatism. This lens better resolves fine tangential structures. If focus shift is accounted for and the subject is not backlit, this lens has adequate resolution out to the subject's eyes (in sample portrait) at f/2.8.
|
What are the Conclusions from this Test?
Tests to date show a correlation between MTF 40 and the maximum "useful aperture" versus image height for the sample portrait with multiple lenses. This means that, in at least some situations, accurate MTF data can be useful in evaluating a lens for a given purpose before buying it.
The same may not be the case for every application of a lens, since MTF usually does not reveal aberrations such as dim color fringing, or the imaged character of out of focus subject matter. However, MTF data is useful in evaluating many basic aspects of the in focus image. Therefore, lens manufacturers are providing a useful service to customers by publishing accurate MTF data. The following conclusions are based on evaluation of lenses (and cameras) thus far.
1.) One conclusion is that a Leica 35mm format digital camera *can* provide shallow depth of field, normal field of view images that are comparable to the "utilized aspects" of at least some of the 4x5 film images I acquired in previous years. This is in the context of typical viewing of a 16x20 print, as opposed to a huge life size print. However, it cannot provide such sharp and shallow depth of field results for on off-center subject with any of the lenses tested above.
A state of the art 35mm format digital camera can probably exceed the quality of most film images I shot on formats smaller than 6x7 cm. However, the only lens likely to reliably do this on the 35mm format is the Leica 50mm f/2.0 APO Summicron-M ASPH. Based on its MTF and vignetting data, it should have about 19.2mm of useful aperture for a portrait like that noted above. Here, the camera pixel size may be more limiting than the lens.
2.) The Leica 50mm f/1.4 Summilux-M ASPH can come close to the 4x5 results in a conventionally framed portrait only if it is stopped down to about f/4.4, which provides only 11.4mm of useful aperture. It can come close to 4x5 results at a moderately wide aperture (f/3.1) only if the subject's face is biased slightly closer to the center of the image than usual, to keep all of the subject's hair that is above shoulder height inside an area that is defined by a 9.5mm image height. Then, 5-6mm from one side of the long aspect 36x24mm format can be cropped out to provide a final 4:3 to 5:4 aspect image. This offset of the subject provides 16mm of useful aperture clear out to the outer extent of the subject's hair, and up to 18mm of useful aperture for the rest of the subject. Spot elongation that limits the useful aperture for portraits does not appear to be quite as significant at longer subject distances.
The 50mm f/2 Zeiss Planar ZM comes in at 14mm useful aperture. Not bad, and this can be increased to 18mm by biasing the subject toward the center of the field in the same way that is mentioned for the Summilux. The only downside to biasing the subject toward the center is asymmetry in vignetting for the final picture, but this could be addressed in post processing. If focus shift is compensated for when imaging a near field, 3D subject, the 50mm f/2.0 Zeiss Planar ZM may surpass the 50mm Summilux in this specific context. Focus shift can be accounted for while focusing if it is characterized, though this adds complexity.
The Nikon 50mm f/1.4 lens falls a little short at just under 15mm of useful aperture, but this does not account for any improvements in newer Nikon 50-58mm lenses, or for using an 85mm lens. However, 85m is too long for the sample portrait, and little else is available in a Nikon mount semi-telephoto, except for the Voigtlander 75mm SL lens. Zoom lenses generally are not sharp enough or fast enough.
The 65mm f/3.5 Elmar lens provides a useful aperture and contrast level similar to that for Nikon 50mm lens. This is also true of the 63mm f/2.8 EL-Nikkor lens. It is somewhat cumbersome to use the 65mm Elmar with the Visoflex III. A rangefinder coupled 65mm class lens would be better. Unfortunately, the only high speed RF coupled lenses in this focal length range are the discontinued, rare, and high priced Leica 66mm f/2 Elcan and the Konica 60mm f/1.2 Hexar (version 2) lenses.
3.) When the focal length is increased to 75mm (or a 65-80mm equivalent for other formats) the Leica 75mm f/2.5 Summarit-M can easily provide results equivalent to the 16x20 print of the 4x5 portrait, while maintaining close to a 20mm equivalent aperture. This is also true of the Hasselblad with a 100mm f/3.5 Zeiss Planar lens. The 75mm focal length on a 35mm format is a little long for this type of portrait, both in terms of perspective, and in terms of avoiding too many obstructions (in this case, flowers) between the camera and the subject.
4.) The big surprise is again that Micro 4/3 and APS formats can pull off a 15 to 17mm useful aperture at a 50mm (APS) to 80mm (Micro 4/3) equivalent focal length with the VC 40mm f/1.4 Nokton lens. And an even larger useful aperture may be possible with the 40mm f/1.2 Nokton lens.
The Fujinon 33mm f/1.4 lens on a Fujifilm APS format digital camera also does quite well in this test. It is almost sharp enough for the entire portrait at full aperture (23.6mm aperture), and slower apertures are only shown in order to overcome the strong vignetting of the 33mm lens. When reasonably good illumination of the field is considered, the 33mm lens works well at f/2.2 (15mm apeture), but the outer extent of the image looks a little better at f/2.6 (12.7mm aperture). However, if a little dimming or noise in the image corner is acceptable, the lens can comfortably be used at about f/1.8 (18.3mm aperture), which is quite impressive for APS format.
Relatively short focal length rangefinder lenses better than the 40mm Nokton are available, but of the 40mm and shorter focal length rangefinder lenses tested to date, the 40mm Nokton works best when effects of Micro 4/3 and APS format camera anti-alias filters are considered. Here, because of the anti-alias filter, the 40mm Nokton performs better than the 35mm Summicron or the Contax G Zeiss 35mm f/2 Planar do at the same aperture. More recently, fast 42.5mm lenses have been introduced for Micro 4/3, but these have not been tested. These are physically larger than the 40mm f/1.4 Nokton. Even 40mm is a bit long for the type of portraits considered above on Micro 4/3 format. A 32mm focal length would be better for M4/3. But 40mm is a good focal length for APS format.
The format aspect ratio of Micro 4/3 vesus that of APS and full frame is another consideration. The final print of the sample portrait has a 5:4 aspect ratio, while a Micro 4/3 camera has a 4:3 ratio, while the APS and 35mm full frame formats have a 3:2 ratio. Therefore, 35mm format equivalent of a 40mm lens on a Micro 4/3 camera is actually a little less than 80mm for the case of the sample portrait. Specifically, the format areas used for a 5:4 crop would be 16.2 x 13mm for Micro 4/3, compared to 30.0 x 24.0 for the 35mm digital format. The difference here is 1.85:1, so in the present context, a 40mm lens on Micro 4/3 is equivalent to a 74mm lens on the 35mm fulll framrformat. On the Fujifilm APS format, a 40mm lens is equivalent to 61mm on full frame. The 33mm f/1.4 Fujinon lens that is mentioned above also provides good performance at relatively wide apertures.
5.) The Pentax 6x7 (apparently no digital equivalent for its full format exists yet) can provide at least 26mm of useful aperture with lenses ranging from 105mm to 135mm focal length Takumar lenses. Also, the Calumet 135mm f/5.6 Caltar II is a view camera lens, but it performs well at full aperture (24.1mm aperture) on the Pentax 6x7, if adapted by means of the helical extension tube plus a custom part. The Mamiya RB67 camera with 127mm f/3.8 Mamiya lens can provide acceptable results at f/5.6 (22.7mm aperture), so 6x7 format cameras are a good choice for film portraits without the inconvenience of using a view camera. It would be really nice if a 6x7 digital camera with a sensor size of at least 66.6 x 53.3mm would be introduced. A smaller format sensor would not really cut it.
6.) In practice, a Hasselblad with a high resolution 645 or 6x6 digital back will easily best any 35mm format digital camera. This is because only the MTF 20 to MTF 30 performance of the Hasselblad lens would need to correspond to the contrast achieved on details having an angular size similar to details that correspond to the MTF 40 performance of a 35mm format lens. In the end, there is no substitute for a larger format with larger pixels. A sensor size of at least 53.3 x 40mm would be preferred for the Hasselblad, especially the V system. An square image sensor that is at least 53.3mm wide would be even better, since this captures the original vision of the Hasselblad V system: Namely, that the camera can be held the same way, regardless of how the final image will be cropped.
However, a compact 35mm camera system, especially a rangefinder that does not make much noise, is likely to be used more in the field. In practice, even the sound a camera makes can influence the expression of a subject. For example, I never acquired a portrait as good as I'd have liked when using a relatively loud Rolleiflex SL66 film camera, while I took numerous good portraits with quieter Yashica-Mat, 4x5, and Leica film cameras.
Optimum Half to 3/4 Length Portrait Lenses for Various Formats:
4x5": For those still into 4x5 film, a 200 to 240mm lens works well. Shorter lenses can also be used because there is always overhead to crop a little with 4x5. A moderately wider lens (e.g. 135mm to 180mm) would also be compatible with a sweeping landscape format portrait. A fast f/ratio is not needed because the lens must usually be stopped down to less than 26mm in order to have enough depth of field for the subject.
6x7 cm: The Pentax 6x7 works well with the 105mm f/2.5 lens, or with the 135mm f/4 Macro lens. I used a 135mm f/5.6 Caltar II view camera lens on the Pentax helical extension tube for even higher performance than the Pentax lenses. A 127mm lens is a good choice for the Mamiya RB/RZ 6x7.
6x6 and 645 cm format: For the Hasselblad V system, a nearly ideal lens already exists in the Zeiss 100mm f/3.5 Planar. This is ideal for the full 56x42mm format of the 645 film back. The main limitation for digital is that the V system digital back sensor size is only 49x37mm, while a 53x40mm sensor would be needed for the 100mm lens to just barely provide the long end of the range for an ideal field of view. The lack of a Hasselblad brand 53x40mm V-system back, combined with the lower performance of the wider 80mm lens, are what contributed to my looking into a digital Leica system. (The Hasselblad H System has a back with a 53x40 sensor, but its medium focal length lens is a longer 110mm, rather than 100mm. Also I don't like the H system as well as the older vintage V system.)
If a Hasselblad V-System back with either a 53mm square or a 53mm x 40mm or larger sensor had existed, I'd have just gone for a high end Hasselblad V system digital back instead of the Leica system, and then just used fewer Hasselblad lenses as my condition reduced my ability to carry the full system. As with the 4x5 film camera, there is room for a little cropping with the high resolution (50 MP or more) Hasselblad backs.
35mm format: For the full frame 35mm format, the ideal lens for portraits like those discussed above would be a 60mm (up to 65mm) lens that can provide really sharp images out to at least 13.5mm image height, and have minimal vignetting out to beyond 16mm image height, while operating at f/2.8 or faster. The 50mm Summilux is good, but both it and the 18MP Leica M9 lack the overhead to resolve a subject's hair at wide aperture, especially after much cropping. The newer Zeiss Otus f/1.4 SLR lens could easily provide a shallow depth of field image, but it is large and lacks rangefinder coupling. For a rangefinder camera, only the Leica 50mm f/2.0 APO Summicron-M ASPH lens provides both a normal focal length and high resolution at an acceptably large (19mm) aperture.
APS format: Here, the ideal lens for the sample portrait would be about 40mm, so the VC 40mm f/1.4 Nokton (or the newer 40mm f/1.2) could fill the bill. However, most APS cameras have some of the same anti alias filter issues as Micro 4/3 cameras encountered to date, so there may be little point in using a more expensive lens such as the 35mm Summilux. Even the 40mm Nokton could be pushing it with APS format sensor filter stacks or anti alias filters. If so, retrofocus (partially telecentric) wide to normal lenses such as those made for SLRs may work a little better.
Micro 4/3: For this format, the ideal portrait focal length would be about 32mm. Such a lens would need to be sharp and have reasonably low vignetting at f/1.9 in order to provide as much useful aperture (17mm) as the 40mm Nokton. A lens like this would probably have to be a retrofocus design in order to reduce the range of ray angles on the anti-alias filter near the edges of the format. In reality, 30mm may actually be better for MFT, because I have used a 35mm focal length lens on Micro 4/3, and 35mm was too long for an optimium perspective and working distance.
Additional information about the f/ratio required to get a given optical aperture size on different format cameras is in the introduction to my review of the 50mm f/1.4 Summilux-M ASPH lens in the Leica M Lens Review Chapter (Appendix D) of this web page. However, the following table provides a brief overview.
In In general, the f/ratio of a lens has to be faster for smaller format sizes, and it is more difficult and expensive to make faster f/ratio lenses. In addition, it is difficult to make compact fast f/ratio normal focal length lenses that can work well with thick image sensor filter stacks, and especially with AA filters.
- The "Portrait Equivalent" Focal Length column below is the focal length that provides the appropriate field of view (for the sample portrait) after compensating for forward movement of the lens to focus at the portrait subject distance. This is only significant for larger formats.
- The "Available Lens" column is for the closest available focal length that does not significantly exceed the optimum focal length. The "Required f-Stop" column is based on this focal length. The lens has to be sharp at this f/stop.
Maximum f/ratio Required to Get 20mm Apertue at 63mm Equivalent Focal Length:

CAMERA   UTILIZED      FORMAT  OPTIMUM  PORTRAIT  AVAIL.  REQIRED
FORMAT:  IMGAGE AREA:  SCALE:  FL INF.  EQUIV.FL  LENS:   f-STOP   NOTES:

4 x 5"	 90 x 112 mm    3.75    236mm	 218mm    210mm   f/10.5   Many Options
6x7 cm   65 x 52 mm     2.17    137mm    126mm	  127mm   f/6.35   Mamiya 127 f/3.8
6 x 4.5  52 x 41.6mm    1.73    109mm    104mm    100mm   f/5.0    H.100 f/3.5 Planr
44x33mm  44 x 33 mm     1.37     87mm     82mm     80mm   f/4.0    Various Makes
35 mm    36 x 24 mm     1.00     63mm	  65mm     50mm   f/2.5    Leica 50 f/2 APO
APS      23.4 x 15,6    0.65     41mm     40mm     40mm   f/2.0    V.40f/1.2 Nokton
M 4/3    17.3 x 13.0    0.54     34mm     33mm     25mm   f/1.25   ImpossibleToDate
As has been noted above, anti alias filters impose some limitations on the use of rangefinder lenses. An anti alias filter usually is not an issue for normal to wide angle SLR lenses, since their optics (and more importantly, their exit pupils) are farther from the focal plane. However, in practice, SLR lenses are not always as sharp as rangefinder lenses. A Leica digital camera elimimates the anti alias filter, which provides for wider use of rangefinder lenses in digital imaging.
Some of the 35mm format lenses discussed above would support a 70 MP full frame 35mm format camera. (A similar sensor could in theory be made by combining four 16 MP Micro 4/3 sensors.) However, limitations of actual pixel well depth may limit the practical pixel count to between 24MP and 50 MP when it is desirable to maintain real dynamic range and avoid both noise and noise reduction artifacts. Too much processing can cause the watercolor problem on hair in even a high pixel count 35mm format camera, as happens in smaller format cameras. These are trades to consider.
A full frame sensor having about 8400 x 5600 pixels with a 4.3 micron pixel interval seems like a reasonable maximum. With sensor shift, this can achieve 47MP of resolution for each color. Even then, there will always be a place for lower resolution (12 to 24 MP) sensors in the 35mm format, due to their potential for higher real dynamic range.
This sub-section Copyright 2015, 2016, 2021, 2023 Jeffrey R. Charles, All Rights Reserved.
APPENDIX L: Photo Products and Versions it would be Nice to See Made by or for Leica, etc.
This section covers products and product versions it would be nice to see either made by Leica, or made by other parties to fit Leica, etc., cameras. Many of the more general features could apply to any type or brand of camera. Some of the following were covered near the end of my previous 2012 paper about effects of anti alias filters.
Enhancements to Existing Cameras (M9, Digital MP, etc.), Short Version
With the 2015 Introduction of the Digital Leica MP, the new models are looking more attractive than before. The frame line preview lever is back, and the increased dynamic range and high ISO performance of the M240 is retained. However, the camera could still benefit from a few features that users of Micro 4/3 cameras have long been able to take for granted.
Enhancements for a Model Following the Digital Leica MP (or the MP where possible):
- JPEG engine providing SF (2.5:1) JPEGs that are comparable to newer Micro 4/3 cameras.
- Low ISO setting for clean images as w/Pull 80, but with less contrast, WIDE dynamic range.
- Two axis (X-Y) image stabilization via moving sensor up to 0.5mm. (Coding can set FL.)
- Sensor shift high resolution, plus sensor tracking. (Latter tracks stars for 2 min. w/50mm lens.)
- Ultrasonic sensor cleaning (similar to that on Olympus M4/3 cameras).
- PC flash (etc.) contact and means to add second flash shoe (side rail, notch dovetail, etc.)
- (Above permits simultaneous use of flash and EVF, or external microphone and EVF)
- EVF attachment having means to move magnified focus assist area around in the field of view.
- Lens coding to indicate use of lenses longer than 135mm. Two settings (>180, >320mm) OK.
- Option for 0.85x rangefinder with extent equivalent to 28mm lens. 250mm lines can be added.
- Natural RF frame line illumination (supplements internal illumination, or option to substitute).
- Small RF frame lines (or just corner dots) for 40mm, 65mm, 105mm, 180, and 240/280mm.
- Means to use attachments (magnifier, etc.) on RF eyepiece cell, even if diopter lens attached.
- Some diopter adjustment on rangefinder eyepiece, as opposed to requiring weak diopter lenses.
- Built-in STEREO microphone to equal sound quality of Olympus E-P2, Pan. ZS-7, Sony TR-7.
- Option to record audio only, to capture the sound of an environment or record a memo.
- 30 FPS (60 better) 1080P HD video with MJPEG option, since MJPEG better for productions.
- Smaller screw to cover MP RF adjust hole. Maybe "black dot" attached w/2 small screws?
Enhancements to Existing Cameras (M9, etc.), Long Version
- For Leica M9 & earlier models, firmware update to increase image review zoom another level.
- For all models, a low ISO setting that provides low noise as in the Pull 80 setting, but also provides the most dynamic range possible. Also implement software reduction of the most obvious aliasing. Hasselblad-Imacon digital backs do all of this, which is why the Leica M9 image could not quite match the lower pixel count Hasselblad V96C back in comparisons above. I'm not sure if a mere firmware update can do all of this. Low ISO is not an issue when the best possible picture quality is the goal, since a tripod may be used in such cases. The objective is good landscapes and half to full length portraits, etc., that have low noise but don't have blown out highlights. After all, the best picture possible is what it's all about! A Hasselblad with an Imacon V96C back does all of this, but is harder to transport, set up and use.
- For all models, improved JPEG engine to add reduced compression SF JPEG for better images.
- For all models, improved JPEG engine that does not output such high contrast images, for the purpose of reducing or preventing highlight and shadow clipping. Clipping by the Leica M9 (even compared to Micro 4/3) is clearly illustrated by crescent moon pictures in a previous section. The M9 also clips white and black fur on my cat more than Micro 4/3, even at the lowest contrast setting. Better quality in-camera JPEG's are important for some types of work flow, where there isn't time to deal with .DNG files.
- For all models, combination of buttons that can be used to "safely" exit a process without hanging the camera. An example is interrupting a long time exposure, even if the in-process picture is lost.
- In-camera means to easily re-size an image and save new copy under a new file name so both retained. For example, this is useful to quickly get a smaller image to E-mail. I use this feature on my circa 2001 Sony DSC-F707 a lot, and still use the Sony partly because of this feature.
- For all models, binning of sensor pixels for lower resolution but potentially lower noise high ISO images, implemented as firmware update if possible.
- For all models, firmware update providing a lens code to compensate for (undo potential vignetting from) micro lens array offset when long FL optics including telescopes used.
- For Leica M9 and previous models, firmware update to permit an intermittent quasi-live view with magnification. Here, the Leica M9 could take a picture every 2 to 4 seconds, but not save it to a memory card. Instead, it would display one image on its LCD screen until the next image could be displayed. The user could toggle between the full screen view and a view that magnifies the center (or another region) by at least 8 times, and preferably between 12 and 20 times. This is similar to the "focus" mode on some astronomical CCD cameras, and would simplify framing and focusing many types of pictures with long lenses or telescopes, while retaining the CCD sensor of the M9. User selectable gain in this mode would be useful to prevent excess brightness when focusing on planets through a telescope. This is a very useful enhancement for landscapes with long tele lenses, astrophotography, and other applications.
- Retrofit modification of the Leica M9 (etc.) base plate, to reinforce the wimpy strip of brass around the side rectangular base mounting hole. This is desirable even if it extends out a little from the base envelope and adversely impacts the camera's appearance to some. It would sure beat having the existing thin metal strip break, making use on a tripod risky or impractical.
- Means to record f-stop and filter information in image EXIF data, even it has to be via a menu.
Features for New Cameras (Leica or any other brand)
- Versions with a 0.85x viewfinder that drops the 28mm frame lines, but for which the extent of the finder (outside the 35mm frame lines) approximates 28mm. Frame lines for one or more of the longer focal lengths mentioned below could then be added to the 90mm lines.
- P versions of all models, all with no front model letter or red dot. Or, at least offer toned down brightness and color on the model letter and dot.
- Battery and memory card interface that does not require removal of camera base.
- In a new model camera, include at least frame line corner dots for lenses for which frame lines do not currently exist. Focal lengths would include at least 24mm, 40mm, 65mm, 180mm and 250mm. The reason for the latter two is mentioned later.
- User defined frame lines (for focal length and style) in cameras having internal frame line illumination or generation. This can include a dot for super-tele lenses.
- In a new model camera that has some similarity to the new M, include the frame line preview lever of the M9, plus two on board accessory shoes, or at least one shoe plus a Hasselblad-style rail (one would fit in the viewfinder "notch" on an M9) and a PC socket. Also provide 30 FPS HD movies and a built-in stereo microphone similar to that on an Olympus E-P2. Change the strap lugs to the type that directly accepts a strap without using D-rings (as on the Leica CL) to reduce audio noise.
- In a new model camera (if this is not already done in the Monochrome version) make a Monochrome M that has no color filters or offset micro lenses on the sensor. Ideally, it would also have an option for no IR filter at all. The camera would also have a sensor with a relatively linear response with exposure, and to some degree, with wavelength. Remote operation by a computer and a shutter with sower moving blades (to reduce vibration) would also be good. This could be used on microscopes and for some types of astrophotography and photometry.
- Option where newer cameras can have no IR cut filter, or a weak IR cut filter as in Leica M8.
- Camera with (or option for) a radial gradient anti-alias filter that provides the most anti-aliasing in the center, but virtually none in the edges and corners. This can be implemented in layers, with the anti alias filter tapering down toward the edge, but with the change in thickness compensated for through the use of ordinary transparent material having optical thickness changes that are inverse to the anti alias filter.
- Camera with (for lack of a better term) a "Super 35mm" sensor size that provides an aspect between 4:3 and 5:4, while maintaining the 36mm width. A sensor of this size may have dark corners when used with existing 35mm lenses, but it would provide more sensor area for those who want to use more traditional format shapes. The degree of cropping the 35mm format to get an 8x10 aspect print had a lot to do with my going to medium format back when film was king. A Super 35 digital camera could still provide a mode for 36x24mm (3:2 aspect) pictures, as well as other aspects.
- Cameras with Dual Boot (or Multi-Boot) Operating Systems (OS's). These could be in separate dedicated camera memories, or all but one could be installed run from a dedicated memory card slot. A menu item in any of the camera OS's would let a user return to an OS selection list. One OS could be an open source OS, to which users can contribute features and enhancements. Then, if a better JPEG engine was desired, someone could write it without convincing a camera manufacturer to catch up to other brands in this area. If some aspect of an open source OS hangs the camera, the camera could by default come up in the manufacturer's OS after reset.
Lenses and Attachments, Normal to Short Telephoto
- 60 to 65mm f/2.0 or slightly faster (f/1.7) lens having many characteristics of 50mm f/2 and 75mm f/2 APO Summicrons, but with focus closer than 0.7m that is utilized via Live View or an EVF in the newer M's, etc.
* A selectable focus stop or click detent would provide a reference for the 0.7m distance.
* Ideally, the reproduction ratio would go down to 1:3.5, though closer extremes of this could use an extension tube. It would not be an issue if the lens had to be used at f/4 or slower at close distances for good results.
* A 63mm focal length provides the field of view that many of my best pictures were either taken at or cropped to, but 65mm would work. (70-75mm is too long.)
* Ideally, the 65mm lens would have oversized front and rear elements to reduce vignetting to less than half an f-stop at f/2.8. It would also ideally have MTF 40 that exceeds 55 percent (on both sagittal and tangential structures) out to at least 14.5mm image height at f/2.8, when used at focus distances between 1.2m and infinity, while providing neutral or better bokeh.
* It would also be best if the 65mm lens is an APO, since this would reduce "bokeh fringing" (spherochromatism and LCA) such as that which is common (and at times distracting) in wide aperture pictures with the 50mm f/1.4 Summilux-M ASPH. It would be preferable if fluorite is not used, to reduce susceptibility to condensation and thermal shock.
* With such a 60~65mm lens, a Leica M could potentially deliver half length portraits with the resolution and background separation I used to get on medium format or larger film, while retaining a perspective that doesn't make the subject look two dimensional. A Hasselblad with a Zeiss 100mm f/3.5 Planar T lens does this well.
* Adding this capability to Leica M digital cameras via a high performance and compact 65mm f/2 lens is an excellent enhancement. (Leica made a 66mm f/2 Elcan many years ago in very limited quantity, but it is unknown if its AR coatings and vignetting are up to par for today.)
* As of 2021, two lenses exist that may have optics that could work for this lens if repackaged in Leica M mount. These lenses are:
** Voigtlander 58mm f/1.4 (newest version), and:
** Voigtlander 65mm f/2 Macro (but focus to 1:3.5 is OK for a Leica M version).
- Rangefinder coupled extension tube for 90mm and longer lenses (also compatible with 75mm lenses if practical). The extension tube would allow rangefinder focusing down to 0.7m (and EVF focusing to 0.5m) with the 90mm lens, and rangefinder coupled focus down to about 0.75m with 135mm lenses. The extension tube would have a transfer bar (similar to that of the original 90mm f/2.8 Elmarit lens, only shorter than what would set the rangefinder to infinity) to provide rangefinder coupling. Rangefinder goggles would not be needed with this approach.
Lenses and Attachments, Moderate Telephoto
- Matched 1.33x to 1.4x and 2x tele-converters for the 135mm f/3.4 Apo Telyt-M lens. These may not provide as sharp an image as a longer focal length prime lens, so a long prime lens would be better. If only one converter is made, roughly 1.9 to 1.95x may be best, so the T-value will be exactly 2-f stops slower than the f-stop setting on the 135mm lens. The tele-converter would have a transfer bar (similar to that of the original 90mm f/2.8 Elmarit lens) to preserve rangefinder coupling. Optics similar to those in the Nikon TC-201 converter (not the longer TC-301) may be adequate for this. The front element cell will by necessity project in front of the lens mount, so the converter is only applicable to 90mm and longer Leica M lenses.
- 180mm f/4 to f/4.8 lens, packaged similar to the Leica 135mm f/3.4 APO Telyt-M Leica R lens. (Ideally, this lens could have optics like or similar to those of the Voigtlander 180mm APO Lanthar, but have slightly less vignetting wide open.) The lens would be rangefinder coupled and have a small diameter barrel. A slower f/4.5 (to f/4.8) version could be offered if necessary to provide lighter weight, or to be compatible with a collapsible design. If necessary for focusing accuracy, the lens could use 2x goggles and bring up the 90mm frame lines, but it would be better if an optional eyepiece magnifier could be available instead of the lens having bulky goggles. It is envisioned that this lens may be used most at long subject distances.
- 250mm f/5.6 lens that basically consists of re-packaged Zeiss 250mm Sonnar T* lens optics (those made for Hasselblad V cameras). The maximum f-ratio could be a little slower to reduce weight if necessary. Rangefinder coupling, etc., could be as for the 180mm. If goggles were provided, they could utilize the 135mm frame lines.
Lenses and Attachments, APO 180, 240, and 320mm Lenses, APO 1.33-1.4x Converter
This subsection starts with a summary table of the proposed lenses. Considerable details (including renderings of most lenses) follows the summary table. It is anticipated that only one version of each focal length would be made, at least initially.
FOCAL		Phys.	Outer	Filter	Minimum
LENGTH  f/No.   Length	Dia.	Size	Focus	Note 1          Note 2

65mm    2.0      57     56.5    E46     0.4m    Built-in Hood   1:3.5 Reprod.Ratio
63mm    1.7      61     58.5    E49     0.5m    Built-in Hood   RF couple to 0.7m
180mm   4.0     107     58.5    E49     1.4m    Built-in Hood   -
240mm   5.6     141     58.5    E49     1.7m    Built-in Hood   OptionTelescopeConv
240mm   4.8     142     59.0    E55     1.7m    CompactNoHood   OptionTelescopeConv
240mm   4.8     142     62.6    E55     1.7m    Built-in Hood   OptionTelescopeConv
320mm   6.3     205     62.6    E55     2.8m    Built-in Hood   OptionTelescopeConv
320mm   4.8     208     81.0    72mm    2.8m    Built-in Hood   OptionTelescopeConv
1.34xTC  -       25     55.0     -       -      APO Tele-Conv.  For 90mm/LongerLens
2xTelCv  -       41     55.0     -       -      APO Tele-Conv.  SameLengthAsVisofl.
- 180mm and 240mm to 320mm high performance but extremely compact rangefinder coupled telephoto lenses are proposed here. Each lens will be covered separately after this introduction.
- All of the telephoto lenses proposed in this section are Rangefinder Coupled Leica M Mount.
* Rangefinder coupling is beneficial or even necessary for several reasons:
** First, the rangefinder provides a way to focus the lens on Leica M cameras that lack live view. Also, if the infinity stop is properly calibrated, it can be relied on for sharp focus on distant subject matter even if the rangefinder is not spot on.
*** Additionally, accurate focus at long ranges out to a few hundred meters is possible by adding small marks to the focus scale to indicate focus at longer distances. These marks can indicate focus out to as far as about 1,000 times the lens focal length (i.e marks for out to 160 meters with a 180mm lens, 200 meters with a 240mm lens, etc.) I added such marks to my lenses, and they provided sharp results. (See the "Astrophotography" and "Using Various Accessories..." parts of this Leica M9 and Leica M mount lens review page for details.)
** Second, and just as important, the rangefinder patch moves as a lens is focused in order to compensate for parallax. This makes it possible to use the rangefinder patch as a centering reference for each subject distance. The Leica M viewfinder can then act as a sports finder of sorts for long focal length lenses, where the viewfinder reveals subject matter well beyond the area covered in the picture. This is very useful when photographing birds in flight, etc.
** For example, on my first day using a 400mm lens on the Leica M9 with an adapter I modified to position the rangefinder patch at infinity, I captured three soaring hawks at a good image size in a single picture, and two overlapping hawks in another.
** The rangefinder patch in most Leica M cameras covers about the same field of view as a 400mm lens, so interpolating between the rangefinder patch boundary and the 135mm frame lines makes it possible to estimate the field of view for lenses between 135mm and 400mm when using Leica M cameras that lack Live View.
** An additional benefit of rangefinder coupling is it can provide distance information for future (as of 2020) adapters for other cameras that detect the rangefinder cam position of a Leica M lens, then use this to display distance information in various other cameras.
- Additional reasons RF coupled Leica M mount is proposed for initial lens versions include:
* Leica M lenses are usually more compact solutions for mirrorless cameras.
* Leica M mount will likely support a higher price than SLR mounts. (More Mfr. incentive.)
* Leica M mount lenses do not have an auto diaphragm, so they can have more iris blades for better bokeh. (Recommend an odd number of slightly curved blades: 9, 11, or 13.)
* Rangefinder coupling permits a Leica camera rangefinder patch to compensate for parallax, even if the rangefinder focus is not particularly precise for longer focal lengths.
* I have successfully used long FL lenses on Leica M cameras since the late 1970's, using techniques similar to the more refined hardware and methods shown toward the end of the "Using Various Accessories with the Leica M9" section of this Leica M9 and Leica M mount lens review document. (If I can take good pictures with a Leica M this way, others can too. And rangefinder coupling goes beyond the capability of hardware I am using with my tele lenses.)
* Of course, live view (in cameras that have it) is useful for obtaining reliable focus at closer distances. And live view can be used on other mirrorless cameras (Canon, Fuji, Nikon Olympus, Panasonic, Sony, etc.) that can utilize Leica M lenses via an adapter.
- Ideally, the physical envelope of the shorter focal length, slower f/ratio lenses will not exceed about 55mm diameter x 120mm length, measured from the lens mount. This is close to the 135mm f/4 Elmar envelope. (I designed a sharp 250mm f/11 collapsible lens that met this envelope, but have no way to build it, and f/11 is slow.)
** Slower versions of the lenses could be collapsible to fit this envelope.
** However, a physical length up to 141mm is useful for a 240mm lens if it is not collapsible.
* The maximum f/ratio could be as slow as f/8, but f/6.8 or faster is better.
* Proposed versions of the 180mm lens range from f/4 to f/4.5.
* The two proposed versions of the 240mm lens are f/4.8 and f/5.6.
* The two proposed versions of the 320mm lens are f/4.8 and f/6.3.
* A tripod mount is recommended for the 240mm and longer lenses in spite of the small size, partly to make use as a telescope practical.
* Most of these lenses are compatible with filter sizes commonly used on Leica lenses.
* The filter size for all proposed lenses except the fastest 320mm range from E46 to E55, with E49 being a good match for the shorter and slower lenses. A small filter size is desirable for almost all lenses listed in this section.
* If only one of the proposed long FL lenses is made, the 240mm f/5.6 may be the most practical, since it is significantly longer than the existing 135mm focal length, it is compact, and it can take the same 49mm (E49) filters as the Leica 135mm f/3.4 APO Telyt-M lens.
- Renderings of a few of my tele lens designs having small envelopes are shown below.
Basic Specifications for Notional M-Compatible APO Tele Lenses up to 320mm (240 Shown)
Basic specifications for notional Leica M compatible rangefinder coupled lenses from 180mm to 320mm, with renderings of two 240mm lenses.
© Copyright 2016 Jeffrey R. Charles. All Rights Reserved.
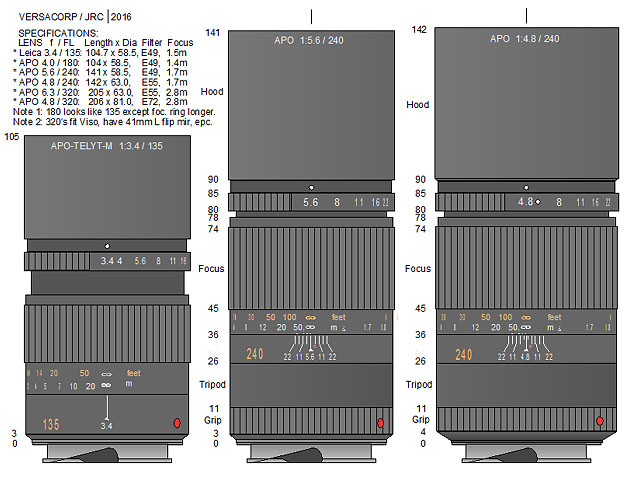 |
|
Notional 240mm Lenses (right 2), Shown to Scale with Leica 135mm f/3.4 Apo-Telyt-M (left).
Renderings of two notional 240mm lenses on the right are shown to scale with a Leica 135mm f/3.4 APO Telyt-M rendering on the left. The upper left table shows data for a Leica 135mm, as well as notional 180, 240, and 320mm lenses of various speeds. All are rangefinder coupled, though this is more for accurate centering of a subject in M cameras than for precise near field focus. The lenses have small marks near the infinity symbol to indicate distances up to 200m, for accurate focus at long distances without relying on the rangefinder. (I put such marks on my Leica R lenses, and they provide reliable results.) The 180mm lens, if based on the Voigtlander 180mm f/4 APO Lanthar, would be almost exactly the same size as the Leica 135mm, but would have a longer focus ring and helicoid to allow for closer focus (down to 1.5m or so). A focus assembly based on focusing the Leica 135mm down to 1 meter would work well for the 180mm. The 240mm lenses are only about 141mm long. 240mm is about longest practical focal length to carry in the same case as a Leica M system. Its 1:0.7 ratio for effective focal length versus the distance from the front element vertex to the focal plane is not unheard of in high performance tele lenses. The 180mm f/4 and 240mm f/5.6 lenses would take E49 filters. The 240mm f/4.8 lens takes filters as small as E55, and could potentially use the same focus mechanism as the 320mm lenses covered below. (However, one alternative is for the 240mm f/4.8 to use the same focuser as the 240mm f/5.6, which makes the rear 60 percent of the f/4.8 version more compact. Likewise, the entire length of the 240mm f/4.8 could be as compact as the f/5.6 version if the f/4.8 version is also made without a built-in hood.) All of the 240mm and longer lenses are shown with compact rotating tripod mounts to facilitate using the lenses as telescopes. The 320mm lenses (shown below) are also Visoflex compatible.
|
After researching compatible filter sizes, it was possible to arrive at the following eleven preferred embodiments of lenses between 180 and 320mm focal length, shown in order of preference for each focal length:
A.) 180mm f/4.0 lens having a 45.0mm clear aperture, E49 filter thread.
B.) 180mm f/4.5 or slower lens having a 40.0mm clear aperture, E46 filter thread.
C.) 240mm f/5.6 (actual 5.657) lens with 42.4mm clear aperture, E49 filter thread (pictured above).
D.) 240mm f/4.8 lens having a 50.0mm clear aperture and E55 filter thread (pictured above).
E.) 240mm f/6.0 lens having a 40.0mm clear aperture and E46 filter thread.
F.) 320mm f/6.3 lens having a 50.8mm clear aperture and E55 filter thread (pictured below).
G.) 320mm f/4.8 lens having a 66.7mm clear aperture and 72mm filter thread (pictured below).
H.) 320mm f/7.3 (actual 7.333) lens having a 43.6mm clear aperture and E49 filter thread.
I.) 280mm f/5.6 (actual 5.657) lens having a 49.5mm clear aperture and E55 filter thread.
J.) 280mm f/6.7 (actual 6.728) lens having a 41.6mm clear aperture and E46 or E49 filter thread.
K.) 320mm f/8.0 lens having a 40.0mm clear aperture, E46 or E49 filter thread. Can be collapsible.
The 240mm and 320mm lenses are preferred over 280mm, partly because the envelope of the 240mm f/5.6 lens is close to the practical maximum for keeping it in the same gadget bag as a Leica M system, while keeping the bag size reasonable. Once this envelope is exceeded, the lens will probably have to be kept in a separate case, so the focal length then might as well be longer than 280mm.
Of the lenses listed above, each of the five lenses that are rendered in the drawings immediately above and below (i.e. the drawings that emphasize 240mm and 320mm lenses) are breifly described in more detail here, along with covering some of the related trade space. Proposed rangefinder coupled Leica M mount lenses covered here are:
* 180mm f/4 Ultra Compact Leica M Mount APO Lens
* 240mm f/5.6 Compact Leica M Mount APO Lens
* 240mm f/4.8 Leica M Mount APO Lens
* 320mm f/6.3 APO Lens and Telescope
* 320mm f/4.8 APO Lens and Telescope
* 1.33x to 1.4x APO Tele-Converter in Rangefinder Coupled Leica M Mount is also covered
180mm f/4 Ultra Compact Leica M Mount APO Lens:
This Leica M Mount 180mm f/4 APO lens could potentially be based on the optics of the (discontiued) Cosina / Voigtlander 180mm f/4 APO-Lanthar SL lens. It could be made by Leica, Cosina / Voigtlander, or another manufacturer. When it was available new, the Voigtlander 180mm f/4 APO-Lanthar SL lens had a very low price of about $400 US. However, some time after the 180mm f/4 APO-Lanthar lens was discontinued, the price of a used one soared to at least twice the original price. And people pay it. (I did, anyway, and I have no regrets because it's a sharp lens.)
If a lens like or similar to the Voigtlander 180mm APO Lanthar is made in Leica M mount, it will be a compact solution to get more reach with Leica M cameras and a wide array of mirrorless cameras that can accept Leica M lenses via adapters. A rangefinder coupled 180mm Leica M lens would probably be in more demand than was the former Nikon F mount lens, and a more compact Leica M version may support a considerably higher retail price.
A 180mm f/4 APO Leica M mount lens having optics as compact as those in the APO-Lanthar lens could have almost exactly the same mechanical envelope as the Leica 135mm f/3.4 APO Telyt-M lens. The main difference from the appearance of the 135mm APO-Telyt M would be that the 180mm lens focus ring would extend almost all the way up to the aperture ring in order to provide more length for the helical threads and a close focus distance of about 1.4 meters.
The main advantages (and requirements) of the 180mm f/4 APO lens include:
* Compact size and light weight that should fit in with most camera systems.
* Should fit the mechanical envelope shown and described in this section.
* As with the other proposed lenses, an accurate infinity stop, combined with small marks on the focus scale for distances out to almost 1,000 times the lens focal length, can provide good results at longer ranges in comparison to the rangefinder.
* Existing optical design of Cosina / Voigtlander 180mm f/4 APO Lanthar lens may be suitable.
* Compatibility with the same 49mm filters that Leica M users may already have.
** Comment: The cost of filters is not the main issue. The main issue is the additional system size and complexity that results when using two sets of filters.
240mm f/5.6 Compact Leica M Mount APO Lens:
Of the lenses longer than 180mm proposed in this section, the 240mm focal length is highly recommended over 200mm because 240mm has just barely enough extra reach to produce a picture of the moon (for example) that is acceptable. Also, 240mm is enough different from 180mm (and especially from 135mm) to be worthwhile. 240mm is also recommended over 250mm because the physical size of the lens gets too large even at the slightly longer 250mm focal length, at least is the f/ratio is an even multiple of an f/stop (f/5.6) or half an f/stop (f/4.8). This is particularly true if compact size and compatibility with the filter sizes most common on Leica M lenses are considered.
The proposed 240mm f/5.6 APO lens is small and light, plus it has the same 49mm (E49) filter size as the Leica 135mm f/3.4 APO-Telyt-M lens. The 240mm f/5.6 lens may be made with or without a tripod mount, or with a detachable low profile tripod mount that screws on to a rotating collar (shown on drawing) that is always on the lens. (One example of a lens with a moderately compact detachable tripod mount is the Tamron 500mm f/8 mirror lens.) Some form of tripod mount is recommended for better stability, especially when adapted to smaller mirrorless cameras.
The 240mm f/5.6 lens is only 141mm long as measured from the front of a Leica M camera. The proposed minimum focus distance is 1.7 meters. This is based on a combination of what is useful versus what is possible in a physically short and compact lens. The 240mm f/5.6 APO lens will ideally have less than 10 percent of its aperture mechanically clipped at f/5.6 when used on a full frame 35mm format camera, and have NO aperture clipping at f/6.8.
The main advantages (and requirements) of the 240mm f/5.6 APO lens include:
* Compact size and light weight that should fit in well with most camera systems.
* Should fit the mechanical envelope shown (on drawing) and described in this section.
* Depth of field at f/5.6 and slower allows for slight rangefinder inaccuracy.
* As with the other proposed lenses, an accurate infinity stop, combined with small marks on the focus scale for distances out to almost 1,000 times the lens focal length, can provide good results at longer ranges in comparison to the rangefinder.
* Compatibility with the same 49mm filters that Leica M users may already have.
** Comment: The cost of filters is not the main issue. The main issue is the additional system size and complexity that results when using two sets of filters.
240mm f/4.8 Leica M Mount APO Lens:
The proposed 240mm f/4.8 lens takes a 55mm (E55) filter, and is only 142mm long as measured from the front of a Leica M camera. The proposed minimum focus distance is 1.7 meters. This is based on a combination of what is useful versus what is possible in a physically short and compact lens.
This 240mm f/4.8 lens has a rotating tripod socket that has an appearance similar to that of the 250mm f/4 Telyt-R Type 2 lens, except that the 240mm tripod mount is more compact. The rotating collar is a permanent part of the lens, but the tripod mount could be removable (similar to that on the Tamron 500mm f/8 mirror lens) if this widens its appeal.
The 240mm f/4.8 lens (and the 240mm f/5.6) may have adequate performance if loosely based on scaling the optics of the Voigtlander 180mm f/4 APO-Lanthar lens by a factor of 1.33 times, then appropriately slowing the f/stop, thinning some of the elements, and slightly changing spacing where advantageous. If this is done, the lens may cover up to 44 x 33mm image sensors, though the initially proposed version is a compact rangefinder coupled Leica M mount lens.
The 240mm f/4.8 Leica M mount lens is a lot smaller than an f/4 lens would be, takes 55mm (E55) filters, and has enough aperture to be useful as a small telescope. It is best if the 240mm f/4.8 lens has a low profile rotating tripod mount.
The main advantages (and requirements) of the 240mm f/4.8 APO lens include:
* f/4.8 maximum aperture, for use in slightly lower light than f/5.6.
* Should fit the mechanical envelope shown (on drawing) and described in this section.
* Should have less than 12 percent mechanical aperture clipping at f/4.8 on 35mm format.
* Must have almost ZERO mechanical aperture clipping at f/5.6 or slower on 35mm format.
* Optics are more likely to be compatible with larger 44x33mm image sensors than f/5.6 version.
* The 50mm aperture of a 240mm f/4.8 lens is moderately useful as a small telescope.
The 240mm f/4.8 lens can be made as a Visoflex compatible lens to provide 41mm of additional back focus and wider adaptability beyond Leica M and full frame or crop sensor mirrorless cameras. (Such a lens could adapt to DSLR and some larger sensor cameras.) The 240mm lens is not shown this way on the drawing because the mechanical design of a close focusing compact version could be difficult if implemented as a Visoflex compatible lens. The 320mm lenses below are better suited to this.
320mm f/6.3 APO Lens and Telescope in M39 or Leica M Mount:
The 320mm focal length is actually more useful than 240mm for some subjects, but the physical size of the 320mm lens is enough larger than the 240mm lens that the 320mm would have to be carried in a separate lens case. However, the added physical length of a 320mm lens makes it practial to implement it in a Visoflex mount, which has 41mm more back focus than a direct mount Leica M lens. This added back focus makes it possible to ultilze many types of accessories for both photography, and for visual use of either of the proposed 320mm lenses as a telescope.
The back of either Visoflex mount 320mm lens includes a rangefinder coupling cam, but it is not used with a Leica M rangefinder without adding a 41mm long extension tube or flip mirror attachment that includes a rangefinder transfer bar of the same length. Accessories that can be added to the back of the RF coupled Visoflex lens include:
* Existing Leica 41mm extension tube that lacks rangefinder coupling.
* Proposed 41mm extension tube that includes a rangefinder transfer bar.
* Standard Leica Visoflex unit (no RF coupling).
* Flip mirror for M39 cameras (if lens is M39 and M adapter used behind mirror).
* Flip mirror or eyepiece turret that includes a rangefinder tansfer bar.
* Eyepiece turret that is custom made for the proposed series of 320mm, etc., lens.
* Adapters for existing telescope accessories that require sufficiently short back focus.
* Adapters for cameras (DSLRs, medium format) that require more back focus than a Leica M lens.
The proposed 320mm f/6.3 lens has a relatively small outer diameter, is relatively light, and accepts commonly available 55mm (E55) filters. This is the same filter size as the Leica 90mm f/2 APO Summicron and some other Leica M lenses. The physical length of the 320mm lens is enough longer than the 240mm lenses that it may not fit in most Leica M gadget bags, but it could fit in a relatively small external case. It is small by DSLR lens standards, but not by Leica M lens standards. Details are in the drawings below.
The 320mm f/6.3 lens is shown (on the drawing below) with a conventional 62-63mm diameter focusing assembly that is the same as that of the 320mm f/4.8 lens. Either lens can be made as shown or instead have internal focus and include floating elements for better near focus performance. The minimum focus distance with the shown focuser is 2.8 meters, but minimum focus can be closer with internal focus.
The main advantages (and requirements) of the 320mm f/6.3 APO lens include:
* f/6.3 aperture is the fastest that will accept common 55mm (E55) filters.
* Reasonably portable and lightweight, even for a Leica M system.
* Should fit the mechanical envelope shown (on drawing) and described in this section.
* Should have less than 10 percent mechanical aperture clipping at f/6.3 on 35mm format.
* Must have almost ZERO mechanical aperture clipping at f/6.8 or slower on 35mm format.
* Can be made as a Leica Visoflex compatible lens (see drawing) to facilitate use with a flip mirror or certain adapted visual, etc., telescope accessories.
* The 51mm aperture of a 320mm f/6.3 lens is somwewhat useful as a small telescope.
* Compact eyepiece turret (shown) can be an optional accessory. The low profile of the eyepieces shown in the drawing are for direct mounting of the eyepiece turret on Leica M mount lenses. If attached to a lens with the added back focus of a Visiflex mount, the eyepieces will project out considerably more than what is shown.
320mm f/4.8 APO Lens and Telescope in M39 or Leica M Mount:
The proposed 320mm f/4.8 lens is inspired in part by a custom assembly that I designed and built in 1995 for use with a 300mm f/4.5 ED Nikkor lens. The assembly I used on the lens consisted mostly of two optical accessories that I designed, manufactured, and sold as commercial Versacorp products. These accessories included the DiaGuider (TM) flip mirror and off-axis guider that I introduced commercially around 1986, and the VersaScope (TM) adapter that I introduced in 1995, which is a lens mount adapter combined with a long throw 2x Barlow lens that provides enough back focus for the DiaGuider.
For years, the 300mm ED Nikkor lens, combined with the DiaGuider (TM) and VersaScope (TM) adapter was my main portable telescope. It was used (among other things) to observe and photograph the 1995 total solar eclipse from Thailand, and for public viewing of Comet Hale-Bopp in 1998. Even though the 300mm ED Nikkor lens only had an aperture of 67mm, many who saw the comet through it at 30x liked the view better than the higher magnification views through larger telescopes. (Photos and details for this 300mm lens/telescope assembly are in my 1995 eclipse expedition photos at my www.eclipsechaser.com web site.)
The magnification of about 30x that the assembly provided with a 20mm Erfle eyepiece was useful for a variety of things, and different eyepieces could easily be used. The main drawback was that the 300mm ED Nikkor lens had to be stopped down to about f/6.8 in order to provide an image that was anywhere near diffraction limited, and the reduced aperture from stopping down limited planetary performance.
Many wanted to emulate my portable 300mm lens and telescpe setup (and I made some of the rear assemblies commercially), but field curvature from the relatively simple Barlow lens was not as controlled as what a Nikon TC-301 tele-converter can provide at wide apertures. The cost of integrating optics like those of a TC-301 into the assembly was prohibitive for market conditions at that time. Conditions are more favorable now, but I can no longer manufacture such items at scale (if at all) for medical reasons.
One purpose of the proposed 320mm f/4.8 APO lens is to improve significantly on the previous compact lens and telescope combination. This includes providing good optical performance at or near full aperture, so that applications can include acceptably good planetary observation. Like the 320mm f/6.3 lens, the f/4.8 version is Visoflex mount, meaning that the back 41mm of the lens barrel can consist of several different things, and it has enough back focus to work on a wide variety of cameras via appropriate adapters.
The proposed 320mm f/4.8 APO lens is not as compact as the other lenses proposed in this section, but its performance (if made as proposed) is good enough that it doubles as a telescope that is capable of imaging and observing terrestrial subjects (birds, etc.) as well as observing astronomical objects including the moon, planets, and brighter comets and nebulae. It is far more compact than most portable telescopes of similar aperture, and it should provide reasonably good planetary views at magnifications up to 140x if made with optics that are diffraction limited at or near full aperture. It also has the fast handling characteristics of a camera lens.
The 320mm f/4.8 APO lens is shown (on the drawing below) with a conventional 62-63mm diameter focusing assembly that is the same as that of the 320mm f/6.3 lens. Either lens can be made as shown or instead have internal focus and include floating elements for better near focus performance. The minimum focus distance with the shown focuser is 2.8 meters, but minimum focus can be closer with internal focus. The filter size is 72mm.
The main advantages (and requirements) of the 320mm f/4.8 APO lens include:
* f/4.8 maximum aperture, for use in lower light than f/6.3.
* Should fit the mechanical envelope shown (on drawing) and described in this section.
* Should have less than 12 percent mechanical aperture clipping at f/4.8 on 35mm format.
* Must have almost ZERO mechanical aperture clipping at f/5.6 or slower on 35mm format.
* Optics are more likely to be compatible with larger 44x33mm image sensors than f/6.3 version.
* Can be made as a Leica Visoflex compatible lens (see drawing) to facilitate use with a flip mirror or certain adapted visual, etc., telescope accessories.
** The added 41mm of back focus behind a Leica M Visoflex mount is also compatible with adding rear adapters that have enough back focus and clear aperture to fit DSLR cameras, and to even illuminate larger format 44x33mm image sensors.
* The 67mm aperture of a 320mm f/4.8 lens is very useful as a small telescope.
* Compact eyepiece turret (shown) can be an optional accessory. The low profile of the eyepieces shown in the drawing are for direct mounting of the eyepiece turret on Leica M mount lenses. If attached to a lens with the added back focus of a Visiflex mount, the eyepieces will project out considerably more than what is shown.
1.33x to 1.4x and 2x APO Tele-Converters in Rangefinder Coupled Leica M Mount:
A reasonable compromise to add maximum flexibility to a Leica M system (and provide high performance compact lenses for other mirrorless cameras), while making as few new products as possible, would be to simply make one version of a 240mm lens, plus a good rangefinder coupled Leica M mount tele-converter in the 1.33x to 1.4x range. A high performance tele-converter would by necessity have a protruding front element cell, so it would only work with 90mm and longer Leica M lenses, and would be optically optimized for lenses of 135mm or longer focal length.
The main advantages (and requirements) of the 1.33x to 1.4x and 2x APO tele converters include:
* When used with the Leica 135mm f/3.4 APO Telyt M lens and the proposed 240mm lens, the 1.33x conveter provides the capability for 180mm f/4.5 and 320mm f/6.4 or f/8.4 optics.
* When used with the Leica 135mm f/3.4 APO Telyt M lens and the proposed 180mm f/4 lens, the 2x conveter provides the capability for 270mm f/6.8 and 360mm f/8 optics.
* Rangefinder coupled for both focusing and parallax correction.
* Adds only a small amount (up to about 41mm for the 2x) of physical length to a lens.
* Could potentially be based in part on the existing Nikon TC-14 or TC-201 converter designs.
* Lens element cell of 2x could (optionally) be removable to provide a 41mm extension tube.
for using existing Visoflex compatible lenses without the Visoflex attachment.
Comment: Re-introducng the stand alone Leica M 41mm extension tube for existing Visoflex lenses (but adding rangefinder coupling to the tube for compatibility with the proposed 320mm lenses) is also recommended, since Leica M and other cameras with Live View could then use Visoflex lenses without the bulk of the mechanical Visoflex unit. This tube could also have a permanent or removable rotating tripod mount, for use with heavier Visoflex lenses that lack their own tripod mounts.
Discussion About the Proposed 240mm and 320mm Lenses:
If only one focal length longer than 135mm is offered, the 240mm f/4.8 would probably be the best one if it is also used as a telescope, while the more compact 240mm f/5.6 is probably best if it is not often used as a telescope. 320mm is generally a more useful maximum focal length, but the 240mm lenses are significantly more compact, while still having more reach than a 180mm or 200mm lens.
The 240mm is also preferred over a 320mm in this situation for a few other reasons:
* Shown 240mm f/5.6 lens is about largest practical size to carry in same case as a Leica M system.
* An f/4.8 version (if implemented) may make it easier to have almost no vignetting at f/5.6.
* The physical length of a 240mm lens could be as short as 141mm without going overboard on telephoto amplification by rearward optics.
* A 240mm lens could use a matched rangefinder coupled 1.33x to 1.4x Apo tele-converter to provide roughly 320mm focal length.
* The same rangefinder coupled Apo tele-converter can also provide 180mm, when used with the existing 135mm f/3.4 Apo-Telyt-M lens.
* Additionally, a 2x converter could provide up to a 480mm focal length, but at a relatively slow f:ratio of f/9.6 to f/11.
* A 50mm aperture makes the 240mm f/4.8 lens more useful as a telescope.
* Either 240mm lens could use a miniature eyepiece turret attachment like or similar to that shown on the 320mm lenses below.
* If the 240mm lens with telescope adapter turret is kept in a separate case, it would be very compact.
The longest recommended focal length of 320mm was arrived at for multiple reasons.
* First, 400mm has often been too long for good compositions, while 350mm to 380mm has often been about right for the full 35mm format. For this reason, I've found 350mm to be more useful than a 400mm. (Nature rarely conforms to round numbers!)
* Also, with 16:10 and 16:9 image display proportions now more common, a 320mm focal length provides a vertical angle of view (in a 16:9 image) similar to that of a 380mm in a 1.5:1 image.
The physical length of a 320mm focal length lens (when a 1:0.7 tele ratio is not exceeded) is about the maximum practical size for travel, given carry on bag sizes limits, etc. A 320mm lens provides slightly more image scale than a 300mm, yet is physically smaller than a 350mm lens of similar design.
Some of the notional 320mm lenses are relatively slow, but this may not be an issue if designed for high performance and very little vignetting wide open. Many lenses, including the Leica R 250mm and 350mm lenses, must be stopped down to between f/5.6 and f/8 (depending on the subject) to adequately control fringing and vignetting. If a smaller 320mm f/6.3 to f/6.8 lens performs as well or better wide open than the current Leica R 350mm f/4.8 lens does at the same aperture, it would provide the same results as the physically larger lens, without carrying around the added weight of an extra f-stop of glass that may rarely be used.
Ideally, at least one of the 240mm and/or 320mm lenses would be offered in addition to a 180mm.
* Any of the proposed long tele lens embodiments shall meet the following performance criteria:
** Goal at full aperture is for MTF 40 to exceed 60 percent contrast out to 18.5mm image height.
** At full aperture, resolution and fringing are better than 250mm f/4 Telyt-R V2 is at f/6.8.
** Corner vignetting at full aperture shall not exceed 12 percent (1/4 f-stop) from clipping.
** Shall be free of coma that would be problematic for astrophotgraphy at the maximum aperture or at f/5.6, whichever is slower.
** Physical length of lens, including a standard Leica M rear cap, shall not exceed 223mm.
** Has infinity stop or user-adjustable focus stop similar to that on the 300mm f/4 or 400mm f/5.6 ED Nikkor lenses.
The faster lenses should be of an APO design, while the f/6.3 and slower lenses may perform adequately even if not fully apochromatic. Where possible, it is best to avoid fluorite or other optical materials that have relatively high susceptibility to thermal shock and moisture. This is particularly true of the 320mm lenses, since their increased compatibility with use as telescopes could result in more exposure to the elements.
For more versatility, a low to moderate magnification (say, 15 to 33x) telescope and/or fine focusing adapter could also be made for the back of a compact tele lens (and/or other M, etc., lenses), or, a small flip mirror (smaller than a Visoflex, even if eyepiece field smaller) could be incorporated or attached.
Such a telescope adapter could even have an eyepiece turret, to reduce the risk of dust contamination when changing eyepieces. A turret may also help people be less inclined to use eyepieces that provide too much magnification for a given lens. A turret with screw-in eyepieces would also reduce the risk of users removing the eyepieces and losing them or getting dirt on the field lenses.
Two renderings of 320mm tele lenses are shown below, along with a rendering of a notional flip mirror and eyepiece turret. (In general, the flip mirror would not be needed on a turret, and it may be best if the turret has a fixed mirror or prism that is less susceptible to becoming misaligned.)
As shown, both 320mm lenses are compatible with the Leica Visoflex III, but are also rangefinder coupled. A Visoflex could be used where the eyepiece turret is shown. The flip mirror and eyepiece turret is only 41mm long, which is the same depth as the Visoflex. As shown, the turret includes a rangefinder transfer fitting to preserve rangefinder coupling. A blank tube of the same 41mm length could also have a rangefinder transfer fitting. (See comments at the end of the above APO tele-comverter details.)
The eyepiece turret could instead be a visual only attachment with a fixed right angle mirror or prism. This is more compatible with an Amici prism that does not flip the image left to right as a mirror would. (A slightly enlarged and offset Amici prism, with a corresponding offset eyepiece position, will eliminate diffraction spikes from the prism roof at the image center.) A visual-only Leica M compatible eyepiece turret would also be less expensive, and is compatible with the low profile eyepieces illustrated below.
A compact eyepiece turret is preferred over typical slide fit interchangeable eyepieces because it provides a dust seal and prevents dropping or misplacing eyepieces. The lowest magnification eyepiece (circa 18mm) works as a finder scope on lenses up to 320mm focal length, eliminating the need for a separate finder scope.
To meet the 41mm length on a version having a flip mirror, and to keep the diameter small enough to use on existing Visoflex lenses such as the 280mm f/4.8, the flip mirror (or prism) is only large enough to accommodate the field of the largest eyepiece in the turret. The longest focal length eyepiece shown is 18mm, though longer focal length eyepiece can be used. Ideally, the lens tripod mount collar (or an outrigger on the flip mirror) would include means to attach an unusually small finder scope (4x15, for example) or a small (non laser) dot finder.
The shown versions of the 320mm lens and flip mirror/eyepiece turret provide at least three visual magnifications. If the optics from readily available eyepieces are used, magnifications of 18, 32, and 53x would be provided with 18, 10, and 6mm eyepieces. Additional magnifications are possible by changing eyepieces, or if a fourth eyepiece is added to the 4th port on the bottom. A fourth eyepiece (4mm or 3mm) could provide even higher magnification (80x or 107x). The fourth eyepiece is not shown in the rendering because the longer 18mm eyepiece could interfere with a large tripod head if it is rotated to the bottom, unless of course the low profile tripod mount on the lens is made taller. If a 4th eyepiece is used, a good magnification would be between 100x and 140x, which is at the low end of what is useful for planetary viewing. The highest magnification eyepiece would require some form of built-in Barlow lens to have acceptable eye relief. (Something like the optics from the vintage Takahashi HI-OR 2.8mm eyepiece may work well here.)
If a 240mm lens is the only M lens longer than 135mm that is offered, the eyepiece turret could be used in conjunction with a 1.4x or similar tele-converter to provide similar visual magnifications. If no tele-converter is offered, the preferred eyepieces would have slightly shorter focal lengths, but the lowest magnification eyepiece would be of a wide field design in the 12mm to 16mm range (optics could be similar to the compact 1980's Meade Research grade Erfle eyepieces). On the 240mm lens, a notional magnification range with 4 eyepieces would be on the order of 16x, 30x, 60x, and 100x. However, the maximum practical magnification may only be 86x if the shortest existing simple and compact eyepiece optics (2.8mm) are used. A finder scope may not be needed if the lowest magnification is 16x or less.
Four turret ports are shown instead of 5, etc., because this better fits a small square case. However, a 5 or 6 port turret is possible, as is a 3 port with 120 degree rather than 90 degree detents. The 240mm lenses and the f/6.3 version of the 320mm lens may be small enough for visual use on a Leica tabletop tripod. Here, a compact but precise slow motion head would be useful.
If a larger aperture 320mm f/4.0 to f/4.8 lens is paired with a slow motion adapter, a finder scope, and a Barlow lens (e.g. tele-converter) that optimizes central performance, the magnifications may be higher, with 32, 53, 100, and 200x being possible. This will provide reasonable views of planets out to Saturn. However, it is anticipated that most users would use the lens and eyepiece assembly for terrestrial subjects such as birds, etc.
If designed as a lens system, all of the 240mm and 320mm lenses with E55 or larger filter threads could potentially use a common compact (62-63mm diameter) yet heavy duty focusing assembly that provides smooth focus and does not wobble or rattle over time like some later 250mm and 350mm Leica R lenses.
Obviously, lenses having adequate back focus for a Visoflex III will easily adapt to a variety of cameras. It is likely that all of the 180mm and longer notional lenses will have enough back focus behind their rear elements to work on SLR cameras as well as Leica M cameras. The Leica Visoflex mount has a longer back focus than just about any 35mm camera, and even some medium format cameras. A maximum focus assembly diamerer of 62mm to 63mm is recommended because larger diameters can interfere with mounting certain cameras (Micro 4/3 in particular) on large tripod heads.
The proposed tele lenses could be designed to just barely cover the larger 44x33mm sensor of Leica and other quasi medium format cameras, yet be optimized for exceptional performance and almost no mechanical vignetting out to at least 18.5mm image height. This would permit the same optics to be used with multiple formats, from quasi medium format all the way down to Micro 4/3 or smaller. The only difference would be the rear interface, or the use of certain adapters.
Basic Specifications for Preferred Embodiments of M/Viso-Compatible 320mm APO Lenses
Basic specifications for notional rangefinder coupled 320mm lenses that are compatible with Leica M, other cameras via adapters, the Visoflex III, and a compact telescope adapter.
© Copyright 2016 Jeffrey R. Charles. All Rights Reserved.
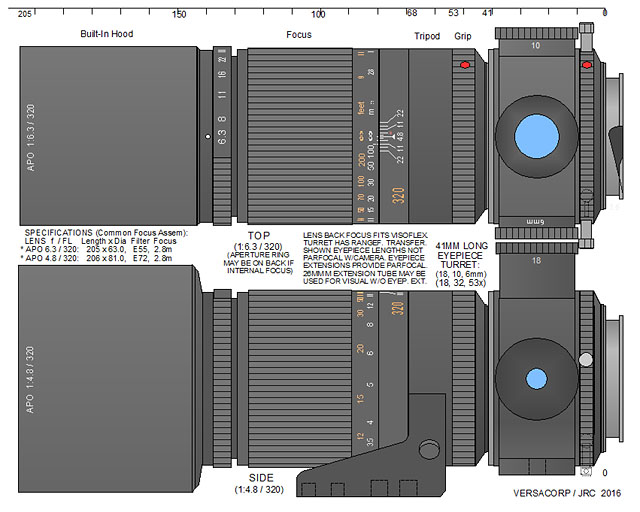 |
Two Notional 320mm Lenses, Each Shown with a Miniature Telescope Eyepiece Turret.
Renderings of two notional 320mm focal length lenses, each with a compact flip mirror and eyepiece turret that is the same depth as a Visoflex III. The top version is a 320mm f/6.3 lens that accepts E55 filters and is only 205mm long. The bottom version is a 320mm f/4.8 lens that takes 72mm filters and is 206mm long. Both use a rotating tripod mount about like that on later Leica R lenses, only with a smaller 62mm diameter. Both lenses have infinity stops or user adjustable focus click stops. The small flip mirror and eyepiece turret is not parfocal with the camera focal plane when the shown short eyepiece barrels are used. Extending the eyepiece barrels will make them parfocal with the camera, and make it easier to see into a selected eyepiece when a camera is attached. The lowest magnification eyepiece could have a telescoping barrel and/or a spot screen for focusing. A 25mm M extension tube permits near field visual use without eyepiece extensions.
|
Continuing with the Leica M mount lens wish list...
- 320mm to 500mm lens similar to above 240mm, but that uses the rangefinder patch to center the subject and/or approximate its field of view. The f-ratio could be slow for portability, and the lens could be collapsible. The old Tamron 400mm Nestar is an example of a collapsible long tele lens.
- 600mm to 750mm f/15 (or faster) mirror lens having an envelope not larger than 62mm outside diameter, and including a flip mirror and top port that accepts small telescope eyepieces. This lens would lend itself more to small formats (due to vignetting on a larger format), and could be used on smaller format cameras via adapters. The flip mirror would be for viewing, for focusing the center of the field, and centering a subject in a Leica M9 (etc.). The compact flip mirror part could also be used on microscopes. (I previously designed a few of these compact lenses and flip mirrors, but have no way to build them now. I also previously manufactured and sold some of them [DiaGuider (TM), VersAgaonal (TM), VersaScope (TM) Adapter, and VidFinder (TM)] as commercial products.) The Ednar, Kenko, and Pentax 500mm f/8 Mirror Scopes are close to the right envelope, but has no flip mirror and is not particularly sharp.
- All of the above lenses would have properly calibrated infinity stops, so a user can confidently set good infinity focus for landscapes, even if the rangefinder is not accurate in this focal length range. (An alternative is an adjustable focus stop or click stop.) I implemented something similar to the infinity stop, plus reference to the rangefinder patch, for long FL lenses with a Leica M3 in the 1970's. In 2013, I implemented something similar (but not kludged) in several adapters to use various lenses with the Leica M9. (See the "Using Various Accessories with the Leica M9" part of this Leica M9 and Leica M mount lens review document for details.)
Accessories
- Rigid system case similar to the modified Leica M system case shown in a section above, but with the suggested slightly increased dimensions (5-10mm) and divider padding. This would accommodate a Leica M digital camera with a 35mm or 50mm lens with hood attached, plus up to five more lenses, a flash unit, the compact charger, auxiliary viewfinders, and other accessories. But with the slightly increased size, everything would fit better, and faster lenses (75mm f/2, etc.) could be stored. I can currently get this many items in a modified vintage black Leica system case, but it is too crowded for larger diameter lenses like the 75mm f/2. (See the "Compatibility with Vintage Compact Leica System Cases" part of this Leica M9 and Leica M mount lens review document for details.)
- Grip similar to what Leica now makes for the M9, but with a built-in pop-up or fixed flash unit. The flash could connect to the camera hot shoe via a removable cord, since the M9 lacks a PC socket connector. The grip could house small batteries if necessary. An ISO 100 guide number of 7 to 10 would be adequate for this type of flash. The purpose is to save time when taking certain types of pictures that do not require a strong flash. It would also be good if the grip did not interfere with the use of vintage lenses with goggles such as the 135mm f/2.8 Elmarit.
- Optional short 10 to 27 cm long (including connectors) power cord for the compact charger. This would more easily fit in a camera case with the charger.
- Small Leica M mount ground glass back with critical focus magnifier, to use for setting up pictures on a microscope or telescope. (I use a custom one.) This will be less important on the newer Leica M with EVF compatibility, but would be helpful for other models. It would have a pre-set distance to the focus screen, but could be adjusted slightly so a user can make its focus screen agree with a given camera sample.
- Adapter to mount Hasselblad V System tele lenses in front of the Leica Visoflex III flip mirror for focus to infinity. Such an adapter is possible, but the back surface of the adapter would need to be relatively thin. It should also incorporate a tripod adapter, since the 350mm Tele-Tessar in particular is excessive cantilevered weight.
- Leica M to Leica R lens adapter that sets the Leica M rangefinder and its parallax correction to infinity. This facilitates using the rangefinder patch to center the subject, and to approximate the field of view of a 400mm lens. The user estimates the subject distance and sets the lens via the lens focus scale. It is preferred if this adapter was also made for other lenses having manual aperture rings, such as Nikon F mount manual focus (and some AF) lenses. A custom adapter of this type is shown in this web page and it works well.
- Adapter similar to above, but that incorporates a precise focus scale ring that is adjustable between infinity and 2 to 4 meters minimum distance, combined with a rangefinder cam that sets the Leica rangefinder (and thus parallax correction) to the corresponding distance. This facilitates use of the Leica camera rangefinder to get more accurate distance information to transfer to the lens focus setting. This is simple, adding a rangefinder cam and calibrated focus scale to the above adapter. I could have made one myself in my healthier years.
- Compact adapter with integral tele-converter (and field flattener if needed) that adapts Leica R tele lenses to the Leica M Visoflex flip mirror and has enough back focus for infinity focus. The same could adapt Nikon and other lenses to the Visoflex. This will be less necessary with M cameras having EVF compatibility, but would still have some application because its tele-converter aspect may make long lenses more compatible with the camera's micro-lens array offset. I implemented these in 1995 as the VersaScope (TM) adapter, to use Nikon, etc., tele lenses with a camera and Versacorp DiaGuider (TM) flip mirror. It also works on a Visoflex.
- Optical adapter having the sole function of compensating for the effects of a camera's micro-lens array offset when using long focal length optics such as telescopes. This would most likely have to be a tele-converter (so rays diverge more toward edges of the sensor), though close to unity focal length could potentially be maintained with a Galilean design, particularly when adequate back focus distance is available. An alternative is a specialized version of the camera without the micro-lens array offset, for use with long focal length optics.
- Replacement base plate for Leica M9 that has a reinforced area to increase strength of the wimpy strip of brass around the rectangular base mounting hole. This could also be a modification that is welded (or otherwise attached) to the base (as a retrofit by Leica, for example), even if it adversely impacts the camera's appearance to some. Either way, it would beat having the wimpy brass strip break and potentially dump the camera off a tripod.
- Heavy wrist strap such as that previously offered for some compact Contax cameras. The gray Contax strap has a robust loop for the camera lugs.
The foregoing suggests improvements to cameras, optics, accessories, processes, methods and techniques. Where any aspect of the above describes new improvements or devices or processes, etc., to the point of comprising a reduction to practice, or that is close enough to a reduction to practice that a reduction to practice or appropriate modifications and changes would readily occur to those skilled in the art, the above shall serve as a "defensive publication", to prevent any other party from patenting it and then restricting its manufacture, distribution and use by other competent manufacturers or users. Hereby declared this 18th day of March, 2013. Some details were added after 2013, but almost all of the concepts were developed during or prior to 2013. Exceptions include the compact 180mm, 240mm, and 320mm lenses shown above, which were developed up through 2016 but generally not published until 2019 or later.
APPENDIX M. (Table 2): Relevant Dimensions for Micro 4/3, Leica, Hasselblad, Etc:
Introduction: Most dimensions below are from measuring various product
samples, and do not represent a manufacturer's official specifications.
Further, it is not known if the samples measured are typical for most
samples of a given product.
MICRO 4/3:
Micro 4/3 dimensions and clearances, Longitudinal from focal plane (based on E-P2):
Shutter clearance from Focal P: 9.65~9.85 (!!!) (9.4~9.6mm behind Oly. lens mount)
Shutter mask to focal p. P.GX7: 9.725 (measured)
Back Fujinon 2.7mm f/1.8 to FP: 9.75 (spec; probably too close to safely use)
Back Fujonon 2.7mm f/1.8 cell: 9.50 (measured from rear cell)
Back of Computar 5mm MP to FP: 10.624
C-mount thread dia clear to FP: 11.63~13.80 (for 25.4mm OD)
(Ref. CS Mount to Focal Plane): 12.50
(Ref: Bolex 16mm BS Clearance): 13.52 optical distance from focal plane
Clearance for 25.4~28.0mm OD: 14.48~14.93 (best case)
Clearance for 28.0~29.51mm OD: 14.68 from focal plane (conservative)
Back of Micro 4/3 Lens Flange: 15.40 (deepest sample measured so far)
Metal >29.51 (1.162") OD Clear: 15.70 (19.25-M4/3 lens bayonet depth-0.75mm=3.55)
(Ref: C-Mount to Focal Plane): 17.52
Lens Flange - Focal Plane Dist. 19.25mm
Micro 4/3 Diameters:
Contact ring inner clearance: 29.51 (1.162") Approximate
Bayonet mount cylinder OD: TBD
Leica 90mm f/2.8 Col. Elmar OD: 52.0
Leica-M4/3 Adapter base OD: 55.0mm
Maximum OD to clear tripod hd: 62.0~63.1mm (depending on E-P2 camera sample)
Oly. 17mm f/2.8 Pancake L. OD: 57.0
Pan. 20mm f/1.7 Pancake L. OD: 63.0
Focal Plane Dimensions: 17.3 x 12.98mm (~22 diagonal incl. centering error)
Critical Ray Angle, Range for Olympus E-P2 Minimum: 14.5 to 18.8 deg.
Micro 4/3 HD movie frame, not stabilized: 17.30 x 9.73 (est.)
Micro 4/3 HD movie frame size, stabilized: 14.70 x 8.27 (est.)
LEICA:
Leica Dimensions, Longitudinal from Focal Plane:
Measured Attribute: Meas. Notes.
LeicaM-Mic4/3 Adapt (8.55 theo) 8.623 Best real depth for infinity stop (0.3395")*
Leica M, Mount to Fr. Shut. Ct. 9.80 Conservative, (18.00mm (0.710") from lens mt)
Leica M, Mount to Meter Cell 10.15 Axial, (17.65mm (0.695") from lens mount)
Leica M, Mount to Shutter Baf. 10.35 12.0 OA, (17.45mm (0.687") from lens mount)
Leica M, FP to RF Wheel Screws 11.93 12.5 OA, (15.87 (0.625") from lens mount)
Leica M, Rear Cell 28/2 Ultron 14.54 (Projects 13.26 behind lens mount; OD=29.51)
Leica M Mount: Bayonet to FP 27.80 M4/3 adapter is ~8mm long, so M4/3 <19.8.
Leica M39 Thr.: M39-26tpi to FP 28.80
Leica CL, Safe rear protrusion 15.87~17.45mm (0.625~0.687") [Back from lens mount]
* Note: Best adapter depth depends on any variation in lens mount to focal plane
distance between Micro 4/3 cameras. This distance appears to be well controlled in
samples observed to date. However, a little (~0.05mm) variation has been detected.
This is too much variation for a rangefinder, but is acceptable for AF cameras with
manual focus feedback from an image sensor, and with no infinity stops on lenses.
Leica Dimensions, Parallel to Focal Plane, Radius from Optical Axis:
Measured Attribute: Meas. Notes
Leica CL, Top Rangefinder Coupling Wheel 17.44
Leica M9, Top Rangefinder Coupling Wheel 17.80
Zeiss 50 f/2 ZM, Barrel ID 19.62
Zeiss 50 f/2 ZM, RF Coupling OD 18.33 18.22 with chamfer.
Zeiss 50 f/2 ZM, RF Coupling ID 16.82 Little (0.5mm) contact w/Leica CL RF
Leica 90 f/2.8 Elmarit, Barrel ID 19.56
Leica 90 f/2.8 Elmarit, RF Coupling OD 16.79
Leica 90 f/2.8 Elmarit, RF Coupling ID 15.09 Full contact with RF coupling wheel
Leica 90 f/2.8 Tele-Elmarit-M, Barrel ID 19.49
Leica 90 f/2.8 Tele-Elmarit-M, RF Cpl. OD 16.97 Cam ring. ~16.69 in places w/chamfer
Leica 90 f/2.8 Tele-Elmarit-M, RF Cpl. ID 16.00 Full contact with RF coupling wheel
Leica 135 f/4 Elmar, Barrel ID 19.45
Leica 135 f/4 Elmar, RF Coupling OD 17.17
Leica 135 f/4 Elmar, RF Coupling ID 15.29 Good contact with RF coupling wheel
Leica 135 f/4.5 Hektor, M39 Barrel ID 17.78
Leica 135 f/4.5 Hektor, RF Coupling OD 16.64
Leica 135 f/4.5 Hektor, RF Coupling ID 14.68 Good contact with RF coupling wheel
Nikon to LM Adapter, ID 19.45
Nikon to LM Adapter Mod, RF Coupling OD 17.18 Dimensions of Prototype
Nikon to LM Adapter Mod, RF Coupling ID 14.82 Good contact with RF coupling wheel
HASSELBLAD:
Hasselblad Mount to Focal Plane 74.90
Hasselblad Mount to Mirror Sweep TBD
Hasselblad Mount to Back of Body TBD
Hasselblad Body to Focal Plane TBD
THEORETICAL VERSUS ACTUAL BACK FOCUS DISTANCES:
There are many cases where the actual dimensions of camera hardware may not match
specifications. This may occur on either a consistent or inconsistent basis.
The following table compares measured dimensions for various lens to focal plane
distances, and the measured versus theoretical depth of various adapters, etc.
Offsets based on actual Leica M9 lens-FP distance being 0.01mm over 27.800mm spec.
This section is in work. Several measurements may be shortened by 0.025mm (0.001").
Camera or Adapter Description: Spec.: Actual: Notes:
Micro 4/3 Camera (Oly. E-P2, etc) 19.250 19.240 (50 S�lux on 8.585mm (0.3380") ad.)
Micro 4/3 to Leica M Adapter: 08.550 8.5750 (Sp:0.3366" M:0.3376; 0.025mm long)
Leica M, 1991 SN 3096431 / older: 27.800 27.775 (90 not reach inf on M9; >0.025 sh)
Leica M, 1998 SN 3854672 / newer: 27.800 27.810 (35/2 ASPH inf on M9; 0.010mm long)
Nikon to Micro 4/3 Adapter: 27.250 27.285 (Sp:1.0728" M:1.0742. 0.035mm long)
Nikon to Leica M Adapter: 18.700 18.735 (Sp:0.7362" M:0.7376. 0.035mm long)
Nikon F Lens-Focal Plane Dist: 46.500 46.545 (Sp:1.8307 AvM:1.8325.0.054mm long)
Leica R to Micro 4/3 Adapter: 27.750 27.737 (Sp:1.0925" M:1.092(250)-1.093(180)
Leica R to Leica M Adapter: 19.200 19.139 (Sp:0.7559" M:0.7535. 0.061mm sh.)
Leica R Lens-Focal Plane Dist: 47.000 47.048 (Sp:1.8504" M.S: 1.8523 M.F: 1.846)
Notes:
A.) Leica R lens back focus is 0.012mm short on Leicaflex for M9 focus w/adapter.
Leica CL lens-FP: 27.714~27.744mm (1.0911~1.0921"). Pre 1991 std. may be 27.775.
135mm f/2.8 Elmarit is only observed exception to less back focus before 1991.
Third party M lenses (Zeiss, etc.) back focus generally matches pre-1991 Leica.
B.) Nikon lenses don�t reach infinity in film camera focusing screens if LM adapter
is theoretically in spec. Nikon back focus tested to focusing screens, not FP.
C.) Nikon lens to Focal Plane, measured distances (all short of distance to screen):
* Earliest Nikon F: 46.361~46.457mm (1.8252~1.8290").
* Nikon F2, Silver: 46.393~46.439mm.
* Nikon F2, David: 46.429-46.347mm (1.8279-1.8247").
* Nikon FM2, Black: 46.406~46.439. (0.043~0.107mm short).
* Leicaflex (measured) 46.888 (slightly shorter than optical distance to screen)
D.) Item C shows discrepancies in Nikon focus screen vs focal plane.
* Real averages may be: MFT: 19.215; Leica 1991: 27.775;
Leica 1998: 28.800; Nikon F: 46.520; Leicaflex: 47.023.
E.) Nikon-M4/3 stack must be 1.0742". Nikon-LM must be 0.7376" for M9 focus.
LM-M4/3 must be 0.3376". Total: 0.001 >stack (from flexure).
GENERAL: Table of Full, Half, Third, and Quarter f-Stops:
Notes:
* Full f-stops increment by the square root of 2.
* Therefore, f/1.4 is really often f/1.4142.., f/2.8 is really f/2.8284.., etc.
* These multiples of the square root of 2 are accounted for in the table below.
* Half stop clicks are typical on Hasselblad, Leica, Voigtlander, etc. lenses.
* Half stops increment by the 4th root of 2, or about 1.189.
* Third stop clicks are typical on Zeiss ZM lenses.
* Third stops increment by the 6th root of 2, or about 1.123.
* Quarter stops are included since setting to <1/4 stop is at times appropriate.
* Quarter stops increment by the 8th root of 2, or about 1.091.
ROUNDED RESULTS FOR f/1.0 to f/2.8:
f-stops, full: 1.0 1.41 2.0 2.83
f-stops, half: 1.0 1.19 1.41 1.7 2.0 2.4 2.83
f-stops, 1/3: 1.0 1.12 1.26 1.41 1.6 1.8 2.0 2.2 2.5 2.83
f-stops, 1/4: 1.0 1.09 1.19 1.30 1.41 1.54 1.68 1.83 2.0 2.2 2.4 2.6 2.83
ROUNDED RESULTS FOR f/2.8 to f/8:
f-stops, full: 2.83 4.0 5.66 8.0
f-stops, half: 2.83 3.4 4.0 4.8 5.66 6.7 8.0
f-stops, 1/3: 2.83 3.2 3.6- 4.0 4.5 5.0 5.66 6.3 7.1 8.0
f-stops, 1/4: 2.83 3.1 3.4 3.7 4.0 4.4 4.8 5.2 5.66 6.2 6.7 7.3 8.0
ROUNDED RESULTS FOR f/8 to f/22:
f-stops, full: 8.0 11.3 16.0 22.6
f-stops, half: 8.0 9.5 11.3 13.4 16.0 19.0 22.6
f-stops, 1/3: 8.0 9.0 10.1 11.3 12.7 14.2 16.0 18.0 20.2 22.6
f-stops, 1/4: 8.0 8.7 9.5 10.4 11.3 12.3 13.4 14.7 16.0 17.4 19.0 20.7 22.6
Appendix N: Benefits and Perils of Buying Photo Gear You can't See in Person Ahead of Time.
As of this writing, walk-in camera stores have become an endangered species in many cities. For many, purchasing photo items online has become a necessary evil, especially when travel to a store is difficult due to work obligations or distance, or because a local store does not have desired items.
Almost all of my early camera purchases were in camera stores or pawn shops. On the few occasions when I did I mail order a camera or lens from a New York area camera store, results were mixed. In the best case, I received a new camera in about a month. In the worst case, I never received either the Miida lens I ordered or a refund from Viking International in New Jersey. That hurt, because I was then in high school, and my only income was $1.36 per hour working summers at a grocery store. So, there went a good percentage of my income for that year!
Up through the 1990's, I still emphasized walk-in camera stores. The exceptions were used items. At least half of these were acquired from pawn shops or via purchasing a copy of Shutterbug Ads and contacting the sellers. It was fun haggling in the pawn shops, and I could tell that the staff in certain pawn shops liked haggling too.
I got into online shopping in the early 2000's, after many local camera stores had evaporated. The main sources were Astromart and eBay, though some items were later acquired through Amazon. There are advantages and disadvantages to each of these.
In the early 2000's, and up to maybe 2010, it was my own experience that Astromart item descriptions for photo gear and electronic items were more accurate than the descriptions on eBay, with all Astromart purchases except one being a relatively good experience. Astromart used to be free for buyers, but it costs about US $15 per year now. Not bad if the first few purchases save you more than that.
Acquiring things on eBay started out a little rough, but got better as more buyer protections were put in place. At first, at least 10 percent of the eBay items I bought were inaccurately described to a significant degree, or the shipping took several weeks. In one case, an editing VCR I bought did not even remotely work as described, and by the time I received it, the seller had been kicked off of eBay after getting several negative feedbacks in a row. So I was out $175, with no recourse.
Feedback was not something that could always be counted on, since a seller could retaliate with negative feedback if you left them negative feedback. There were also a few weird sellers that would leave neutral or negative feedback for no reason, even if they shipped an item late or it was not quite as described, but the transaction was smooth in other respects, and you gave them positive feedback they didn't deserve. One such seller left me a neutral after I simply inquired about where a late item was, and then the same seller lied about the send date in their feedback, since it didn't match the postmark. This led me to the conclusion that positive feedback for sellers could be artificially high, and that it may be a good idea to stick with sellers having better than 99.5 percent positive feedback. I found that if a seller had a lot of sales, but less than 97 to 98 percent positive feedback, there was often a reason for it.
Up to the present time, about 95 percent of my eBay transactions have been a positive experience. This is not as good a percentage as Astromart or walk in camera stores, but it is not abysmal either. Four examples of bad experiences that (combined) involved a total of about $1,500 are pictured and described below. One of the items was returned. The seller adjusted the price on another, and the remaining two were -- ripoffs!
Items not pictured below include a Vivitar 500mm lens that was packed with so little padding that one element was chipped, though the chip was confined to the very edge of the lens where it was obscured by the lens cell. An unusual aspect of this lens was that its front lens cell had a fillet where the back of the achromatic lens rested in the cell, preventing any lateral motion of the elements. This was corrected and oddly enough, the lens had slightly less astigmatism after that.
A different seller claimed that the Samsung Galaxy 4 phone he listed was "unlocked", but the phone was NOT unlocked, and the carrier he had used would not unlock it. This seller would not resolve the issue, but eBay eased the pain a little by refunding about a third of the price themselves.
I later found that it helps to look at the types of items an eBay seller lists, and if the item of interest is in a different category than most of the seller's other listings. If the seller has negative feedback, it also helps to see if there is a correlation between the feedback and items in certain categories.
For example, if a seller is selling mostly industrial items, trinkets, or clothing, but only a few photo items, they may not be the best source for photo items. A seller can tell if a trinket is OK just by looking at it, but maybe they can't tell if a photo item is working properly just by looking at it. They may not even know how to evaluate a photo item. And they may not know how to (or just not care to) properly pack a photo item for shipping. One abysmal example is pictured below.
The "good" 95 percent of eBay purchases included the Leica M9 (from an authorized Leica dealer) and all but one of my Leica brand lenses.
eBay Buyer Protection is important as of when this paragraph was added in 2021. The percentage of good transactions went down in 2021, and I had to utilize buyer protection for the first time in years. This was necessary after a seller failed to send a Fujifilm 18-55mm lens I bought (which wasn't cheap), and they also did not respond to inquiries about the item. By the time I had eBay step in, the seller had racked up several incidents of negative feedback from other buyers who also had not received their items.
One important aspect of eBay buyer protection is that there is not much time to request assistance if the seller does not accept returns. More time is allowed to request assistance concerning an item that was not received if a seller does accept returns. Therefore, it is usually better to limit purchases to sellers that do accept returns. This because of the time to request assistance is tied to whether or not a seller accepts returns. It is pretty rare for me to actually return an item. (I probably return less than 1 percent of items, and I try to salvage a transaction when practical, so as not to have to start looking for the same item all over again.)
Amazon can be a good source for certain types of new items, partly because customer feedback there emphasizes the item itself, rather than a seller. Also, there is no mechanism for retaliation if a buyer leaves truthful feedback about a not-so-good item. However, there a few possible down sides.
One potential downside of Amazon and some other large online sellers is "shill"' reviews, where an item has only been for sale a few months and all of the feedback is good, yet the feedback fails to refer to any specifics about the product. Amazon or similar sellers may be less desirable for certain types of items, but this can vary widely over time or between customers. For example, in the area of "new" handicap assist items over $100 (walkers, ramps, etc.) I am 4 for 4 in receiving previously opened or damaged items. One of the handicap ramps was so badly damaged that there was no way to repair it, so it had to be sent back.
Another potential problem with Amazon and some other large sellers is that the actual item you are buying may not be pictured. This is more of a problem with third party sellers on Amazon, since they only refer to the Amazon page for information. Sometimes, a third party seller will have an item that is in some ways similar to, but not exactly like, the item on the Amazon page. This can be a problem when the difference is a key feature.
Also, it is important to see if third party sellers are charging a fortune for shipping before completing checkout. Some third pary sellers have shipping costs that exceed the cost of the item. In addition, a few thrid party sellers tried to gouge people during the pandemic by selling paper goods and some food items for several times the new retail price, with some also showing long shipping delays. I saved print screens of some of these for historical purposes, and to have a reference that shows the sellers I was not going to buy anything from.
The Perils of Buying Online - 1: It is Only as Reliable as the Sellers You Deal with!
Examples of eBay transactions where abysmal packing by sellers ruined purchased items.
© Copyright 2016 Jeffrey R. Charles. All Rights Reserved.
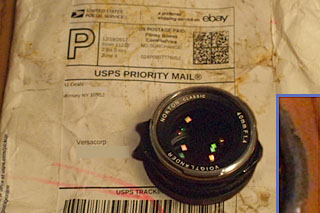 |
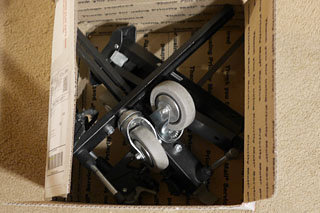 |
Damage from ZERO Protection (left) to Inadequate Protection (right) During Shipping:
LEFT: A trashed Leica M mount Voigtlander 40mm f/1.4 Nokton lens. The seller quite stupidly sent it in the shown unpadded Kevlar envelope with no caps, cardboard, padding, or protection of any kind, in spite of charging $10 shipping! The results were devastating. The optics were pitted, filter threads dented, lens hood bayonet flanges severely bent, and the aperture ring had been knocked loose and was badly bent. Most of all, the lens barrel was itself bent, resulting in loss of parallelism with the focal plane. As a result, the lens can never be used on a Leica M. Instead, after much time repairing the aperture ring, etc., the lens is used only on Micro 4/3 - with an adapter that's wedged to compensate for the bent lens barrel, which is something that can't be repaired. The eBay seller also stalled on resolution until the last possible day for eBay to step in, but then didn't follow through.
RIGHT: This "like new" Manfroto tripod dolly certainly wasn't "like new" when it arrived! Here, the seller stupidly crammed its parts into an excessively small shipping box - with no padding. This seller also had a disproportionately high shipping charge. The dolly parts caused the box to bulge on both sides, and no part of the dolly escaped being dented and having some black finish worn off the edges. These sellers must have taken the course: "How to destroy photo items 101."
|
More Potential Perils of Buying Online - 2: It is Only as Reliable as Sellers You Deal with!
Perils of buying online. eBay transactions where item descriptions did not match reality.
© Copyright 2016 Jeffrey R. Charles. All Rights Reserved.
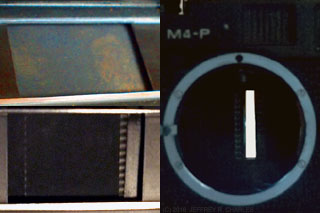 |
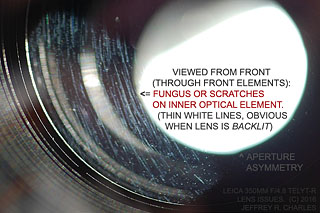 |
Items Having Undisclosed Problems. Leica M4-P Camera (left) 350mm Telyt-R Lens (right).
LEFT: This Leica M4-P had several undisclosed issues, including non-functional flash synch, a stained focal plane shutter curtain that did not produce a parallel slit at high speeds, and other problems. The right inset is a high speed image of the shutter firing at 1/1000 sec. This eBay purchase was returned, but not without protracted headaches and having to eat shipping costs.
RIGHT: A Leica 350mm f/4.8 Telyt-R lens with internal fungus or scratches, even though the listing said it had no fungus. This lens would have been returned except it was from another country, so return shipping would have been prohibitive. Here, the seller quickly offered to adjust the price, so it turned out OK. If it is fungus and not scratches, it's at an early enough stage it may be removable. (However, properly repairing this model lens is not trivial.) The flaw is only obvious when the lens is backlit, but it does lower image contrast. Many sellers do not do backlight checks on lenses.
|
A final area where caution is in order relates to digital cameras that also take video. Here, USA buyers (including myself) who purchased from Amazon (a third partly on Amazon) and eBay have been sent cameras that record only PAL video. Even though a camera can OUTPUT NTSC, it is not the same as actually RECORDING NTSC, since PAL has a lower frame rate. For example, it was difficult to find a Panasonic GX7, new or used, that recorded NTSC, 30 and 60 frames/second. If a seller won't answer questions about frame rates a camera records (not just outputs), it may be best to look elsewhere. As with many things, buying online can be a "do at your own risk" (or at your own wallet's risk) situation.
Appendix O: References.
- Leica AG Web Site, Photography
(http://us.leica-camera.com/photography/)
- Voigtlander (VC or VM) Lens Web Page (one of them).
(http://www.cosina.co.jp/seihin/voigt/english/lens-top--e.html)
- Carl Zeiss web page for ZM (Leica M mount) lenses (not in English).
(http://www.cosina.co.jp/seihin/cz/index.html)
- Charles, Jeffrey R.; Review of Samyang 8 mm f/3.5 Proportional Projection Ultra-wide Angle Lens, Draft 0.5, 4 Dec. 2009. www.versacorp.com
- dpreview forums, Re: AA filter on NEX-7, but none on NEX-5N?, 2012.
- Petersen, Bjorn, Discerning the Differences between the Nikon D800 and D800E, 16 Mar. 2012
- Reid, Sean; Fast Lenses for the Epson R-D1, Publication date TBD;
http://www.luminous-landscape.com/reviews/lenses/fastlensreview.shtml
- Rockwell, Ken; Review that includes Leica 35mm f/2.0 Summicron lens.
- Rockwell, Ken; Review of Zeiss 35mm f/2.0 Biogon T* ZM lens.
- Reference (TBD) for focus shift in VC 35mm f/1.4 lens.
- Reference (TBD) or link for sample photos from VC 17.5 and 15mm f/0.95 lenses.
- Reference (TBD) or link for person who removed the AA filter from a Sony NEX-7.
- Crazy Comparison: A not fair Leica M9 RAW vs NEX-5n JPEG comparison! (Image of barn at Steve Huff site, Sep. 13, 2011.) URL (which is wrapped on 2 lines of text below) is:
http://www.stevehuffphoto.com/2011/09/13/crazy-comparison-
a-not-fair-leica-m9-raw-vs-nex-5n-jpeg-side-comparison/
- Lens coding: http://www.l-camera-forum.com/leica-news/leica-lens-codes/
- H. H. Nasse; How to Read MTF Curves; Carl Zeiss, Camera Lens Division, December 2008. The URL (wrapped in 2 lines of text below) is:
http://www.zeiss.de/C12567A8003B8B6F/EmbedTitelIntern/
CLN_30_MTF_en/$File/CLN_MTF_Kurven_EN.pdf
- Zeiss datasheet for 50mm f/2.0 Planar ZM lens, MTF plots.
- Leica datasheet for 50mm f/1.4 Summilux-M-ASPH lens, MTF plots.
- EclipseChaser web site ( http://www.eclipsechaser.com ) Jeffrey R. Charles. 2017 Total Solar Eclipse expedition photos, deep sky photos with Voigtlander 180mm f/4 APO Lanthar SL lens.
- Fujifilm X Camera (and Lens) Reviews, Tests, Comparisons. (J. R. Charles, 2021)
( http://www.versacorp.com/vlink/jcreview/fujixrev.htm ) (About 80 percent complete.)
Links to Other Resources that I have Found Useful (or Entertaining*):
(Search on the web for each name, site, or channel to find URLs.)
- AstroBackyard (YouTube channel about astrophotography).
- AstroBiscuit (YouTube channel about astronomy)
- Camera Review web sites (dpreview, Imaging Resource, etc.)
- Christopher Frost (YouTube channel. Has good, consistent, lens reviews).
- Itchy Boots (* YouTube channel by woman who travels the world by motorrcycle.)
- Kai Wong (* Kai W, Bokeh Bro's) YouTube channels (formerly of DigitalRev).
- Leica Review (YouTube channel. Not technical reviews, but sometimes worthwhile).
- Optical Limits lens tests (formerly PhotoZone.de).
All aspects of the material herein including text and images (with exception of any quotations from references, or images of manufacturer MTF plots) Copyright 1975, 1997, 2004-2011, 2012, 2013, 2014, 2015, 2016, 2017, 2019, 2021 Jeffrey R. Charles, All Rights Reserved.
Originated (by compiling my existing test data, etc., and writing some new material for the context of this document): 120829 (then unpublished). Published at Versacorp.com: 130222 (as appendix to another page); 130223 at this URL.
Rev's. made or posted 130225, 030228, 130311, 130315, 130317, 130318, 130322, 130325, 130330, 130406, 130420, 130516, 130719, 130824, 130907, 130922, 131006, 131110, 140126, 140331, 140407, 140416, 140829, 141108, 150103, 150306, 150328, 150416, 150503, 150529, 150622, 150704, 150904, 160124, 160210, 160319, 160408, 160616, 170120, 190601, 190616, 211012, 211024, 211017, 211120.
Note: Dates of minor revisions such as correcting typos, updating photos, etc., may not be shown. Where multiple revisions have similar dates, only the later one was actually posted online.
Appendix P: Photo Gear that may be For Sale (to help fund the Leica and some lenses)
After reading the above Leica M9 review (actually a user report of sorts), and realizing that Leica's newer cameras exceed the performance of the M9 by a considerable margin, some people may no longer be interested in any camera except a Leica. Those in this category may not have much interest in items such as those listed for possible sale below, other than maybe the few Leica items listed.
For those who are not looking for a Leica, some of the following items may be of interest. If so, please feel free to E-mail me about any items you may have an interest in. Please allow some time for response. The time is needed because I usually can't deal with E-mail except on weekends, and I'd need to go to where I can access the equipment to make sure it didn't get oil on aperture blades, etc, while sitting idle. I am at jcharles (then the) at (then the domain) versacorp dot com. USA sales only.
Where did all of this stuff come from? Over the years, I ended up with many photo items I can no longer use for health reasons. I started building up a comprehensive Pentax 6x7 film camera system in the 1990's. By 1992, film had improved to where the Pentax was capable of about as much resolution in a shallow depth of field picture as I had gotten with my 4x5 camera in the 1970's.
However, health issues later set in to where I couldn't even lift the Pentax 6x7 system, let alone use it. I then started putting together a lighter medium format film system in 2004, but soon could not lift it either. Later, I got a V96 digital back with a Hasselblad camera I could use it on, and (you guessed it) that became too heavy for me too! In my case, it was false economy to gradually put together cheaper but heavier camera systems. After two decades of gradually putting together medium format systems I can't use now, I ended up where I should have started out in the first place - with a Leica!
At least a week or two of advance notice may be needed for inspection of any of the items, since I don't keep them all at the same place and am not always well enough to locate items on short notice.
All transactions (except those shown as being for third parties) will be handled through PayPal unless arrangements are made otherwise, and the prices include PayPal fees, but do not include shipping. Estimated shippimg for most small to medium size items is $12 to $15, not counting insurance, if desired. Large or heavy items are pick-up only by appointment so I can arrange to have the item moved so it is available for pickup.
Please allow up to 2 weeks for me to even get items that are eligible for shipping mailed. (I have a bad back disk and other handicaps, and the lone handicap spot at the local Post Office is often taken by a car WITHOUT a handicap placard or plate, and any alternate parking spots are usually beyond my range when trying to carry anything.)
For the time being, in-state transactions will either be:
A.) handled through a third party who has a California tax number, or,
B.) Sold with the understanding that the buyer is solely responsible for the Use Tax liability, and will indicate and pay the apprioriate California Use Tax (same as sales tax) on Line 91 (or equivalent) of their CA 540 tax form.
- This is necessary because I lack the stamina to keep up with sales tax related paperwork (beyond that related to Use Tax I pay on items I buy online). California sales tax is not included in price.
- All items are subject to prior sale without notice. Prices and availability are subject to change without notice. Will consider offers on some items. A third party may eventually list all of the items on eBay if they don't sell here.
ASTRONOMICAL TELESCOPES, ASTROPHOTOGRAPHY, ACCESSORIES:
- AstroTrac TT320x tracking mount with polar alignment scope. $475
- Flip roof observatory building, 7x7' (may keep if can move to dark area) $1750
- B&L 800mm f/10 camera lens and telescope with 2 eyepieces, in original box. $125
- Explore Scientific 2x Barlow (quaisi copy of early TV PowerMate) $125
- Kasai Pico 8 (80mm f/11.2) compact Maksutov-Cassegrain Telescope with red dot finder (this is a small telescope, but it is VERY poorly made. $139.00 OBO
- Losmandy GM8 mount with (Gemini?) digital setting circles (for 3rd party) $1750
- Meade 2045 LX-3 telescope and fork mount. Has diagonal but no eyepiece or tripod. $295
- Meade ETX-90 Maksutov-Cass Optical Tube. Flip mirror knobs don't match. $135
- Meade ETX-105 Telescope GoTo Mount, two hand controllers, piggyback camera mount, counterweights, box. Does NOT include tripod or eyepieces. $495.00
- Glass solar filter for Meade ETX 105 (if ETX-105 scope sells first) $80
- NoName 130mm f/15.4 Mak Cassegtain (light baffle has poor design) $225
- Astro-Tech AT6RC Ritchey-Chretien astrograph with focuser, 3 tubes, box. $325
- Skywatcher 180mm f/15 Mak-Cass OTA w/8x50 finder (2 small dents in tube) $750
- Sky Window binocular pointng mirror (for third party) $349.00
- Will be more astro stuff, but haven't decided which other items yet.
MEDIUM FORMAT CAMERA, FUJICA:
- Fujica: GS645w format rangefinder camera w/45mm leaf shutter lens, hood, case.
- Back side of upper body has a thin crack (not in area that causes light leak), and front viewfinder glass had detached before I got the camera, and has been glued back in. Camera works, but is not in the greatest cosmetic condition. $225 OBO
MEDIUM FORMAT CAMERAS, LENSES, FINDERS, BACKS, HASSELBLAD:
- Hasselblad 40mm f/4 Zeiss Distagon lens, version without T* coatings. Optics are clean and clear, focus is smooth but a little stiff. Shutter speeds sound accurate except that the escapement slows down a little toward the end of the slowest 1 second setting. Barrel finish is good, but the paint and leatherette is not jet black like it would be on a mint lens. Includes Hasselblad hard case and front and rear caps. Only reason for selling is that I later got the T* version. $699.00.
- Hasselblad 100mm f/3.5 Zeiss Planar T* lens 20125, with Automatic Diaphragm Control (ADC) Unit 40355. This lens has an ADC assembly with a built-in light meter and a motor that sets the lens aperture based on the shutter setting, ISO, and meter reading. The shutter works at all speeds. Unfortunately, it is not known if the ADC unit works. There is a sad story behind that. The original owner gave it to one of his relatives so he could sell it and raise some cash, but the relative partially disassembled the ADC so he could use the 100mm as a manual lens. Some lens settings must be read from the bottom side because the ADC unit obscures them from the top. The ADC is included and has been re-attached to the lens. It does not appear to be missing any parts; however, there is no way to be sure about that, or if the ADC even works. The lens itself has separation around the outer 40 percent of a rear element group, but oddly, the lens takes just as good of a picture as my 100mm Planar lens that lacks separation. I originally picked up this lens to simply display on a Hasselblad EL/M, but need to sell items in this price range that I don't actually use, to fund Leica items. Includes front and rear caps. This item is as-is, but I can supply photos. $449.00 OBO.
- Hasselblad 250mm f/5.6 lens, chrome version from before time of T* coatings. Shutter works but depth of field preview button does not work. $175.
- Hasselblad PM 90 prism finder 42288. This item is in near mint condition and includes the original box. It is a really neat eye level prism finder for Hasselblad V cameras. Only reason for selling is that it will not fit on a Hasselblad V camera when the V96C digital back is used. $249.00.
- Hasselblad 40045 Microscope Adapter. This adapter is a set of more or less conical bellows that mount to the Hasselblad camera body and has a metal ring that fits around a microscope eyepiece holder at the front. Excellent condition and Hasselblad lens bubble included. $149.00.
- Hasselblad Transparency Copy Holder 50490. This is only the slide holder with diffuser. It must be used with Hasselblad bellows, etc. It holds 6x6 slides rather than 35mm slides. $129.00.
- Hasselblad camera system with leather Hasselblad system case. Includes:
- Hasselblad 500c camera with 3 film backs, plus:
- 40mm f/4 Planar T* lens,
- 60mm f/3.5 lens,
- 80mm f/2.8 lens,
- 100mm f/3.5 lens,
- 150mm f/4 lens,
- 250 f/5.6 lens,
- 350mm f/5.6 lens,
- 500mm f/8 lens,
- third party 2x converter
(all lenses except the 500mm and 2x converter have the Zeiss T* coating, and the 40mm and 500mm lenses have their own cases).
Also includes: Hasselblad flash shoe, flash shoe with grip, pistol grip, wind knob light meter, and other accessories. Saves a lot of leg work putting together a system!
- Would also consider selling all items except the 500c camera, 60mm and 100mm lenses, flash shoe, meter wind knob, and 2-3 film backs, but will not part out the system at this point. I hate to see it go, but I can't lift it. (Price not yet established.)
- Hasselblad V96C digital back with 40 GB Image Bank, cables, original case, Sony battery, and Sony charger. (Price not yet established. Only available with above Hasselblad system, or by itself after the Hasselblad system is sold.)
MEDIUM FORMAT CAMERAS AND LENSES, MAMIYA RB67:
- Mamiya RB67 ProS with 90mm f/3.8 lens, film back, waist level finder, 45 degree prism, and case for 45 degree prism plus soft but rigid black Mamiya system case.
- This camera works, but it is covered in a very tenacious goo. I bought it this way and never got around to removing the goo from anything except the waist level finder. The goo does not come off easily. I think the goo came from the leatherette adhesive, since the leatherette is peeling. $350.00
MEDIUM FORMAT CAMERAS, LENSES, ACCESSORIES, MAMIYA TLR:
- Mamiya Twin Lens Reflex (TLR) camera system. If you want to save a lot of legwork in putting together a Mamiya TLR system that actually works, this is the system for you! Includes a Mamiya C220 camera with waist level finder and soft case, plus all 7 lens focal lengths:
55mm f/4 (black version),
65mm f/3.5 (black version),
80mm f/2.8 (chrome shutter version),
105mm f/3.5 DS (black version),
135mm f/4.5 (black version),
180mm f/4.5 Super (black version),
250mm f/6.3 (black version).
All lenses except the 80mm are the newer black versions, and the shutters work in ALL of the lenses! Condition is excellent with the following exceptions: Medium scratch (way deeper than a cleaning mark) near the edge of the focusing lens on the 105mm f/3.5 DS, and slight haze in the 135mm lens.
- Also includes an eye level prism finder, chimney finder, paramender, Vivitar 283 flash, and other accessories, all in a customized metal Mamiya system case.
- Only reason for selling is that there is no digital option for using this camera, and I have a beat up C220F camera that I can still use.
- I put close to $3k plus a lot of repair time into this system a little over 15 years ago. (Like the other medium format systems, it took a over a year to put this system together even at that price.) It was recently checked out, but was not "film tested". (Price not yet established.)
- Mamiya C220F body. Works, but has play in focus, needs one roller. AS IS $99.00
- Mamiya Twin Lens Reflex (TLR) C33 camera body (works but is no name plate). Price TBD.
- Over half a dozen Mamiya lenses (65mm, 80mm, 105mm, 2x 135mm, 180mm) having shutters that either don't work at all or don't work right, plus a few accessories (most with problems) and some misc.
- The 80mm and 105mm lenses are missing the escapement assemblies, and the 135mm has a disassembled escapement.
- The 65mm and 180mm lenses have sluggish escapement mechanisms.
- Most of the lenses were bought on eBay long ago (before buyer protection). Some were represented as working, but were not working. (These are items I bought for the above C22 system, but did not want to take on repairing in my condition.)
- "Fair warning" is that when the shutter escapement in Seiko shutters of Mamiya TLR lenses gradually fail to the point of jamming, they usually are not fully repairable to where slow speeds work right. This is because the usual failure mode is elongation of larger gear shaft holes in the excessively soft metal plates that support the escapement assembly gears. (Price not yet established.)
- Mamiya TLR parts from a camera repair shop. (Details and price not yet established.)
MEDIUM FORMAT CAMERA, LENSES, ACCESSORIES, PENTAX 6x7:
- Pentax 6x7 camera system with Pentax 6x7 MLU body, TTL meter prism, and:
- 45mm f/4 lens with case and box,
- 50mm f/4 lens (compact type 3 version),
- 75mm f/4.5 lens with case,
- 105mm f/2.4 lens,
- 135mm f/4 Macro lens,
- 165mm f/2.8 (chip in outer part of rear elment),
- 300mm f/4 lens,
- 400mm f/4 lens (non-apo, with case),
- Third party 2x tele-converter.
- Also includes waist level finder, remote battery holder, wood grip with flash shoe, larger (TBD brand) grip with swiveling flash shoe, and several other accessories. Lens infinity stops have all been calibrated. The camera and some lenses have cases, and the 45mm lens has its original hood, case, box, and manual. An added bonus is the helical extension tube with a custom made adapter that will fit either 52mm threads (for a future custom telescope adapter tube) and also fits a Copal 0 size view camera lens.
- Another bonus is a big soft camera case with dividers that can hold most of the system except for the 300mm and 400mm lenses. A Halliburton case large enough for the entire system including the 400mm lens (but which has no foam) is also available. System condition is excellent except that foam seals on the camera back and prism interface must be replaced, and the 165mm lens has a good size chip out of the edge of its rear element. (Chip does not effect resolution, but it really fouls up bokeh, so the 165mm can be excluded if unwanted by a buyer.)
- Would consider selling all items except the Pentax 6x7 camera with meter prism and 45 or 55mm, 105mm, and 135mm lenses, waist level finder, remote battery holder, wood grip, helical tube that fits Copal 0 adapter, and the case, but will not part out the system at the present time. I hate to see it go, but as with other larger camera systems, I can't lift it! (Price not yet established.)
- Vivitar 800mm f/11 Solid Cat lens, MODIFIED to have back focus f/Pentax 6x7. $349 for lens itself (T2 Mount), $495 for lens including Custom Pentax 6x7 Adapter.
35mm FILM CAMERAS, MISC. BRANDS AND TYPES:
- Horizon 203 swing lens panoramic camera with filters. (Not sure if selling.) $300
- Olympus PEN Ft with Olympus 50-90mm zoom lens. Significant haze in viewfinder. $179
35mm FILM CAMERA LENSES, CONTAX G:
- Contax G Zeiss Planar T* 35mm f/2 lens. Excellent condition, without the green tarnish on the lens mount that some samples have. Includes rear cap, Contax metal hood, and a Contax metal cap that fits the lens hood. (No Contax brand 46mm cap that fits the lens directly, but a generic 46mm cap is included.)
- This is the lens that showed me what a really good lens can do!
- It includes a matching champagne and chrome color Micro 4/3 adapter that has been modified to have smoother action, show general setting for infinity focus (not exact), and work on a tripod (focus ring jams against tripod head without modification). The latter modification to the adapter by necessity removed the finish from half the circumference of the adapter focus ring.
- One word of caution is that the Anti-Alias filter in a typical Micro 4/3 camera will not allow this lens to provide good edge resolution unless it is stopped down, as is the case for most wide angle non-SLR lenses on Micro 4/3.
- Only reason for selling is that I don't want to chop up the lens barrel for use on a Leica M, plus I wanted a 35mm lens having an infinity stop (so I got a Summicron to use instead).
- $529 including the tweaked Micro 4/3 adapter, or $469 without it.
- Contax G Zeiss Sonnar T* 90mm f/2.8 lens. Excellent condition with front and rear caps plus original box with both inserts and instruction manual. It includes a Micro 4/3 adapter of the type with a direct drive focus wheel on one side, but the adapter has been customized to reduce the amount of contaminants that can get in around the focus wheel. Only reason for selling is that I don't want to chop up the lens barrel for use on a Leica M, plus I wanted a 90mm lens having an infinity stop. This lens takes a zippier picture than all of the Leica 90mm f/2.8 lenses except maybe the Elmarit-M.
- $379.00 with the customized Micro 4/3 adapter, or $329.00 without it.
- I have one Contax G to Fuji X adapter that is available separately, but only if it is purchased with one of the Contax G lenses, or after the lenses have been sold. Price TBD.
35mm LENSES AND ACCESSORIES, LEICA M:
- Leica 90mm f/2.8 Elmar lens, matte silver color version. Very BAD condition.
- This lens was acquired on eBay years ago. The seller did disclose the optical condition (abrasion on the front element) but the pictures didn't make it look as bad as described. It really IS as bad as described!
- The front element abrasions give pictures a soft focus look that is unlike anything I have ever been able to get with a filter or post processing. Sort of cool, but limited in application. (This soft focus effect is why I didn't sell it earlier.)
- The lens is also missing one of the bayonet flanges (the top one, which is the one that stops the lens from rotating too far when mounted), and the focus ring slips sporadically, plus it is missing some of the leatherette and just plain looks beat up when viewed up close. (But it looks OK when viewed from across a room from some angles.)
- Because of the missing bayonet mount flange, I do not recommend using this lens on a Leica camera because it would not be good if the lens was turned too far when mounting. It should only be used on other cameras (Micro 4/3, etc.) via an adapter. Sold "as is". $190.00.
- Leica 135mm f/2.8 Elmarit-M lens with Goggles. Excellent condition. $550 (Matching case will be included, but case is not part of price because the case has a musty smell.)
- Leica 90mm f/2.8 Tele-Elmarit-M Type II lens. Includes a Leica 90mm Tele-Elmarit-M box (non-matching serial number), a collapsible lens hood like that used on the 90mm f/4 Elmar-C lens with matching front cap, and a rear cap. This lens has flare due to its barrel design, but its flare is not any worse than other Tele-Elmarit-M lens. Excellent condition. $800.00
- Leica Bellows with original version Visoflex flip mirror, 45 degree prism. $275
35mm LENSES, LEICA R:
- Leica 180mm f/4.0 Elmar-R lens. (There is a somewhat unsightly set screw hole added to the focus ring.) This compact lens was acquired to use when I did not need the fast f/ratio of my 180mm f/2.8 Nikkor. Then I acquired a 180mm f/4 APO Lanthar. Having two 180mm f/4 lenses is a little extravagant. This 180mm f/4 Elmar-R lens is in excellent condition except for some cleaning marks on the front element (from a prior owner) and a not-so-pretty 3-4mm diameter area on one side of the focus ring, where a set screw was added to prevent focus ring slippage after the thin rubber rings Leica used disintegrated. The screw hole would look better except a tap broke in the soft aluminum of the ring and had to be removed. This makes the disturbed area around the 2-56 set screw about 1.5 times larger than the screw diameter. The good part is that after adding the set screw, the lens and its infinity stop became very reliable. $375.00 OBO
- Leica 250mm f/4.0 Telyt-R, Type 1 lens with front and rear Leica caps. This is the same lens that was tested. Only selling it because my 250mm Type II has less color fringing, though it is physically longer. Condition is very good or better. The iris opening is a little elongated (maybe 10 percent) compared to a perfect octagon at small apertures, but this is not uncommon in samples I have seen. Lens has some wearing of the black anodizing at the very corners of the focusing ring knurling and lens hood. Includes a custom 72mm filter holder that can be pressed and glued into the built-in lens hood. (The filter holder is not installed now though.) $395.00.
- Leica 350mm f/4.8 Telyt-R lens, 3 cam version (has wobble, is evidence of tampering by a prior owner, needs fixed) AS IS $399
- Leica 560mm f/6.8 Telyt-R lens with custom bracket. $550
35mm LENSES AND ACCESSORIES, NIKON F NIKKOR, OTHER NIKON F MOUNT:
- Nikon 50mm f/1.8 Series E lens. $65
- Nikon 85mm f/1.8 Nikkor _ lens. AI converted, but not in the usual way. $295
- Nikon 105mm f/1.8 AIs Nikkor lens. Shimmed for best full field sharpness. $359
- Nikon 135mm f/2.8 AI Nikkor. So-so condition but optics and iris OK. $50.00.
- Nikon 200mm f/4 AI Nikkor. Fairly beat up mechanically, but optics and iris are OK. The filter threads were dented before I got it, and barely repaired enough to tightly fit 52mm filters. $50.00.
- Nikon 500mm f/5 Reflex Nikkor with case $449
- (Mirror coating looks slightly mottled from some angles under strong light, but it is a rear surfaced coating that Nikon covered with black paint, so it may have been made that way.)
- Nikon 500mm f/8 Reflex-Nikkor-C lens. Near mint with 5 rear mounted filters and Nikon CL-23 case that is in so-so condition. $399.00.
- Nikon 1,000mm f/11 Nikkor-C lens with hood, caps, case. This version has 4 filters (including L37) in a built-in filter wheel, so it does not need separate rear filters. It is in excellent condition. Only selling because I found that local daytime atmospheric conditions are not compatible with this much focal length for bird photography. (Details in Appendix H.) $699.00.
- Tokina 24-200mm f/3.5-5.6 Zoom lens with original hood, caps, box. $195
- Nikon Non-TTL meter prism for Nikon F, black. Includes screw-in spot metering fittings. Condition is fair, with a few shallow dents on the front. The prism has no dings on the roof, but there is a faint haze extending out to about 1mm from the prism roof. $129.00
35mm LENSES, PENTAX M42:
- Pentax 300mm f/6.3 Tele-Takumar lens with original case. M42 thread mount. Also includes an 8mm screw that can be used instead of the big tripod socket clamp knob, for better portability. Lens is in excellent condition and the case is good to very good. This is the lens that was reviewed. Selling this 300mm only because I started using the 250mm f/4 Telyt-R Type II lens instead of most other 35mm format lenses in its focal length range. $129.00
35mm LENSES, SOLIGOR, TOKINA, VIVITAR, MISC, T2-MOUNT:
- Soligor 180mm f/3.5 Pre-set T2 mount lens from circa 1960's. No T2 adapter. This lens is considerably smaller than 200mm f/3.5 lenses from the same era, and uses smaller filters. Excellent condition. $30.00
- Vivitar 500mm f/8 Tele Lens, 1960's version (same heavy focuser as 800mm) $149
- Tokina 800mm f/8 modular lens (not as sharp as good stovepipe version) $259
- Vivitar 800mm f/8 modular lens (not as sharp as good stovepipe version) $249
- Vivitar 800mm f/8 stovepipe lens (triangular star images, so not for astro) $199
LENSES: ENLARGING, PROCESS, VIEW CAMERA, ETC.
- 35mm f/3.5 Spiratone Macrotar lens. $39
- 80mm f/4.5 Fujinon enlarging lens (TBR) $79
- 105mm f/4.5 generic enlarging lens $49
- 240mm f/9 Red Dot Artar view camera lens in Copal 1 Shutter $499
- 375mm f/6.3 Calumet lens (no shutter) with separation in rear group. $49
LENS ATTACHMENTS (Most used in FRONT of a camera lens):
- Century Optics 0.3x (BIG) glass fisheye lens attachment, 58mm thread. $149
- IPIX fisheye lens attachment for Nikon Coolpix camera (significant scratches) $59
- Nikon FC-E8 fisheye lens attachment 2 for Nikon Coolpix camera $149
- Nikon FC-E9 Fisheye Attachment with pouch and original box. I got this to do some optical experiments with, but ended up using a regular fisheye lens instead. The FC-E9 is significantly larger than the FC-E8 attachment. It is used in front of a camera lens, but the camera lens needs to focus to a relatively close distance to work with it. $349.00 OBO. More than one available.
PHOTO ACCESSORIES (Cases, Shutters, Tripods, Tripod Heads, VR Optics, etc):
- Copal 3S shutter with box. Not used by either first owner or myself. Was $1k new. $439
(I bought this shutter to use in adapting a Nikon 28mm PC lens to a Hasselblad V96C digital back, but there was no need for this project after getting a Leica M9.)
- Gitzo tripod heads, about 6 in all; Series 0 through Series 3. $ varies.
- Kogetto Lucy 360 degree video camera. No cables, software, accessories. Looks cool! $149
- Camera cases, various. $ varies.
- Stay tuned for more!
Appendix Q: Photo Orientation in this Web Page with Some Browsers
(Some recent browsers use only EXIF data, and ignore image rotation done in post processing!)
Starting in about 2017, newer versions of Firefox (and perhaps some other browsers) began to emphasize the camera orientation recorded in original EXIF data over the way a photo was rotated and processed in post to make it have the desired orientation in a web page. This new trend in some browsers may cause some images in this web page (and other web pages at the same web site) to display in orientations other than what is intended.
For example, if I hold a camera upside down to take an original photo of camera equipment on a table (not unusual, since this provides a higher camera lens vantage point when using an EVF), then rotate the picture to be right side up in post, it had always displayed as intended in any web browser that was used. However, this changed in about 2017.
Since about 2017, recent versions of Firefox (and maybe other browsers) ignore how the image was rotated in post, and instead UN-rotate the image, which causes it to display upside down or sideways in the web page. In cases where a camera was used in a vertical (portrait) orientation, a newer browser may rotate a cropped portion of the image to make it display sideways and look distorted.
Also, unusual camera orientations are not uncommon in astrophotography. Therefore, newer browsers have done similar things to the way some images in my solar eclipse and astrophotography web pages are displayed. There does not appear to be a way to prevent this problem, while also maintaining compatibility with heritage browsers. This is because css coding (incompatible with older versions of HTML and thus older browsers) is required for this.
The Firefox image display problem has been even worse since Firefox version 87. Therefore, if images in this web page do not appear to be oriented correctly, try using another browser. For the next several years, it will be impractical go through all of my web pages (some of which are up to 25 years old) and strip out or edit camera orientation information in the EXIF data for the hundreds to thousands of affected JPEG images.
This link may help people see the EXIF data in at least some of the images:
Exif Viewer:
https://addons.mozilla.org/firefox/addon/exif-viewer/
Originated in 2013, in part utilizing material from my 2012 web page and my other previous works.
Copyright 1975, 1997, 2004-2017, 2019, 2021, 2023, 2025 Jeffrey R. Charles, All Rights Reserved.
Last significant text revisions: 28 Sept. 2021; 12, 24, 27 Oct; 3, 6, 20 Nov. 2021.
Return to Local Table of Contents
Go to EclipseChaser Home Page
Go to Versacorp Home Page